

Grow cantaloupe at home? Absolutely! Imagine biting into a juicy, sun-ripened cantaloupe that you nurtured from seed to fruit, right in your own backyard. Forget those bland, store-bought melons – we’re talking about flavor explosions here! For centuries, cultivating melons has been a cherished tradition in many cultures, symbolizing abundance and sweetness. From ancient Egypt to modern-day gardens, the allure of a perfectly grown melon remains strong.
But let’s be honest, the thought of growing your own cantaloupe can seem a little daunting. Where do you even begin? That’s where this DIY guide comes in! I’m here to share some simple, yet effective tricks and hacks that will empower you to grow cantaloupe at home, even if you’re a complete beginner. We’ll break down the process into manageable steps, covering everything from seed starting to harvesting, ensuring you enjoy a bountiful harvest of delicious cantaloupes. So, ditch the grocery store melons and get ready to experience the unparalleled satisfaction of growing your own!
Watermelon Cultivation in Your Own Garden: A Step-by-Step Guide
Hey everyone! Have you ever imagined harvesting your own juicy watermelons from the garden? I can tell you, it’s an incredibly satisfying feeling! And the best part: it’s not as difficult as you might think. In this article, I will show you how to successfully grow your own watermelons – from sowing to harvest. Let’s get started!
Preparation: The Key to Success
Before we start with the actual cultivation, good preparation is key. Watermelons are little divas when it comes to their needs, but if we give them what they want, they will reward us with delicious fruits.
- Choice of variety: There are countless watermelon varieties, from small, handy types to giant specimens. For beginners, I recommend varieties like ‘Sugar Baby’ (early-maturing and compact) or ‘Crimson Sweet’ (classic and robust). Find out which varieties thrive well in your region.
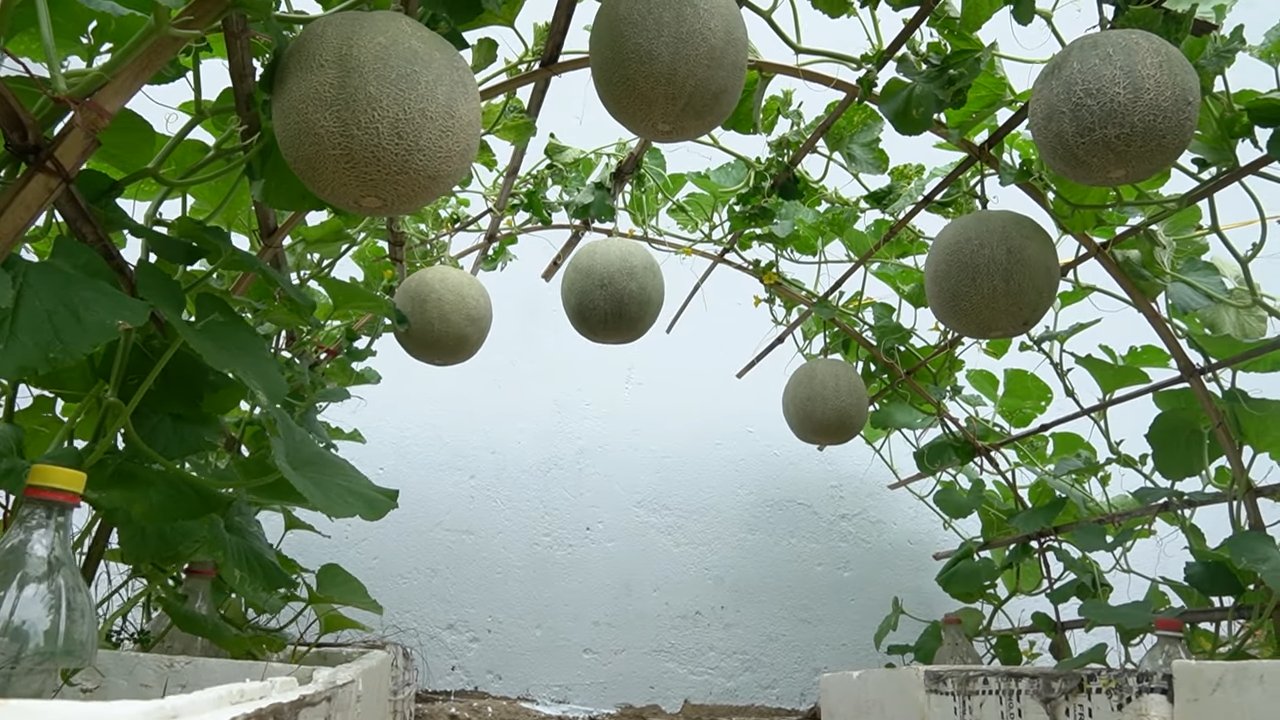
- The right location: Watermelons love the sun! Choose a location that receives at least 6-8 hours of direct sunlight per day. They also need a lot of space, as their vines spread out widely. Plan for about 1-2 square meters (10-20 square feet) per plant.
- The perfect soil: Watermelons prefer a well-draining, sandy loam soil with a pH between 6.0 and 6.8. The soil should be rich in organic matter.
- Starting indoors or direct sowing: You can either sow the seeds directly into the bed or start them in pots. Starting them indoors has the advantage that the plants have a head start and are less susceptible to pests.
Sowing and Starting: The Beginning of the Watermelon Adventure
Now let’s get down to it! We sow the seeds and watch our little watermelon babies grow.
- Starting indoors (optional):
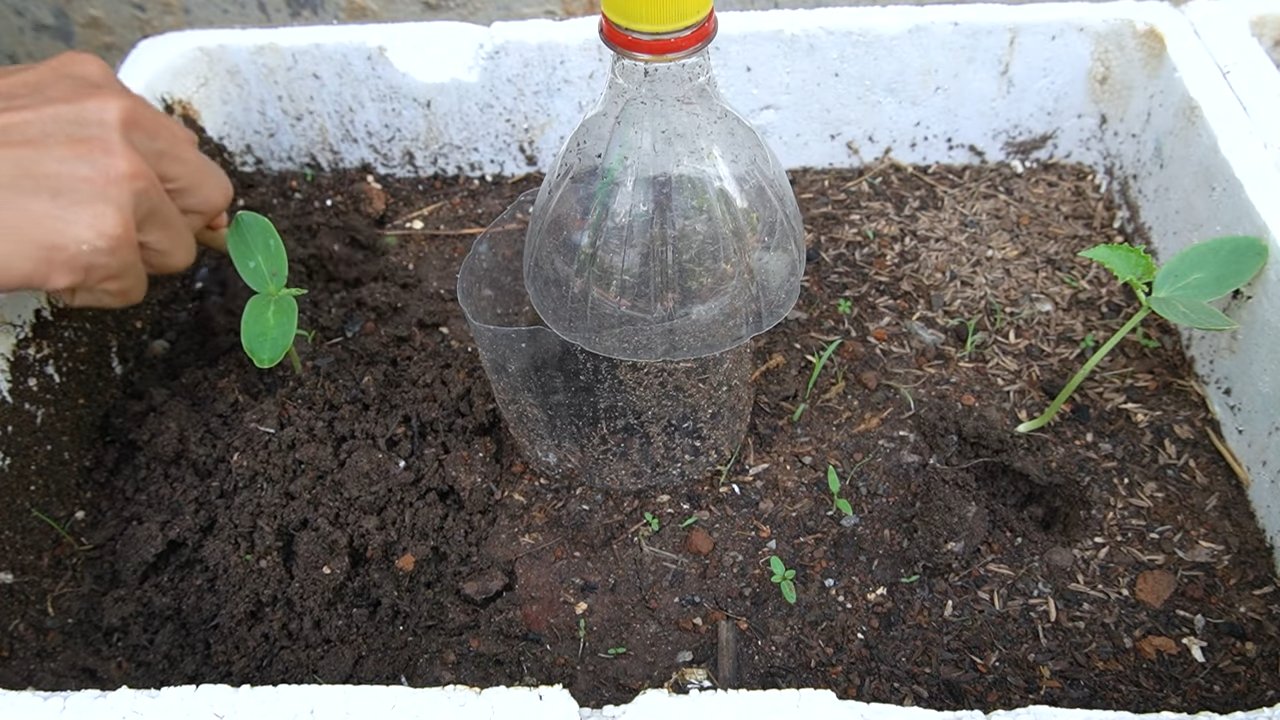
- Fill small pots (approx. 8-10 cm / 3-4 inches in diameter) with seed starting mix.
- Place 2-3 seeds per pot about 2-3 cm (1 inch) deep in the soil.
- Water the soil gently so that it is moist but not wet.
- Place the pots in a warm, bright place (e.g., a windowsill or greenhouse). The ideal germination temperature is 25-30°C (77-86°F).
- Keep the soil evenly moist.
- The seeds should germinate after about 7-10 days.
- Once the seedlings have 2-3 true leaves, you can remove the weakest seedling per pot.
- Direct sowing:
- Prepare the bed by loosening the soil and enriching it with compost or other organic material.
- Sow the seeds about 2-3 cm (1 inch) deep in the soil.
- Maintain a distance of about 60-90 cm (2-3 feet) between plants and 1-2 meters (3-6.5 feet) between rows.
- Water the soil gently.
- You may want to cover the bed with a fleece to speed up germination and protect the young plants from pests.
- The right time:
- Sowing should only take place when there is no more danger of frost. In most regions, this is from mid-May.
- If starting indoors, you can begin about 4-6 weeks earlier.
Planting and Care: Making the Watermelons Feel at Home
The small seedlings are now ready for their new home in the garden. Now it’s important to provide them with the best possible conditions.
- Preparing the planting hole:
- Dig a planting hole that is slightly larger than the plant’s root ball.
- Add some compost or organic fertilizer to the planting hole.
- Planting:
- Carefully remove the plant from the pot and place it in the planting hole.
- Fill the planting hole with soil and press it down lightly.
- Water the plant thoroughly.
- Watering:
- Watermelons need a lot of water, especially during fruit formation. Water regularly, but avoid waterlogging.
- It is best to water in the morning so the leaves can dry during the day.
- Fertilizing:
- Fertilize the plants regularly with an organic fertilizer or a special watermelon fertilizer.
- Start fertilizing about 2-3 weeks after planting.
- Mulching:
- A layer of mulch made of straw or grass clippings helps to retain moisture in the soil, suppress weeds, and keep the soil warm.
- Trellis (optional):
- Although watermelons spread on the ground, a trellis can help reduce the space needed and protect the fruits from contact with the ground.
- Use a sturdy trellis, as the fruits can become heavy.
- Protection from pests and diseases:
- Watch for signs of pests like aphids or snails. Combat them with natural means if necessary.
- Also watch for signs of diseases like powdery mildew. Ensure good ventilation and remove affected leaves.
Fruit Formation: When the Magic Begins
Now it gets exciting! The first flowers appear and slowly transform into small watermelons.
- Pollination:
- Watermelons rely on pollination by bees and other insects.
- If there are few insects, you can also pollinate the flowers by hand. To do this, use a brush to transfer pollen from the male to the female flowers.
- Female flowers can be recognized by the small, immature fruit directly below the blossom.
- Fruit set:
- After pollination, the fruit bases swell and develop into small watermelons.
- Thinning:
- If too many fruits grow on one plant, it can affect the quality of the individual fruits.
- Therefore, remove some of the smaller fruits, leaving about 2-3 fruits per plant.
- Underlay:
- Place an underlay of straw or wood under the growing fruits to protect them from contact with the ground and rot.
The Harvest: The Reward for Your Effort
The time has finally come! The watermelons are ripe and ready for harvest.
Cut watermelons should be stored in the refrigerator.
Signs of ripeness:
Recognizing the ripeness of a watermelon is not always easy. Here are some signs:
The spot where the watermelon rests on the ground turns yellow or cream-colored.
The tendril connected to the watermelon becomes dry and brown.
When you knock on the watermelon, it should sound hollow.
The rind of the watermelon becomes dull and loses its shine.
Harvesting:
Cut the watermelon from the vine with a sharp knife or garden shears.
Leave a small stem on the fruit to make it last longer.
Storage:
Watermelons can be stored at room temperature for about 1-2 weeks.
Conclusion
So, there you have it! Growing cantaloupe at home, while it might seem daunting at first, is an incredibly rewarding experience that brings the sweet taste of summer directly to your table. We’ve walked you through the essential steps, from selecting the right seeds and preparing your garden to nurturing your growing vines and harvesting your perfectly ripe melons.
But why should you bother with all this effort when you can simply buy cantaloupe at the store? The answer lies in the unparalleled flavor and satisfaction that comes from nurturing your own food. Store-bought cantaloupes are often picked before they’re fully ripe to withstand shipping and storage, resulting in a less intense, less sweet flavor. When you grow your own, you control the entire process, ensuring that your cantaloupe is harvested at its peak of ripeness, bursting with juicy sweetness and an aroma that will fill your kitchen.
Beyond the superior flavor, growing your own cantaloupe allows you to choose from a wider variety of cultivars than you’ll typically find in stores. Experiment with different types of cantaloupe, such as the classic ‘Hales Best Jumbo,’ the smaller and sweeter ‘Sugar Cube,’ or even the unique ‘Galia’ melon with its green flesh and distinctive aroma. Each variety offers a slightly different flavor profile and texture, allowing you to discover your personal favorite.
Furthermore, engaging in gardening activities like growing cantaloupe at home is a fantastic way to connect with nature, reduce stress, and get some exercise. It’s a mindful activity that allows you to slow down, appreciate the beauty of the natural world, and witness the miracle of growth firsthand. Plus, you’ll be reducing your carbon footprint by avoiding the transportation and packaging associated with store-bought produce.
Don’t be afraid to experiment with different techniques to optimize your cantaloupe growing experience. Consider using raised beds to improve drainage and soil warmth, or try vertical gardening methods to save space and improve air circulation. Companion planting with herbs like basil or marigolds can help deter pests and attract beneficial insects. You can even try succession planting, sowing seeds every few weeks, to extend your harvest season.
Growing cantaloupe at home is more than just a gardening project; it’s an investment in your health, your well-being, and your connection to the natural world. It’s a chance to learn new skills, challenge yourself, and reap the delicious rewards of your labor.
We encourage you to take the plunge and try growing your own cantaloupe this season. Whether you have a sprawling garden or a small balcony, there’s a way to make it work. And once you’ve tasted the difference between a homegrown cantaloupe and a store-bought one, you’ll never go back.
We’d love to hear about your experiences! Share your tips, tricks, and photos with us in the comments below. Let’s create a community of cantaloupe growers and inspire others to discover the joy of homegrown goodness. Happy gardening!
Frequently Asked Questions (FAQ)
What is the best time to start growing cantaloupe from seed?
The ideal time to start cantaloupe seeds indoors is about 3-4 weeks before the last expected frost in your area. This allows the seedlings to develop a strong root system before being transplanted outdoors. If you’re starting seeds directly in the garden, wait until the soil has warmed up to at least 60°F (15°C). Check your local weather forecast and planting guides for specific dates relevant to your region. Starting too early can lead to leggy, weak seedlings that struggle to thrive once transplanted. Starting too late can shorten your growing season and reduce your harvest.
How much space does a cantaloupe plant need?
Cantaloupe vines can spread quite extensively, so it’s important to provide them with ample space to grow. Generally, you should allow at least 2-3 feet between plants in a row and 4-6 feet between rows. If you’re growing cantaloupe in hills, space the hills about 4-6 feet apart. Consider using a trellis or other support structure to train the vines vertically, which can save space and improve air circulation. Insufficient spacing can lead to overcrowding, which can increase the risk of disease and reduce fruit production.
What kind of soil is best for growing cantaloupe?
Cantaloupe thrives in well-drained, fertile soil that is rich in organic matter. The ideal soil pH is between 6.0 and 6.8. Before planting, amend your soil with compost, aged manure, or other organic materials to improve its fertility and drainage. Avoid heavy clay soils, which can become waterlogged and inhibit root growth. If you have clay soil, consider growing cantaloupe in raised beds or containers filled with a well-draining potting mix. A soil test can help you determine the pH and nutrient levels of your soil and identify any amendments that may be needed.
How often should I water my cantaloupe plants?
Cantaloupe plants need consistent moisture, especially during fruit development. Water deeply and regularly, aiming to keep the soil consistently moist but not waterlogged. Water at the base of the plants to avoid wetting the foliage, which can increase the risk of fungal diseases. During hot, dry weather, you may need to water daily. Mulching around the plants can help retain moisture in the soil and reduce the need for frequent watering. As the fruits ripen, you can reduce watering slightly to improve their sweetness.
How do I know when my cantaloupe is ripe?
Determining when a cantaloupe is ripe can be tricky, but there are several telltale signs to look for. The most reliable indicator is the stem. When the cantaloupe is ripe, the stem will begin to separate from the fruit, forming a crack or slip at the point where they connect. The melon should also have a fragrant aroma, and the skin should turn from green to a tan or yellowish color. The blossom end of the melon should feel slightly soft to the touch. Avoid picking cantaloupes that are still completely green or have a hard, unyielding blossom end.
What are some common pests and diseases that affect cantaloupe plants?
Cantaloupe plants can be susceptible to a variety of pests and diseases, including aphids, squash bugs, cucumber beetles, powdery mildew, and fusarium wilt. Regularly inspect your plants for signs of pests or diseases, and take action promptly to prevent them from spreading. Use organic pest control methods, such as insecticidal soap or neem oil, to control aphids and other pests. Ensure good air circulation and avoid overhead watering to prevent fungal diseases. Choose disease-resistant varieties of cantaloupe to minimize the risk of infection. Crop rotation can also help prevent soilborne diseases from building up in your garden.
Can I grow cantaloupe in a container?
Yes, you can successfully grow cantaloupe in a container, provided that you choose a large enough container and provide adequate support for the vines. Select a container that is at least 20 gallons in size and has good drainage holes. Use a high-quality potting mix that is well-draining and rich in organic matter. Provide a trellis or other support structure for the vines to climb on. Water regularly and fertilize every few weeks with a balanced fertilizer. Container-grown cantaloupes may require more frequent watering and fertilization than those grown in the ground.
How can I improve the sweetness of my cantaloupe?
Several factors can influence the sweetness of your cantaloupe. Choose a variety that is known for its sweetness. Ensure that your plants receive plenty of sunlight, as sunlight is essential for sugar production. Water regularly, but reduce watering slightly as the fruits ripen. Avoid over-fertilizing with nitrogen, as this can promote vegetative growth at the expense of fruit development. Allow the cantaloupe to ripen fully on the vine before harvesting.
What are some good companion plants for cantaloupe?
Companion planting can help improve the health and productivity of your cantaloupe plants. Good companion plants for cantaloupe include basil, marigolds, nasturtiums, oregano, and thyme. Basil helps repel aphids and other pests, while marigolds deter nematodes and other soilborne pests. Nasturtiums attract beneficial insects, such as ladybugs and lacewings, which prey on aphids and other pests. Oregano and thyme are aromatic herbs that can help deter pests and attract pollinators. Avoid planting cantaloupe near potatoes, as they can compete for nutrients and water.
How do I save seeds from my cantaloupe for next year?
Saving seeds from your cantaloupe is a great way to preserve your favorite varieties and save money on seeds. Choose a healthy, ripe cantaloupe from a plant that exhibited desirable traits, such as good fruit size, flavor, and disease resistance. Scoop out the seeds and rinse them thoroughly to remove any pulp. Spread the seeds out on a paper towel to dry completely. Once the seeds are dry, store them in an airtight container in a cool, dark, and dry place. Properly stored cantaloupe seeds can remain viable for several years.


Leave a Comment