

Grow bean sprouts container – ever thought about how easy and rewarding it could be to cultivate your own fresh, crunchy sprouts right in your kitchen? Forget those pricey trips to the grocery store for a handful of sprouts that might not even be that fresh. I’m here to tell you that with a simple container and a few clever tricks, you can have a constant supply of these nutritional powerhouses at your fingertips!
Sprouts have been a staple in Asian cuisine for centuries, prized not only for their delicious flavor but also for their incredible health benefits. From mung bean sprouts in stir-fries to alfalfa sprouts in salads, they add a delightful crunch and a boost of vitamins and minerals to any meal. But beyond their culinary appeal, growing your own sprouts connects you to a tradition of self-sufficiency and healthy eating that spans generations.
In today’s fast-paced world, we’re all looking for ways to eat healthier and save money. That’s where this DIY guide comes in. Learning how to grow bean sprouts container style is not only incredibly easy, but it’s also a fantastic way to reduce your grocery bill and ensure you’re eating the freshest, most nutritious sprouts possible. Plus, it’s a fun and engaging project for the whole family! So, let’s dive in and discover the secrets to sprouting success – you’ll be amazed at how simple and satisfying it is.
DIY Bean Sprout Growing Container: A Simple & Sustainable Project
Hey there, fellow DIY enthusiasts! I’m super excited to share this project with you – building your own bean sprout growing container. It’s incredibly easy, budget-friendly, and allows you to enjoy fresh, crunchy bean sprouts right from your kitchen. Plus, it’s a fantastic way to reduce your reliance on store-bought produce and embrace a more sustainable lifestyle. Let’s get started!
Materials You’ll Need
Before we dive in, let’s gather all the necessary materials. Don’t worry, you probably already have most of these lying around!
* Two Plastic Containers: You’ll need two food-grade plastic containers. One should be slightly larger than the other. Think yogurt containers, margarine tubs, or even repurposed takeout containers. The key is that the smaller container can fit comfortably inside the larger one with some space around it.
* Drill or Nail and Hammer: We’ll need to create drainage holes in the smaller container. A drill with a small drill bit works best, but a nail and hammer will do the trick too.
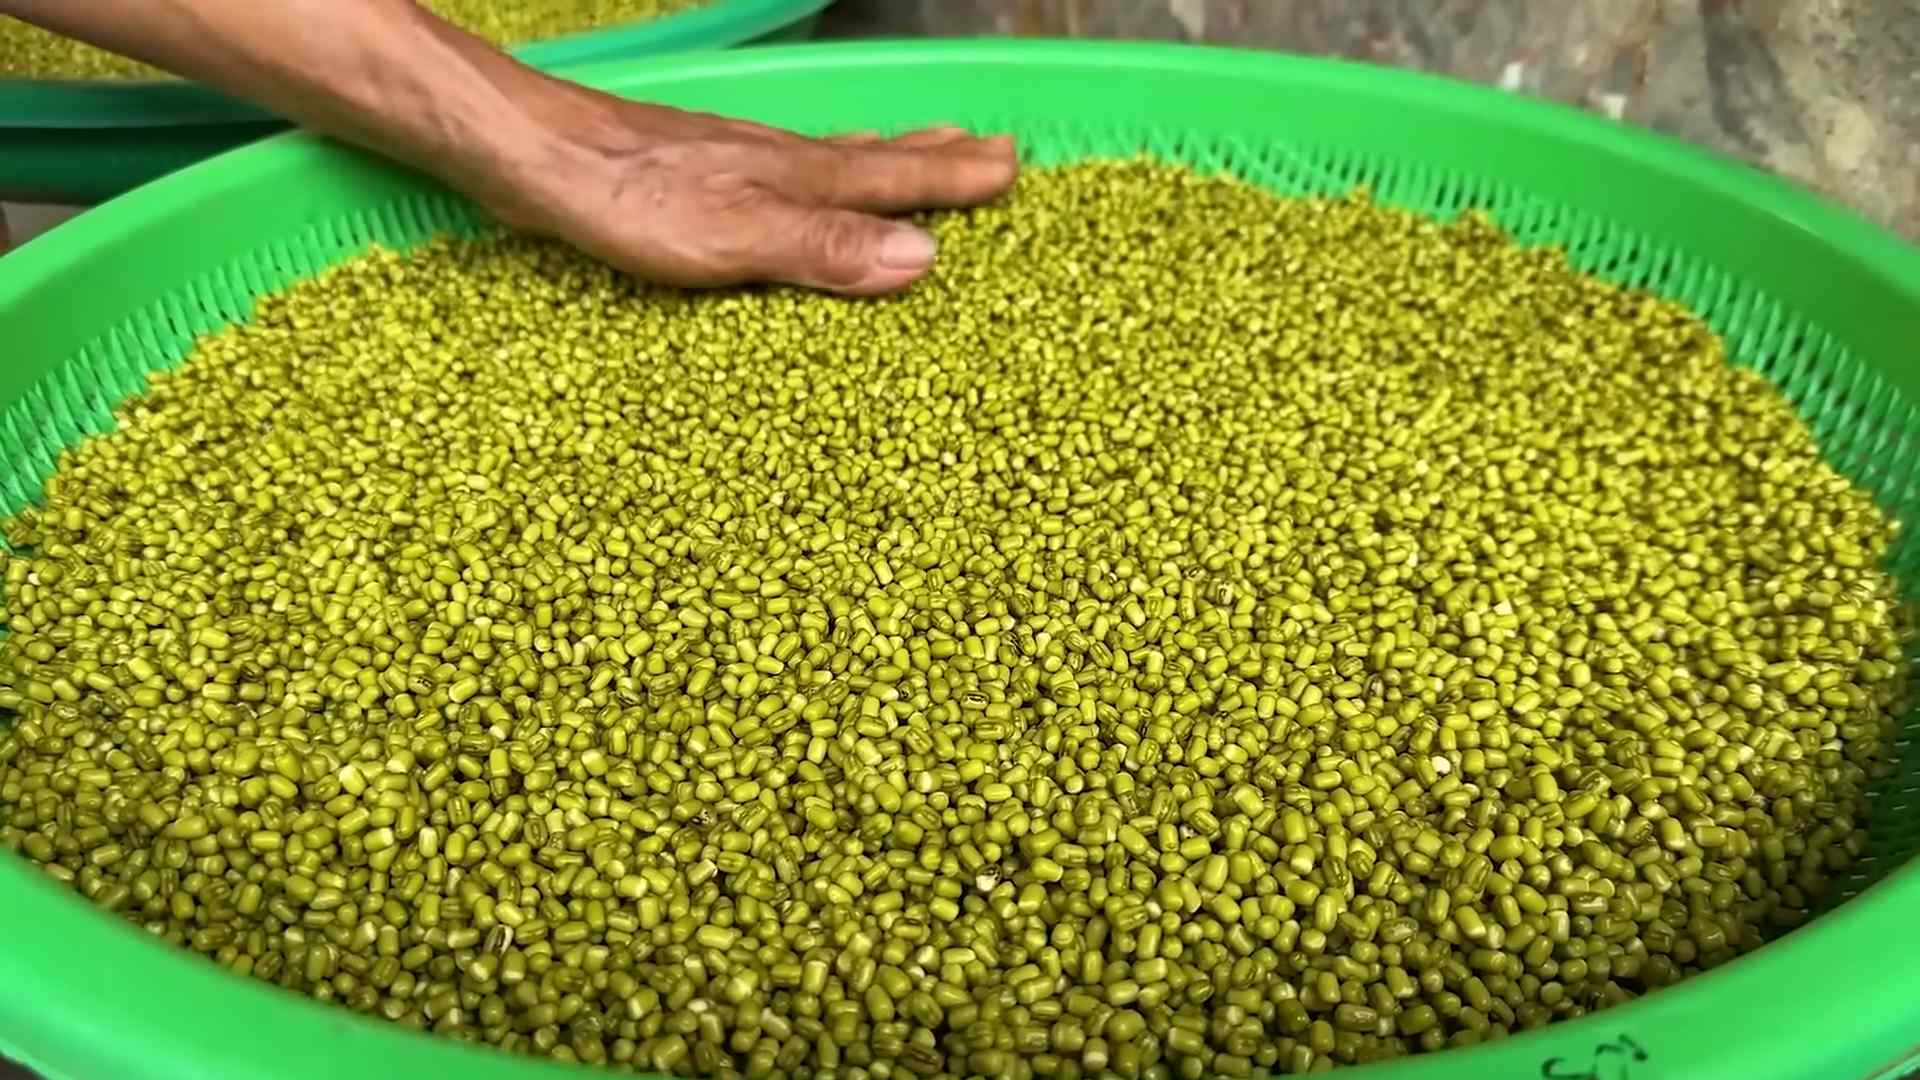
* Sprouting Beans: Of course, you’ll need beans! Mung beans are the most common and easiest to sprout, but you can also use adzuki beans, lentils, chickpeas, or even radish seeds. Make sure they are specifically labeled for sprouting, as some beans are treated and not safe to eat raw.
* Dark Cloth or Towel: Bean sprouts need darkness to grow properly. A dark cloth, towel, or even a black plastic bag will work perfectly.
* Water: Clean, filtered water is essential for rinsing and soaking the beans.
* Spray Bottle (Optional): A spray bottle can be helpful for keeping the sprouts moist, especially in drier climates.
* Measuring Cup: For measuring the initial amount of beans.
Preparing the Containers
This is where we transform our ordinary plastic containers into a bean sprout haven!
1. Clean the Containers: Thoroughly wash both containers with warm, soapy water. Rinse them well to remove any residue. This is crucial to prevent mold or bacteria from contaminating your sprouts.
2. Drill Drainage Holes: Take the smaller container and carefully drill or poke drainage holes in the bottom. I recommend spacing them about an inch apart. The holes should be large enough to allow water to drain freely but small enough to prevent the beans from falling through. If you’re using a nail and hammer, gently tap the nail through the plastic, being careful not to crack it.
3. Test the Fit: Place the smaller container inside the larger container. Make sure there’s enough space between the bottom of the smaller container and the bottom of the larger container to allow for drainage. Ideally, you want at least an inch or two of space.
Sprouting the Beans: A Step-by-Step Guide
Now for the fun part – watching those tiny beans transform into crunchy sprouts!
1. Soak the Beans: Measure out about 1/4 to 1/2 cup of sprouting beans. Place them in a bowl and cover them with plenty of cool, filtered water. The beans will absorb water and expand, so make sure they have enough room. Let them soak for 8-12 hours, or even overnight. I usually soak mine before I go to bed and they are ready to go in the morning.
2. Drain and Rinse: After soaking, drain the beans thoroughly using a fine-mesh sieve or colander. Rinse them well under cool, running water to remove any debris or impurities.
3. Transfer to the Sprouting Container: Place the rinsed beans into the smaller container with the drainage holes. Spread them out evenly in a single layer. Don’t overcrowd them, as they need space to grow.
4. Place Inside the Larger Container: Carefully place the smaller container (with the beans) inside the larger container. This creates a dark, humid environment that’s perfect for sprouting.
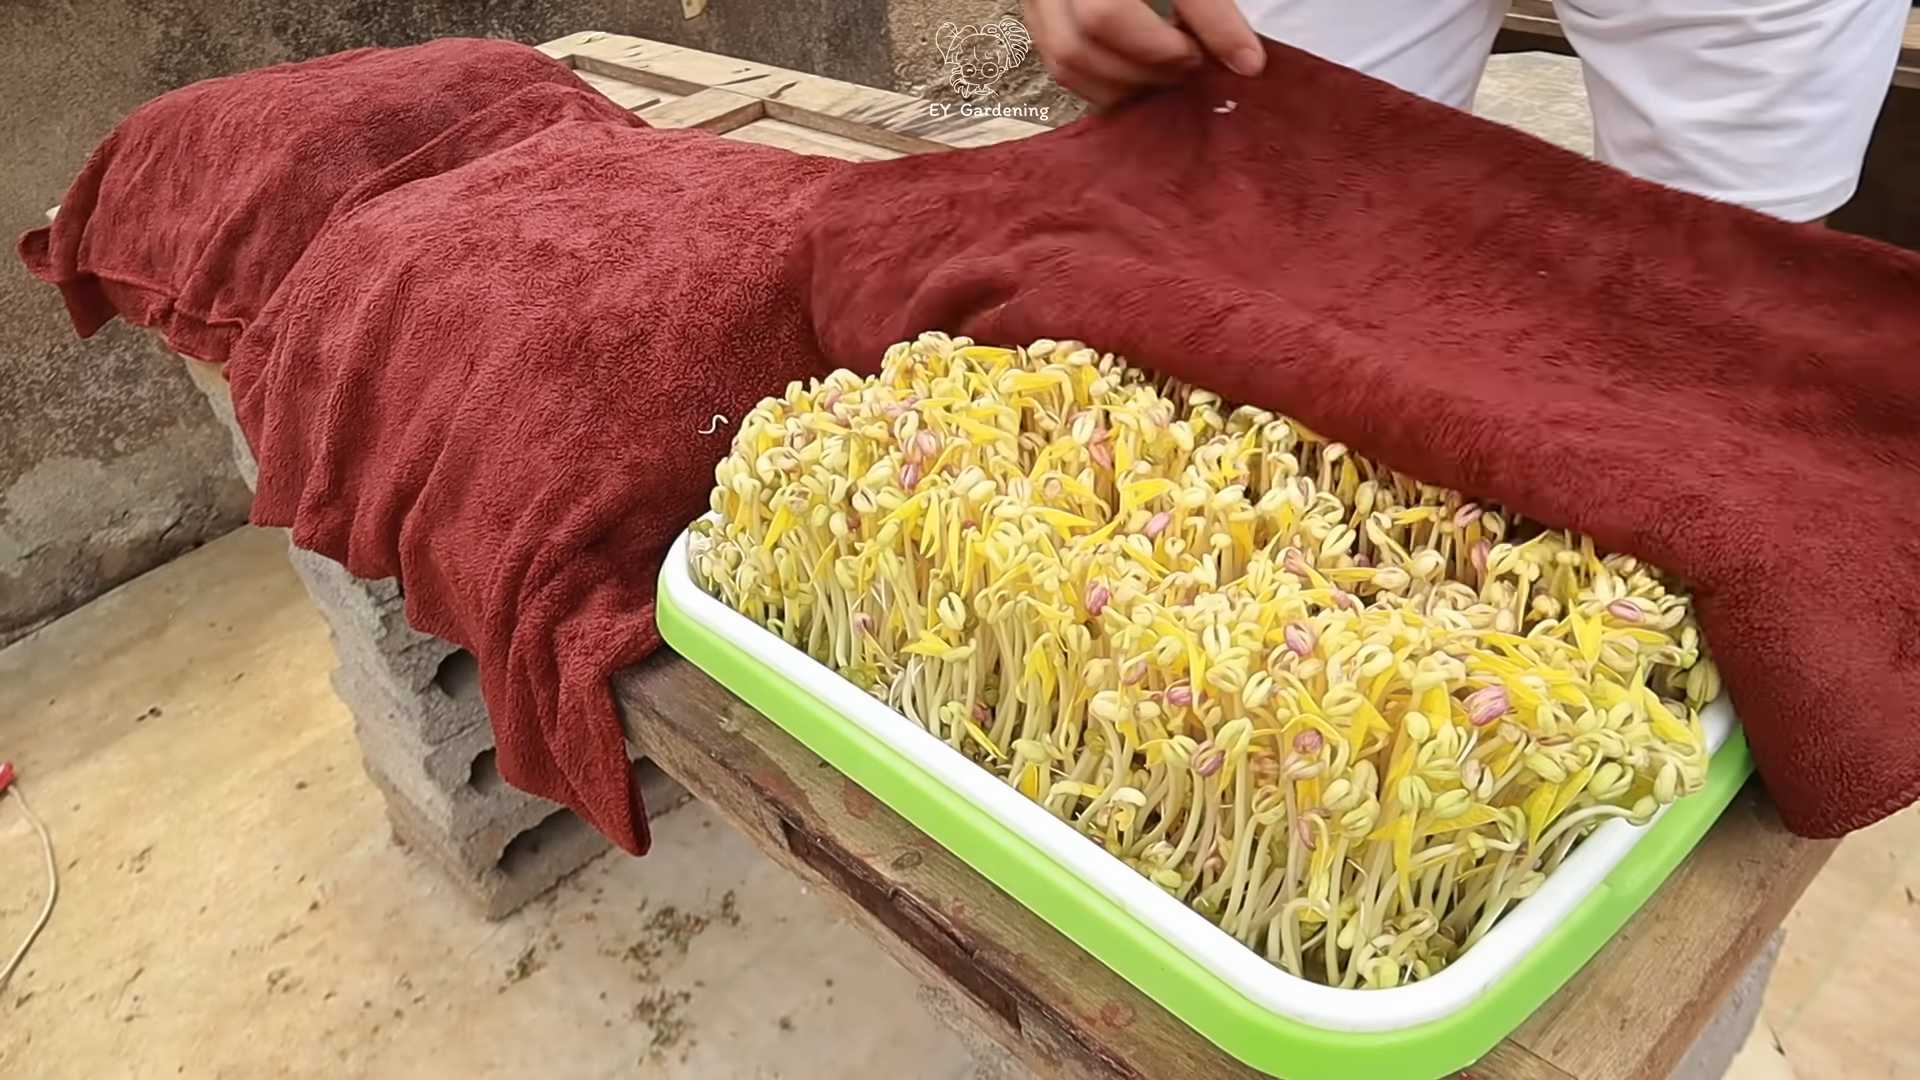
5. Cover with a Dark Cloth: Cover the entire setup with a dark cloth or towel. This is essential because bean sprouts need darkness to germinate and grow properly. You can also use a black plastic bag, but make sure it’s breathable and doesn’t trap too much moisture.
6. Rinse and Drain Regularly: This is the most important step! Rinse the beans at least twice a day (morning and evening) with cool, filtered water. To do this, gently pour water over the beans in the smaller container, allowing it to drain through the holes into the larger container. Then, carefully lift the smaller container out of the larger container and discard the drained water. Replace the smaller container back inside the larger container and cover with the dark cloth.
7. Maintain Moisture: If you live in a dry climate, you may need to mist the beans with a spray bottle in between rinses to keep them moist. The goal is to keep them damp but not waterlogged.
8. Observe and Enjoy: After a few days (usually 3-5), you’ll start to see tiny sprouts emerging from the beans. Continue rinsing and draining them regularly until they reach your desired length. I usually let mine grow to about an inch or two long.
9. Harvest and Store: Once the sprouts are ready, harvest them by gently pulling them out of the container. Rinse them thoroughly one last time and remove any remaining bean hulls. Store them in an airtight container in the refrigerator for up to a week.
Troubleshooting Tips
Even with the best instructions, things can sometimes go awry. Here are a few common issues and how to fix them:
* Mold Growth: If you notice any mold growing on your sprouts, it’s usually due to poor drainage or inadequate rinsing. Discard the affected sprouts and thoroughly clean your containers before starting a new batch. Make sure you’re rinsing the sprouts at least twice a day and that the drainage holes are clear.
* Slow Growth: Slow growth can be caused by several factors, including low temperatures, insufficient moisture, or old beans. Make sure your sprouts are kept in a warm (but not hot) location and that you’re rinsing them regularly. If you suspect your beans are old, try using a fresh batch.
* Rotting Beans: Rotting beans are usually a sign of overwatering or poor drainage. Make sure the drainage holes are clear and that you’re not leaving the sprouts sitting in water.
* Bitter Taste: A bitter taste can sometimes develop if the sprouts are exposed to too much light. Make sure they are kept covered with a dark cloth throughout the sprouting process.
Variations and Experimentation
Once you’ve mastered the basic bean sprout growing technique, feel free to experiment with different types of beans and seeds. Here are a few ideas to get you started:
* Adzuki Beans: These beans have a slightly sweeter flavor than mung beans and are a good source of protein and fiber.
* Lentils: Lentil sprouts are quick to grow and have a mild, earthy flavor.
* Chickpeas: Chickpea sprouts are a bit more challenging to grow, but they’re worth the effort. They have a nutty flavor and are packed with nutrients.
* Radish Seeds: Radish sprouts have a spicy, peppery flavor that adds a kick to salads and sandwiches.
Enjoying Your Homegrown Bean Sprouts
Now that you have a bounty of fresh, crunchy bean sprouts, it’s time to enjoy them! Here are a few of my favorite ways to use them:
* Salads: Add bean sprouts to your favorite salads for extra crunch and nutrients.
* Sandwiches and Wraps: Bean sprouts make a great addition to sandwiches and wraps.
* Stir-fries: Toss bean sprouts into stir-fries for a quick and easy way to add vegetables.
* Soups: Add bean sprouts to soups for a boost of flavor and texture.
* Spring Rolls: Bean sprouts are a classic ingredient in spring rolls.
* As a Snack: Just eat them raw!
Why Grow Your Own Bean Sprouts?
Growing your own bean sprouts is not only easy and affordable, but it also offers a number of benefits:
* Freshness: Homegrown bean sprouts are much fresher than store-bought ones.
* Cost-Effective: Sprouting your own beans is significantly cheaper than buying them at the store.
* Nutritious: Bean sprouts are packed with vitamins, minerals, and antioxidants.
* Sustainable: Growing your own bean sprouts reduces your reliance on store-bought produce and helps to minimize your environmental impact.
* Fun and Rewarding: It’s incredibly satisfying to watch those tiny beans transform into crunchy sprouts!
Final Thoughts
I hope you’ve enjoyed this DIY bean sprout growing container tutorial. It’s a simple yet rewarding project that anyone can do. So, grab your containers, beans, and get sprouting! You’ll be amazed at how easy it is to grow your own fresh, nutritious bean sprouts right in your kitchen. Happy sprouting!
Conclusion
So, there you have it! Growing your own bean sprouts at home is not only incredibly easy and cost-effective, but it also guarantees you’re consuming the freshest, most nutritious sprouts possible. Forget those limp, pre-packaged sprouts from the grocery store. With this simple DIY trick, you can have a constant supply of crisp, flavorful bean sprouts ready to add a delightful crunch to your salads, stir-fries, sandwiches, and more.
This method, using a simple container, truly unlocks the potential of home sprouting. It’s a game-changer for anyone looking to incorporate more healthy, living foods into their diet. The satisfaction of watching those tiny seeds transform into vibrant sprouts is surprisingly rewarding, and the taste difference compared to store-bought is undeniable.
Why is this DIY trick a must-try? Because it puts you in control. You control the quality of the seeds, the cleanliness of the environment, and the freshness of the final product. You eliminate the risk of preservatives and additives, and you drastically reduce your environmental footprint by avoiding plastic packaging and transportation. Plus, it’s a fun and educational activity for the whole family!
Looking for variations? Experiment with different types of beans! Mung beans are the most common for sprouting, but you can also try adzuki beans, lentils, chickpeas, or even alfalfa seeds. Each variety offers a unique flavor and texture profile. You can also adjust the sprouting time to achieve your desired sprout length. Some people prefer shorter, more delicate sprouts, while others like them longer and crunchier. Consider adding a layer of cheesecloth to the bottom of your container for even better drainage.
Don’t be intimidated by the idea of growing your own food. This DIY bean sprouts container method is foolproof, even for beginners. It requires minimal effort and yields impressive results. It’s a fantastic way to connect with nature, learn about the life cycle of plants, and enjoy the delicious rewards of your labor.
We wholeheartedly encourage you to give this DIY trick a try. You’ll be amazed at how easy and rewarding it is to grow your own bean sprouts. Once you experience the taste and freshness of homemade sprouts, you’ll never go back to store-bought again.
And most importantly, we want to hear about your experience! Share your photos, tips, and variations in the comments below. Let us know what kind of beans you’re sprouting, what dishes you’re using them in, and any challenges or successes you encounter along the way. Your feedback will help other readers learn and grow, and together, we can create a community of home sprouting enthusiasts! So, grab your container, your beans, and get sprouting! You won’t regret it.
Frequently Asked Questions (FAQ)
What kind of container is best for growing bean sprouts?
The ideal container for growing bean sprouts should be food-grade, clean, and allow for good drainage and air circulation. A wide-mouthed jar, a plastic container with holes drilled in the bottom, or even a sprouting tray specifically designed for this purpose will work well. The key is to ensure that excess water can drain away easily to prevent mold growth. Avoid using containers made of materials that could leach harmful chemicals into your sprouts.
How often should I rinse the bean sprouts?
Rinsing your bean sprouts is crucial for their healthy growth and to prevent bacterial contamination. You should rinse them at least two to three times a day with cool, clean water. This helps to keep them moist, provides them with the necessary hydration, and washes away any accumulated waste products. In warmer climates, you might need to rinse them even more frequently.
What type of beans are best for sprouting?
While mung beans are the most commonly used for sprouting, you can experiment with various other types of beans and seeds. Adzuki beans, lentils, chickpeas, alfalfa seeds, and even radish seeds can be sprouted. Each type offers a unique flavor and texture profile. Make sure to use beans specifically intended for sprouting, as those sold for cooking may have been treated with chemicals that inhibit germination.
How long does it take for bean sprouts to grow?
The sprouting time varies depending on the type of bean, the temperature, and the humidity. Generally, mung beans take about 3 to 5 days to sprout. Lentils and adzuki beans may take a bit longer, around 4 to 6 days. Keep an eye on your sprouts and harvest them when they reach your desired length and crunchiness.
What if my bean sprouts start to smell bad?
A foul smell is a sign of bacterial contamination or mold growth. This usually happens due to insufficient rinsing or poor drainage. If you notice a bad smell, discard the entire batch of sprouts immediately. Thoroughly clean and disinfect your sprouting container before starting a new batch. To prevent this, ensure you are rinsing your sprouts frequently and that your container has adequate drainage.
How do I store bean sprouts after they are grown?
Once your bean sprouts have reached your desired length, rinse them thoroughly and drain them well. Store them in an airtight container lined with a paper towel in the refrigerator. The paper towel will help absorb excess moisture and keep the sprouts fresh for up to a week.
Can I grow bean sprouts in direct sunlight?
No, direct sunlight can damage your bean sprouts and cause them to dry out or become bitter. Bean sprouts prefer a cool, dark, and well-ventilated environment. Keep them away from direct sunlight and heat sources. A cupboard or a shaded area in your kitchen is ideal.
Are there any health benefits to eating bean sprouts?
Yes, bean sprouts are packed with nutrients and offer numerous health benefits. They are a good source of vitamins, minerals, and enzymes. They are also low in calories and high in fiber, making them a healthy addition to your diet. Bean sprouts are known to aid digestion, boost the immune system, and promote overall well-being.
What can I do if my bean sprouts are not sprouting?
If your bean sprouts are not sprouting, there could be several reasons. First, make sure your beans are viable and intended for sprouting. Old or damaged beans may not germinate. Second, ensure that you are soaking the beans for the recommended amount of time. Third, check the temperature. Bean sprouts prefer a cool environment, so avoid extreme heat or cold. Finally, make sure you are rinsing them regularly to keep them moist.
Can I eat the roots of the bean sprouts?
Yes, the roots of bean sprouts are perfectly edible and nutritious. They are a natural part of the sprout and do not need to be removed before consumption. Some people even prefer the slightly nutty flavor of the roots.
How do I prevent mold from growing on my bean sprouts?
Preventing mold growth is essential for healthy bean sprouts. The key is to ensure proper drainage and frequent rinsing. Make sure your container has adequate drainage holes to prevent water from pooling at the bottom. Rinse your sprouts at least two to three times a day to wash away any accumulated waste and keep them fresh. Also, avoid overcrowding the container, as this can restrict air circulation and promote mold growth.
Is it safe to eat raw bean sprouts?
While bean sprouts are often eaten raw, there is a small risk of bacterial contamination. To minimize this risk, always purchase sprouting beans from a reputable source and follow proper hygiene practices. Rinse the sprouts thoroughly before consumption. If you are concerned about food safety, you can lightly cook the sprouts before eating them.
Can I use tap water to rinse my bean sprouts?
Yes, you can use tap water to rinse your bean sprouts, as long as your tap water is safe to drink. If you are concerned about the quality of your tap water, you can use filtered water instead.
What are some creative ways to use bean sprouts in my cooking?
Bean sprouts are incredibly versatile and can be used in a wide variety of dishes. Add them to salads for a crunchy texture, stir them into stir-fries for a boost of nutrients, or use them as a topping for sandwiches and wraps. They can also be added to soups, spring rolls, and even omelets. Get creative and experiment with different flavor combinations to find your favorite ways to enjoy bean sprouts.


Leave a Comment