

Grow Asparagus Year Round? Yes, you read that right! Imagine harvesting fresh, tender asparagus spears even when the snow is falling outside. It sounds like a gardener’s dream, doesn’t it? Well, it’s more attainable than you might think, and I’m here to share some clever DIY tricks to make it a reality.
Asparagus, a springtime delicacy enjoyed for centuries, has a rich history. The ancient Romans and Greeks prized it for its medicinal properties and unique flavor. While traditionally a seasonal treat, the desire to extend its availability has led to innovative gardening techniques. Let’s face it, who wants to wait all year for that delicious, earthy taste?
This DIY guide is perfect for anyone who loves fresh produce and wants to take their gardening game to the next level. Whether you’re a seasoned gardener or just starting out, these simple hacks will help you grow asparagus year round, regardless of your climate. We’ll explore everything from creating a controlled environment to selecting the right varieties for extended harvests. Say goodbye to asparagus envy and hello to a continuous supply of this nutritious and delicious vegetable!
Grow Your Own Asparagus Year-Round: A Comprehensive DIY Guide
Hello dear garden friends! Have you ever wished you could enjoy fresh asparagus not just in the spring, but all year long? Me too! And that’s why I went searching for a solution and found one. With a little planning and the right techniques, you can actually grow asparagus year-round. Sounds crazy? It’s not! Let’s dive into this exciting project together.
The Basics: What You Need for Growing Asparagus
Before we get started, it’s important that we understand the basics and gather the right materials. Here is a list of the things you will need:
- Asparagus plants (crowns): One or two-year-old crowns are best. Look for healthy, strong plants.
- Large containers: Choose containers with a diameter of at least 45 cm (18 inches) and a depth of 60 cm (24 inches). Asparagus needs space for its roots!
- High-quality potting soil: A well-draining, nutrient-rich soil is crucial. I recommend a mixture of garden soil, compost, and sand.
- Organic fertilizer: Asparagus is a heavy feeder and requires regular fertilization.
- Grow lights (optional): For growing indoors during winter or in places with little sunlight, grow lights are essential.
- Patience: Asparagus takes time to grow and mature. Be patient and don’t get discouraged!
Step-by-Step Guide: Growing Asparagus in a Pot
Now, let’s get down to it! Here is a detailed guide on how to grow asparagus in a pot:
- Preparing the Containers:
- First, you should ensure that your containers have adequate drainage holes. Asparagus does not like waterlogging!
- Fill the containers with your prepared potting soil. Leave about 15 cm (6 inches) of space to the rim.
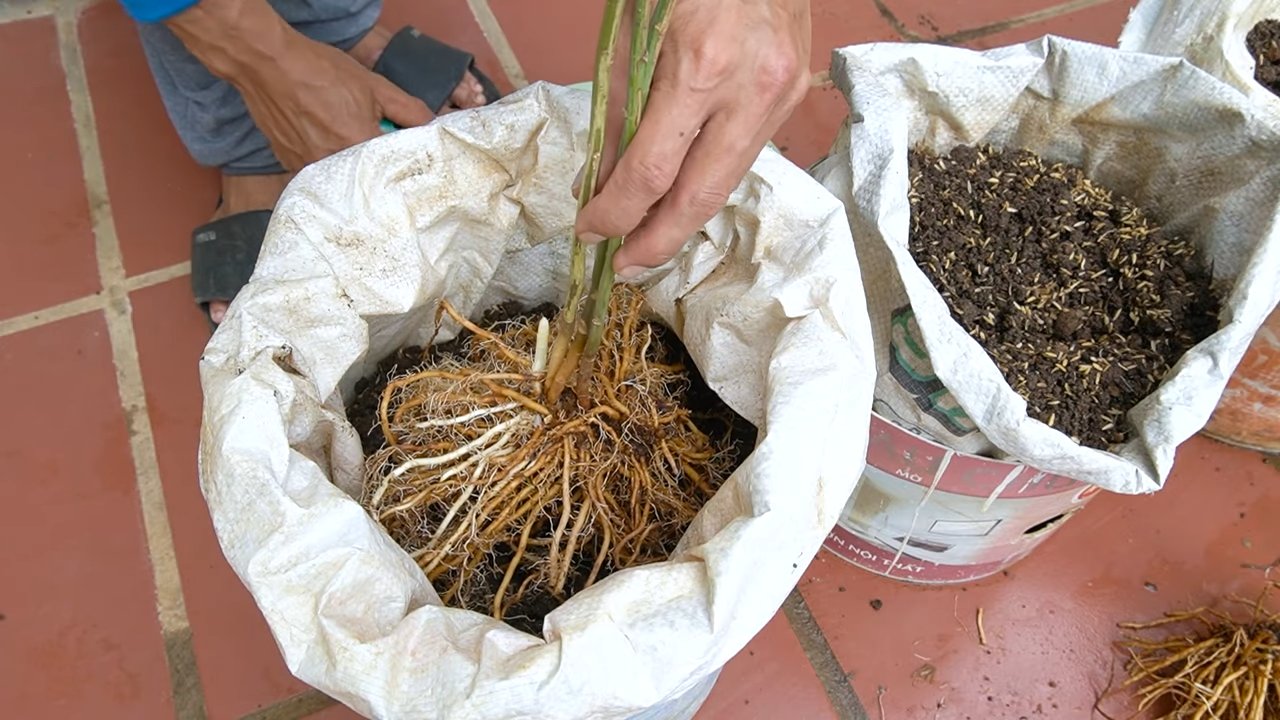
- Planting the Asparagus Crowns:
- In the middle of the container, dig a hole large enough to accommodate the asparagus crown.
- Carefully place the crown in the hole, making sure the roots point downwards.
- Cover the crown with soil so that the buds (the small tips from which the asparagus grows) are just below the surface.
- Water the soil well.
- Proper Care:
- Watering: Water the asparagus regularly, but avoid waterlogging. The soil should always be slightly moist.
- Fertilizing: Fertilize the asparagus every two to three weeks with an organic fertilizer. I like to use compost tea or diluted nettle tea.
- Light: Asparagus needs a lot of light, at least six hours per day. If you are growing asparagus indoors, you should use grow lights.
- Temperature: The ideal temperature for growing asparagus is between 18 and 24 degrees Celsius (65-75°F).
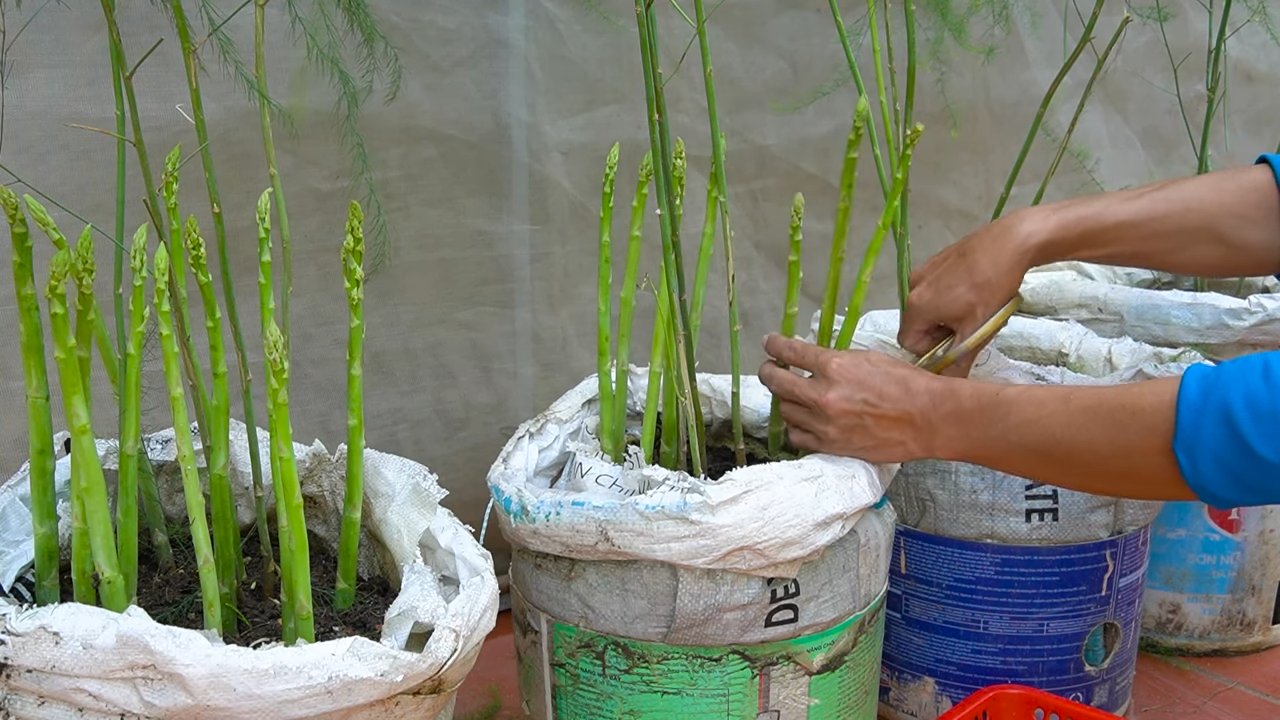
- The Harvest:
- In the first year, you should not harvest the asparagus so that it can develop well.
- From the second year onwards, you can begin harvesting. Cut the asparagus with a sharp knife about 2-3 cm (1 inch) below the soil surface.
- Harvest only the thick, strong spears. Leave the thin spears to allow the plant to continue growing.
Asparagus All Year Round: The Trick with the Dormancy Period
The key to year-round asparagus cultivation is to put the plants into a dormancy period. Asparagus is a perennial plant and needs a resting phase to gather new energy. Here’s how it works:
- Preparing for the Dormancy Period:
- In the fall, when the asparagus plants turn yellow and die back, cut off the above-ground shoots.
- Reduce watering and fertilizing.
- The Dormancy Period:
- Place the containers in a cool, dark place, e.g., in the cellar or garage. The temperature should be between 0 and 5 degrees Celsius (32-41°F).
- Water the soil only occasionally to keep it slightly moist.
- Let the plants rest for about 8-10 weeks.
- Waking Up the Plants:
- After the dormancy period, bring the containers back into the light and resume regular watering and fertilizing.
- The plants will soon sprout again, and you can begin to harvest.
Special Tips and Tricks for Successful Asparagus Cultivation
Here are a few additional tips that will help you grow your asparagus even more successfully:
- Choosing the right variety: There are different asparagus varieties suitable for growing in pots. Ask at your local nursery which varieties are best suited for your region.
- The importance of pH: Asparagus prefers slightly acidic soil with a pH between 6.0 and 7.0. You can check the pH of your soil with a test kit and adjust it if necessary.
- Protection from pests and diseases: Asparagus can be affected by various pests and diseases. Watch for signs of infestation and treat the plants with organic remedies if necessary.
- The right harvesting technique: Always cut the asparagus with a sharp knife to avoid damaging the plant.
- Storing asparagus: Fresh asparagus is best when consumed immediately after harvest. If you need to store it, wrap it in a damp cloth and keep it in the refrigerator.
Common Mistakes and How to Avoid Them
Even with asparagus cultivation, mistakes can happen. Here are some of the most common mistakes and how you can avoid them:
- Too little light: Asparagus needs a lot of light to grow. Make sure your plants get enough light, either from sunlight or grow lights.
- Too much water: Waterlogging can lead to root rot. Water the asparagus regularly, but avoid overwatering.
- Too little fertilizer: Asparagus is a heavy feeder and needs regular fertilizing. Fertilize the plants every two to three weeks with an organic fertilizer.
- Harvesting too early: In the first year, you should not harvest the asparagus so it can develop well.
- Incorrect dormancy period: The dormancy period is crucial for year-round asparagus cultivation. Make sure the plants rest for a sufficient amount of time in a cool, dark place.
Why Grow Asparagus Yourself? The Benefits at a Glance
Why should you go to the trouble of growing your own asparagus? Here are some of the benefits:
- Fresh, aromatic asparagus: Homegrown asparagus simply tastes better than store-bought.
- Control over growing conditions: You know exactly what goes into your soil and can avoid pesticides.
- Sustainability: You reduce transportation miles and support sustainable agriculture.
- A fulfilling hobby: Gardening is a great way to relax and do something meaningful.
- Year-round enjoyment: With the right technique, you can harvest asparagus all year long.
I hope this guide has inspired you to grow your own asparagus.
Conclusion
So, there you have it! Mastering the art of growing asparagus year-round is not just a gardener’s dream; it’s an achievable reality with a little planning and this simple DIY trick. We’ve walked you through the process, highlighting the key steps to ensure your success, from selecting the right asparagus variety to creating the ideal indoor environment. But why is this method a must-try?
Firstly, imagine the sheer delight of harvesting fresh, tender asparagus spears in the dead of winter, when grocery store prices are at their peak and the quality is often subpar. This DIY approach allows you to bypass seasonal limitations and enjoy the unparalleled flavor of homegrown asparagus whenever you crave it. Secondly, it’s a fantastic way to extend your growing season and maximize your yield. By starting asparagus indoors, you give your plants a head start, resulting in earlier and more abundant harvests.
Furthermore, this method is incredibly rewarding. There’s something deeply satisfying about nurturing a plant from seed or crown to maturity, especially when you’re defying the natural rhythms of the seasons. It’s a testament to your gardening skills and a source of pride that you can share with friends and family.
But the possibilities don’t end here! Feel free to experiment with different asparagus varieties to find your personal favorite. ‘Jersey Knight’ is a reliable choice for its high yield and disease resistance, while ‘Purple Passion’ offers a unique color and sweeter flavor. You can also explore different growing mediums, such as coco coir or perlite, to optimize drainage and aeration. Consider adding companion plants like basil or parsley to your indoor garden to deter pests and enhance the flavor of your asparagus.
Don’t be afraid to get creative with your setup. If you don’t have a dedicated grow light, a sunny windowsill can work in a pinch, although you may need to rotate your plants regularly to ensure even growth. You can also use reflective materials, such as aluminum foil, to maximize light exposure.
We understand that growing asparagus year-round might seem daunting at first, but we assure you that it’s a manageable and enjoyable project. The key is to be patient, observant, and willing to learn from your mistakes. Remember to monitor your plants regularly for signs of pests or diseases and adjust your watering and fertilization schedule as needed.
We are confident that with a little effort and dedication, you’ll be enjoying fresh, homegrown asparagus all year long. So, what are you waiting for? Give this DIY trick a try and experience the joy of harvesting your own delicious asparagus, regardless of the season.
And most importantly, we want to hear about your experiences! Share your successes, challenges, and tips in the comments below. Let’s create a community of asparagus enthusiasts who are passionate about growing their own food and pushing the boundaries of what’s possible. Your insights could inspire others to embark on their own asparagus-growing journey. Let us know if this DIY trick to **grow asparagus year round** worked for you!
Frequently Asked Questions (FAQ)
1. What is the best asparagus variety to grow indoors for year-round harvesting?
While several asparagus varieties can be grown indoors, ‘Jersey Knight’ is often recommended for its high yield, disease resistance, and adaptability to indoor conditions. ‘Purple Passion’ is another excellent choice, offering a unique color and sweeter flavor, but it may require slightly more attention to ensure optimal growth. Ultimately, the best variety depends on your personal preferences and growing conditions. Consider experimenting with different varieties to find the one that thrives best in your indoor environment.
2. How much light does asparagus need when grown indoors?
Asparagus requires a significant amount of light to thrive indoors. Ideally, you should provide at least 6-8 hours of direct sunlight per day. If you don’t have access to a sunny windowsill, you’ll need to supplement with artificial grow lights. Full-spectrum LED grow lights are a great option, as they provide the necessary wavelengths for photosynthesis and are energy-efficient. Position the lights about 12-18 inches above the plants and adjust as needed to prevent burning. Remember to rotate your plants regularly to ensure even light exposure on all sides.
3. What type of soil is best for growing asparagus indoors?
Asparagus prefers well-draining soil that is rich in organic matter. A mixture of equal parts potting soil, compost, and perlite or vermiculite is a good starting point. The potting soil provides essential nutrients, the compost improves drainage and aeration, and the perlite or vermiculite helps to prevent compaction. Avoid using heavy clay soils, as they can become waterlogged and lead to root rot. You can also add a slow-release fertilizer to the soil to provide a steady supply of nutrients.
4. How often should I water my indoor asparagus plants?
Water your asparagus plants regularly, keeping the soil consistently moist but not waterlogged. Check the soil moisture level daily by sticking your finger about an inch into the soil. If it feels dry, it’s time to water. Water deeply, allowing the excess water to drain out of the bottom of the pot. Avoid overwatering, as this can lead to root rot. During the dormant period in the fall and winter, you can reduce watering frequency.
5. How do I fertilize my indoor asparagus plants?
Asparagus plants are heavy feeders and require regular fertilization to thrive. Use a balanced fertilizer with an NPK ratio of 10-10-10 or 20-20-20. Apply the fertilizer according to the package instructions, typically every 2-4 weeks during the growing season. You can also supplement with organic fertilizers, such as compost tea or fish emulsion. Avoid over-fertilizing, as this can burn the roots.
6. How long does it take to harvest asparagus spears from indoor plants?
It typically takes 2-3 years for asparagus plants to mature enough to produce a significant harvest. During the first year, focus on establishing a strong root system and avoid harvesting any spears. In the second year, you can harvest a few spears, but be careful not to over-harvest. In the third year and beyond, you can harvest more liberally, but always leave some spears to fern out and replenish the plant’s energy reserves.
7. How do I deal with pests and diseases on my indoor asparagus plants?
Indoor asparagus plants are generally less susceptible to pests and diseases than outdoor plants, but they can still be affected. Common pests include aphids, spider mites, and asparagus beetles. You can control these pests with insecticidal soap or neem oil. Diseases such as rust and crown rot can also occur. Prevent these diseases by providing good air circulation, avoiding overwatering, and using disease-resistant varieties. If you notice any signs of pests or diseases, treat them promptly to prevent them from spreading.
8. Can I grow asparagus from seed indoors?
Yes, you can grow asparagus from seed indoors, but it’s a more time-consuming process than starting with crowns. Soak the seeds in water for 24 hours before planting them in seed trays filled with well-draining potting mix. Keep the soil moist and warm, and the seeds should germinate in 2-3 weeks. Once the seedlings have developed a few true leaves, transplant them into individual pots. It will take several years for seedlings to mature enough to produce a harvest.
9. How do I overwinter my indoor asparagus plants?
Asparagus plants require a dormant period in the fall and winter to rest and replenish their energy reserves. In late fall, cut back the ferns to ground level and reduce watering frequency. Move the plants to a cool, dark location, such as a basement or garage, where the temperature stays between 40-50°F. Allow the plants to rest for 2-3 months, then gradually reintroduce them to light and warmth in the spring.
10. What are some common mistakes to avoid when growing asparagus indoors?
Some common mistakes to avoid when growing asparagus indoors include:
* Overwatering: This can lead to root rot.
* Underwatering: This can stunt growth.
* Insufficient light: Asparagus needs plenty of light to thrive.
* Over-fertilizing: This can burn the roots.
* Harvesting too early: Allow the plants to mature before harvesting.
* Ignoring pests and diseases: Treat problems promptly to prevent them from spreading.
* Not providing a dormant period: Asparagus needs a rest period in the fall and winter.
Leave a Comment