

Foam box peanut growing might sound a little unconventional, but trust me, it’s a game-changer for any home gardener looking to enjoy fresh, homegrown peanuts! Forget sprawling fields and complicated setups. I’m going to show you how to cultivate these delicious legumes right in your backyard, balcony, or even indoors, using a simple foam box.
Peanuts, originally cultivated in South America thousands of years ago, have become a beloved snack and staple food worldwide. But did you know you can easily grow them yourself? Many people think peanut cultivation is only for large farms, but that’s simply not true! With a few clever tricks, you can bypass the usual space constraints and enjoy the satisfaction of harvesting your own peanuts.
Why should you try this DIY peanut growing hack? Well, for starters, it’s incredibly rewarding to nurture a plant from seed to harvest. Plus, you’ll have access to the freshest, most flavorful peanuts imaginable, free from the additives and preservatives often found in store-bought varieties. More importantly, this method is perfect for urban dwellers or anyone with limited garden space. So, are you ready to ditch the store-bought peanuts and embark on a fun and fulfilling foam box peanut growing adventure with me? Let’s get started!

Growing Peanuts in a Styrofoam Container: A DIY Guide
Hello, dear gardening friends! Have you ever thought about growing your own peanuts? It’s easier than you think, and with this DIY guide, I’ll show you how to do it in a Styrofoam container. This is not only space-saving but also a great way to close the loop and reuse waste. Let’s get started!
What you’ll need:
- A large Styrofoam container (e.g., from food transport)
- Peanuts (raw, unsalted, and unroasted – preferably from an organic store or garden center)
- High-quality potting soil or a mix of garden soil, compost, and sand
- Drainage material (gravel, expanded clay, or clay shards)
- A drill or screwdriver
- A watering can or hose
- Patience and a little bit of love!
Why a Styrofoam Container?
Styrofoam containers have several advantages for growing peanuts:
- Insulation: Styrofoam insulates well, which is particularly beneficial in cooler regions. It keeps the soil warmer, thus promoting the growth of the peanuts.
- Lightweight: Even when the container is filled with soil, it is easier to move compared to clay pots or other containers.
- Reuse: Instead of throwing the Styrofoam container away, we can reuse it meaningfully and thus contribute to environmental protection.
- Drainage: Styrofoam is easy to work with to create drainage holes.
Preparing the Styrofoam Container
Before we start planting, we need to prepare the Styrofoam container.
- Cleaning: Clean the Styrofoam container thoroughly with water and possibly a little dish soap. Make sure to remove all residues.
- Drill drainage holes: Using a drill or a screwdriver, drill several drainage holes in the bottom of the container. These holes are important to allow excess water to drain and prevent the roots from rotting. I recommend drilling at least 5-6 holes, depending on the size of the container.
- Add a drainage layer: Fill a layer of drainage material (gravel, expanded clay, or clay shards) at the bottom of the container. This layer ensures good drainage and prevents waterlogging. A layer of about 5-7 cm is ideal.
Preparing and Planting the Peanuts
Now comes the exciting part: planting the peanuts!
- Select peanuts: Choose healthy, plump peanuts. Make sure they are unsalted and unroasted. It’s best to use peanuts from an organic store or garden center, as these are specifically suited for cultivation.
- Pre-sprout peanuts (optional): To speed up the germination process, you can pre-sprout the peanuts. Place them in lukewarm water for 24 hours. Then, wrap them in a damp paper towel and place them in a plastic bag. Put the bag in a warm place and check regularly to see if the paper towel is still moist. The peanuts should sprout after a few days.
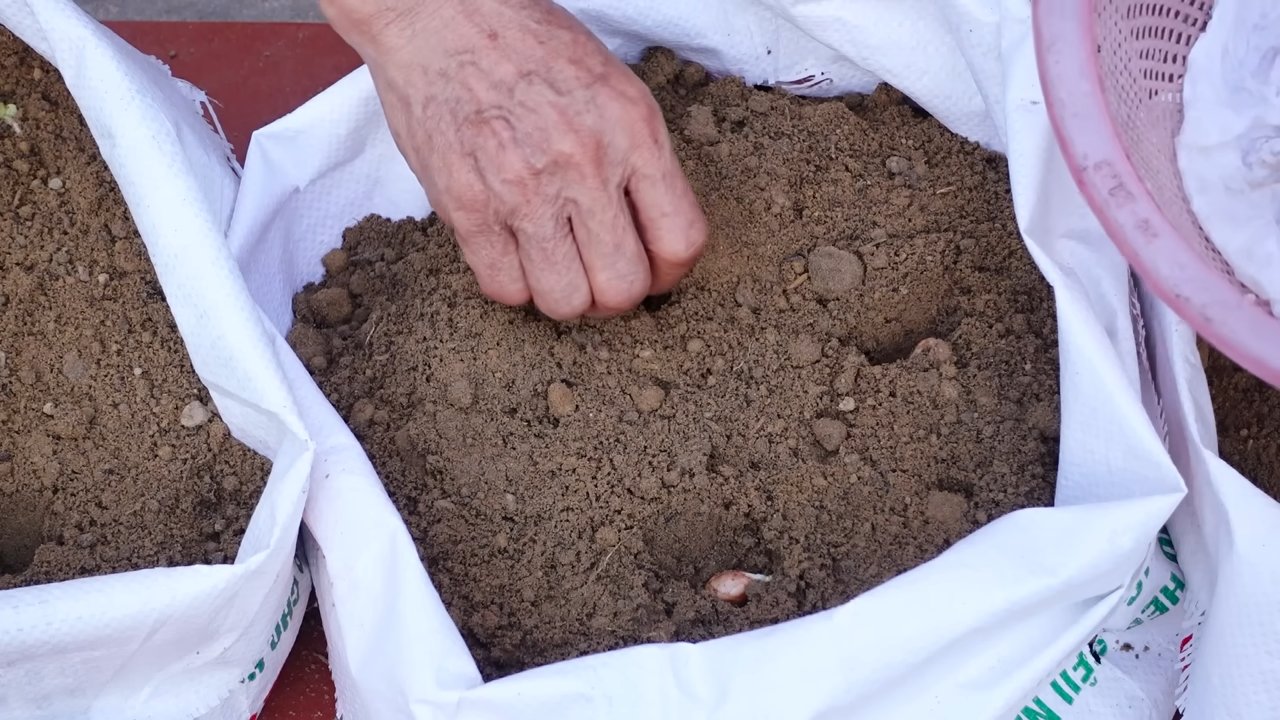
- Fill the container with soil: Fill the Styrofoam container with high-quality potting soil or a mixture of garden soil, compost, and sand. Leave about 5-10 cm of space to the rim of the container.
- Plant the peanuts: Plant the peanuts about 5-7 cm deep in the soil. Make sure that the sprouts (if any) are pointing upwards. Plant the peanuts with a spacing of about 15-20 cm from each other.
- Watering: Water the soil thoroughly after planting. Make sure the soil is well-moistened, but not too wet.
Caring for the Peanut Plants
Caring for peanut plants is relatively simple, but there are a few things you should pay attention to.
- Location: Peanuts love the sun! Place the Styrofoam container in a sunny location where the plants get at least 6-8 hours of sun per day.
- Watering: Water the peanut plants regularly, especially during the hot summer months. Make sure the soil is always slightly moist, but not too wet. Avoid waterlogging, as this can lead to root rot.
- Fertilizing: Fertilize the peanut plants regularly with an organic fertilizer during the growing season. I like to use compost tea or an algae-based liquid fertilizer.
- Hilling: When the peanut plants are about 30 cm tall, you should “hill” them. This means you pile up soil around the base of the plants. This encourages the formation of side shoots and increases the yield.
- Observe the flowers: Peanut plants produce yellow flowers. After fertilization, the flower stalks bend down and burrow into the soil. The peanuts then develop there. Make sure the soil around the plants is loose and moist so that the flower stalks can easily penetrate the soil.
- Pests and diseases: Peanut plants are relatively robust, but they can be infested by pests like aphids or spider mites. Check the plants regularly and combat pests with natural remedies like neem oil or soapy water solution if necessary.
Harvesting the Peanuts
Harvesting the peanuts is the crowning achievement of your work!
- Harvest time: The peanuts are ripe when the leaves of the plants turn yellow and die back. This is usually about 4-5 months after sowing.
- Harvest: Carefully pull the entire plants out of the soil. Shake off the soil and let the peanuts dry on the plants.
- Drying: Hang the plants upside down in a dry, airy place until the peanuts are completely dry. This can take several weeks.
- Harvesting the peanuts: Break the peanuts off the plants and store them in a cool, dry place.
Additional Tips and Tricks
- Variety Selection: There are different varieties of peanuts. Find out which variety is best suited for your region.
- Soil Improvement: If your garden soil is very clayey, you should improve it with sand and compost before planting.
- Mulching: Mulch the soil around the peanut plants with straw or grass clippings. This keeps the soil moist and suppresses weeds.
- Protection from Birds: Birds love peanuts! Protect your plants with a net or a scarecrow.
- Sustainability: Use recycled materials and organic fertilizers to make your peanut cultivation as sustainable as possible.
Common Problems and Solutions
Root Rot: Root rot is caused by waterlogging.
No Germination: If the peanuts do not germinate, there can be several reasons. The peanuts may be too old, the temperature too low, or the soil too dry. Try again with fresh peanuts and pay attention to the correct temperature and moisture.
Yellow Leaves: Yellow leaves can be a sign of a nutrient deficiency. Fertilize the plants with an organic fertilizer.
Conclusion
So, there you have it! Transforming a simple foam box into a thriving peanut patch is not just a fun project; it’s a rewarding experience that brings the joy of homegrown goodness right to your doorstep. We’ve walked you through the process, highlighting the ease and accessibility of this DIY method. Why is this a must-try? Because it democratizes gardening, making it possible for anyone, regardless of space or experience, to cultivate their own delicious peanuts.
Think about it: no more wondering about the source of your peanuts. You’ll know exactly where they came from, how they were grown, and that they’re free from unwanted chemicals. Plus, the satisfaction of harvesting your own crop is unparalleled. It’s a connection to nature, a learning opportunity, and a source of fresh, healthy food, all rolled into one.
But the beauty of this foam box peanut growing method lies in its adaptability. Feel free to experiment! Try different varieties of peanuts to discover your favorite flavor profile. Consider adding companion plants like marigolds or basil to deter pests and enhance the overall health of your peanut plants. You could even get creative with the foam box itself – paint it, decorate it, or add drainage holes in unique patterns. The possibilities are endless!
And don’t limit yourself to just one foam box. Once you see how successful this method is, you might be tempted to create a whole peanut farm on your patio or balcony. Imagine the abundance of fresh peanuts you could enjoy!
We truly believe that this DIY project is a game-changer for home gardeners. It’s affordable, sustainable, and incredibly satisfying. But the real magic happens when you try it yourself. So, grab a foam box, some soil, and peanut seeds, and get ready to embark on a peanut-growing adventure.
We’re confident that you’ll be amazed by the results. And we want to hear all about it! Share your experiences, your tips, and your photos with us. Let’s create a community of foam box peanut growers, sharing our knowledge and inspiring others to embrace the joy of homegrown food. Happy growing!
Frequently Asked Questions (FAQ)
What kind of foam box should I use?
Ideally, you want a foam box that’s at least 12 inches deep to allow the peanut roots to develop properly. The width and length will depend on how many peanut plants you want to grow. A standard-sized foam box used for shipping produce or seafood works perfectly. Make sure the box is clean and free of any harmful chemicals or residues. If you’re concerned about the box’s previous contents, you can line it with a thick plastic sheet before adding the soil. Avoid using foam boxes that have been treated with pesticides or herbicides.
What type of soil is best for growing peanuts in a foam box?
Peanuts thrive in well-draining, sandy loam soil. This type of soil allows the peanut pegs (the structures that develop into peanuts) to easily penetrate the ground. Avoid heavy clay soils, as they can become compacted and hinder peanut development. You can create your own well-draining mix by combining equal parts of potting soil, sand, and compost. The compost will provide essential nutrients for your peanut plants. Ensure the soil is slightly acidic to neutral, with a pH between 6.0 and 7.0. You can test the soil pH using a home soil testing kit.
How often should I water my peanut plants in a foam box?
Watering frequency depends on the weather and the drainage of your soil. Generally, you should water your peanut plants deeply whenever the top inch of soil feels dry to the touch. Avoid overwatering, as this can lead to root rot. During hot, dry weather, you may need to water daily. In cooler, wetter weather, you may only need to water every few days. Ensure the foam box has adequate drainage holes to prevent waterlogging. A good way to check if you’re watering correctly is to observe the leaves of your peanut plants. If they are wilting, it’s a sign that they need more water.
How much sunlight do peanut plants need?
Peanut plants need at least 6-8 hours of direct sunlight per day to thrive. Choose a location for your foam box that receives plenty of sunlight throughout the day. If you live in a particularly hot climate, you may need to provide some afternoon shade to prevent the plants from scorching. If you don’t have access to a sunny outdoor space, you can supplement with grow lights. Position the grow lights about 6-12 inches above the plants and keep them on for 12-16 hours per day.
When is the best time to plant peanuts in a foam box?
The best time to plant peanuts is after the last frost, when the soil has warmed up to at least 65°F (18°C). Peanuts are warm-season crops and will not germinate well in cold soil. You can start peanut seeds indoors 4-6 weeks before the last frost to get a head start. Transplant the seedlings into the foam box once the weather has warmed up. If you live in a region with a short growing season, starting seeds indoors is highly recommended.
How long does it take for peanuts to mature in a foam box?
Peanuts typically take 120-150 days to mature, depending on the variety and growing conditions. You’ll know the peanuts are ready to harvest when the foliage starts to turn yellow and the pods feel plump and full. To harvest, carefully dig up the entire plant, being careful not to damage the peanut pods. Shake off the excess soil and hang the plants upside down in a dry, well-ventilated area for 2-3 weeks to cure. Once the peanuts are cured, you can remove them from the plants and store them in a cool, dry place.
What are some common pests and diseases that affect peanut plants?
Common pests that can affect peanut plants include aphids, spider mites, and leafhoppers. These pests can be controlled with insecticidal soap or neem oil. Diseases that can affect peanut plants include leaf spot and root rot. Leaf spot can be prevented by ensuring good air circulation and avoiding overhead watering. Root rot can be prevented by ensuring the soil is well-draining and avoiding overwatering. Regularly inspect your plants for signs of pests or diseases and take action promptly to prevent them from spreading.
Can I grow different varieties of peanuts in a foam box?
Yes, you can grow different varieties of peanuts in a foam box. However, it’s best to choose varieties that have similar growing requirements and maturity times. Some popular peanut varieties include Virginia, Spanish, and Runner. Virginia peanuts are known for their large size and are often roasted. Spanish peanuts are smaller and have a reddish skin. Runner peanuts are commonly used for peanut butter. Experiment with different varieties to find your favorite!
How do I know if my peanuts are getting enough nutrients?
The leaves of your peanut plants will tell you a lot about their nutrient status. If the leaves are pale green or yellow, it could indicate a nitrogen deficiency. If the leaves have purple edges, it could indicate a phosphorus deficiency. If the leaves have brown spots, it could indicate a potassium deficiency. You can address nutrient deficiencies by amending the soil with appropriate fertilizers. A balanced fertilizer with an NPK ratio of 10-10-10 is a good option. You can also use organic fertilizers like compost tea or fish emulsion.
What if I don’t have a foam box? Can I use something else?
While a foam box is ideal due to its insulation and lightweight nature, you can use other containers as well. Large plastic tubs, wooden crates lined with plastic, or even repurposed containers like old tires can work. Just make sure the container is at least 12 inches deep and has adequate drainage holes. The material of the container isn’t as important as ensuring proper drainage and providing enough space for the peanut roots to grow.
Leave a Comment