

Easy Melon Growing Tips – that’s what you’re here for, right? Well, you’ve come to the right place! Imagine biting into a juicy, sun-ripened melon you grew yourself. Sounds delicious, doesn’t it? Forget those bland, store-bought melons; with a few simple tricks, you can cultivate your own sweet and flavorful harvest right in your backyard.
Melons have a rich history, dating back to ancient Egypt and beyond. They were prized for their sweetness and refreshing qualities, often depicted in artwork and enjoyed by royalty. While we might not be pharaohs, we can certainly enjoy the same delicious fruit with a little know-how.
But why bother with the effort? Because let’s face it, store-bought melons can be a gamble. Sometimes they’re perfect, but often they’re bland, mealy, and disappointing. Plus, there’s something incredibly satisfying about nurturing a plant from seed to fruit. It’s a connection to nature, a rewarding hobby, and a source of fresh, healthy food for you and your family. I’m going to share some easy melon growing tips that will help you avoid common pitfalls and maximize your yield. From choosing the right variety to providing the perfect growing conditions, I’ll guide you through every step of the process. Get ready to impress your friends and family with your homegrown melons!
Grow Delicious Melons at Home: A Beginner’s Guide
Hey there, fellow gardening enthusiasts! I’m so excited to share my tried-and-true methods for growing juicy, flavorful melons right in your own backyard. Forget those bland, store-bought melons – with a little know-how, you can enjoy the sweet taste of homegrown goodness all summer long. This guide covers everything from seed starting to harvesting, so even if you’re a complete beginner, you’ll be enjoying your own melons in no time!
Choosing Your Melon Variety
Before we dive into the nitty-gritty, let’s talk about choosing the right melon variety for your climate and preferences. There are so many options out there, it can be a little overwhelming! Here are a few of my favorites:
* Watermelon: A summer classic! Look for varieties like ‘Sugar Baby’ (compact and early maturing), “Crimson Sweet” (classic flavor and size), or “Yellow Doll” (unique yellow flesh).
* Cantaloupe: Sweet and aromatic, cantaloupes are a delightful treat. ‘Hales Best Jumbo’ is a reliable choice, and ‘Athena’ is known for its disease resistance.
* Honeydew: Mild and refreshing, honeydews are perfect for a light snack. ‘Honeycrisp’ is a popular variety with excellent flavor.
* Specialty Melons: Don’t be afraid to experiment! Consider trying Galia melons (sweet and fragrant), Charentais melons (intensely aromatic), or even Armenian cucumbers (technically a melon!).
Important Tip: Check your local climate and growing season before selecting your melon variety. Some varieties require a longer growing season than others.
Starting Your Melon Seeds
Melons thrive in warm weather, so it’s best to start your seeds indoors a few weeks before the last expected frost. This gives them a head start and ensures they’ll have plenty of time to mature.
1. Gather Your Supplies: You’ll need seed starting trays or small pots, seed starting mix, melon seeds, a spray bottle, and a heat mat (optional, but helpful).
2. Prepare the Seed Starting Mix: Moisten the seed starting mix with water until it’s damp but not soggy.
3. Sow the Seeds: Plant 2-3 seeds per cell or pot, about ½ inch deep.
4. Cover and Water: Gently cover the seeds with seed starting mix and lightly mist with water.
5. Provide Warmth: Place the seed starting trays on a heat mat (if using) and cover them with a clear plastic dome or plastic wrap to create a humid environment.
6. Provide Light: Once the seeds germinate (usually within 5-10 days), remove the plastic cover and place the seedlings under grow lights or in a sunny window.
7. Thin the Seedlings: Once the seedlings have their first true leaves (the second set of leaves), thin them to one seedling per cell or pot by snipping off the weaker seedlings at the soil line.
8. Water Regularly: Keep the soil consistently moist, but not waterlogged.
Preparing Your Garden Bed
Melons need plenty of sunshine, well-drained soil, and lots of nutrients to thrive. Here’s how to prepare your garden bed for success:
1. Choose a Sunny Location: Select a spot in your garden that receives at least 6-8 hours of direct sunlight per day.
2. Improve the Soil: Melons prefer well-drained soil that is rich in organic matter. Amend your soil with compost, aged manure, or other organic materials to improve its fertility and drainage.
3. Check the Soil pH: Melons prefer a soil pH between 6.0 and 6.8. You can test your soil pH with a soil testing kit and amend it accordingly.
4. Create Mounds or Rows: Melons benefit from being planted on mounds or rows, which helps to improve drainage and warm the soil.
5. Consider Using Black Plastic Mulch: Black plastic mulch can help to warm the soil, suppress weeds, and conserve moisture.
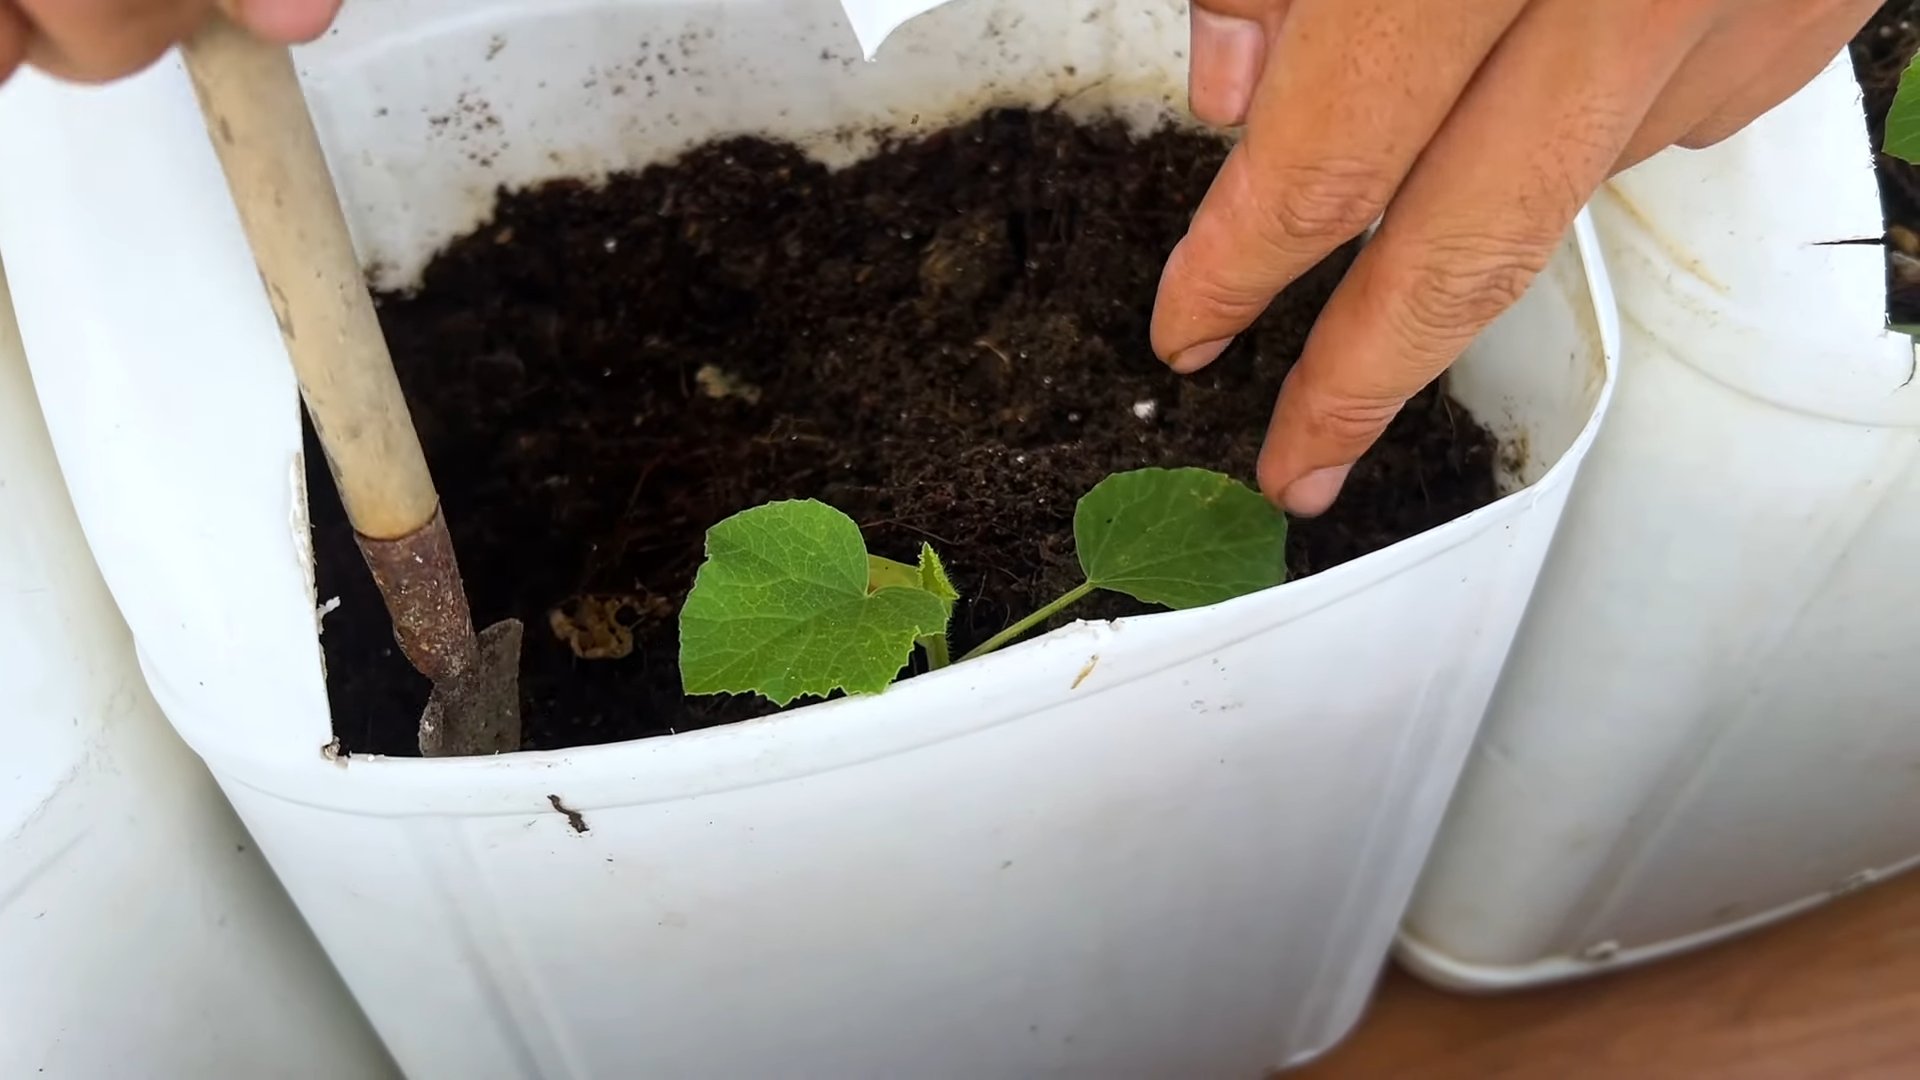
Transplanting Your Melon Seedlings
Once the danger of frost has passed and the soil has warmed up, it’s time to transplant your melon seedlings into the garden.
1. Harden Off the Seedlings: Before transplanting, you’ll need to harden off the seedlings to acclimate them to outdoor conditions. Gradually expose them to longer periods of sunlight and outdoor temperatures over the course of a week.
2. Prepare the Planting Holes: Dig holes that are slightly larger than the root balls of the seedlings, spacing them according to the variety’s recommendations (usually 2-3 feet apart for smaller varieties and 4-6 feet apart for larger varieties).
3. Transplant the Seedlings: Gently remove the seedlings from their containers and place them in the planting holes.
4. Backfill and Water: Backfill the holes with soil and gently firm the soil around the seedlings. Water thoroughly.
5. Mulch Around the Plants: Apply a layer of mulch around the plants to help retain moisture, suppress weeds, and regulate soil temperature.
Caring for Your Melon Plants
Once your melon plants are in the ground, it’s important to provide them with the care they need to thrive.
1. Water Regularly: Melons need consistent moisture, especially during fruit development. Water deeply and regularly, especially during dry spells. Avoid overhead watering, which can lead to fungal diseases. Drip irrigation is ideal.
2. Fertilize Regularly: Melons are heavy feeders and benefit from regular fertilization. Use a balanced fertilizer or a fertilizer specifically formulated for fruits and vegetables. Follow the instructions on the fertilizer label.
3. Control Weeds: Keep the garden bed free of weeds, which can compete with the melon plants for nutrients and water. Hand-pull weeds or use a hoe to cultivate the soil.
4. Protect from Pests and Diseases: Monitor your melon plants regularly for pests and diseases. Common melon pests include aphids, squash bugs, and cucumber beetles. Common melon diseases include powdery mildew, downy mildew, and fusarium wilt. Use appropriate pest control and disease control measures as needed.
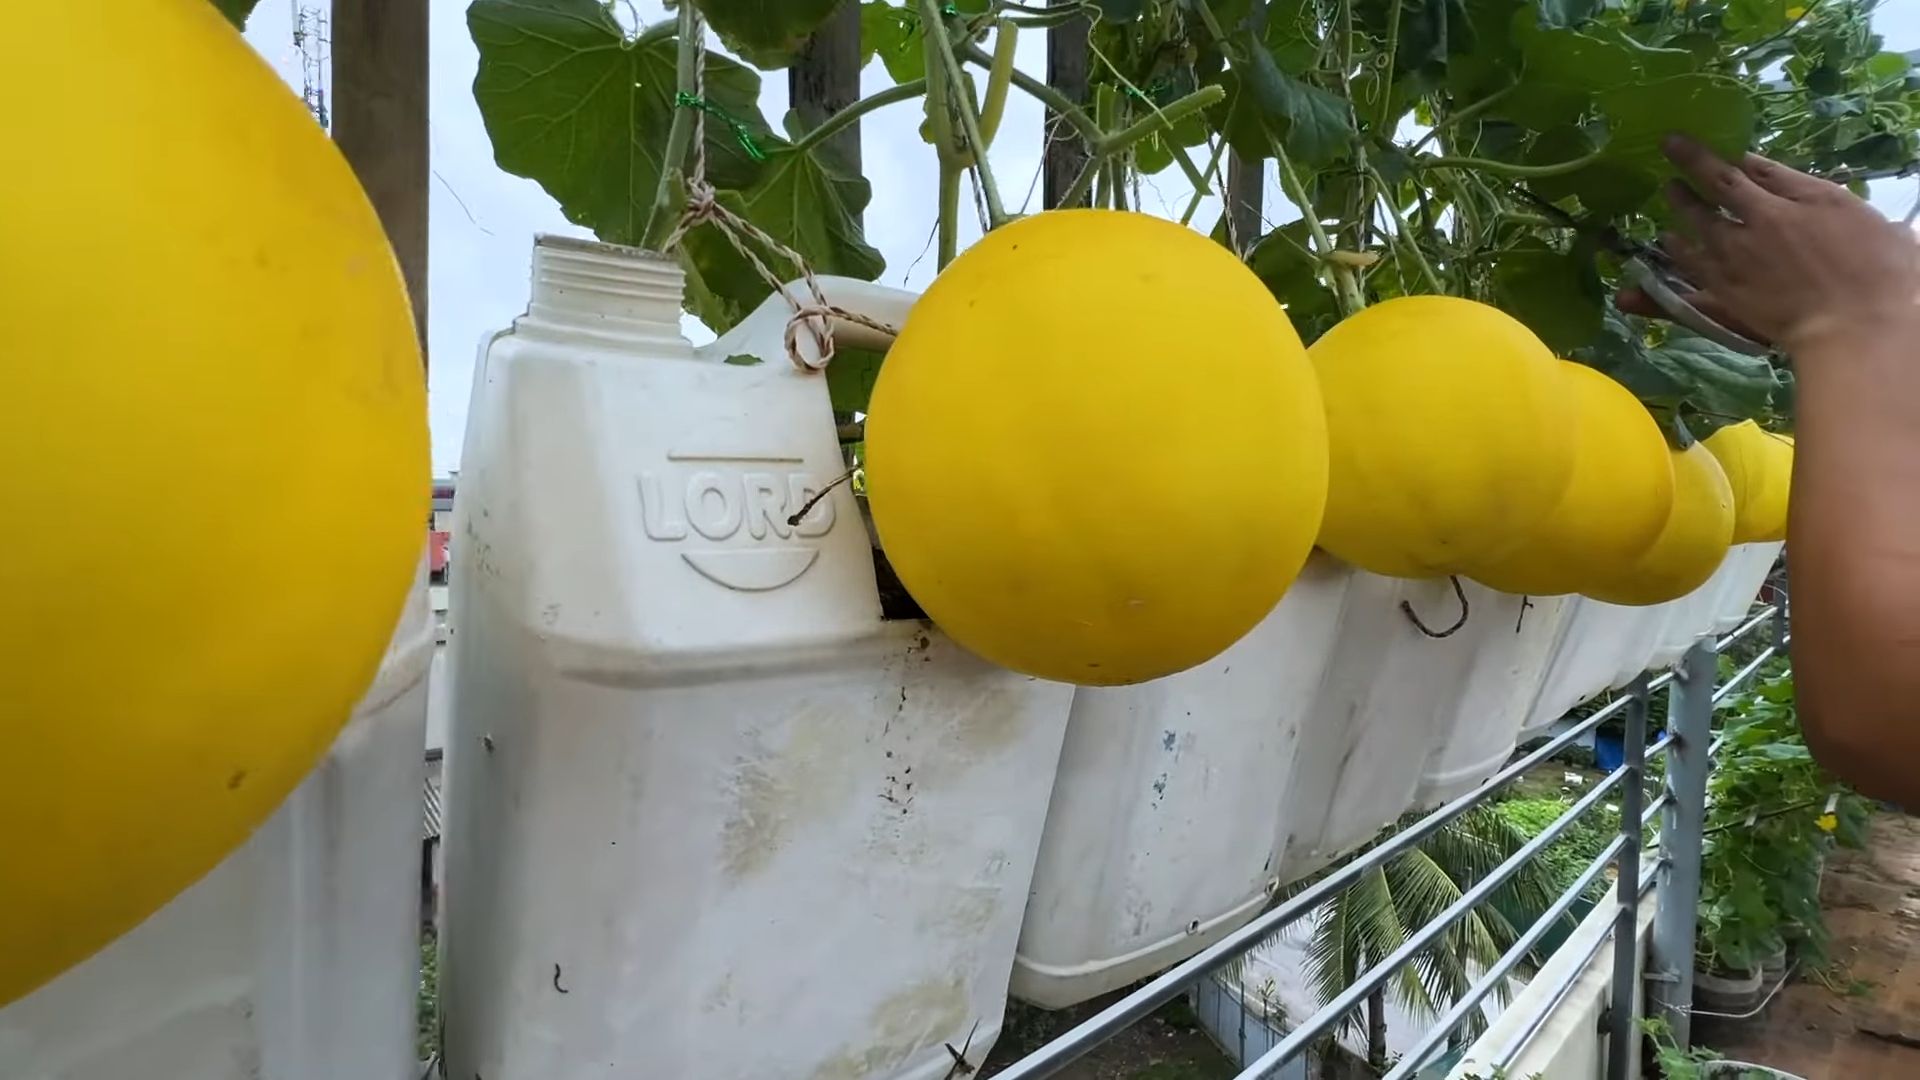
5. Provide Support (Optional): For vining melon varieties, you may want to provide support, such as a trellis or fence, to keep the fruits off the ground and improve air circulation.
Pollinating Your Melon Flowers
Melons have separate male and female flowers. The female flowers have a small swelling at the base, which will eventually become the melon. Bees are essential for pollinating melon flowers.
1. Attract Pollinators: Plant flowers that attract bees and other pollinators near your melon plants.
2. Hand-Pollinate (If Necessary): If you’re not seeing enough bee activity, you can hand-pollinate the flowers yourself. Use a small paintbrush to transfer pollen from the male flowers to the female flowers.
Harvesting Your Melons
Knowing when to harvest your melons is key to enjoying their full flavor and sweetness. Here are some tips for determining when your melons are ripe:
* Watermelon: Look for a dull rind, a dried tendril near the stem, and a hollow sound when you thump the melon. The spot where the melon rests on the ground should be yellow or cream-colored.
* Cantaloupe: Look for a strong aroma, a slight give when you press on the blossom end, and a stem that slips easily from the vine.
* Honeydew: Look for a smooth, waxy rind and a slight give when you press on the blossom end. The melon should also feel heavy for its size.
Harvesting Tip: Use a sharp knife to cut the melon from the vine, leaving a short piece of stem attached.
Dealing with Common Melon Problems
Even with the best care, you may encounter some problems while growing melons. Here are a few common issues and how to address them:
* Blossom End Rot: This is caused by a calcium deficiency and results in a dark, sunken spot on the blossom end of the melon. To prevent blossom end rot, ensure your soil is rich in calcium and water your plants consistently.
* Powdery Mildew: This fungal disease causes a white, powdery coating on the leaves. To prevent powdery mildew, provide good air circulation, avoid overhead watering, and use a fungicide if necessary.
* Squash Bugs: These pests can damage melon plants by sucking the sap from the leaves. Hand-pick squash bugs or use an insecticide to control them.
* Cucumber Beetles: These pests can transmit diseases to melon plants. Use row covers to protect young plants or use an insecticide to control them.
Enjoying Your Homegrown Melons
Congratulations! You’ve successfully grown your own delicious melons. Now it’s time to enjoy the fruits (or rather, melons) of your labor.
* Eat Them Fresh: There’s nothing quite like biting into a juicy, homegrown melon on a
Conclusion
So, there you have it! Growing your own melons doesn’t have to be a daunting task. By implementing these simple yet effective DIY tricks, you’re setting yourself up for a bountiful harvest of sweet, juicy melons right in your backyard. We’ve covered everything from seed starting and soil preparation to pollination assistance and pest control, all with an emphasis on natural and readily available resources.
Why is this a must-try? Because store-bought melons simply can’t compare to the flavor and satisfaction of a homegrown melon, ripened to perfection on the vine. Plus, you have complete control over the growing process, ensuring that your melons are free from harmful chemicals and pesticides. You’re not just growing a melon; you’re cultivating a healthier, more sustainable lifestyle.
But the journey doesn’t end here! Feel free to experiment with different melon varieties. Try growing cantaloupe, honeydew, watermelon, or even some of the more exotic varieties like Galia or Charentais. Each type has its unique flavor profile and growing requirements, offering a fun and rewarding challenge for the adventurous gardener.
Consider these variations to further enhance your melon-growing experience:
* Vertical Growing: If you’re short on space, try growing your melons vertically on a trellis or fence. This not only saves space but also improves air circulation, reducing the risk of fungal diseases. Just be sure to provide adequate support for the heavy fruits as they develop.
* Companion Planting: Plant basil, marigolds, or nasturtiums near your melon plants to deter pests and attract beneficial insects. These companion plants can also improve the overall health and vigor of your melon crop.
* Compost Tea Boost: Give your melon plants a boost of nutrients by watering them with compost tea every few weeks. Compost tea is a natural and effective way to fertilize your plants and improve soil health.
* Sun Protection: In extremely hot climates, provide some afternoon shade for your melon plants to prevent sunburn. You can use shade cloth or plant taller crops nearby to provide natural shade.
We’re confident that with these easy melon growing tips, you’ll be enjoying delicious, homegrown melons in no time. Don’t be afraid to get your hands dirty and embrace the learning process. Gardening is all about experimentation and discovery.
Now, we want to hear from you! Have you tried any of these DIY tricks for growing melons? What were your results? Do you have any other tips or tricks to share? Head over to the comments section and let us know. Your experiences can help other gardeners succeed and inspire them to try growing their own melons. Share your photos, your stories, and your questions – we’re all in this together! Happy gardening!
Frequently Asked Questions (FAQ)
What is the best time to start melon seeds indoors?
The ideal time to start melon seeds indoors is typically 4-6 weeks before the last expected frost in your area. This allows the seedlings to develop a strong root system before being transplanted outdoors. Check your local frost dates to determine the appropriate timing for your region. Starting too early can result in leggy, weak seedlings, while starting too late may delay your harvest.
What type of soil is best for growing melons?
Melons thrive in well-drained, fertile soil that is rich in organic matter. A sandy loam soil is ideal, as it provides good drainage and aeration. Before planting, amend your soil with compost, aged manure, or other organic materials to improve its fertility and drainage. Melons also prefer a slightly acidic to neutral soil pH, ideally between 6.0 and 7.0. You can test your soil pH using a soil testing kit and adjust it accordingly with lime or sulfur.
How often should I water my melon plants?
Melon plants need consistent moisture, especially during fruit development. Water deeply and regularly, aiming for about 1-2 inches of water per week. Avoid overhead watering, as this can increase the risk of fungal diseases. Instead, water at the base of the plants using a soaker hose or drip irrigation system. Monitor the soil moisture regularly and adjust your watering schedule as needed, depending on the weather conditions. During hot, dry periods, you may need to water more frequently.
How do I know when my melons are ripe?
Determining when a melon is ripe can be tricky, but there are a few telltale signs to look for. For cantaloupes, the stem should slip easily from the vine with a gentle tug. The skin should also turn from green to a tan or yellowish color, and the melon should have a fragrant aroma. For watermelons, look for a dull thud when you tap the melon, a yellow or cream-colored spot on the bottom where it rested on the ground, and a dried tendril near the stem. Honeydew melons are ripe when the skin turns a creamy yellow color and the blossom end feels slightly soft.
What are some common pests and diseases that affect melon plants?
Melon plants can be susceptible to various pests and diseases, including aphids, squash bugs, cucumber beetles, powdery mildew, and fusarium wilt. To prevent pest and disease problems, practice good garden hygiene, such as removing weeds and debris, and rotate your crops regularly. You can also use organic pest control methods, such as insecticidal soap, neem oil, or diatomaceous earth, to control pests. For fungal diseases, ensure good air circulation around your plants and avoid overhead watering. If necessary, you can use a fungicide to control the spread of disease.
How can I improve pollination for my melon plants?
Melons require pollination to set fruit. If you’re not seeing many bees or other pollinators in your garden, you may need to hand-pollinate your melon flowers. To hand-pollinate, use a small paintbrush to transfer pollen from the male flowers to the female flowers. Male flowers have a long, thin stem, while female flowers have a small, immature melon at the base. Pollinate early in the morning, when the flowers are open and the pollen is fresh. You can also attract more pollinators to your garden by planting pollinator-friendly flowers, such as sunflowers, zinnias, and lavender.
Can I grow melons in containers?
Yes, you can grow melons in containers, but you’ll need to choose a large container (at least 20 gallons) and select a compact or bush variety of melon. Use a high-quality potting mix and provide adequate support for the vines. Container-grown melons will also need more frequent watering and fertilization than those grown in the ground. Be sure to place your container in a sunny location that receives at least 6-8 hours of sunlight per day.
How do I store my harvested melons?
Once your melons are ripe, harvest them carefully and store them in a cool, dry place. Whole melons can be stored at room temperature for a few days or in the refrigerator for up to a week. Cut melons should be stored in an airtight container in the refrigerator and consumed within a few days. You can also freeze melon chunks for later use in smoothies or desserts.

Leave a Comment