

DIY Pineapple Farm: Ever dreamt of waking up to the sweet, tropical aroma of homegrown pineapples? I know I have! Forget those expensive grocery store pineapples – imagine plucking your own juicy fruit straight from your backyard. This isn’t just a pipe dream; it’s a surprisingly achievable reality with a little know-how and some DIY spirit.
Pineapples, originally native to South America, have a rich history, traveling the globe and becoming a symbol of hospitality and luxury. In colonial America, displaying a pineapple was a sign of wealth and welcome. Now, you can bring that same sense of abundance and tropical flair to your own home, no matter where you live!
Why embark on a DIY Pineapple Farm adventure? Well, for starters, it’s incredibly rewarding to nurture a plant from scraps to fruit. Plus, homegrown pineapples often taste sweeter and more flavorful than store-bought ones. But beyond the deliciousness, growing your own pineapples is a sustainable and eco-friendly way to enjoy this tropical treat. You’ll reduce your carbon footprint by avoiding transportation and packaging waste. And let’s be honest, who wouldn’t want to impress their friends and family with their green thumb and a homegrown pineapple?
This article will guide you through the entire process, from selecting the perfect pineapple top to harvesting your very own golden fruit. Get ready to transform your garden (or even your balcony!) into a mini tropical paradise. Let’s get started!
DIY Hanging Mint Garden: From Seed to Sip!
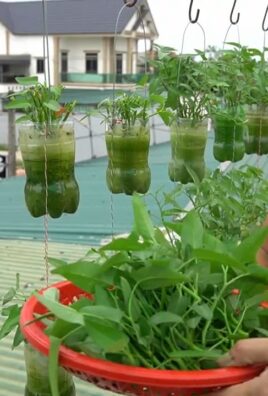
Hey there, fellow plant enthusiasts! I’m so excited to share this super easy and rewarding DIY project with you: creating your own hanging mint garden. Not only will it add a touch of green to your space, but you’ll also have a constant supply of fresh mint for mojitos, teas, or even just to add a refreshing aroma to your home. Let’s get started!
What You’ll Need:
Before we dive in, let’s gather our supplies. Don’t worry, most of these are easily accessible and won’t break the bank.
* **Hanging Basket:** Choose a basket that’s at least 10 inches in diameter to give your mint plenty of room to grow. I personally love the look of coco coir lined baskets, but plastic or metal will work just fine too. Just make sure it has drainage holes!
* **Potting Soil:** A good quality potting mix is crucial for healthy mint. Avoid using garden soil, as it can be too heavy and doesn’t drain well.
* **Mint Seeds or Seedlings:** You can start from seeds, which is a bit more time-consuming, or buy established seedlings from your local nursery. I usually opt for seedlings because I’m impatient!
* **Watering Can:** A watering can with a gentle spout is perfect for watering your delicate mint plants.
* **Scissors or Pruning Shears:** For harvesting and trimming your mint.
* **Gloves (Optional):** If you have sensitive skin, gloves can protect your hands from the soil.
* **Liner (Optional):** If your hanging basket isn’t lined, you might want to add a liner (like burlap or landscape fabric) to help retain moisture and prevent soil from falling out.
* **Slow-Release Fertilizer (Optional):** This will give your mint a boost of nutrients throughout the growing season.
Getting Started: Preparing Your Hanging Basket
This is where we lay the foundation for our minty masterpiece. A well-prepared basket will make all the difference in the long run.
1. **Line Your Basket (If Necessary):** If your basket doesn’t have a liner, cut a piece of burlap or landscape fabric to fit inside. Make sure it covers the bottom and sides, leaving a little extra to fold over the top. This will help prevent soil from escaping and keep the moisture in.
2. **Add Potting Soil:** Fill the basket about two-thirds full with potting soil. Gently pat it down to remove any air pockets. Don’t pack it too tightly, as you want the roots to be able to breathe.
3. **Water the Soil:** Give the soil a good watering until it’s evenly moist. This will help settle the soil and prepare it for planting.
Planting Your Mint: Seeds or Seedlings?
Now comes the fun part: bringing your mint to life! Whether you’re starting from seeds or using seedlings, the process is pretty straightforward.
Planting from Seeds:
This method requires a bit more patience, but it’s also very rewarding to watch your mint sprout from tiny seeds.
1. **Sow the Seeds:** Sprinkle the mint seeds evenly over the surface of the soil. Mint seeds are tiny, so don’t overdo it. A light dusting is all you need.
2. **Cover the Seeds:** Gently cover the seeds with a thin layer of potting soil. About 1/4 inch is perfect.
3. **Water Gently:** Use a spray bottle or a watering can with a fine mist to water the seeds. Be careful not to dislodge them.
4. **Provide Light and Warmth:** Place the hanging basket in a warm, sunny location. Mint needs at least 6 hours of sunlight per day to thrive.
5. **Keep the Soil Moist:** Keep the soil consistently moist, but not soggy. Check the soil daily and water as needed.
6. **Wait for Germination:** Mint seeds typically germinate in 10-14 days. Be patient, and you’ll soon see tiny green sprouts emerging from the soil.
Planting Seedlings:
This is the quicker and easier option, perfect for those who want instant gratification.
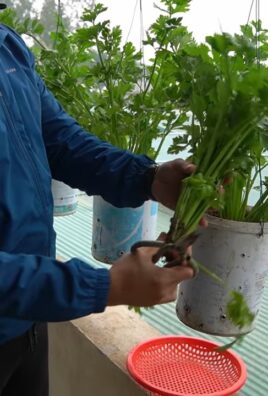
1. **Gently Remove Seedlings:** Carefully remove the mint seedlings from their nursery pots. Gently loosen the roots with your fingers to encourage them to spread out.
2. **Create Planting Holes:** Dig small holes in the soil, spacing them about 4-6 inches apart. The number of seedlings you plant will depend on the size of your hanging basket. I usually plant 3-4 seedlings in a 10-inch basket.
3. **Plant the Seedlings:** Place the seedlings in the holes and gently backfill with potting soil. Make sure the top of the root ball is level with the surrounding soil.
4. **Water Thoroughly:** Water the seedlings thoroughly until the water drains out of the bottom of the basket. This will help settle the soil and establish the roots.
Caring for Your Hanging Mint Garden:
Now that your mint is planted, it’s time to learn how to keep it happy and healthy. Mint is a relatively low-maintenance plant, but it does have a few basic needs.
1. **Watering:** Mint loves moisture, so water your hanging basket regularly, especially during hot, dry weather. Check the soil daily and water when the top inch feels dry to the touch. Be careful not to overwater, as this can lead to root rot.
2. **Sunlight:** Mint needs at least 6 hours of sunlight per day to thrive. Place your hanging basket in a sunny location, such as a patio, balcony, or near a window.
3. **Fertilizing:** Feed your mint with a balanced liquid fertilizer every 2-4 weeks during the growing season. This will help promote healthy growth and abundant foliage. Alternatively, you can use a slow-release fertilizer when you plant your mint.
4. **Pruning:** Regular pruning is essential for keeping your mint bushy and productive. Pinch off the tips of the stems to encourage branching. You can also harvest leaves as needed for cooking or tea.
5. **Pest Control:** Mint is generally pest-resistant, but it can occasionally be affected by aphids or spider mites. If you notice any pests, spray the plants with insecticidal soap or neem oil.
6. **Overwintering:** In colder climates, mint can be overwintered indoors. Bring your hanging basket inside before the first frost and place it in a sunny location. Water sparingly during the winter months.
Harvesting Your Mint:
The best part of growing your own mint is being able to harvest fresh leaves whenever you need them.
1. **Harvesting Leaves:** To harvest mint leaves, simply snip off the stems with scissors or pruning shears. You can harvest individual leaves or entire stems.
2. **Best Time to Harvest:** The best time to harvest mint is in the morning, after the dew has dried. This is when the leaves are at their most flavorful.
3. **Using Your Mint:** Fresh mint leaves can be used in a variety of ways, including teas, cocktails, salads, and desserts. You can also dry mint leaves for later use.
4. **Drying Mint:** To dry mint leaves, tie them in small bundles and hang them upside down in a cool, dry place. Once the leaves are completely dry, store them in an airtight container.
Troubleshooting: Common Mint Problems
Even with the best care, you might encounter a few problems with your mint. Here are some common issues and how to fix them:
* **Yellowing Leaves:** This can be caused by overwatering, underwatering, or nutrient deficiencies. Adjust your watering schedule and fertilize your mint regularly.
* **Leggy Growth:** This is usually caused by insufficient sunlight. Move your hanging basket to a sunnier location.
* **Pests:** As mentioned earlier, aphids and spider mites can sometimes attack mint. Treat them with insecticidal soap or neem oil.
* **Root Rot:** This is caused by overwatering and poor drainage. Make sure your hanging basket has drainage holes and avoid overwatering.
Choosing Your Mint Variety:
There are many different varieties of mint to choose from, each with its own unique flavor and aroma. Here are a few popular options:
* **Spearmint:** This is the most common type of mint, with a classic, refreshing flavor. It’s perfect for teas, cocktails, and desserts.
* **Peppermint:** This mint has a stronger, more intense flavor than spearmint. It’s often used in candies, gum, and digestive aids.
* **Chocolate Mint:** This mint has a subtle chocolate aroma and flavor. It’s delicious in desserts and teas.
* **Orange Mint:** This mint has a citrusy aroma and flavor. It’s great in salads, teas, and cocktails.
* **Apple Mint:** This mint has a fruity aroma and flavor. It’s delicious in salads, teas, and desserts.
I hope this guide has inspired you to create your own hanging mint garden! It’s a fun, easy, and rewarding project that will provide you with fresh mint for years to come. Happy

Conclusion
So, there you have it! Transforming your backyard, balcony, or even a sunny windowsill into a miniature DIY pineapple farm is not only achievable but also incredibly rewarding. We’ve walked you through the simple steps, from selecting the perfect pineapple top to nurturing your new plant into a fruit-bearing marvel. Why is this a must-try? Because it’s more than just growing a pineapple; it’s about connecting with nature, understanding the life cycle of a plant, and experiencing the unparalleled satisfaction of harvesting something you’ve cultivated yourself. Plus, let’s be honest, bragging rights are definitely a perk!
But the fun doesn’t stop with the basic method. Feel free to experiment! Consider using different types of soil to see which yields the best results in your climate. Try varying the amount of sunlight your pineapple plant receives to optimize its growth. For those in colder climates, consider growing your pineapple in a large pot that can be easily moved indoors during the winter months. You can even try propagating multiple pineapple tops at once to increase your chances of a successful harvest. Think about adding companion plants like basil or marigolds to deter pests naturally.
Don’t be afraid to get creative and personalize your pineapple-growing journey. The beauty of DIY projects lies in the opportunity to adapt and innovate.
And remember, patience is key. Growing a pineapple from a top takes time and dedication, but the end result – a delicious, homegrown pineapple – is well worth the wait. Imagine the taste of that first bite, knowing you nurtured it from a simple discarded top into a juicy, tropical treat.
We are confident that with a little effort and the guidance provided in this article, you can successfully cultivate your own DIY pineapple farm. We encourage you to embark on this exciting adventure and share your experiences with us. Post pictures of your pineapple plants, tell us about any challenges you faced, and let us know what variations you tried. Your insights could inspire others to take the plunge and discover the joy of growing their own pineapples.
So, grab a pineapple, enjoy the fruit, and get ready to start your very own DIY pineapple farm. Happy growing!
Frequently Asked Questions (FAQ)
How long does it take to grow a pineapple from a top?
Growing a pineapple from a top is a patience-testing process, but the reward is well worth the wait. Generally, it takes anywhere from 2 to 3 years for a pineapple plant grown from a top to produce its first fruit. Several factors influence this timeframe, including climate, soil quality, sunlight exposure, and the specific variety of pineapple. Warmer climates with consistent sunlight will typically see faster growth. Remember, consistency in watering and fertilizing is crucial for optimal development. Don’t get discouraged if you don’t see immediate results; the plant is likely focusing on root development during the initial stages.
What kind of soil is best for growing pineapples?
Pineapples thrive in well-draining, slightly acidic soil. A sandy loam soil is ideal, as it provides excellent drainage and aeration, preventing root rot. You can create a suitable soil mix by combining equal parts of potting soil, perlite, and sand. Avoid heavy clay soils, as they tend to retain too much moisture. The pH level of the soil should ideally be between 5.5 and 6.5. You can test the soil pH using a home testing kit and amend it accordingly. Adding organic matter, such as compost or well-rotted manure, can improve soil fertility and drainage.
How much sunlight do pineapples need?
Pineapples are sun-loving plants and require at least 6 hours of direct sunlight per day to thrive. Inadequate sunlight can lead to stunted growth and reduced fruit production. If you’re growing your pineapple indoors, place it near a south-facing window where it can receive ample sunlight. You may also supplement with artificial grow lights, especially during the winter months. When growing outdoors, choose a location that receives full sun throughout the day. Be mindful of potential shading from trees or buildings.
How often should I water my pineapple plant?
Watering frequency depends on several factors, including climate, soil type, and the size of the pot. Generally, water your pineapple plant when the top inch of soil feels dry to the touch. Avoid overwatering, as this can lead to root rot. During the warmer months, you may need to water more frequently. In the winter, reduce watering as the plant’s growth slows down. Ensure that the pot has adequate drainage holes to prevent waterlogging. A good rule of thumb is to water thoroughly until water drains out of the bottom of the pot.
What kind of fertilizer should I use for my pineapple plant?
Pineapples benefit from regular fertilization, especially during the growing season (spring and summer). Use a balanced fertilizer with an NPK ratio of 10-10-10 or 14-14-14. You can also use a fertilizer specifically formulated for bromeliads, as pineapples belong to the bromeliad family. Apply the fertilizer according to the manufacturer’s instructions, typically every 2-3 months. Avoid over-fertilizing, as this can burn the roots. You can also supplement with organic fertilizers, such as compost tea or fish emulsion.
How do I encourage my pineapple plant to fruit?
Getting your pineapple plant to fruit can sometimes be a challenge, but there are a few tricks you can try. One common method is to expose the plant to ethylene gas, which promotes flowering. You can do this by placing a ripe apple or banana near the plant and covering it with a plastic bag for a few days. The ripening fruit will release ethylene gas, which can trigger flowering. Another method is to water the plant with a solution of calcium carbide (available at garden centers) diluted in water. Follow the instructions carefully, as calcium carbide can be harmful if used improperly. Ensure the plant is mature enough (at least 2-3 years old) and has received adequate sunlight and nutrients before attempting to induce flowering.
My pineapple plant has brown tips on its leaves. What’s wrong?
Brown tips on pineapple leaves can be caused by several factors, including overwatering, underwatering, low humidity, or fertilizer burn. Check the soil moisture to ensure that you’re not overwatering or underwatering. If the soil is consistently dry, increase the watering frequency. If the soil is waterlogged, reduce watering and ensure that the pot has adequate drainage. Low humidity can also cause brown tips, especially in dry climates. You can increase humidity by misting the plant regularly or placing it on a tray filled with water and pebbles. If you suspect fertilizer burn, flush the soil with water to remove excess salts.
Can I grow a pineapple plant indoors?
Yes, you can successfully grow a pineapple plant indoors, provided you meet its basic requirements. Ensure that the plant receives at least 6 hours of direct sunlight per day, either from a south-facing window or with the help of artificial grow lights. Use a well-draining potting mix and water regularly, allowing the soil to dry slightly between waterings. Maintain adequate humidity by misting the plant regularly or placing it on a tray filled with water and pebbles. Choose a pot that is large enough to accommodate the plant’s root system. Be patient, as indoor-grown pineapples may take longer to fruit than those grown outdoors.
What pests and diseases affect pineapple plants?
Pineapple plants are generally resistant to pests and diseases, but they can occasionally be affected by mealybugs, scale insects, and root rot. Mealybugs and scale insects can be controlled with insecticidal soap or neem oil. Root rot is caused by overwatering and poor drainage. To prevent root rot, ensure that the soil is well-draining and avoid overwatering. If you notice signs of root rot, such as yellowing leaves and a foul odor, repot the plant in fresh soil and remove any affected roots. Regularly inspect your pineapple plant for signs of pests and diseases and take action promptly to prevent them from spreading.
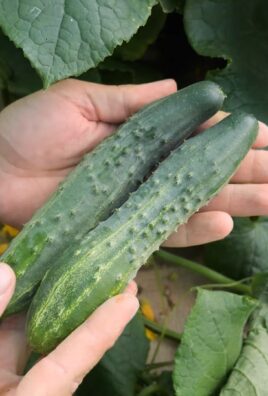
How do I harvest my pineapple?
Knowing when to harvest your pineapple is crucial for enjoying its optimal flavor and sweetness. The best indicator of ripeness is the color of the fruit. A ripe pineapple will typically turn from green to yellow or golden-orange. The fruit should also have a sweet, fragrant aroma. Gently tug on one of the leaves near the top of the pineapple. If it comes off easily, the pineapple is likely ripe. You can also tap the pineapple; a ripe pineapple will have a dull, hollow sound. To harvest, use a sharp knife to cut the pineapple from the plant, leaving a few inches of stem attached. Enjoy your homegrown pineapple!
Leave a Comment