

Container Gardening Summer Squash: Imagine harvesting plump, juicy summer squash right from your own patio! No sprawling garden needed. I know, it sounds too good to be true, right? But trust me, with a few clever tricks and a little DIY spirit, you can absolutely enjoy the taste of homegrown goodness, even in the smallest of spaces.
Growing vegetables in containers isn’t a new fad. In fact, container gardening has roots stretching back to ancient civilizations, where resourceful folks cultivated edibles in pots and troughs. Think of the Hanging Gardens of Babylon – a testament to human ingenuity in bringing nature closer to home! Today, we’re rediscovering this age-old practice, adapting it to our modern lives and limited spaces.
Why should you try container gardening summer squash? Well, for starters, it’s incredibly rewarding! There’s nothing quite like the satisfaction of nurturing a plant from seed to table. Plus, it’s a fantastic way to enjoy fresh, organic produce without the commitment of a traditional garden. And let’s be honest, who wouldn’t want to avoid battling weeds and pests in a huge plot? This DIY guide will give you all the insider tips and tricks you need to successfully grow summer squash in containers, from choosing the right pot and soil to maximizing your harvest. Get ready to unleash your inner gardener and enjoy the delicious rewards!
Container Gardening: Grow Your Own Summer Squash!
Hey there, fellow gardening enthusiasts! I’m so excited to share my experience with growing summer squash in containers. It’s a fantastic way to enjoy fresh, homegrown veggies even if you don’t have a sprawling backyard. Trust me, with a little planning and effort, you can have a bountiful harvest right on your patio or balcony. Let’s dive in!
Choosing the Right Squash Variety
First things first, not all summer squash varieties are created equal when it comes to container gardening. You’ll want to choose bush varieties, which are more compact and manageable than vining types. Here are a few of my favorites:
* ‘Spacemaster’ Zucchini: This is a classic choice, known for its compact size and prolific production. The fruits are dark green and delicious.
* ‘Bush Delicata’: If you’re looking for something a little different, try this butternut squash variety. It has a sweet, nutty flavor and a manageable bush habit.
* ‘Early Crookneck’: This yellow squash is an early producer and has a distinctive curved neck. It’s perfect for grilling or sautéing.
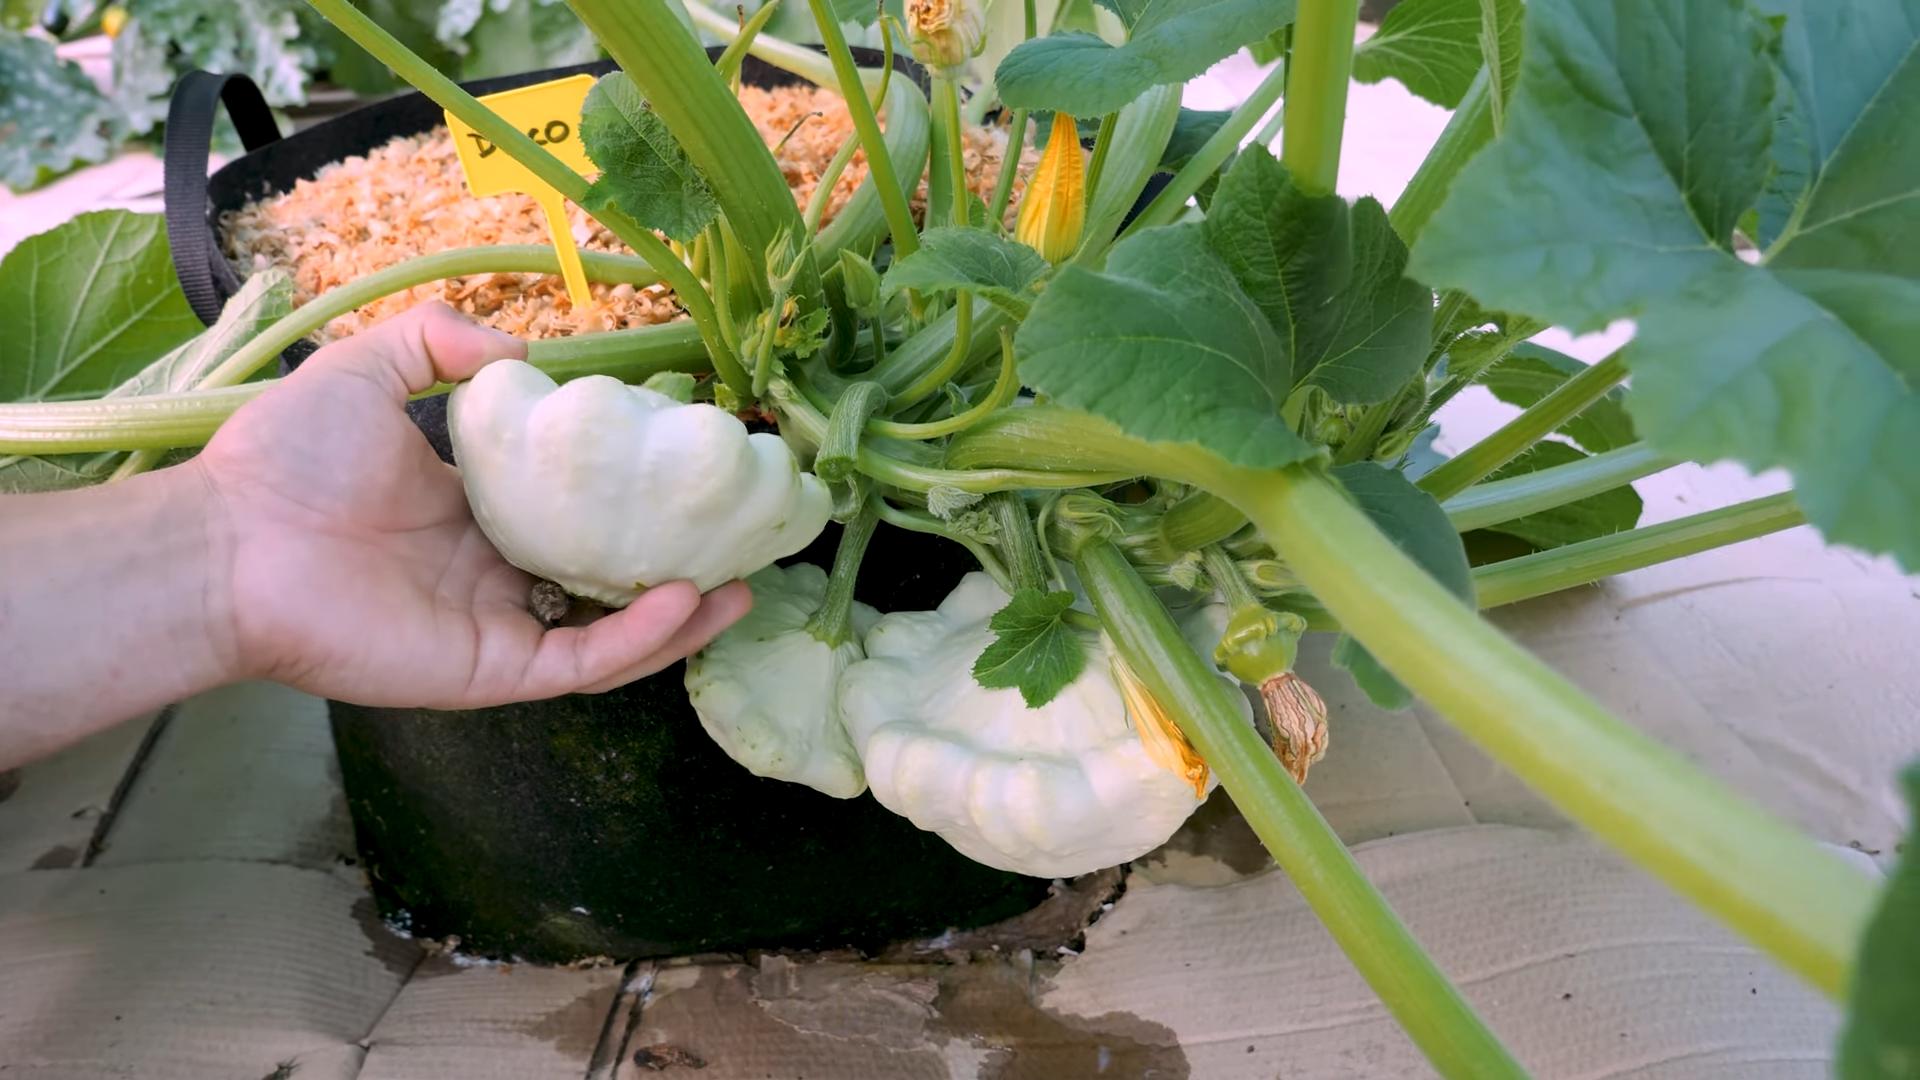
* ‘Patty Pan’ Squash: These come in various colors (yellow, green, white) and have a unique, scalloped shape. They’re fun to grow and add visual interest to your garden.
* ‘Gold Rush’ Zucchini: A beautiful golden zucchini that’s just as easy to grow as its green counterpart.
Gathering Your Supplies
Okay, now that we’ve picked our squash, let’s get our supplies in order. Here’s what you’ll need:
* Large Containers: This is crucial! Squash plants need plenty of room for their roots to grow. I recommend containers that are at least 24 inches in diameter and 24 inches deep. The bigger, the better, really.
* High-Quality Potting Mix: Don’t skimp on the potting mix! Use a well-draining mix that’s specifically formulated for containers. Avoid using garden soil, as it can become compacted and doesn’t drain well.
* Slow-Release Fertilizer: Squash plants are heavy feeders, so a slow-release fertilizer will provide them with the nutrients they need throughout the growing season. Look for a balanced formula (e.g., 10-10-10).
* Watering Can or Hose: You’ll need a reliable way to water your plants regularly.
* Trowel or Shovel: For planting and transplanting.
* Gardening Gloves: To protect your hands.
* Optional:
* Tomato Cage or Stake: To provide support for the plant as it grows. While bush varieties are compact, they can still get a bit unruly.
* Mulch: To help retain moisture and suppress weeds.
* Insecticidal Soap: To combat common squash pests like squash bugs and vine borers.
Step-by-Step Planting Guide
Alright, let’s get our hands dirty! Here’s how to plant your summer squash in containers:
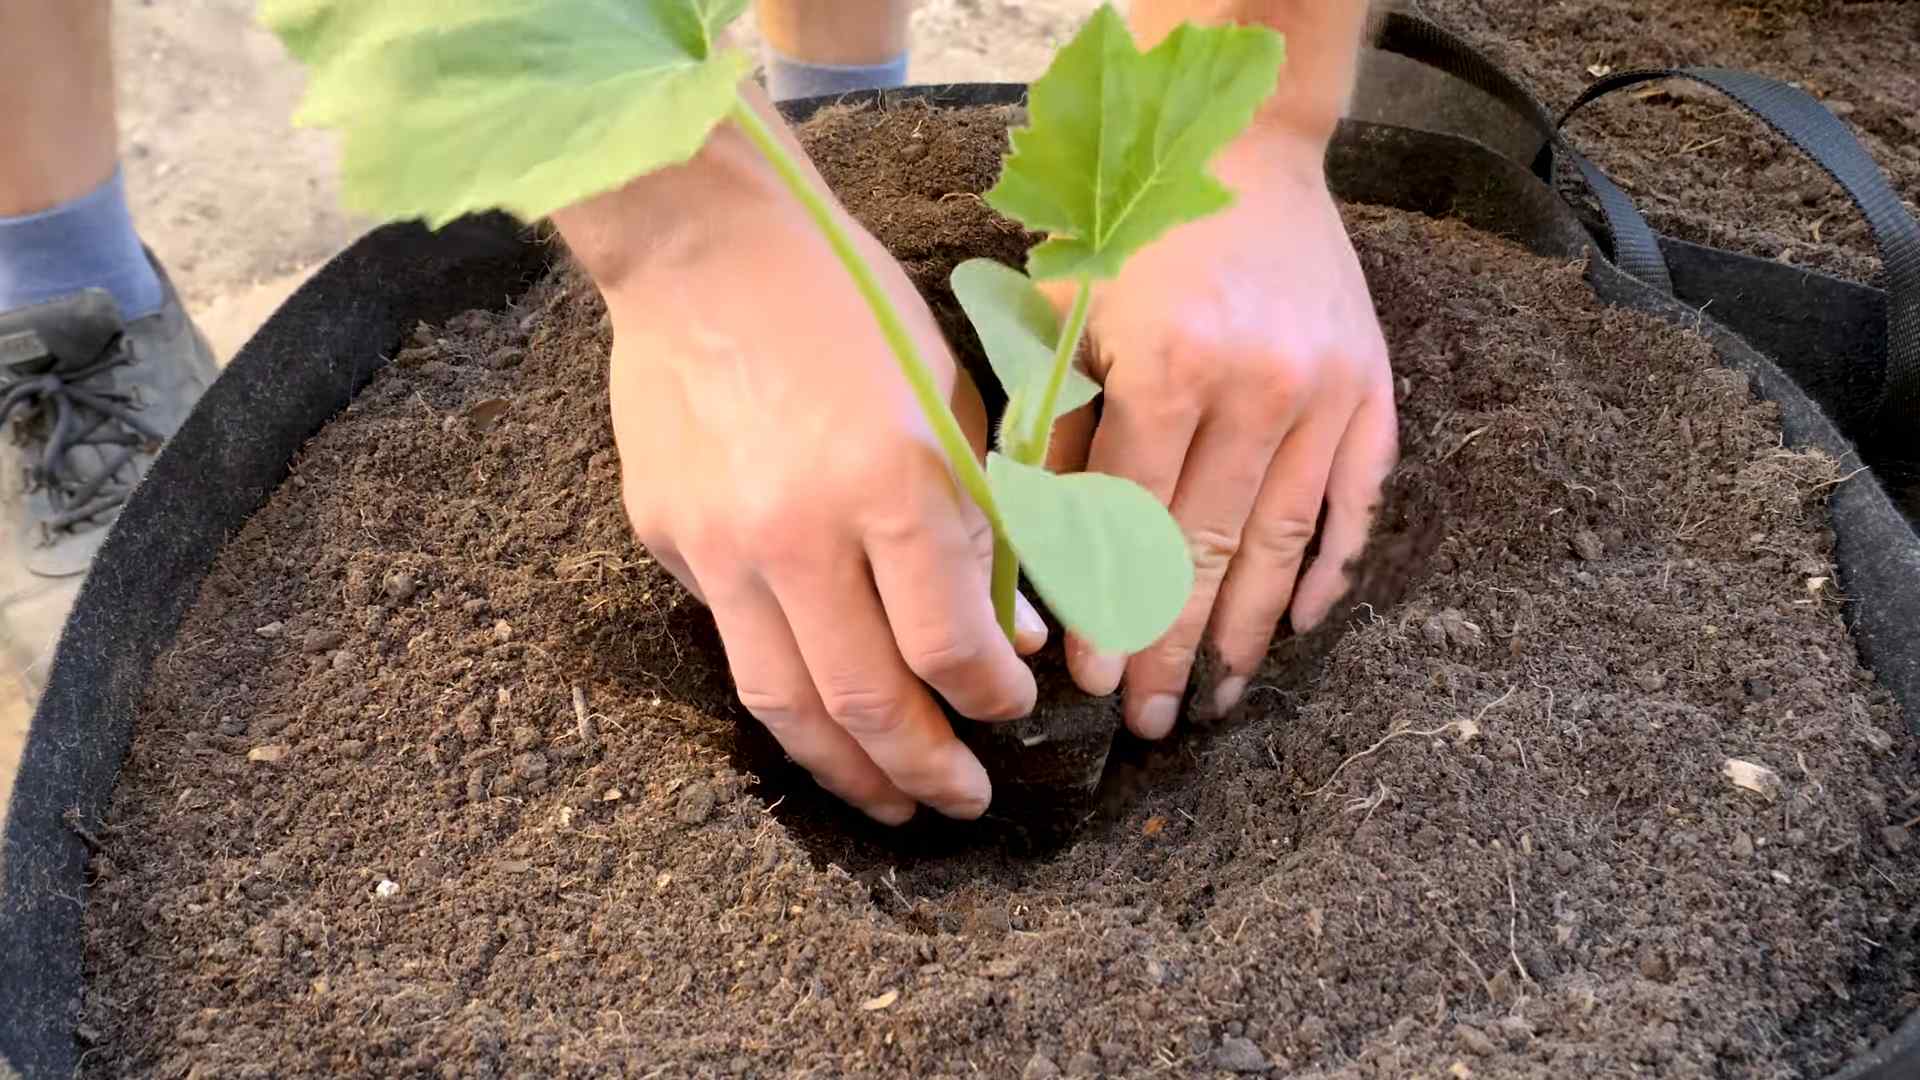
1. Prepare Your Containers: Start by cleaning your containers thoroughly. Make sure they have drainage holes at the bottom to prevent waterlogging.
2. Fill with Potting Mix: Fill each container with high-quality potting mix, leaving about 2-3 inches of space at the top.
3. Add Slow-Release Fertilizer: Sprinkle the slow-release fertilizer evenly over the surface of the potting mix, following the instructions on the fertilizer package. Gently mix it in.
4. Plant Your Seeds or Seedlings:
* From Seed: Sow 2-3 seeds per container, about 1 inch deep. Water gently. Once the seedlings emerge, thin them to one plant per container, selecting the strongest one.
* From Seedlings: Gently remove the seedling from its nursery pot. Loosen the roots slightly. Dig a hole in the potting mix that’s large enough to accommodate the root ball. Place the seedling in the hole and backfill with potting mix. Water thoroughly.
5. Water Thoroughly: After planting, water your squash plants thoroughly until water drains out of the drainage holes.
6. Mulch (Optional): Add a layer of mulch around the base of the plant to help retain moisture and suppress weeds. I like to use straw or wood chips.
7. Place in a Sunny Location: Summer squash needs at least 6-8 hours of sunlight per day. Choose a sunny spot on your patio or balcony where your plants will receive plenty of light.
Caring for Your Squash Plants
Now that your squash plants are in their containers, it’s time to provide them with the care they need to thrive.
1. Watering: Water your squash plants regularly, especially during hot, dry weather. Check the soil moisture by sticking your finger about an inch into the soil. If it feels dry, it’s time to water. Avoid overwatering, as this can lead to root rot. I usually water deeply every 2-3 days, but this will depend on your climate and the size of your containers.
2. Fertilizing: In addition to the slow-release fertilizer you added at planting, you can also supplement with a liquid fertilizer every 2-3 weeks. Look for a balanced fertilizer or one that’s specifically formulated for vegetables. Follow the instructions on the fertilizer package.
3. Pest Control: Keep an eye out for common squash pests like squash bugs, vine borers, and aphids. Inspect your plants regularly and take action as soon as you notice any signs of infestation. Insecticidal soap can be effective for controlling many of these pests. For vine borers, you might need to take more drastic measures, such as injecting Bacillus thuringiensis (Bt) into the stems.
4. Pollination: Squash plants have separate male and female flowers. The female flowers need to be pollinated in order to produce fruit. If you’re not seeing any fruit developing, you may need to hand-pollinate the flowers. To do this, use a small paintbrush to transfer pollen from the male flowers to the female flowers. The male flowers have a long, thin stem, while the female flowers have a small, immature fruit at the base.
5. Support (Optional): As your squash plants grow, they may need some support. A tomato cage or stake can help to keep the plants upright and prevent the fruits from touching the ground.
6. Pruning: While not always necessary, you can prune your squash plants to improve air circulation and encourage fruit production. Remove any yellowing or damaged leaves. You can also pinch off some of the side shoots to encourage the plant to focus its energy on producing fruit.
Harvesting Your Summer Squash
The best part of growing your own summer squash is, of course, the harvest! Here’s how to know when your squash is ready to pick:
* Size: Summer squash is best harvested when it’s young and tender. The size will vary depending on the variety, but generally, you should harvest zucchini when they’re about 6-8 inches long, crookneck squash when they’re about 4-6 inches long, and patty pan squash when they’re about 3-4 inches in diameter.
* Skin: The skin should be smooth and tender. If the skin is tough or hard, the squash is overripe.
* Stem: Use a sharp knife or pruning shears to cut the squash from the plant, leaving about 2 inches of stem attached.
Harvest your squash regularly to encourage the plant to produce more fruit. Summer squash is very productive, so you’ll likely be harvesting several times a week.
Troubleshooting
Even with the best care, you may encounter some problems when growing summer squash in containers. Here are a few common issues and how to address them:
* Yellowing Leaves: This can be caused by a variety of factors, including overwatering, underwatering, nutrient deficiencies, or pests. Check the soil moisture and adjust your watering accordingly. Fertilize your plants regularly. Inspect for pests and take action as needed.
* Powdery Mildew: This is a fungal disease that can cause a white, powdery coating on the leaves. Improve air circulation by pruning the plants. You can also treat with a fungicide.
* Blossom End Rot: This is a condition that causes the ends of the squash to rot. It’s usually caused by a calcium deficiency. Make sure your potting mix contains enough calcium. You can also add calcium to the soil by mixing in some bone meal or crushed eggshells.
* Lack of Fruit Production: This can be caused by a lack of pollination. Hand-pollinate the flowers if necessary. Make sure your plants are getting enough sunlight.
Enjoying Your Harvest
Now that you’ve harvested your delicious summer squash, it’s time to enjoy it! There are so many ways to prepare summer squash. Here are a few of my favorites:
* Grilled:
Conclusion
So, there you have it! Growing summer squash in containers isn’t just possible; it’s surprisingly rewarding. We’ve walked through the steps, from selecting the right variety and container size to nurturing your plants with the proper soil, sunlight, and watering techniques. You’ve learned how to combat common pests and diseases, and even how to hand-pollinate if needed. But why is this DIY container gardening trick a must-try?
Simply put, it democratizes gardening. No sprawling acreage is required, no back-breaking tilling of the soil. Whether you have a tiny balcony, a sunny patio, or just a small patch of concrete, you can experience the joy of harvesting your own fresh, delicious summer squash. Imagine the satisfaction of serving a meal featuring squash you nurtured from seed to table, knowing exactly where it came from and how it was grown.
Beyond the convenience and accessibility, container gardening offers a level of control that traditional gardening often lacks. You can easily move your plants to chase the sun, protect them from unexpected frosts, or isolate them if disease strikes. This control translates to healthier plants and a more bountiful harvest.
But the benefits extend beyond the practical. Gardening, in general, is a therapeutic activity. It connects us to nature, reduces stress, and provides a sense of accomplishment. Growing your own food, even in a small container, amplifies these benefits. It fosters a deeper appreciation for the food we eat and the effort it takes to produce it.
Ready to take your container gardening to the next level? Consider these variations:
* Vertical Gardening: If space is truly limited, explore vertical gardening options. Use trellises or cages to train your summer squash to grow upwards, maximizing your yield in a small footprint.
* Companion Planting: Plant basil, marigolds, or nasturtiums alongside your summer squash to deter pests and attract beneficial insects. These companion plants can also enhance the flavor of your squash.
* Succession Planting: Plant new seeds every few weeks to ensure a continuous harvest throughout the summer. This technique will keep your kitchen stocked with fresh squash all season long.
* Experiment with Varieties: Don’t be afraid to try different varieties of summer squash. From classic zucchini to vibrant yellow crookneck, there’s a squash out there to suit every taste.
Ultimately, the best way to learn is by doing. Don’t be intimidated by the prospect of container gardening. Start small, be patient, and learn from your mistakes. The rewards – fresh, delicious summer squash and the satisfaction of growing your own food – are well worth the effort.
So, grab a container, some soil, and a packet of summer squash seeds. Get your hands dirty and experience the joy of growing your own food. We encourage you to try this DIY container gardening trick and share your experiences with us! Post photos of your squash plants, share your tips and tricks, and let us know what you’ve learned. Together, we can create a community of container gardeners who are passionate about growing their own food. Happy gardening!
Frequently Asked Questions (FAQ)
What is the best type of summer squash to grow in a container?
Compact bush varieties like ‘Spacemaster’ zucchini, ‘Bush Delicata’, or ‘Patio Star’ zucchini are ideal for container gardening. These varieties are bred to be smaller and more manageable than their sprawling counterparts, making them well-suited for limited spaces. Avoid vining varieties, as they require extensive support and can quickly outgrow a container.
How big should my container be for summer squash?
A minimum of 15-20 gallons is recommended for each summer squash plant. The larger the container, the more room the roots have to grow, resulting in a healthier and more productive plant. Choose a container that is at least 18 inches in diameter and 18 inches deep. Make sure the container has drainage holes to prevent waterlogging.
What kind of soil should I use for container gardening summer squash?
Use a high-quality potting mix that is well-draining and rich in organic matter. Avoid using garden soil, as it can become compacted in containers and restrict root growth. A good potting mix will contain a blend of peat moss, perlite, and vermiculite. You can also amend the potting mix with compost or aged manure to provide additional nutrients.
How much sunlight does summer squash need?
Summer squash requires at least 6-8 hours of direct sunlight per day. Choose a location for your container that receives plenty of sunlight throughout the day. If you live in a hot climate, provide some afternoon shade to prevent the plants from overheating.
How often should I water my container-grown summer squash?
Water your summer squash regularly, especially during hot, dry weather. The soil should be kept consistently moist but not waterlogged. Check the soil moisture by sticking your finger into the soil. If the top inch of soil is dry, it’s time to water. Water deeply, until water drains out of the drainage holes. Avoid watering the foliage, as this can promote fungal diseases.
Do I need to fertilize my container-grown summer squash?
Yes, summer squash are heavy feeders and require regular fertilization. Use a balanced fertilizer (e.g., 10-10-10) every 2-3 weeks, following the instructions on the fertilizer label. You can also use a liquid fertilizer or compost tea to provide a boost of nutrients.
How do I deal with pests and diseases on my container-grown summer squash?
Monitor your plants regularly for pests and diseases. Common pests of summer squash include squash bugs, squash vine borers, and aphids. Control pests by handpicking them off the plants, using insecticidal soap, or applying neem oil. Common diseases of summer squash include powdery mildew and squash mosaic virus. Prevent diseases by providing good air circulation, avoiding overhead watering, and using disease-resistant varieties.
How do I hand-pollinate summer squash?
If you’re not seeing any squash developing, you may need to hand-pollinate the flowers. Summer squash has separate male and female flowers. The male flowers have a long, thin stem, while the female flowers have a small squash at the base. To hand-pollinate, use a small paintbrush or cotton swab to collect pollen from the male flower and transfer it to the female flower. Do this in the morning, when the flowers are open.
When is summer squash ready to harvest?
Summer squash is typically ready to harvest about 50-60 days after planting. Harvest the squash when it is young and tender, before the skin becomes tough. The size of the squash will vary depending on the variety. Zucchini is typically harvested when it is 6-8 inches long, while yellow squash is harvested when it is 4-6 inches long. Use a sharp knife to cut the squash from the plant, leaving a short stem attached.
Can I grow summer squash in containers indoors?
While possible, growing summer squash indoors can be challenging. They require a significant amount of light, which can be difficult to provide indoors without supplemental lighting. If you choose to grow summer squash indoors, use grow lights and ensure that the plants receive at least 12-14 hours of light per day. You will also need to hand-pollinate the flowers.

Leave a Comment