

Coconut shell lettuce garden: Ever dreamt of snipping fresh, crisp lettuce right from your own backyard, or even your balcony? I know I have! But what if I told you that dream could be a reality, and in the most charming, eco-friendly way possible? This DIY project isn’t just about growing lettuce; it’s about embracing sustainability and adding a touch of tropical flair to your gardening endeavors.
For centuries, coconuts have been a staple in tropical cultures, providing food, drink, and even shelter. But beyond their practical uses, the shells themselves have often been repurposed into beautiful and functional objects. Think bowls, utensils, and even musical instruments! Now, we’re adding another chapter to the coconut shell’s story: a delightful home for your leafy greens.
Let’s face it, gardening can sometimes feel intimidating, especially if you’re short on space or resources. That’s where this coconut shell lettuce garden hack comes in! It’s a fantastic way to recycle, reduce waste, and create a miniature garden that’s both visually appealing and incredibly productive. Plus, who can resist the charm of tiny lettuce plants nestled in a coconut shell? This DIY project is perfect for beginners, apartment dwellers, or anyone looking for a fun and sustainable way to grow their own food. So, grab your coconut shells, and let’s get gardening!

Coconut Shell Salad Garden: Your DIY Guide for Mini Vegetable Gardens
Hello dear garden friends! Have you ever wondered what to do with the empty coconut shells after you’ve enjoyed the delicious coconut water and flesh? Throw them away? Never! Let’s turn these natural containers into charming mini salad gardens! I’ll show you how to conjure up a small but fine salad garden from your coconut shells. It’s a super project for indoors and outdoors, sustainable, and just looks great!
Required Materials and Tools
Before we get started, here is a list of the things you’ll need:
- Empty coconut shells (preferably halved and cleaned)
- Drill with a small drill bit (for drainage holes)
- Potting soil (preferably organic quality)
- Lettuce seeds (different varieties for a colorful mix!)
- Small shovel or spoon
- Spray bottle with water
- Optional: Coconut coir or expanded clay pebbles (for better drainage)
- Optional: Acrylic paint and brushes (for decorating the shells)
- Optional: Clear varnish (to seal the painted shells)
Preparation of the Coconut Shells
Preparation is key! Clean shells are important to prevent pests or fungi from spreading.
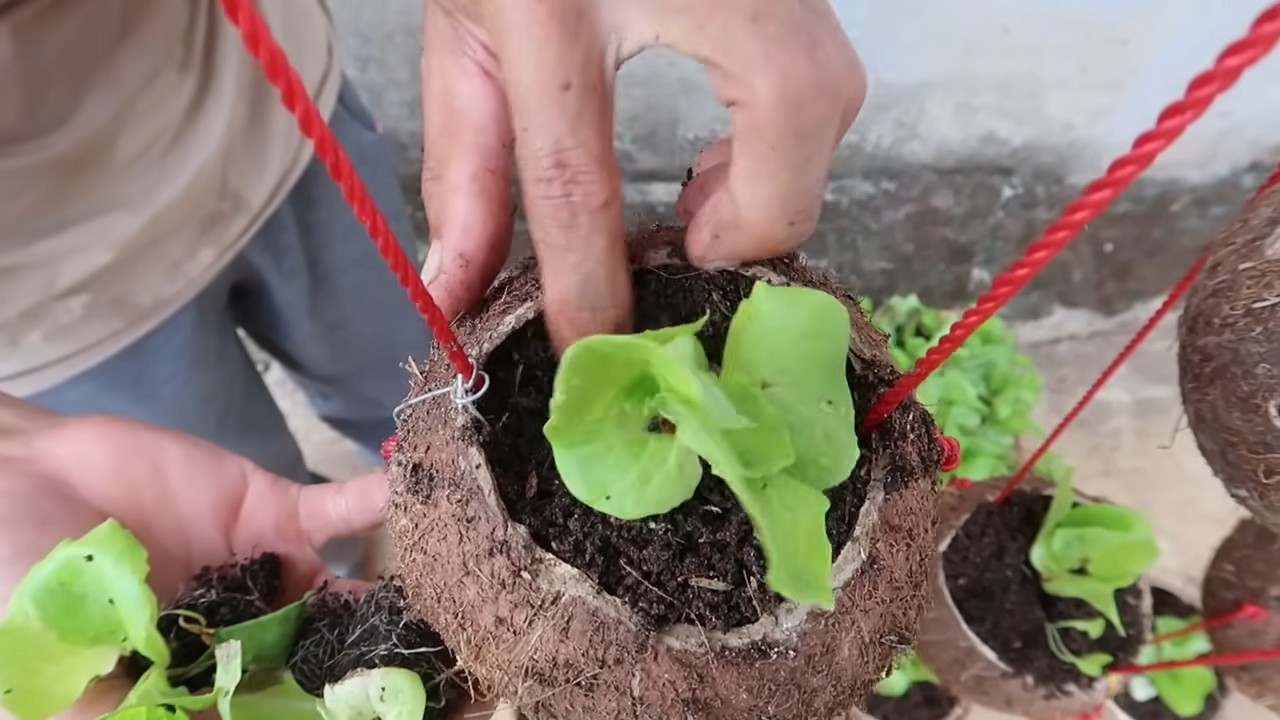
- Cleaning the shells: After removing the coconut water and flesh, rinse the shells thoroughly with warm water and dish soap. Remove all residues. Then let them dry well.
- Drilling drainage holes: This is super important! Lettuce doesn’t like waterlogging. Take your drill and carefully drill 3-4 small holes in the bottom of each shell. Be careful not to apply too much pressure, so the shell doesn’t break.
- Optional: Decorating the shells: Now for the creative part! If you want, you can paint the shells with acrylic paint. Let your imagination run wild! Whether colorful patterns, funny faces, or just a simple color – anything goes. Let the paint dry well before you continue. If you want to protect the painted shells from the elements, you can seal them with clear varnish.
Planting the Coconut Shells
Now we get down to business! We’re planting our little coconut gardens.
- Prepare drainage (optional): If you want, you can put a layer of coconut coir or expanded clay pebbles on the bottom of the shell. This provides even better drainage and prevents waterlogging.
- Fill with soil: Fill the shell with potting soil. Leave about 2-3 cm of space to the edge. Press the soil down lightly.
- Sow lettuce seeds: Distribute the lettuce seeds evenly on the soil. Be careful not to sow too many seeds at once, as the plants will otherwise be too close together. Follow the instructions on the seed packet regarding sowing depth. As a rule, lettuce seeds are only lightly covered with soil.
- Watering: Carefully spray the soil with water from the spray bottle. The soil should be moist, but not wet.
Caring for Your Coconut Shell Salad Garden
For your lettuce to grow well and thrive, it needs the right care.
- Location: Place your coconut shells in a bright spot, but avoid direct sunlight, especially during midday. A windowsill or a balcony with partial shade is ideal.
- Watering: Water the lettuce regularly, but not too much. The soil should always be slightly moist. Avoid waterlogging. It’s best to test with your finger whether the soil is dry before you water.
- Fertilizing (optional): If you want, you can fertilize the lettuce every few weeks with an organic liquid fertilizer. Follow the instructions on the fertilizer package.
- Pest protection: Watch out for pests like aphids or snails. If necessary, you can use organic pesticides.
- Harvesting: Depending on the lettuce variety, you can start harvesting after a few weeks. Simply cut the leaves with scissors. The lettuce will then grow back.
Variety in the Coconut Shell Salad Garden
The great thing about a mini salad garden is that you can grow different varieties. Here are a few ideas:
- Head lettuce: Classic and easy to grow.
- Loose-leaf lettuce: Ideal, as you can repeatedly harvest individual leaves.
- Arugula: For a spicy note.
- Lamb’s lettuce (Mâche): A good choice, especially in winter.
- Baby leaf mixes: A colorful mix of different lettuce varieties.
Common Problems and Solutions
Problems can also arise when growing lettuce. Here are a few tips on how to solve them:
- Yellow leaves: Can be a sign of too much or too little water. Check the moisture of the soil and adjust watering accordingly.
- Mold: Can be caused by too high humidity or waterlogging. Ensure good ventilation and avoid waterlogging.
- Pests: Combat pests with organic pesticides.
More Ideas for Your Coconut Shell Garden
There are no limits to your creativity! Here are a few more ideas:
- Herb garden: Instead of lettuce, you can also grow herbs like basil, parsley, or chives in the coconut shells.
- Succulents: Coconut shells are also excellent for succulents.
- Vertical garden: Attach the coconut shells to a wall or a fence to create a vertical garden.
- Gifts: Give planted coconut shells as gifts to friends and family.
Conclusion
I hope this guide has inspired you to create your own coconut shell salad garden. It is a simple, sustainable, and rewarding project that brings fresh lettuce right to your doorstep. Happy gardening! And remember: even small gardens can bring great joy!
Conclusion
So, there you have it! Transforming discarded coconut shells into charming and functional lettuce gardens is not just a sustainable practice; it’s a rewarding and creative endeavor that brings a touch of the tropics to your home. We’ve explored how to repurpose these readily available materials into miniature ecosystems perfect for nurturing fresh, crisp lettuce right at your fingertips.
Why is this DIY trick a must-try? Because it’s a win-win-win! You’re reducing waste by giving coconut shells a new lease on life, you’re creating a beautiful and unique garden feature, and you’re gaining access to fresh, organic lettuce whenever you desire. It’s a project that’s kind to the planet, easy on the wallet, and incredibly satisfying to complete.
Beyond the basic method we’ve outlined, the possibilities for customization are endless. Consider painting your coconut shell planters with vibrant colors or intricate designs to match your personal style. You could also experiment with different types of lettuce, from the classic Romaine to the peppery Arugula, or even mix in other leafy greens like spinach or kale for a diverse and nutritious harvest. For a more advanced setup, explore adding a self-watering system using a wick or reservoir to minimize maintenance. You can also try grouping several coconut shell lettuce gardens together to create a stunning vertical display. Think about adding small decorative stones or pebbles to the top of the soil for a polished look.
This coconut shell lettuce garden is more than just a gardening project; it’s a statement about sustainability and creativity. It’s a conversation starter, a source of fresh produce, and a testament to the power of repurposing.
We wholeheartedly encourage you to give this DIY project a try. It’s a fantastic way to connect with nature, reduce your environmental footprint, and enjoy the delicious rewards of homegrown lettuce. Don’t be afraid to experiment, get creative, and personalize your coconut shell gardens to reflect your unique style.
Once you’ve created your own miniature lettuce paradise, we’d love to hear about your experience! Share your photos, tips, and variations with us in the comments below. Let’s inspire each other to embrace sustainable gardening practices and transform everyday materials into something beautiful and useful. Happy gardening!
Frequently Asked Questions (FAQ)
What kind of lettuce grows best in coconut shells?
Generally, loose-leaf lettuce varieties like Romaine, Butterhead, and Arugula tend to thrive in smaller containers like coconut shells. These types don’t require as much space for their root systems to develop compared to head lettuce varieties. You can also successfully grow baby leaf lettuce mixes, harvesting them when they are young and tender. Consider the amount of sunlight your coconut shell garden will receive when choosing your lettuce variety. Some varieties are more tolerant of shade than others.
How often should I water my coconut shell lettuce garden?
The watering frequency will depend on several factors, including the climate, the type of soil you’re using, and the size of the coconut shell. As a general rule, check the soil moisture daily. If the top inch of soil feels dry to the touch, it’s time to water. Avoid overwatering, as this can lead to root rot. Ensure that your coconut shell has adequate drainage holes to prevent water from pooling at the bottom. During hot and dry periods, you may need to water more frequently.
What type of soil is best for growing lettuce in coconut shells?
A well-draining potting mix is ideal for growing lettuce in coconut shells. Avoid using garden soil, as it can be too heavy and compact, hindering root growth. Look for a potting mix that contains ingredients like peat moss, perlite, and vermiculite, which promote good drainage and aeration. You can also amend your potting mix with compost to provide additional nutrients for your lettuce plants.
How much sunlight does my coconut shell lettuce garden need?
Lettuce generally requires at least 4-6 hours of sunlight per day. However, in hotter climates, providing some afternoon shade can prevent the leaves from wilting or burning. Place your coconut shell lettuce garden in a location that receives morning sun and afternoon shade, or use a shade cloth to protect your plants during the hottest part of the day. If you don’t have access to enough natural sunlight, you can supplement with grow lights.
How do I fertilize my coconut shell lettuce garden?
Lettuce is a relatively light feeder, but it will still benefit from regular fertilization. Use a balanced liquid fertilizer diluted to half strength every 2-3 weeks. You can also incorporate slow-release fertilizer granules into the potting mix at planting time. Avoid over-fertilizing, as this can lead to leggy growth and bitter-tasting leaves. Organic fertilizers, such as compost tea or fish emulsion, are also excellent options for feeding your lettuce plants.
How do I prevent pests and diseases in my coconut shell lettuce garden?
Regularly inspect your lettuce plants for signs of pests or diseases. Common pests that affect lettuce include aphids, slugs, and snails. You can control aphids with insecticidal soap or by handpicking them off the leaves. Slugs and snails can be trapped using beer traps or by applying diatomaceous earth around the base of the plants. To prevent fungal diseases, ensure good air circulation around your plants and avoid overwatering. Remove any infected leaves promptly to prevent the spread of disease.
How long does it take for lettuce to grow in coconut shells?
The time it takes for lettuce to grow will depend on the variety and the growing conditions. Generally, loose-leaf lettuce varieties can be harvested in as little as 3-4 weeks after planting. Head lettuce varieties take longer, typically 6-8 weeks. You can start harvesting lettuce leaves when they are about 4-6 inches long. Cut the outer leaves first, allowing the inner leaves to continue to grow.
Can I grow other plants besides lettuce in coconut shells?
Yes, you can grow other small herbs and vegetables in coconut shells, such as spinach, kale, radishes, and herbs like basil, parsley, and chives. Choose plants that have shallow root systems and don’t require a lot of space. Be sure to provide adequate drainage and nutrients for the plants you choose to grow.
How do I prepare the coconut shell for planting?
Before planting, thoroughly clean the coconut shell to remove any remaining coconut flesh or fibers. Drill drainage holes in the bottom of the shell to prevent waterlogging. You can also line the inside of the shell with a layer of landscape fabric or burlap to help retain moisture and prevent soil from washing out.
What do I do with my coconut shell lettuce garden in the winter?
If you live in a climate with cold winters, you may need to bring your coconut shell lettuce garden indoors. Place it in a sunny location or under grow lights. Keep the soil moist but not soggy, and monitor for pests and diseases. You can also overwinter lettuce plants in a cold frame or greenhouse.
Leave a Comment