

Bottle Grown Peppers: Imagine harvesting vibrant, flavorful peppers right from your windowsill, even if you don’t have a sprawling garden! Sounds too good to be true? Well, get ready to be amazed because this DIY guide will unlock the secrets to growing peppers in recycled bottles.
For centuries, resourceful gardeners have sought innovative ways to cultivate their own food, often driven by necessity or a desire for fresh, local produce. From ancient rooftop gardens in Babylon to the modern-day victory gardens of wartime, the spirit of self-sufficiency through gardening has always thrived. Now, we’re taking that spirit and shrinking it down to a single bottle!
Let’s face it, not everyone has the space, time, or ideal climate for a traditional garden. But that shouldn’t stop you from enjoying the taste of homegrown goodness. This bottle grown peppers method is perfect for apartment dwellers, beginner gardeners, or anyone looking for a fun and sustainable way to add a little spice to their life. Plus, it’s incredibly rewarding to watch a tiny seed transform into a thriving plant, all within the confines of a recycled bottle. So, grab your supplies, and let’s get growing!

DIY Bottle Grown Peppers: A Fun and Frugal Gardening Project
Hey there, fellow gardening enthusiasts! Ever thought about growing peppers in a bottle? It’s a surprisingly simple and rewarding project, perfect for small spaces, beginners, or anyone looking for a unique gardening experience. I’ve been doing this for a few years now, and I’m always amazed at how well peppers thrive in these recycled containers. Plus, it’s a fantastic way to reduce waste and add a pop of green to your balcony, patio, or even a sunny windowsill. Let’s dive in!
What You’ll Need
Before we get started, let’s gather our supplies. This is a pretty low-cost project, which is always a win in my book!
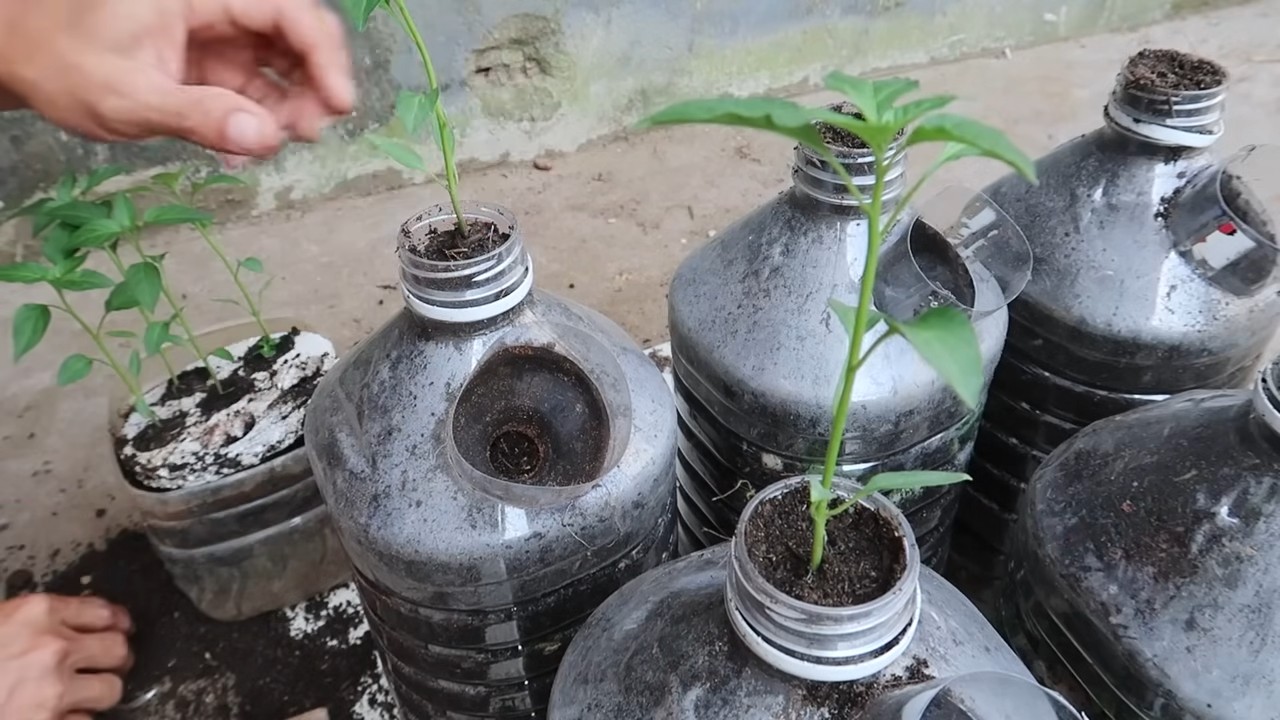
* Plastic Bottles: The star of the show! I usually use 2-liter soda bottles, but any similar-sized plastic bottle will work. Just make sure they’re clean and have a wide enough mouth to easily plant your pepper seedlings.
* Pepper Seedlings: You can start your own from seeds (which is super rewarding!), or you can buy established seedlings from your local garden center. I recommend choosing compact pepper varieties like bell peppers, jalapenos, or chili peppers, as they tend to do better in containers.
* Potting Mix: This is crucial! Don’t use garden soil, as it’s too heavy and doesn’t drain well in containers. Opt for a high-quality potting mix that’s specifically formulated for container gardening.
* Drainage Material: Gravel, pebbles, or even broken pieces of terracotta pots work great for this. This will help prevent waterlogging and keep your pepper plants happy.
* Scissors or a Utility Knife: For cutting the bottles. Be careful!
* Watering Can or Hose: For, well, watering!
* Optional: Liquid Fertilizer: A balanced liquid fertilizer will give your pepper plants a boost and encourage healthy growth and abundant fruit production.
* Optional: Gloves: To keep your hands clean. I always wear them!
Preparing the Bottles
This is where we transform those humble plastic bottles into mini-gardens.
1. Clean the Bottles: Thoroughly wash the bottles with soap and water to remove any residue. Rinse them well and let them dry completely. This is important to prevent any unwanted bacteria or mold from affecting your plants.
2. Cut the Bottles: This is where the scissors or utility knife comes in. You have a couple of options here:
* Option 1: Cut the bottle in half. Discard the top half (or save it for another project!). This creates a simple, open container.
* Option 2: Cut the bottle about two-thirds of the way up. Invert the top portion and place it inside the bottom portion, creating a self-watering system. You’ll need to drill a few small holes in the bottle cap to allow water to wick up to the soil. This is my preferred method, as it helps to keep the soil consistently moist.
3. Drill Drainage Holes (if necessary): If you’re using the first option (cutting the bottle in half), you’ll need to drill drainage holes in the bottom of the bottle. I usually drill about 4-5 holes, each about ¼ inch in diameter. If you’re using the self-watering method, you don’t need to drill drainage holes in the bottom portion, as the water will be contained in the reservoir.
4. (Optional) Decorate the Bottles: This is where you can get creative! You can paint the bottles, cover them with fabric, or even decorate them with mosaic tiles. Just make sure to use non-toxic materials that won’t leach harmful chemicals into the soil. I sometimes use spray paint designed for plastic.
Planting Your Pepper Seedlings
Now for the fun part – planting!
1. Add Drainage Material: Place a layer of drainage material (gravel, pebbles, etc.) at the bottom of the bottle. This will help to prevent the roots from sitting in water and rotting. I usually add about an inch or two of drainage material.
2. Add Potting Mix: Fill the bottle with potting mix, leaving about an inch or two of space at the top. Gently pat down the soil to remove any air pockets.
3. Plant the Seedling: Carefully remove the pepper seedling from its container. Gently loosen the roots with your fingers. Dig a small hole in the potting mix and place the seedling in the hole. Make sure the top of the root ball is level with the surface of the soil.
4. Fill in with Potting Mix: Fill in the hole with potting mix and gently pat down the soil around the seedling.
5. Water Thoroughly: Water the seedling thoroughly until water drains out of the drainage holes (if you have them). This will help to settle the soil and ensure that the roots are well-hydrated.
Caring for Your Bottle Grown Peppers
Now that your pepper plants are planted, it’s time to give them the care they need to thrive.
* Sunlight: Peppers need at least 6-8 hours of sunlight per day. Place your bottle-grown peppers in a sunny location, such as a balcony, patio, or windowsill. If you don’t have enough natural sunlight, you can supplement with grow lights.
* Watering: Water your pepper plants regularly, especially during hot, dry weather. Check the soil moisture by sticking your finger into the soil. If the top inch of soil feels dry, it’s time to water. Be careful not to overwater, as this can lead to root rot. If you’re using the self-watering method, simply refill the water reservoir when it’s empty.
* Fertilizing: Feed your pepper plants with a balanced liquid fertilizer every 2-3 weeks. Follow the instructions on the fertilizer label. I like to use a fertilizer that’s specifically formulated for vegetables.
* Pruning: Pruning your pepper plants can help to encourage bushier growth and more fruit production. Remove any yellowing or dead leaves. You can also pinch off the tips of the branches to encourage branching.
* Pest Control: Keep an eye out for pests, such as aphids, spider mites, and whiteflies. If you notice any pests, treat them with an insecticidal soap or neem oil. I prefer to use organic pest control methods whenever possible.
* Support: As your pepper plants grow, they may need support to prevent them from falling over. You can use stakes, trellises, or even tomato cages to provide support.
* Pollination: Peppers are self-pollinating, but you can help them along by gently shaking the plants or using a small paintbrush to transfer pollen from one flower to another. This is especially important if you’re growing your peppers indoors.
Harvesting Your Peppers
The best part of growing your own peppers is, of course, harvesting them!
* When to Harvest: The timing of the harvest depends on the variety of pepper you’re growing. Bell peppers are typically harvested when they’re fully colored and firm to the touch. Jalapenos are usually harvested when they’re green and about 2-3 inches long. Chili peppers can be harvested when they’re red and fully mature.
* How to Harvest: Use scissors or pruning shears to cut the peppers from the plant. Be careful not to damage the plant.
* Enjoy Your Harvest: Now it’s time to enjoy the fruits (or rather, vegetables!) of your labor. Use your homegrown peppers in your favorite recipes, or simply enjoy them fresh off the plant.
Troubleshooting
Even with the best care, you may encounter some problems along the way. Here are a few common issues and how to address them:
* Yellowing Leaves: This can be caused by a number of factors, including overwatering, underwatering, nutrient deficiencies, or pests. Check the soil moisture and adjust your watering accordingly. Fertilize your plants with a balanced liquid fertilizer. Inspect your plants for pests and treat them as needed.
* Blossom End Rot: This is a condition that causes the bottom of the peppers to rot. It’s usually caused by a calcium deficiency. Add calcium to the soil by mixing in bone meal or crushed eggshells.
* Lack of Fruit Production: This can be caused by a lack of sunlight, poor pollination, or nutrient deficiencies. Make sure your plants are getting enough sunlight. Help with pollination by gently shaking the plants or using a small paintbrush to transfer pollen from one flower to another. Fertilize your plants with a balanced liquid fertilizer.
* Pests: As mentioned earlier, keep an eye out for pests and treat them with an insecticidal soap or neem oil.
Tips for Success
Here are a few extra tips to help you succeed with your bottle-grown peppers:
* Choose the Right Variety: As I mentioned earlier, compact pepper varieties tend to do better in containers.
* Use High-Quality Potting Mix: Don’t skimp on the potting mix
Conclusion
So, there you have it! Growing your own peppers in bottles is not just a quirky gardening experiment; it’s a genuinely effective and rewarding way to cultivate these vibrant vegetables, even with limited space or resources. We’ve explored the simplicity and sustainability of this method, highlighting how it transforms discarded plastic bottles into miniature pepper paradises.
Why is this DIY trick a must-try? Because it democratizes gardening. It removes the barriers of large plots of land, expensive equipment, and extensive gardening knowledge. Anyone, anywhere, can participate in the joy of growing their own food. Imagine the satisfaction of harvesting fresh, flavorful peppers grown right on your windowsill or balcony, all thanks to a repurposed plastic bottle. It’s a tangible connection to nature, a step towards self-sufficiency, and a fantastic conversation starter, all rolled into one.
Beyond the practical benefits, bottle-grown peppers offer a unique aesthetic appeal. The colorful peppers contrasting against the clear or decorated bottles create a visually stunning display. It’s a living art piece that adds a touch of green to any space.
But the beauty of this method lies in its adaptability. Feel free to experiment with different types of peppers. Start with easy-to-grow varieties like bell peppers or jalapeños, and then venture into more exotic options like habaneros or Scotch bonnets as you gain confidence. Consider using different types of bottles too. While standard water or soda bottles work well, you can also use larger juice bottles or even repurposed milk jugs for larger pepper varieties.
Don’t be afraid to get creative with your growing medium. While we recommended a standard potting mix, you can also incorporate compost, vermicompost, or even coconut coir for added nutrients and improved drainage. Remember to adjust your watering schedule based on the type of medium you use.
Another exciting variation is to explore hydroponics. With a few simple modifications, you can convert your bottle-grown pepper setup into a hydroponic system, eliminating the need for soil altogether. This can lead to faster growth and higher yields.
The possibilities are endless! The key is to embrace the spirit of experimentation and learn from your experiences. Each bottle-grown pepper plant is a unique learning opportunity.
We wholeheartedly encourage you to try this DIY trick and experience the magic of growing your own peppers in bottles. It’s a fun, sustainable, and incredibly rewarding project that will transform the way you think about gardening.
Once you’ve embarked on your bottle-grown pepper adventure, we’d love to hear about your experiences! Share your photos, tips, and challenges in the comments section below. Let’s create a community of bottle-grown pepper enthusiasts and inspire others to join the movement. Together, we can prove that even the smallest spaces can yield bountiful harvests. So, grab a bottle, some soil, and a pepper seed, and get growing! You’ll be amazed at what you can achieve. Remember, the best way to learn is by doing, and the most delicious peppers are the ones you grow yourself. Embrace the challenge, enjoy the process, and savor the flavor of your homegrown bottle-grown peppers!
Frequently Asked Questions (FAQ)
What kind of peppers are best for growing in bottles?
The best peppers for bottle growing are typically smaller varieties that don’t require extensive root systems. Bell peppers, jalapeños, chili peppers, and smaller sweet peppers like banana peppers are excellent choices. However, with proper care and larger bottles, you can even attempt to grow larger varieties. Start with easier-to-grow types to gain experience before moving on to more demanding peppers. Consider the size of the bottle you’re using and choose a pepper variety that will thrive in that space. Also, think about your local climate and choose peppers that are well-suited to your growing conditions.
How often should I water my bottle-grown peppers?
Watering frequency depends on several factors, including the size of the bottle, the type of potting mix, the temperature, and the humidity. Generally, you should water your peppers when the top inch of soil feels dry to the touch. Avoid overwatering, as this can lead to root rot. Ensure the bottle has adequate drainage to prevent water from pooling at the bottom. During hot weather, you may need to water more frequently, possibly even daily. In cooler weather, you can reduce the watering frequency. Observe your plants closely and adjust your watering schedule accordingly. A good rule of thumb is to water deeply but infrequently, allowing the soil to dry out slightly between waterings.
What kind of soil should I use for bottle-grown peppers?
A well-draining potting mix is essential for bottle-grown peppers. Avoid using garden soil, as it can be too heavy and compact, leading to poor drainage and root problems. A good potting mix will contain a blend of peat moss, perlite, and vermiculite. You can also add compost or other organic matter to improve the soil’s fertility and water retention. Consider using a potting mix specifically formulated for vegetables, as these mixes often contain added nutrients that will benefit your pepper plants. Ensure the soil is loose and airy to allow for good root development.
Do bottle-grown peppers need fertilizer?
Yes, bottle-grown peppers benefit from regular fertilization. As they grow in a limited space, they rely on you to provide them with the nutrients they need. Use a balanced fertilizer specifically formulated for vegetables. Follow the instructions on the fertilizer package carefully, as over-fertilizing can damage your plants. You can also use organic fertilizers like compost tea or fish emulsion. Fertilize your peppers every two to four weeks during the growing season. Look for signs of nutrient deficiencies, such as yellowing leaves or stunted growth, and adjust your fertilization schedule accordingly.
How much sunlight do bottle-grown peppers need?
Peppers need at least six to eight hours of direct sunlight per day to thrive. Place your bottle-grown peppers in a sunny location, such as a south-facing window or balcony. If you don’t have access to enough natural sunlight, you can supplement with grow lights. Rotate your plants regularly to ensure they receive even sunlight exposure. Insufficient sunlight can lead to leggy growth and reduced pepper production. Monitor your plants closely and adjust their position as needed to ensure they are receiving adequate sunlight.
How do I prevent pests and diseases in my bottle-grown peppers?
Prevention is key when it comes to pests and diseases. Start by using clean bottles and fresh potting mix. Inspect your plants regularly for signs of pests or diseases. Common pests that affect peppers include aphids, spider mites, and whiteflies. You can control these pests with insecticidal soap or neem oil. Diseases like powdery mildew and blossom end rot can also affect peppers. Ensure good air circulation around your plants and avoid overwatering to prevent these diseases. If you notice any signs of pests or diseases, treat them promptly to prevent them from spreading.
Can I grow peppers indoors year-round in bottles?
Yes, you can grow peppers indoors year-round in bottles, provided you provide them with the necessary conditions. This includes adequate sunlight (or grow lights), proper watering, fertilization, and pest control. Choose pepper varieties that are well-suited to indoor growing. Be aware that indoor-grown peppers may not produce as many peppers as those grown outdoors. However, with proper care, you can enjoy a continuous harvest of fresh peppers throughout the year.
How long does it take for bottle-grown peppers to produce fruit?
The time it takes for bottle-grown peppers to produce fruit depends on the variety of pepper, the growing conditions, and the size of the plant. Generally, it takes about 60 to 90 days from planting to harvest. Some faster-maturing varieties may produce fruit in as little as 50 days, while slower-maturing varieties may take longer. Provide your plants with optimal growing conditions to encourage faster fruit production. Be patient and remember that growing peppers takes time.
What do I do if my bottle-grown peppers aren’t producing fruit?
If your bottle-grown peppers aren’t producing fruit, there could be several reasons. First, ensure they are receiving enough sunlight. Peppers need at least six to eight hours of direct sunlight per day to produce fruit. Second, check your watering and fertilization schedule. Overwatering or under-fertilizing can inhibit fruit production. Third, consider the temperature. Peppers prefer warm temperatures, ideally between 70 and 85 degrees Fahrenheit. Finally, make sure your plants are being pollinated. If you’re growing peppers indoors, you may need to hand-pollinate them by gently shaking the plants or using a small brush to transfer pollen from one flower to another.
How do I harvest my bottle-grown peppers?
Harvest your peppers when they have reached their mature size and color. Use a sharp knife or scissors to cut the peppers from the plant, leaving a small stem attached. Avoid pulling the peppers off the plant, as this can damage the plant. Harvest peppers regularly to encourage continued fruit production. Enjoy your fresh, homegrown bottle-grown peppers in your favorite recipes!
Leave a Comment