

Bitter Gourd Trellis DIY: Ready to ditch the sprawling vines and embrace a vertical garden bursting with healthy, homegrown bitter gourds? I’m so excited to share this simple, yet incredibly effective, DIY project that will transform your gardening game! For centuries, gardeners in Asia and Africa have understood the power of trellises, not just for supporting climbing plants, but for maximizing sunlight exposure and improving air circulation – leading to healthier, more abundant harvests.
Let’s be honest, bitter gourd, while incredibly nutritious and delicious (when prepared right!), can be a bit of a space hog. Without proper support, its vines tend to take over, smothering other plants and making harvesting a real challenge. That’s where this bitter gourd trellis DIY comes in! I’ll walk you through creating a sturdy and attractive trellis that will not only keep your bitter gourd plants happy and healthy but also add a touch of rustic charm to your garden.
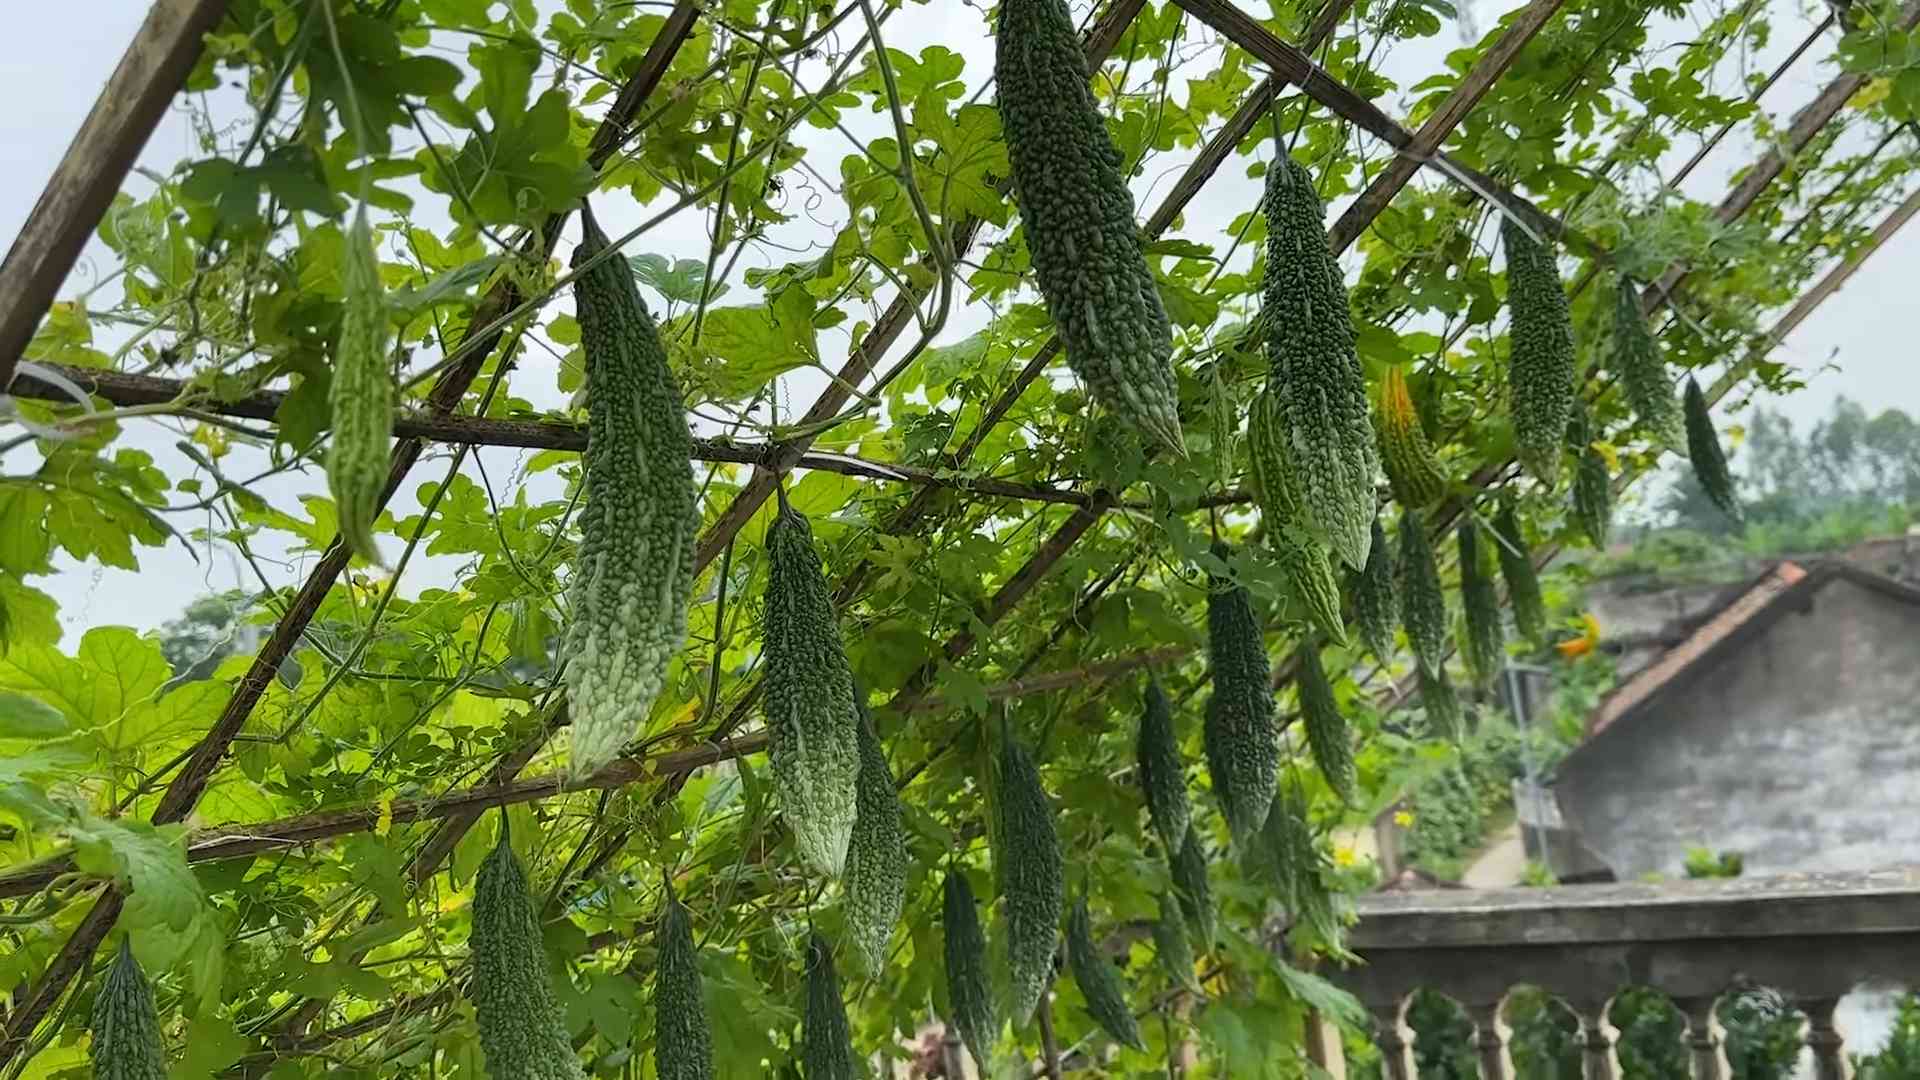
Imagine plucking perfectly formed bitter gourds, easily accessible and free from soil contact, thanks to your own handcrafted trellis. This project is perfect for small gardens, balconies, or anyone looking to optimize their growing space. Plus, it’s a fantastic way to reduce the risk of pests and diseases. So, grab your tools, and let’s get started on this rewarding and space-saving gardening adventure!
DIY Bitter Gourd Trellis: Grow Your Own Deliciousness!
Hey there, fellow gardening enthusiasts! Are you ready to take your bitter gourd game to the next level? Forget letting those vines sprawl all over the ground – we’re building a trellis! Not only will this keep your gourds clean and healthy, but it’ll also make harvesting a breeze. Plus, it looks super cool in the garden. Trust me, this DIY project is easier than you think, and the rewards are oh-so-delicious. Let’s get started!
Materials You’ll Need
Before we dive in, let’s gather our supplies. I’ve tried to keep this budget-friendly, so feel free to substitute materials based on what you have on hand.
* **Bamboo Poles or Wooden Stakes:** (6-8 feet long, 4-6 pieces) These will form the main structure of our trellis. Bamboo is lightweight and readily available, but sturdy wooden stakes work just as well.
* **Twine or Garden Wire:** (A generous amount!) We’ll use this to create the climbing grid for the bitter gourd vines. Jute twine is a natural and biodegradable option.
* **Measuring Tape:** Essential for accurate cuts and spacing.
* **Scissors or Wire Cutters:** For cutting the twine or wire.
* **Gloves:** To protect your hands, especially if using wire.
* **Optional: Wood Preservative:** If using wooden stakes, applying a preservative will extend their lifespan.
* **Optional: Hammer or Mallet:** For driving the stakes into the ground.
* **Optional: Level:** To ensure your trellis is nice and straight.
Planning Your Trellis Design
Okay, before we start hammering and tying, let’s think about the design. I’m going to walk you through a simple A-frame trellis, which is sturdy and easy to build. But feel free to get creative! You could also build a teepee trellis, a lean-to trellis against a wall, or even a tunnel trellis if you’re feeling ambitious.
Here are a few things to consider:
* **Size:** How much space do your bitter gourd plants need? Bitter gourd vines can grow quite long, so plan accordingly. A trellis that’s 6-8 feet tall and 4-6 feet wide should be sufficient for a few plants.
* **Sunlight:** Make sure your trellis is positioned in a spot that gets plenty of sunlight. Bitter gourds need at least 6-8 hours of direct sunlight per day.
* **Soil:** The soil should be well-draining and fertile. Amend with compost or other organic matter if necessary.
* Stability: This is key! You don’t want your trellis collapsing under the weight of the gourds. Make sure the stakes are securely anchored in the ground.
Building the A-Frame Trellis: Step-by-Step
Alright, let’s get our hands dirty! Here’s how to build a simple A-frame trellis for your bitter gourds:
1. **Prepare the Stakes:** If you’re using wooden stakes, consider applying a wood preservative to the bottom portion that will be buried in the ground. This will help prevent rot and extend the life of your trellis. Let the preservative dry completely before proceeding.
2. **Position the First Pair of Stakes:** Choose two stakes and position them in the ground at an angle, forming one side of the “A”. The distance between the base of the stakes will determine the width of your trellis. I usually aim for about 3-4 feet apart. Use a hammer or mallet to drive the stakes firmly into the ground. Aim for at least 1-2 feet deep for stability.
3. **Position the Second Pair of Stakes:** Repeat step 2 with the remaining two stakes, forming the other side of the “A”. Make sure the tops of the stakes overlap or meet each other. Use a level to ensure both sides are relatively even.
4. **Secure the Top:** This is where the magic happens! Use twine or garden wire to tightly bind the tops of the stakes together where they overlap. Wrap the twine or wire several times around the stakes, creating a strong and secure connection. Tie a secure knot or twist the wire tightly to prevent it from unraveling.
5. **Add a Horizontal Support (Optional but Recommended):** For added stability, you can add a horizontal support beam across the middle of the “A”. This will help prevent the trellis from spreading apart under the weight of the vines. Use a shorter stake or piece of bamboo and tie it securely to both sides of the “A” with twine or wire.
6. **Create the Climbing Grid:** Now comes the fun part – creating the grid that the bitter gourd vines will climb. Start by tying a length of twine or wire to one of the stakes at the base of the trellis.
7. **Weave the Twine Horizontally:** Run the twine horizontally across the trellis, tying it securely to each stake as you go. Space the horizontal lines about 6-8 inches apart. This will provide plenty of support for the growing vines.
8. **Weave the Twine Vertically:** Once you’ve completed the horizontal lines, weave the twine vertically, creating a grid pattern. Tie the twine securely to each horizontal line as you go. Again, space the vertical lines about 6-8 inches apart.
9. **Secure the Ends:** Make sure all the ends of the twine or wire are securely tied off to prevent them from unraveling. You can also trim any excess twine or wire with scissors or wire cutters.
10. **Reinforce (If Needed):** Give your trellis a good shake. If it feels wobbly, add more twine or wire to reinforce any weak points. You can also add additional stakes for extra support.
Planting Your Bitter Gourd
Now that your trellis is built, it’s time to plant your bitter gourd!
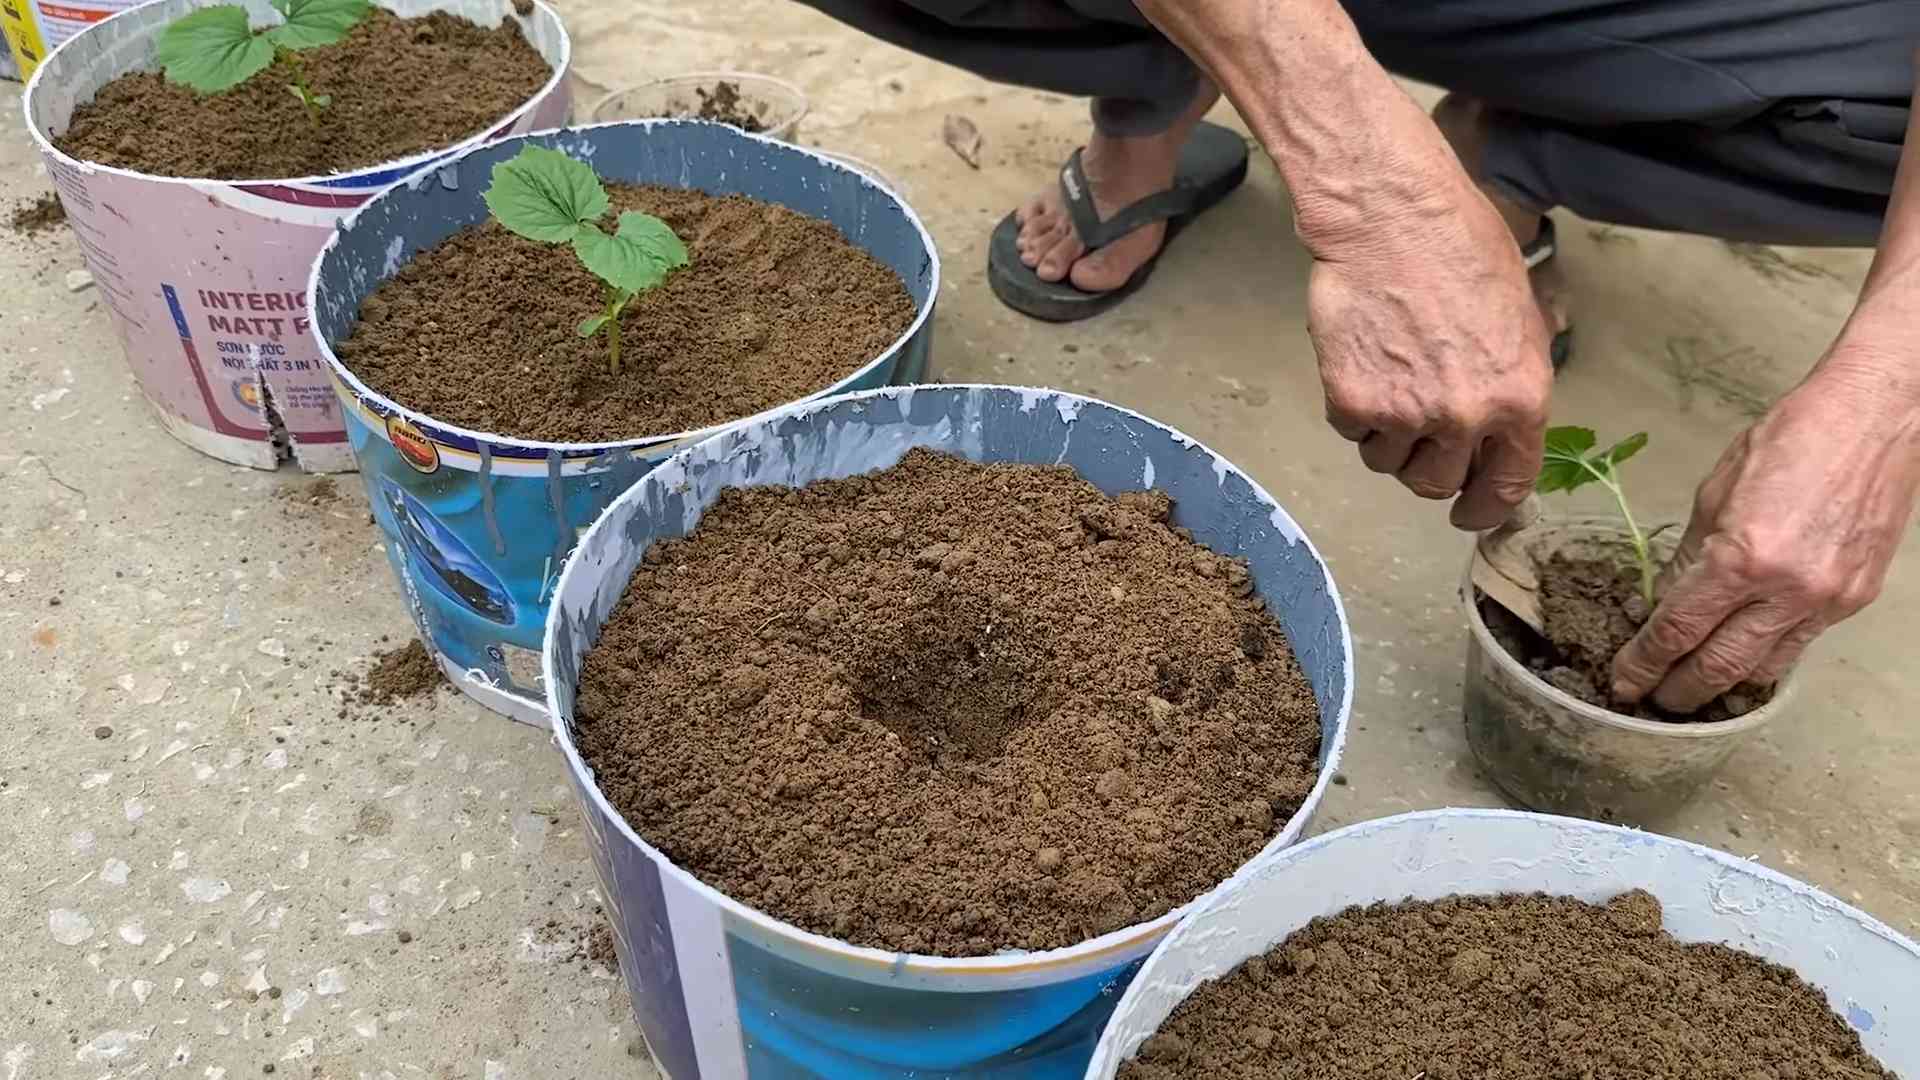
1. **Prepare the Soil:** Make sure the soil around the base of the trellis is loose and well-draining. Amend with compost or other organic matter if necessary.
2. **Plant the Seeds or Seedlings:** You can either direct sow bitter gourd seeds or transplant seedlings. If direct sowing, plant the seeds about 1 inch deep and 12-18 inches apart. If transplanting seedlings, dig a hole slightly larger than the root ball and gently place the seedling in the hole. Backfill with soil and water thoroughly.
3. **Water Regularly:** Bitter gourds need consistent moisture, especially during hot weather. Water deeply and regularly, especially when the plants are young.
4. **Train the Vines:** As the bitter gourd vines grow, gently guide them onto the trellis. Use twine or plant clips to secure the vines to the grid if necessary.
5. **Fertilize:** Feed your bitter gourd plants with a balanced fertilizer every few weeks to promote healthy growth and abundant fruit production.
Maintenance and Harvesting
A little bit of maintenance will go a long way in ensuring a bountiful harvest.
* **Watering:** Keep the soil consistently moist, especially during dry spells.
* **Fertilizing:** Continue to fertilize regularly throughout the growing season.
* **Pruning:** Prune away any dead or diseased leaves or vines. You can also prune the tips of the vines to encourage branching and more fruit production.
* **Pest Control:** Keep an eye out for pests such as aphids, spider mites, and squash bugs. Treat infestations promptly with organic pest control methods.
* **Harvesting:** Bitter gourds are typically ready to harvest about 2-3 months after planting. Harvest the gourds when they are still green and firm. Use a sharp knife or pruners to cut the gourds from the vine.
Troubleshooting
Even with the best planning, things can sometimes go wrong. Here are a few common problems and how to fix them:
* **Trellis Collapsing:** If your trellis starts to collapse, reinforce it with additional stakes and twine or wire. Make sure the stakes are securely anchored in the ground.
* **Vines Not Climbing:** If the vines are not climbing the trellis on their own, gently guide them onto the grid and secure them with twine or plant clips.
* **Poor Fruit Production:** Poor fruit production can be caused by a variety of factors, including lack of sunlight, poor soil, or inadequate watering. Make sure your plants are getting enough sunlight, water, and nutrients.
* **Pest Infestations:** Treat pest infestations promptly with organic pest control methods.
Enjoy Your Harvest!
And there you have it! You’ve successfully built a bitter gourd trellis and are well on your way to enjoying a delicious and bountiful harvest. Remember to be patient, have fun, and don’t be afraid to experiment. Happy gardening!
Conclusion
So, there you have it! Transforming your garden with a DIY bitter gourd trellis is not just a project; it’s an investment in healthier plants, a bountiful harvest, and a visually stunning outdoor space. We’ve walked you through the simple steps, highlighted the benefits, and hopefully, inspired you to take the plunge.
Why is this DIY trick a must-try? Because it addresses the core needs of bitter gourd plants: support, airflow, and sunlight exposure. By providing a sturdy trellis, you’re preventing your precious gourds from sprawling on the ground, where they’re vulnerable to pests, diseases, and uneven ripening. The improved airflow reduces the risk of fungal infections, a common problem with these vining vegetables. And the vertical growth allows for better sunlight penetration, leading to sweeter, more flavorful bitter gourds.
But the advantages extend beyond just plant health. A well-constructed trellis elevates the aesthetic appeal of your garden, adding a touch of rustic charm or modern elegance, depending on your design choices. It also maximizes space utilization, allowing you to grow more in a smaller area. Plus, the satisfaction of building something with your own hands and nurturing your plants to thrive on it is simply unparalleled.
Feeling adventurous? Consider these variations to personalize your DIY bitter gourd trellis:
* **A-Frame Trellis:** Construct two separate trellises that lean against each other, forming an “A” shape. This provides excellent stability and creates a visually striking focal point.
* **Arched Trellis:** Build a curved trellis over a pathway or garden entrance. This adds a touch of whimsy and creates a beautiful tunnel of greenery.
* **Repurposed Materials:** Get creative with recycled materials like old ladders, metal gates, or even sturdy branches to build a unique and eco-friendly trellis.
* **Vertical Pallet Garden:** Secure a pallet vertically and reinforce it. This is a great option for small spaces and allows you to grow other herbs or flowers alongside your bitter gourd.
* **Add Decorative Elements:** Incorporate decorative elements like painted designs, hanging planters, or string lights to personalize your trellis and make it a true reflection of your style.
Don’t be afraid to experiment and adapt the design to suit your specific needs and preferences. The most important thing is to create a sturdy and supportive structure that will allow your bitter gourd plants to thrive.
We wholeheartedly encourage you to try this DIY project. It’s a rewarding experience that will not only enhance your garden but also provide you with a delicious and healthy harvest. Once you’ve built your trellis and your bitter gourds are climbing, we’d love to see your creations! Share your photos and experiences with us on social media using #BitterGourdTrellisDIY. Let’s inspire each other to grow beautiful and productive gardens! We are eager to hear about your successes, challenges, and any innovative modifications you make along the way. Happy gardening!
Frequently Asked Questions (FAQ)
What is the best material to use for a DIY bitter gourd trellis?
The best material depends on your budget, aesthetic preferences, and the availability of resources. Wood is a popular choice for its natural look and ease of construction. Bamboo is another excellent option, offering a lightweight yet sturdy structure. Metal, such as galvanized steel or wrought iron, provides durability and longevity. You can also repurpose materials like old ladders, fences, or even sturdy branches. Consider the weight of the mature bitter gourd plants when selecting your material.
How tall should my bitter gourd trellis be?
The ideal height for a bitter gourd trellis is typically between 6 to 8 feet. Bitter gourd vines can grow quite long, so providing ample vertical space is crucial for optimal growth and fruit production. If you have limited space, you can opt for a shorter trellis, but be prepared to prune the vines regularly to prevent them from becoming too unruly.
How do I train my bitter gourd vines to climb the trellis?
Gently guide the vines towards the trellis and use soft plant ties or twine to secure them to the structure. As the vines grow, continue to train them by weaving them through the trellis or attaching them with ties. Avoid using wire or anything that could damage the stems. Regular training will encourage the vines to climb vertically and maximize sunlight exposure.
How far apart should I plant my bitter gourd seedlings from the trellis?
Plant your bitter gourd seedlings about 12 to 18 inches away from the base of the trellis. This provides enough space for the roots to develop without overcrowding. As the seedlings grow, they will naturally reach for the trellis and begin to climb.
What kind of soil is best for growing bitter gourd?
Bitter gourd thrives in well-drained, fertile soil that is rich in organic matter. Amend your soil with compost or aged manure before planting to improve its fertility and drainage. A slightly acidic to neutral pH (6.0 to 7.0) is ideal.
How often should I water my bitter gourd plants?
Water your bitter gourd plants regularly, especially during hot and dry weather. Aim to keep the soil consistently moist but not waterlogged. Water deeply at the base of the plants, avoiding wetting the foliage, which can increase the risk of fungal diseases.
Do I need to fertilize my bitter gourd plants?
Yes, bitter gourd plants benefit from regular fertilization. Apply a balanced fertilizer (e.g., 10-10-10) every 2 to 3 weeks during the growing season. You can also use organic fertilizers like compost tea or fish emulsion.
How do I protect my bitter gourd plants from pests and diseases?
Monitor your plants regularly for signs of pests and diseases. Common pests include aphids, spider mites, and squash bugs. Control pests with insecticidal soap, neem oil, or by handpicking them off the plants. Prevent fungal diseases by ensuring good airflow around the plants and avoiding overhead watering.
When is the best time to harvest bitter gourds?
Harvest bitter gourds when they are still green and firm, typically about 2 to 3 months after planting. The gourds should be about 6 to 8 inches long. Overripe gourds will turn yellow or orange and become more bitter.
Can I grow bitter gourd in a container?
Yes, you can grow bitter gourd in a container, but you’ll need a large pot (at least 15 gallons) with good drainage. Use a well-draining potting mix and provide a sturdy trellis for the vines to climb. Water and fertilize regularly, and ensure the container receives at least 6 to 8 hours of sunlight per day.
What if my bitter gourd plant is growing but not producing fruit?
There could be several reasons why your bitter gourd plant is not producing fruit. Insufficient pollination, lack of sunlight, poor soil fertility, or stress from pests or diseases can all contribute to this problem. Ensure your plants are receiving adequate sunlight, water, and nutrients. You may also need to hand-pollinate the flowers if there are not enough pollinators in your area.
How do I hand-pollinate bitter gourd flowers?
Bitter gourd plants have separate male and female flowers. To hand-pollinate, use a small paintbrush to collect pollen from the male flower (which has a long, thin stem) and transfer it to the stigma of the female flower (which has a small fruit behind it). Do this in the morning when the flowers are open.
Can I save seeds from my bitter gourds to plant next year?
Yes, you can save seeds from your bitter gourds, but keep in mind that the resulting plants may not be identical to the parent plant if it was cross-pollinated. To save seeds, allow a few gourds to ripen fully on the vine until they turn yellow or orange. Remove the seeds, wash them thoroughly, and dry them completely before storing them in a cool, dry place.


Leave a Comment