

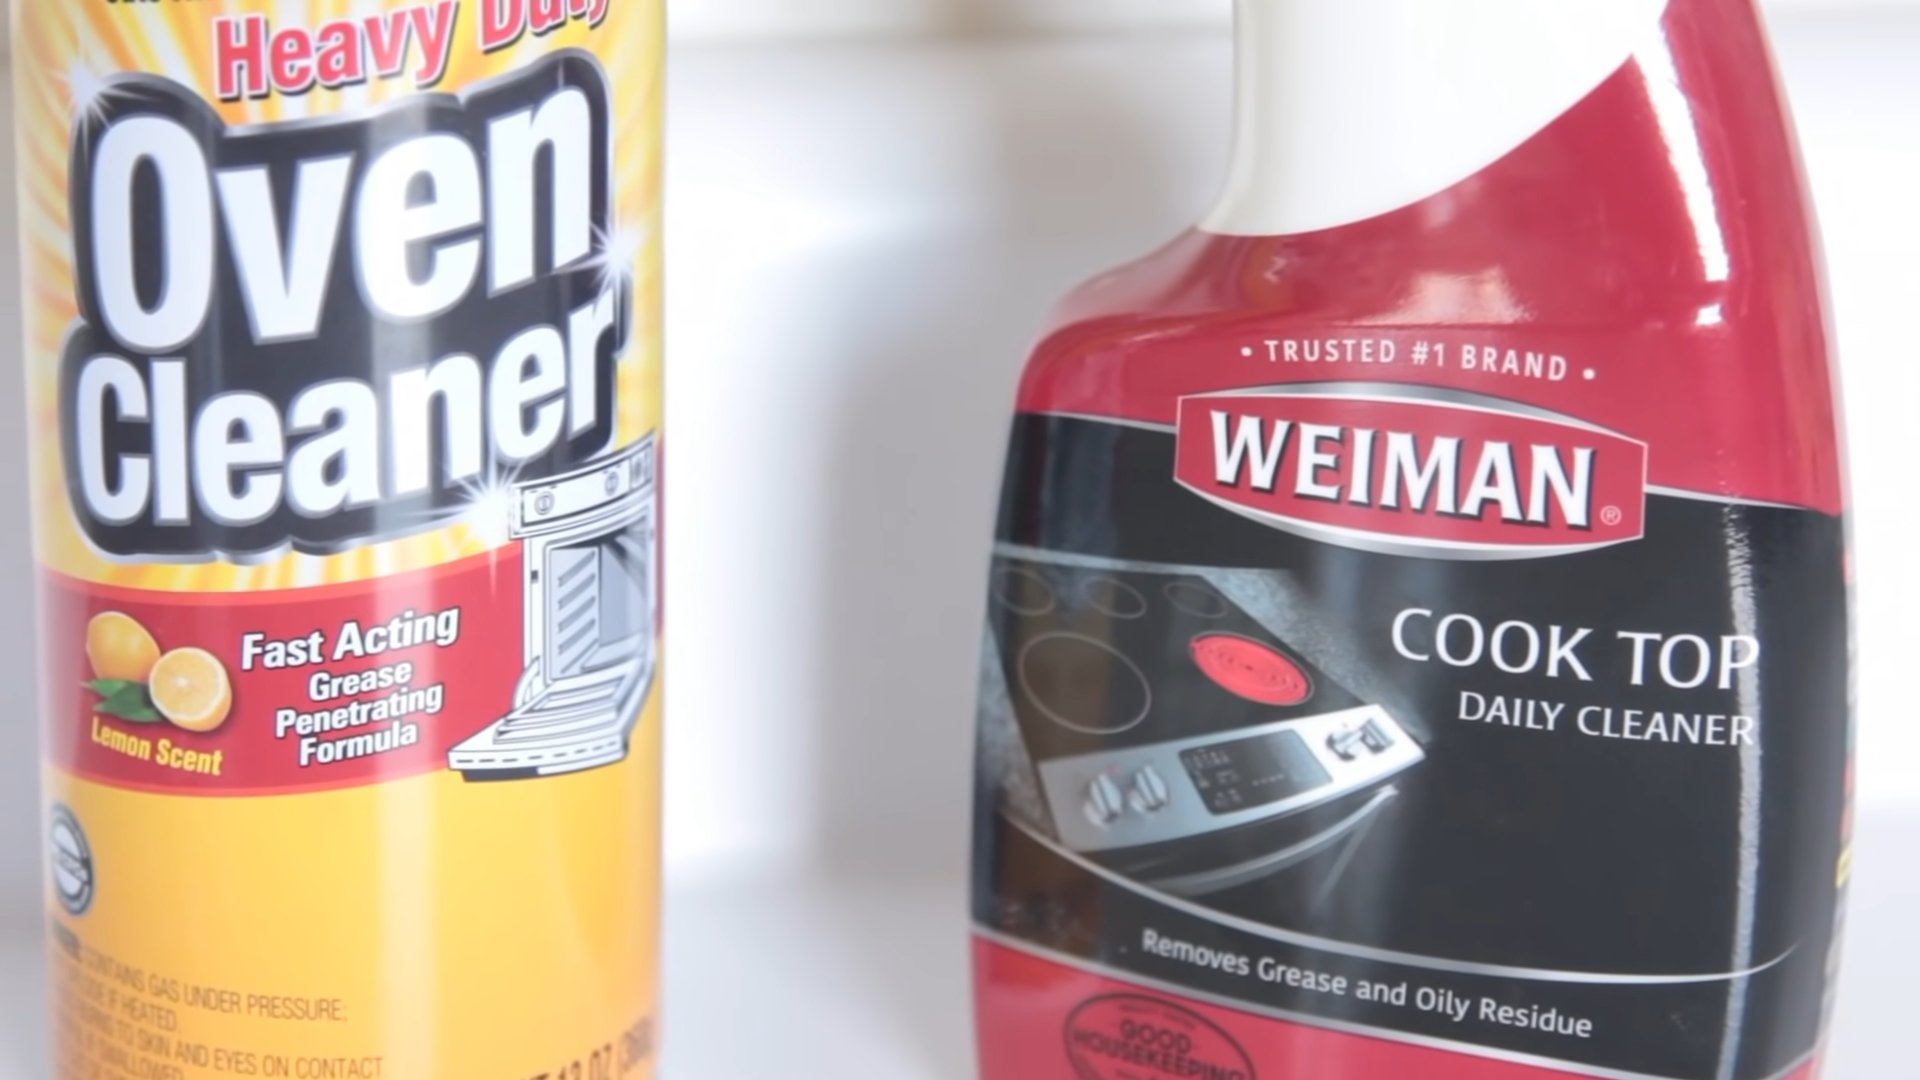
Best Oven Cleaner Review: Are you tired of battling baked-on grime and stubborn stains in your oven? I know I am! It feels like a never-ending chore, doesn’t it? But what if I told you that sparkling clean oven is within reach, without spending hours scrubbing or resorting to harsh chemicals?
For generations, keeping a clean oven has been a symbol of a well-maintained home. In many cultures, a spotless kitchen, including the oven, is seen as a reflection of care and attention to detail. But let’s be honest, with our busy lives, who has the time for that kind of meticulous cleaning? That’s where finding the best oven cleaner review comes in handy!
That’s why I’ve put together this comprehensive guide to help you discover the best oven cleaner review that will transform your cleaning routine. We’ll explore various options, from powerful sprays to eco-friendly alternatives, and I’ll share my personal experiences and recommendations. Say goodbye to greasy messes and hello to a sparkling clean oven that you’ll be proud to show off!
DIY Oven Cleaning: A Sparkling Oven Without Harsh Chemicals
Okay, let’s face it, cleaning the oven is probably on everyone’s list of least favorite chores. But a clean oven cooks more efficiently and, let’s be honest, just *feels* better. The good news is you don’t need those harsh, chemical-laden oven cleaners to get a sparkling clean oven. I’m going to walk you through my favorite DIY oven cleaning method using ingredients you probably already have in your pantry!
What You’ll Need: The Arsenal of Clean
Before we dive in, let’s gather our supplies. This is a pretty straightforward process, so the list is short and sweet:
* Baking Soda: This is our main cleaning agent. It’s a mild alkali that helps dissolve grease and grime.
* White Vinegar: The acid in vinegar reacts with the baking soda to create a fizzing action that helps loosen baked-on messes.
* Water: For mixing and rinsing.
* Spray Bottle: To apply the vinegar solution.
* Spatula or Scraper: For removing stubborn baked-on food. A plastic one is best to avoid scratching the oven surface.
* Rubber Gloves: To protect your hands.
* Sponge or Scrub Brush: For scrubbing the oven interior.
* Old Rags or Paper Towels: For wiping down the oven.
* Small Bowl: For mixing the baking soda paste.
* Trash Bags or Old Newspaper: To protect your floor.
Phase 1: Prepping for the Deep Clean
This is a crucial step to make the actual cleaning process easier. Think of it as softening the battlefield before the main attack!
1. Safety First: Make sure your oven is completely cool. Never attempt to clean a hot oven. Unplug the oven or turn off the breaker for added safety.
2. Remove the Racks: Take out all the oven racks, baking stones, or any other removable items. We’ll clean these separately.
3. Protect Your Floor: Lay down trash bags or old newspaper around the oven to catch any drips or spills. This will save you from having to clean the floor afterward!
4. Initial Wipe Down (Optional): If there are any loose crumbs or debris, give the oven a quick wipe down with a damp cloth or paper towel. This will prevent them from getting mixed into the baking soda paste.
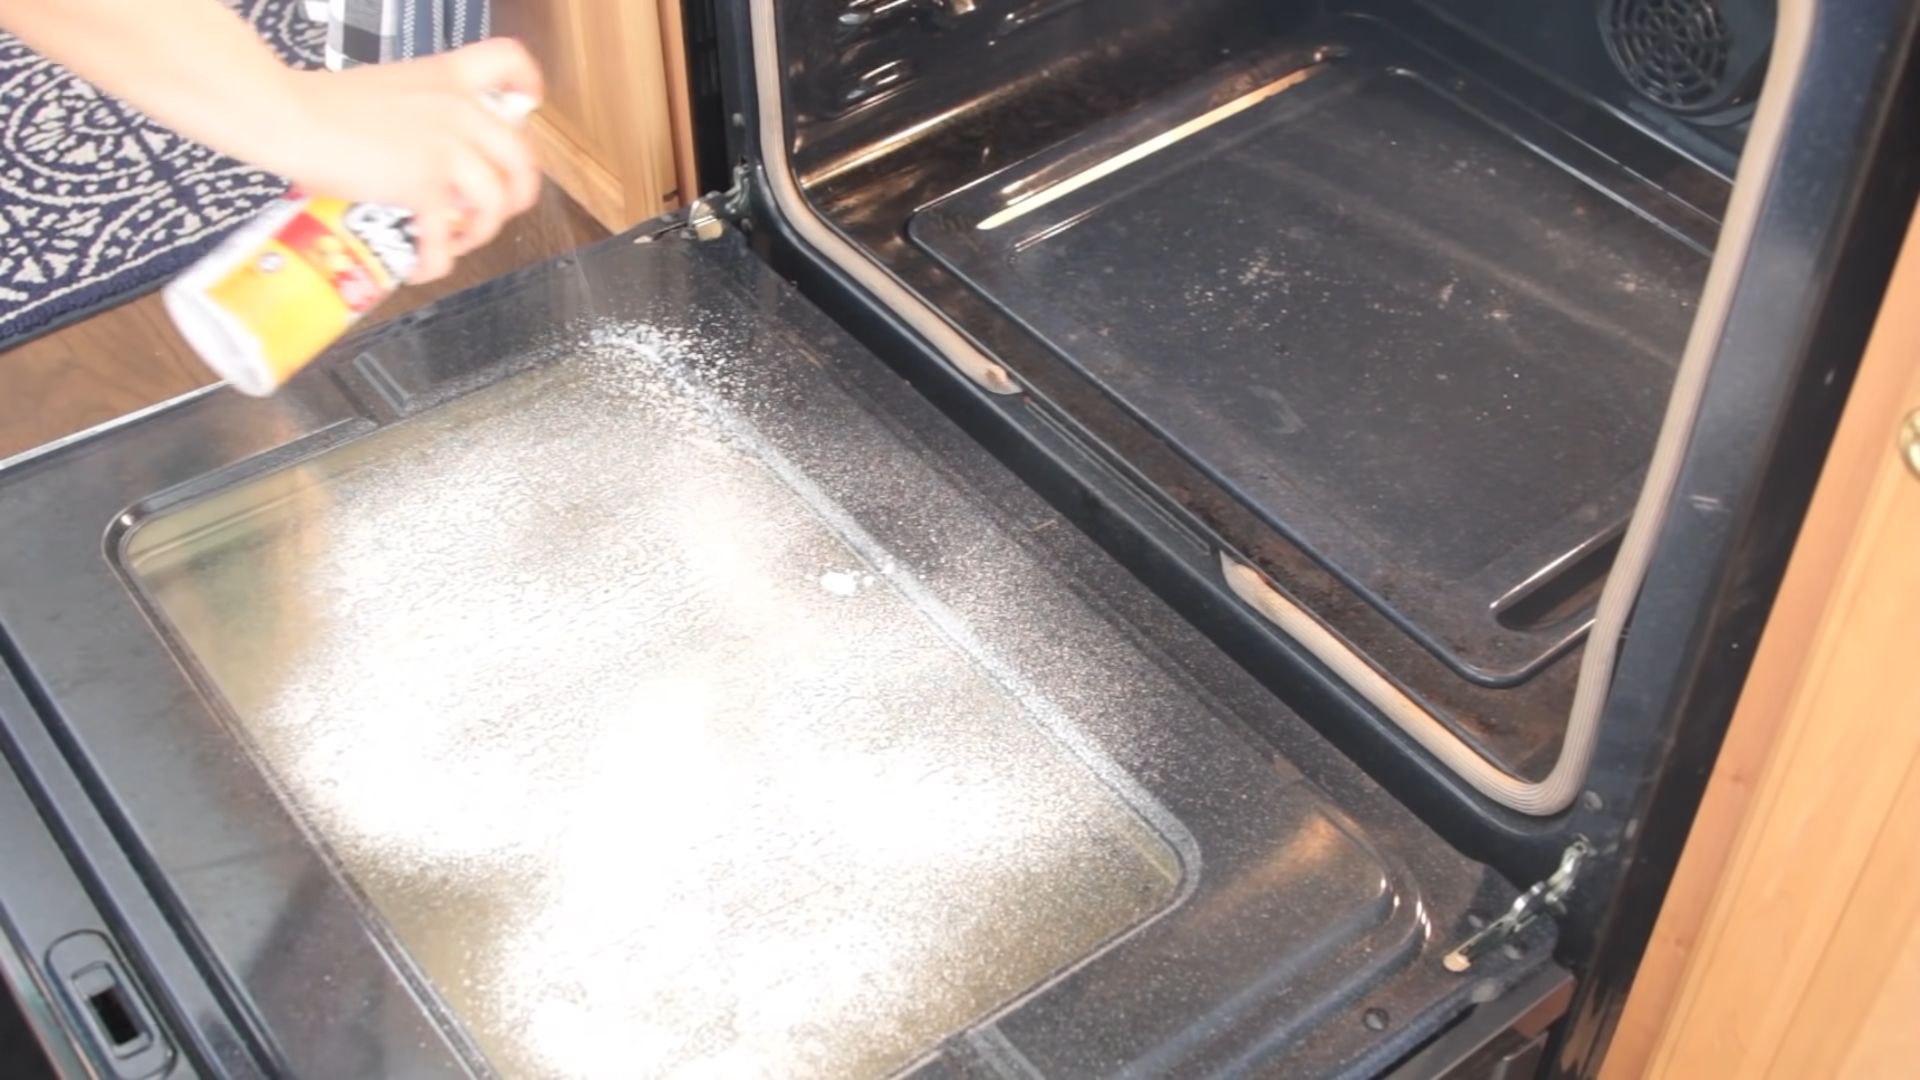
Phase 2: The Baking Soda Paste Application
This is where the magic happens! We’re going to create a powerful cleaning paste that will break down all that stubborn grime.
1. Mix the Paste: In your small bowl, combine about ½ cup of baking soda with enough water to form a thick, spreadable paste. You want it to be similar in consistency to frosting. Add water gradually, mixing as you go, until you reach the desired consistency.
2. Coat the Oven: Using your hands (with gloves on, of course!), spread the baking soda paste all over the interior surfaces of the oven. This includes the walls, floor, door (inside and out), and even the heating elements (if you can reach them safely). Avoid the heating element if it’s exposed and fragile.
3. Focus on the Grime: Pay special attention to areas with heavy buildup of grease and baked-on food. Apply a thicker layer of paste to these areas.
4. Let it Sit: This is the most important part! Let the baking soda paste sit for at least 12 hours, or even overnight. The longer it sits, the more effectively it will loosen the grime. I usually do this before I go to bed so it has all night to work its magic.
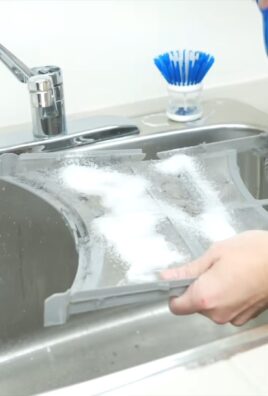
Phase 3: Cleaning the Oven Racks
While the baking soda paste is working its wonders inside the oven, let’s tackle those greasy oven racks.
1. Choose Your Method: There are a few ways to clean oven racks. I prefer using my bathtub, but you can also use a large utility sink or even a large trash bag.
2. Bathtub Method: Line your bathtub with old towels to protect the surface. Place the oven racks in the tub.
3. Dish Soap and Hot Water: Fill the tub with hot water and add a generous amount of dish soap. I like to use a grease-cutting dish soap for this.
4. Soak and Scrub: Let the racks soak in the soapy water for at least 2-3 hours, or even overnight. This will help loosen the grease and grime. After soaking, use a scrub brush or sponge to scrub the racks clean. For stubborn spots, you can use a steel wool pad, but be careful not to scratch the racks.
5. Trash Bag Method (Alternative): Place the oven racks inside a large, heavy-duty trash bag. Add about ½ cup of dish soap and 1 cup of ammonia to the bag. Seal the bag tightly and let it sit outside (away from children and pets) for at least 24 hours. The ammonia fumes will help loosen the grease and grime. Be extremely careful when opening the bag, as the ammonia fumes can be strong. Wear gloves and a mask, and open the bag in a well-ventilated area. Rinse the racks thoroughly with water.
6. Rinse and Dry: Once the racks are clean, rinse them thoroughly with water and dry them with a clean towel.
Phase 4: The Vinegar Power Wash
Now it’s time to unleash the power of vinegar! This will react with the baking soda and help lift away all that loosened grime.
1. Prepare the Vinegar Solution: Fill your spray bottle with white vinegar. You can use it straight, or dilute it with a little water if you prefer.
2. Spray the Oven: Spray the vinegar all over the baking soda paste inside the oven. You’ll notice it starts to fizz and bubble. This is a good thing! It means the vinegar is reacting with the baking soda and helping to lift away the grime.
3. Let it Fizz: Let the vinegar sit for a few minutes to allow the fizzing action to work its magic.
4. Wipe Away the Grime: Using a damp sponge or scrub brush, start wiping away the baking soda paste and loosened grime. You may need to use a little elbow grease for stubborn spots.
5. Spatula Assistance: For really stubborn baked-on food, use your spatula or scraper to gently scrape it away. Be careful not to scratch the oven surface.
6. Rinse and Repeat: Rinse your sponge or scrub brush frequently with clean water. You may need to repeat the wiping and rinsing process several times to remove all the baking soda residue.
7. Final Wipe Down: Once you’ve removed all the baking soda paste and grime, give the oven a final wipe down with a clean, damp rag or paper towel.
Phase 5: The Finishing Touches
Almost there! Just a few more steps to ensure a sparkling clean oven.
1. Dry the Oven: Use a clean, dry towel to dry the interior of the oven. This will prevent water spots and ensure a shiny finish.
2. Replace the Racks: Once the oven is completely dry, replace the clean oven racks.
3. Vinegar Odor Removal: If you’re concerned about the vinegar smell, you can place a bowl of water with a few drops of lemon juice in the oven and bake it at 350°F (175°C) for about 30 minutes. This will help neutralize the vinegar odor.
4. Admire Your Work: Step back and admire your sparkling clean oven! You did it!
Tips and Tricks for a Super Clean Oven
* Regular Cleaning: The best way to keep your oven clean is to clean it regularly. Try to wipe up spills as soon as they happen.
* Self-Cleaning Cycle (Use with Caution): If your oven has a self-cleaning cycle, you can use it occasionally, but be aware that it can produce strong odors and high temperatures. Make sure to follow the manufacturer’s instructions carefully. I personally prefer the DIY method because it’s gentler and doesn’t produce those harsh fumes.
* Baking Soda as a Preventative: Sprinkle a thin layer of baking soda on the bottom of your oven to absorb spills and prevent them from baking on. Just be sure to vacuum it up regularly.
* Lemon Power: Cut a lemon in half and rub it on the inside of your oven door to help remove grease and grime. The citric acid in the lemon will help break down the mess.
* Steam Cleaning: Place a bowl of water in the oven and bake it at 450°F (232°C) for about 20 minutes. The steam will help loosen baked-on food and make it easier to wipe away.
And there you have it! A sparkling clean oven without the harsh chemicals. This method might take a little more time and effort than using commercial oven cleaners,
Conclusion
So, there you have it! Ditching those harsh chemicals and embracing this simple, effective DIY oven cleaner is more than just a trend; it’s a game-changer for your kitchen and your well-being. We’ve explored how readily available ingredients like baking soda, vinegar, and a little elbow grease can transform your grimy oven into a sparkling clean appliance, ready to bake up delicious memories.
Why is this DIY trick a must-try? Because it’s not just about cleaning; it’s about making a conscious choice for a healthier home. Commercial oven cleaners are notorious for their fumes and corrosive properties, posing risks to your respiratory system and potentially damaging your oven’s interior. This homemade solution offers a safe, non-toxic alternative that’s just as effective, if not more so, at tackling baked-on grease and grime. Plus, let’s be honest, it’s incredibly satisfying to see the power of simple ingredients at work!
Beyond the health and safety benefits, this DIY oven cleaner is also incredibly cost-effective. You likely already have baking soda and vinegar in your pantry, making this a budget-friendly cleaning solution. Think of all the money you’ll save by skipping those expensive, chemical-laden cleaners at the store!
But the beauty of this DIY approach lies in its adaptability. Feel free to experiment with variations to suit your specific needs and preferences.
Variations and Suggestions:
* Lemon Power: Add a few drops of lemon essential oil to your baking soda paste for a fresh, citrusy scent and an extra boost of cleaning power. Lemon’s natural acidity can help cut through grease and leave your oven smelling amazing.
* Borax Boost: For particularly stubborn stains, consider adding a tablespoon of borax to your baking soda paste. Borax is a natural mineral with excellent cleaning properties, but be sure to wear gloves when handling it.
* Overnight Soak: For heavily soiled ovens, let the baking soda paste sit overnight for maximum effectiveness. This allows the baking soda to penetrate and loosen the grime, making it easier to wipe away.
* Preventative Measures: To keep your oven cleaner for longer, consider placing a baking sheet on the bottom rack to catch spills and splatters. Wipe up any messes immediately to prevent them from baking onto the oven’s surface.
We are confident that once you try this DIY oven cleaner, you’ll never go back to those harsh chemicals again. It’s a simple, safe, and effective way to keep your oven sparkling clean and your home healthy.
So, what are you waiting for? Gather your ingredients, roll up your sleeves, and get ready to transform your oven. We encourage you to try this DIY oven cleaner and share your experience with us! Let us know in the comments how it worked for you, what variations you tried, and any tips you have to share. We can’t wait to hear your success stories! Let’s create a community of clean oven enthusiasts!
Frequently Asked Questions (FAQ)
Q: Is this DIY oven cleaner safe for all types of ovens?
A: Generally, yes, this DIY oven cleaner is safe for most types of ovens, including electric, gas, and convection ovens. However, it’s always a good idea to check your oven’s manufacturer’s instructions before using any cleaning product, even a homemade one. Pay particular attention to any warnings about specific cleaning agents or materials that should be avoided. If you have a self-cleaning oven, it’s best to consult the owner’s manual before using this method, as some self-cleaning ovens have specific cleaning recommendations. For example, some self-cleaning ovens have a special coating that can be damaged by certain cleaning agents. If you are unsure, test a small, inconspicuous area first to ensure that the cleaner doesn’t damage the surface.
Q: How often should I clean my oven using this method?
A: The frequency of cleaning depends on how often you use your oven and how much food spills inside. As a general guideline, cleaning your oven every 3-6 months is a good practice. However, if you notice spills or splatters, it’s best to clean them up immediately to prevent them from baking onto the oven’s surface and becoming more difficult to remove later. Regular spot cleaning can help extend the time between deep cleanings. If you use your oven frequently for baking or roasting, you may need to clean it more often. Conversely, if you only use your oven occasionally, you can probably get away with cleaning it less frequently.
Q: Can I use this DIY oven cleaner on the self-cleaning function?
A: No, this DIY oven cleaner is not intended to be used in conjunction with the self-cleaning function of your oven. The self-cleaning function uses extremely high temperatures to burn off food residue, and introducing baking soda and vinegar into this process could potentially damage your oven or create unwanted fumes. Always clean your oven manually using the DIY method described above, and never attempt to use it as a substitute for the self-cleaning function. If you have a self-cleaning oven, consult your owner’s manual for specific cleaning instructions and recommendations.
Q: What if the baking soda paste is too thick or too thin?
A: The consistency of the baking soda paste should be similar to that of a thick frosting. If the paste is too thick, it will be difficult to spread and may not adhere well to the oven surfaces. If the paste is too thin, it will run and drip, making it less effective at cleaning. To adjust the consistency, simply add more baking soda if it’s too thin, or more water if it’s too thick. Add the ingredients gradually, mixing well after each addition, until you achieve the desired consistency. Remember, you want a paste that is thick enough to cling to the oven walls and ceiling but thin enough to spread easily.
Q: How do I remove the baking soda residue after cleaning?
A: After the baking soda paste has sat for the recommended time, use a damp sponge or cloth to wipe away the residue. You may need to rinse the sponge or cloth frequently to remove all traces of the baking soda. For stubborn residue, try using a spray bottle filled with vinegar to loosen the baking soda before wiping it away. The vinegar will react with the baking soda, creating a fizzing action that helps to lift the residue from the surface. Once you have removed all the baking soda residue, dry the oven with a clean towel.
Q: What if I have a particularly stubborn stain that won’t come off?
A: For particularly stubborn stains, you can try a few different approaches. First, make sure you’ve allowed the baking soda paste to sit for a sufficient amount of time, ideally overnight. If the stain is still present after wiping away the paste, try creating a more concentrated paste by using less water. Apply the concentrated paste directly to the stain and let it sit for several hours or even overnight. You can also try using a scrub brush or scouring pad to gently scrub the stain after it has soaked. Be careful not to scratch the oven’s surface, especially if it has a special coating. As mentioned earlier, adding a tablespoon of borax to the baking soda paste can also help to remove stubborn stains.
Q: Can I use this DIY oven cleaner on other appliances?
A: While this DIY oven cleaner is primarily designed for cleaning ovens, it can also be used on other appliances with baked-on grease and grime, such as stovetops, grills, and even some pots and pans. However, it’s important to test the cleaner on a small, inconspicuous area first to ensure that it doesn’t damage the surface. Avoid using this cleaner on delicate surfaces, such as aluminum or copper, as it may cause discoloration or corrosion. Always rinse thoroughly after cleaning and dry with a clean towel.
Q: My oven has a strong odor after cleaning. How do I get rid of it?
A: If your oven has a strong odor after cleaning, it’s likely due to residual vinegar or baking soda. To eliminate the odor, try placing a bowl of vinegar or baking soda inside the oven and leaving it overnight. The vinegar or baking soda will absorb the odor. You can also try heating the oven to a low temperature (around 200 degrees Fahrenheit) for 30 minutes with the door slightly ajar. This will help to evaporate any remaining moisture and odors. Another option is to place a few lemon slices in a baking dish filled with water and bake them in the oven for 30 minutes. The lemon will release a fresh, citrusy scent that will help to neutralize any lingering odors.


Leave a Comment