

Bell Pepper Growing at Home can seem daunting, but trust me, with a few clever tricks and a little DIY spirit, you can be harvesting vibrant, juicy peppers right from your own backyard (or balcony!) in no time. Forget those bland, overpriced peppers from the grocery store; imagine the satisfaction of biting into a sun-ripened bell pepper you nurtured yourself.
Bell peppers have a rich history, originating in South America and spreading throughout the world thanks to their adaptability and delicious flavor. They’ve been a staple in cuisines for centuries, adding color and zest to dishes from stir-fries to stuffed peppers. But why rely on commercial growers when you can bring that history and flavor directly to your table?
I know what you’re thinking: “I don’t have a green thumb!” But that’s where these DIY hacks come in. This article is packed with simple, effective techniques to overcome common challenges and maximize your bell pepper yield. We’ll cover everything from seed starting secrets to pest control solutions, all designed to make bell pepper growing at home accessible to everyone, regardless of experience. Plus, saving money and reducing your carbon footprint by growing your own food is a win-win! So, grab your gardening gloves, and let’s get started!
Growing Bell Peppers at Home: A Beginner’s Guide
Hey there, fellow gardening enthusiasts! I’m so excited to share my experience with growing bell peppers at home. It’s surprisingly easy and rewarding, and nothing beats the taste of a fresh, homegrown pepper. This guide will walk you through every step, from choosing the right seeds to harvesting your delicious peppers. Let’s get started!
Choosing Your Bell Pepper Variety
Before we dive into the nitty-gritty, let’s talk about choosing the right bell pepper variety for your garden. There are tons of options, each with its own unique characteristics.
* **Classic Colors:** Red, yellow, and orange bell peppers are the most common and offer a sweet, mild flavor.
* **Green Bell Peppers:** These are often harvested before they fully ripen, resulting in a slightly bitter taste.
* **Specialty Peppers:** Look for varieties like purple, brown, or even white bell peppers for a unique twist.
* **Consider your climate:** Some varieties are more heat-tolerant or cold-tolerant than others. Check the seed packet for specific recommendations.
* **Space constraints:** If you’re gardening in containers, look for compact or dwarf varieties.
I personally love growing a mix of red and yellow bell peppers for their vibrant colors and sweet flavor. I’ve also experimented with some purple varieties, which are not only beautiful but also have a slightly different taste.
Starting Your Bell Pepper Seeds
Bell peppers need a long growing season, so starting them indoors is usually the best way to go, especially if you live in a cooler climate.
1. **Gather Your Supplies:** You’ll need:
* Bell pepper seeds
* Seed starting trays or small pots
* Seed starting mix (a light, well-draining soil)
* A spray bottle filled with water
* A heat mat (optional, but helpful)
* A grow light (optional, but highly recommended)
2. **Sow the Seeds:** Fill your seed starting trays or pots with seed starting mix. Moisten the soil with your spray bottle. Plant the seeds about ¼ inch deep, placing 2-3 seeds in each cell or pot. Gently cover the seeds with soil and mist again.
3. **Provide Warmth and Light:** Place the trays or pots on a heat mat (if using) and under a grow light (if using). The ideal temperature for germination is around 75-80°F (24-27°C). If you don’t have a heat mat, you can place the trays in a warm spot in your house. If you don’t have a grow light, place the trays near a sunny window, but be sure to rotate them regularly to prevent the seedlings from leaning towards the light.
4. **Keep the Soil Moist:** Check the soil daily and mist it with water whenever it feels dry to the touch. Avoid overwatering, as this can lead to fungal diseases.
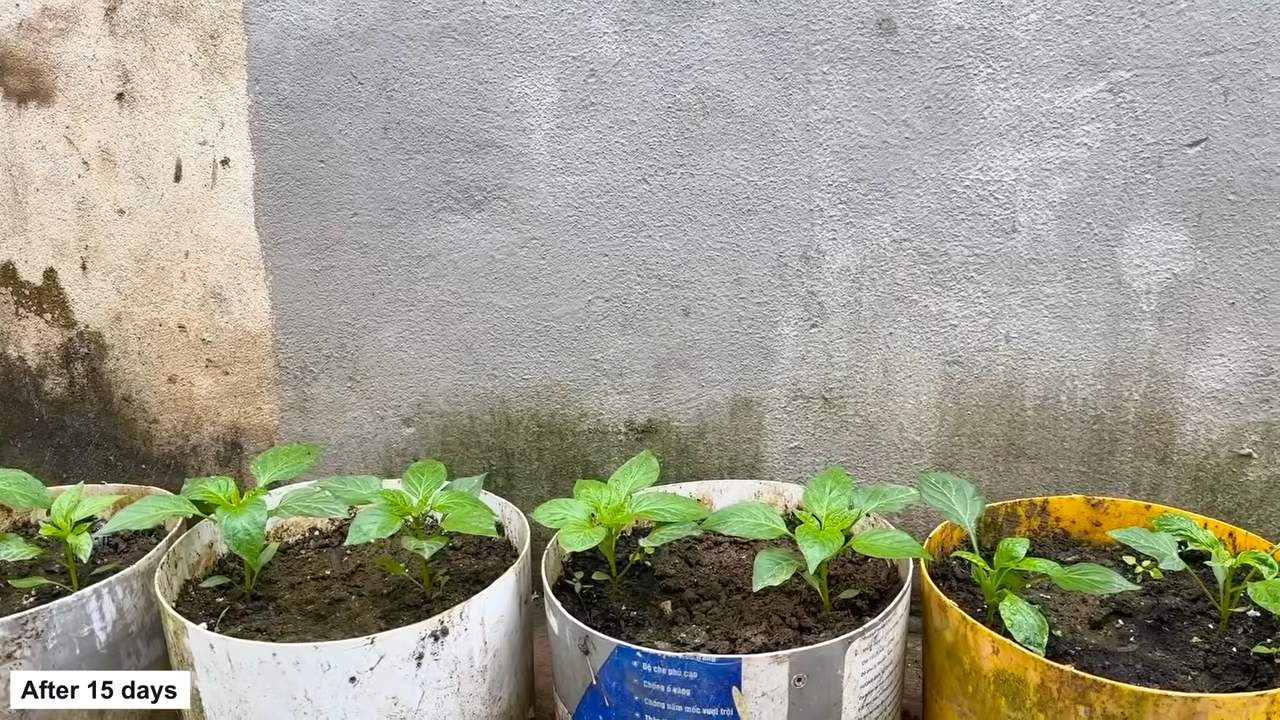
5. **Wait for Germination:** Bell pepper seeds can take anywhere from 7 to 21 days to germinate, so be patient! Once the seedlings emerge, remove the heat mat (if using) and continue to provide them with plenty of light.
6. **Thin the Seedlings:** Once the seedlings have their first true leaves (the second set of leaves that appear after the initial seed leaves), thin them out by snipping off the weaker seedlings at the soil line, leaving only the strongest seedling in each cell or pot.
Transplanting Your Bell Pepper Seedlings
Once your bell pepper seedlings are about 6-8 inches tall and the weather has warmed up (nighttime temperatures consistently above 55°F or 13°C), it’s time to transplant them into your garden or containers.
1. **Harden Off the Seedlings:** Before transplanting, you need to “harden off” the seedlings to acclimate them to outdoor conditions. This involves gradually exposing them to sunlight, wind, and cooler temperatures over a period of 7-10 days. Start by placing the seedlings outdoors in a sheltered location for an hour or two each day, gradually increasing the amount of time they spend outside.
2. **Prepare the Soil:** Bell peppers prefer well-drained soil that is rich in organic matter. Amend your garden soil with compost or aged manure before planting. If you’re growing in containers, use a high-quality potting mix.
3. **Choose a Sunny Location:** Bell peppers need at least 6-8 hours of sunlight per day to thrive. Choose a location in your garden that receives plenty of sun.
4. **Plant the Seedlings:** Dig holes that are slightly larger than the root balls of the seedlings. Gently remove the seedlings from their trays or pots and place them in the holes. Backfill with soil and gently firm around the base of the plants. Space the plants about 18-24 inches apart.
5. **Water Thoroughly:** Water the newly transplanted seedlings thoroughly to help them settle in.
6. **Add Mulch:** Apply a layer of mulch around the base of the plants to help retain moisture, suppress weeds, and regulate soil temperature. I like to use straw or shredded leaves.
Caring for Your Bell Pepper Plants
Now that your bell pepper plants are in the ground, it’s important to provide them with proper care to ensure a bountiful harvest.
1. **Watering:** Bell peppers need consistent moisture, especially during hot, dry weather. Water deeply whenever the top inch of soil feels dry to the touch. Avoid overwatering, as this can lead to root rot.
2. **Fertilizing:** Bell peppers are heavy feeders, so they need regular fertilization. Use a balanced fertilizer (e.g., 10-10-10) every 2-3 weeks, following the instructions on the package. You can also use organic fertilizers like compost tea or fish emulsion.
3. **Support:** As the bell peppers grow, they can become quite heavy and may need support to prevent the branches from breaking. Use stakes or cages to support the plants.
4. **Pruning:** Pruning bell pepper plants can help improve air circulation and encourage fruit production. Remove any suckers (small shoots that grow from the base of the plant) and any yellowing or diseased leaves.
5. **Pest Control:** Bell peppers can be susceptible to pests like aphids, flea beetles, and tomato hornworms. Inspect your plants regularly for signs of pests and take action promptly. You can use insecticidal soap, neem oil, or hand-pick the pests off the plants.
6. **Weed Control:** Keep the area around your bell pepper plants free of weeds, as weeds can compete with the plants for nutrients and water.
Harvesting Your Bell Peppers
The moment you’ve been waiting for! Harvesting your homegrown bell peppers is the most rewarding part of the process.
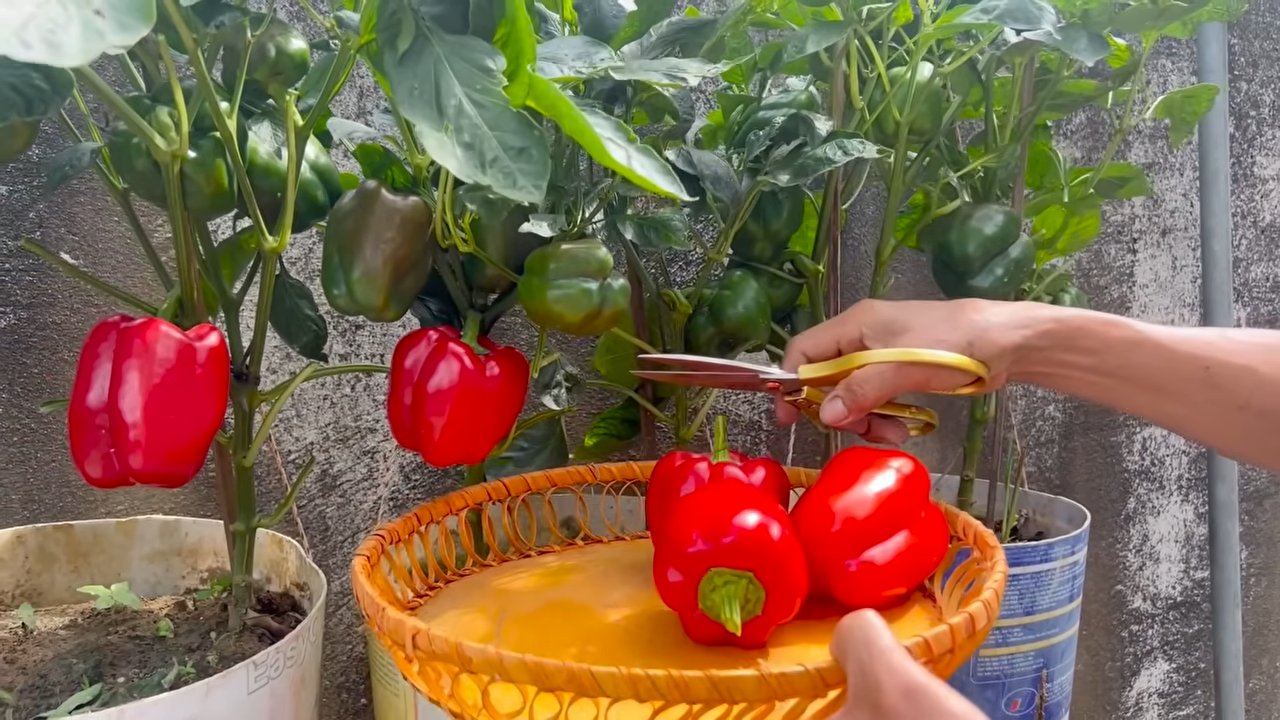
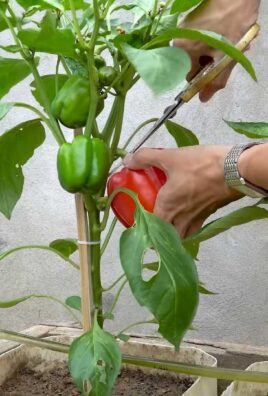
1. **Timing:** Bell peppers are typically ready to harvest about 60-80 days after transplanting, depending on the variety. The peppers should be firm, glossy, and have reached their mature color.
2. **Harvesting Technique:** Use a sharp knife or pruning shears to cut the peppers from the plant, leaving about an inch of stem attached.
3. **Green vs. Colored Peppers:** You can harvest green bell peppers at any time, but they will be sweeter and more flavorful if you allow them to ripen to their mature color (red, yellow, orange, etc.).
4. **Continuous Harvest:** Bell pepper plants will continue to produce peppers throughout the growing season if you harvest them regularly.
Troubleshooting Common Problems
Even with the best care, you may encounter some problems while growing bell peppers. Here are some common issues and how to address them:
* **Blossom End Rot:** This is caused by a calcium deficiency and results in a dark, sunken spot on the bottom of the pepper. To prevent blossom end rot, ensure that your soil is well-drained and that you are providing your plants with adequate calcium. You can add lime to the soil or use a calcium-rich fertilizer.
* **Sunscald:** This occurs when the peppers are exposed to too much direct sunlight, causing them to develop white or tan patches. To prevent sunscald, provide your plants with some shade during the hottest part of the day.
* **Poor Fruit Set:** This can be caused by a variety of factors, including high temperatures, low humidity, and lack of pollination. To improve fruit set, try hand-pollinating the flowers by gently shaking the plants or using a small paintbrush to transfer pollen from one flower to another.
* **Pest Infestations:** As mentioned earlier, bell peppers can be susceptible to pests. Inspect your plants regularly and take action promptly to control any infestations.
Growing bell peppers at home is a fun and rewarding experience. With a little bit of planning and care, you can enjoy a bountiful harvest of delicious, homegrown peppers. Happy gardening!
Conclusion
So, there you have it! Growing your own bell peppers at home isn’t just a gardening project; it’s an investment in flavor, freshness, and a sustainable lifestyle. We’ve walked you through the essential steps, from selecting the right seeds to nurturing your plants to a bountiful harvest. But why is this DIY trick a must-try?
Firstly, the taste difference is undeniable. Store-bought bell peppers, while convenient, often lack the vibrant, sweet flavor of homegrown varieties. When you grow your own, you control the entire process, ensuring optimal ripeness and flavor development. Imagine biting into a crisp, juicy bell pepper, bursting with sunshine and garden-fresh goodness – that’s the reward waiting for you.
Secondly, it’s incredibly rewarding. There’s a unique satisfaction in watching a tiny seed transform into a thriving plant, laden with colorful peppers. It connects you to nature, teaches you patience, and provides a sense of accomplishment that’s hard to replicate. Plus, you’ll have bragging rights among your friends and neighbors!
Thirdly, it’s cost-effective in the long run. While there’s an initial investment in seeds, soil, and perhaps some basic gardening tools, you’ll quickly recoup those costs with the abundance of bell peppers you’ll harvest. Think of all the money you’ll save at the grocery store!
But the benefits don’t stop there. Growing your own bell peppers allows you to choose from a wider variety of options than you typically find in stores. Want to try a purple bell pepper? Or a spicy shishito pepper? The possibilities are endless!
Ready to take your bell pepper game to the next level? Consider these variations:
* Container Gardening: If you’re short on space, bell peppers thrive in containers. Choose a pot that’s at least 12 inches in diameter and ensure it has good drainage. This is perfect for balconies, patios, or even indoor growing with the right lighting.
* Companion Planting: Bell peppers love the company of certain plants. Basil, marigolds, and carrots are excellent companions that can help deter pests and improve soil health.
* Hydroponics: For the adventurous gardener, hydroponics offers a soil-less growing method that can yield impressive results. It requires a bit more technical know-how, but the rewards are well worth it.
* Experiment with Varieties: Don’t limit yourself to the standard green bell pepper. Explore different colors, shapes, and flavors. Try growing yellow, orange, red, or even chocolate bell peppers.
Ultimately, growing your own bell peppers is a journey of discovery and delight. It’s a chance to connect with nature, enjoy fresh, flavorful produce, and save money along the way. So, what are you waiting for? Grab some seeds, get your hands dirty, and start growing your own bell peppers today!
We’re confident that you’ll find this DIY trick to be both enjoyable and rewarding. But don’t just take our word for it – try it for yourself! And when you do, we’d love to hear about your experience. Share your photos, tips, and stories with us in the comments below. Let’s create a community of bell pepper enthusiasts!
Frequently Asked Questions (FAQ)
Q: How long does it take to grow bell peppers from seed?
A: Growing bell peppers from seed to harvest typically takes between 60 to 90 days, depending on the variety and growing conditions. Starting seeds indoors 6-8 weeks before the last expected frost can give you a head start. Remember that the time to maturity is also affected by the amount of sunlight the plant receives and the overall health of the plant.
Q: What kind of soil is best for bell peppers?
A: Bell peppers thrive in well-draining, fertile soil that is rich in organic matter. A slightly acidic to neutral pH (around 6.0 to 7.0) is ideal. Amend your soil with compost or well-rotted manure before planting to improve its fertility and drainage. If you’re growing in containers, use a high-quality potting mix specifically formulated for vegetables.
Q: How often should I water my bell pepper plants?
A: Bell peppers need consistent moisture, especially during hot weather. Water deeply when the top inch of soil feels dry to the touch. Avoid overwatering, as this can lead to root rot. Mulching around the plants can help retain moisture and suppress weeds. Aim for watering 2-3 times a week, adjusting based on weather conditions.
Q: What are some common pests and diseases that affect bell peppers?
A: Common pests that affect bell peppers include aphids, spider mites, and pepper weevils. Diseases include blossom-end rot, fungal leaf spot, and viral diseases. Regularly inspect your plants for signs of pests or diseases and take appropriate action. Organic pest control methods, such as insecticidal soap or neem oil, can be effective. Ensure good air circulation around your plants to prevent fungal diseases. Blossom-end rot is caused by calcium deficiency, so ensure your soil has adequate calcium or use a calcium supplement.
Q: How much sunlight do bell peppers need?
A: Bell peppers need at least 6-8 hours of direct sunlight per day to thrive. Choose a sunny location in your garden or on your patio. If you’re growing indoors, use grow lights to supplement natural sunlight. Insufficient sunlight can lead to leggy plants and reduced fruit production.
Q: When is the best time to harvest bell peppers?
A: Bell peppers are typically ready to harvest when they are fully colored and firm to the touch. The exact color depends on the variety you’re growing. You can harvest green bell peppers before they fully ripen, but they will be sweeter and more flavorful if you allow them to ripen to their mature color. Use pruning shears or a sharp knife to cut the peppers from the plant, leaving a small stem attached.
Q: Can I grow bell peppers indoors?
A: Yes, you can grow bell peppers indoors, but it requires some extra effort. You’ll need a sunny window or grow lights to provide adequate light. Choose a compact variety of bell pepper that is well-suited for container gardening. Ensure good air circulation and pollinate the flowers by hand if necessary.
Q: How do I prevent blossom-end rot in bell peppers?
A: Blossom-end rot is caused by calcium deficiency, which can be exacerbated by inconsistent watering. Ensure your soil has adequate calcium by adding lime or bone meal before planting. Water your plants consistently and deeply, avoiding both overwatering and underwatering. Mulching around the plants can help retain moisture and prevent fluctuations in soil moisture levels.
Q: Can I save seeds from my bell peppers to plant next year?
A: Yes, you can save seeds from your bell peppers, but keep in mind that hybrid varieties may not produce true-to-type offspring. To save seeds, allow the peppers to fully ripen on the plant. Remove the seeds from the pepper and spread them out on a paper towel to dry completely. Store the dried seeds in an airtight container in a cool, dark place.
Q: What are some good companion plants for bell peppers?
A: Good companion plants for bell peppers include basil, marigolds, carrots, onions, and garlic. Basil helps repel pests and improve the flavor of bell peppers. Marigolds also deter pests and attract beneficial insects. Carrots help loosen the soil and improve drainage. Onions and garlic can help deter fungal diseases. Avoid planting bell peppers near fennel or brassicas (such as cabbage and broccoli), as they can inhibit growth.

Leave a Comment