

Balcony Mint Growing Tips: Ever dream of stepping onto your balcony and snipping fresh mint for a refreshing mojito or a fragrant cup of tea? I know I have! It’s easier than you think to transform your small outdoor space into a thriving herb garden, and mint is the perfect place to start.
Mint has a rich history, dating back to ancient Egypt, where it was used for medicinal purposes and in religious ceremonies. The Romans spread mint throughout Europe, and it has since become a staple in cuisines and gardens worldwide. But you don’t need acres of land to enjoy this versatile herb.
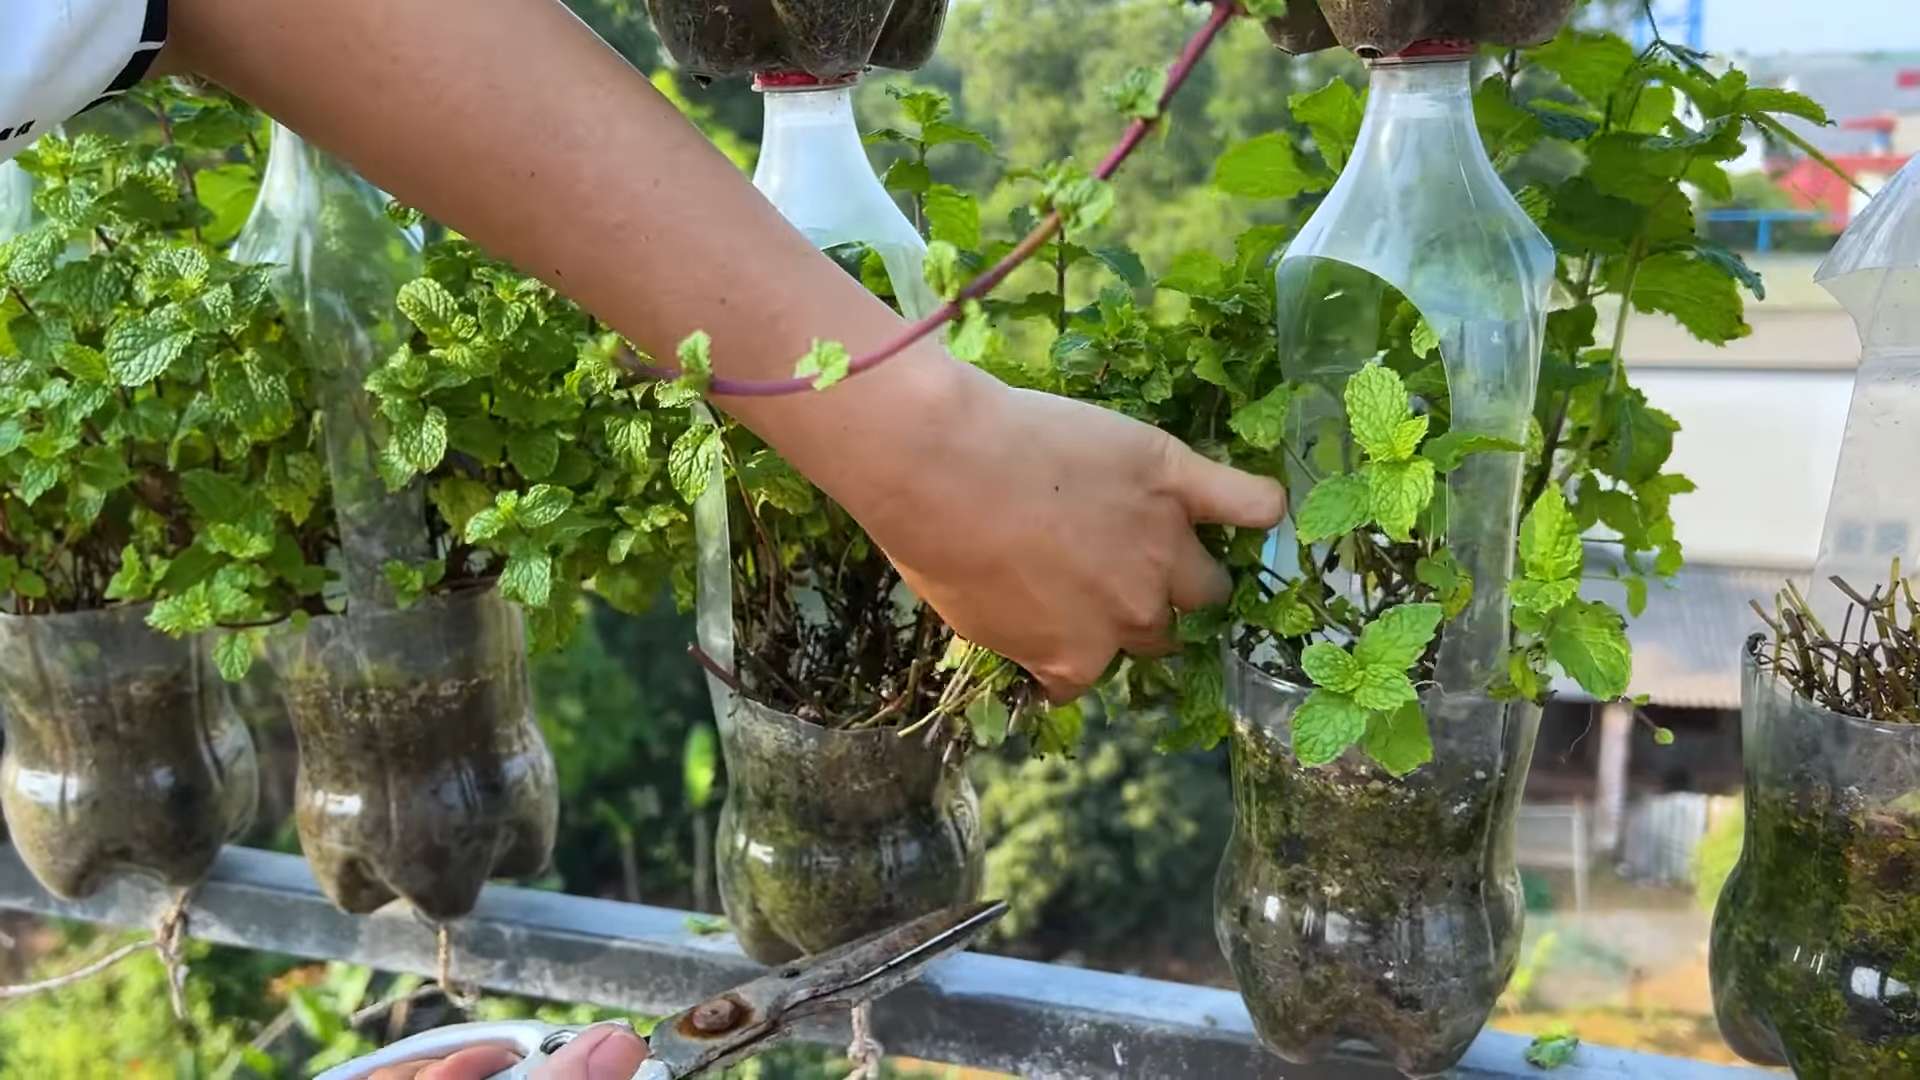
Many people struggle with growing mint because it can be invasive in a traditional garden bed. That’s where balcony gardening comes in! Growing mint in containers on your balcony not only controls its spread but also allows you to enjoy fresh, flavorful mint right outside your door. Plus, who doesn’t love a little DIY project that adds beauty and functionality to their home? In this article, I’m going to share some simple yet effective balcony mint growing tips and DIY hacks to help you cultivate a flourishing mint patch, even in the smallest of spaces. Get ready to unleash your inner gardener and enjoy the delightful aroma and taste of homegrown mint!
Growing Mint on Your Balcony: A Beginner’s Guide
Hey there, fellow plant enthusiasts! I’m so excited to share my experience with growing mint on my balcony. It’s surprisingly easy, incredibly rewarding (hello, fresh mojitos!), and adds a lovely fragrance to your outdoor space. Plus, having fresh mint on hand is a game-changer for cooking and teas. Let’s dive into how you can create your own little mint oasis!
Choosing the Right Mint Variety
First things first, let’s talk about mint varieties. There are tons of different types, each with its own unique flavor and aroma. Here are a few popular choices for balcony gardens:
* Peppermint: Classic, strong, and perfect for teas and desserts.
* Spearmint: Milder than peppermint, great for cocktails and savory dishes.
* Chocolate Mint: A fun twist with a hint of chocolate flavor.
* Apple Mint: Fruity and refreshing, ideal for salads and drinks.
* Orange Mint: Citrusy and bright, adds a unique flavor to your creations.
I personally love growing both peppermint and spearmint because they’re so versatile. But feel free to experiment and find your favorites!
Essential Supplies You’ll Need
Before we get started, let’s gather all the necessary supplies. This will make the whole process much smoother.
* Mint Seeds or Seedlings: You can start from seeds, but I find it easier to buy seedlings from a local nursery.
* Pots or Containers: Choose pots that are at least 6-8 inches in diameter. Mint spreads quickly, so giving it enough space is important.
* Potting Mix: Use a well-draining potting mix specifically designed for containers.
* Watering Can or Hose: For regular watering.
* Gardening Gloves: To keep your hands clean.
* Scissors or Pruning Shears: For harvesting and trimming.
* Optional: Fertilizer: A balanced liquid fertilizer can help your mint thrive.
Step-by-Step Planting Guide
Now for the fun part – planting your mint! Follow these steps for a successful start:
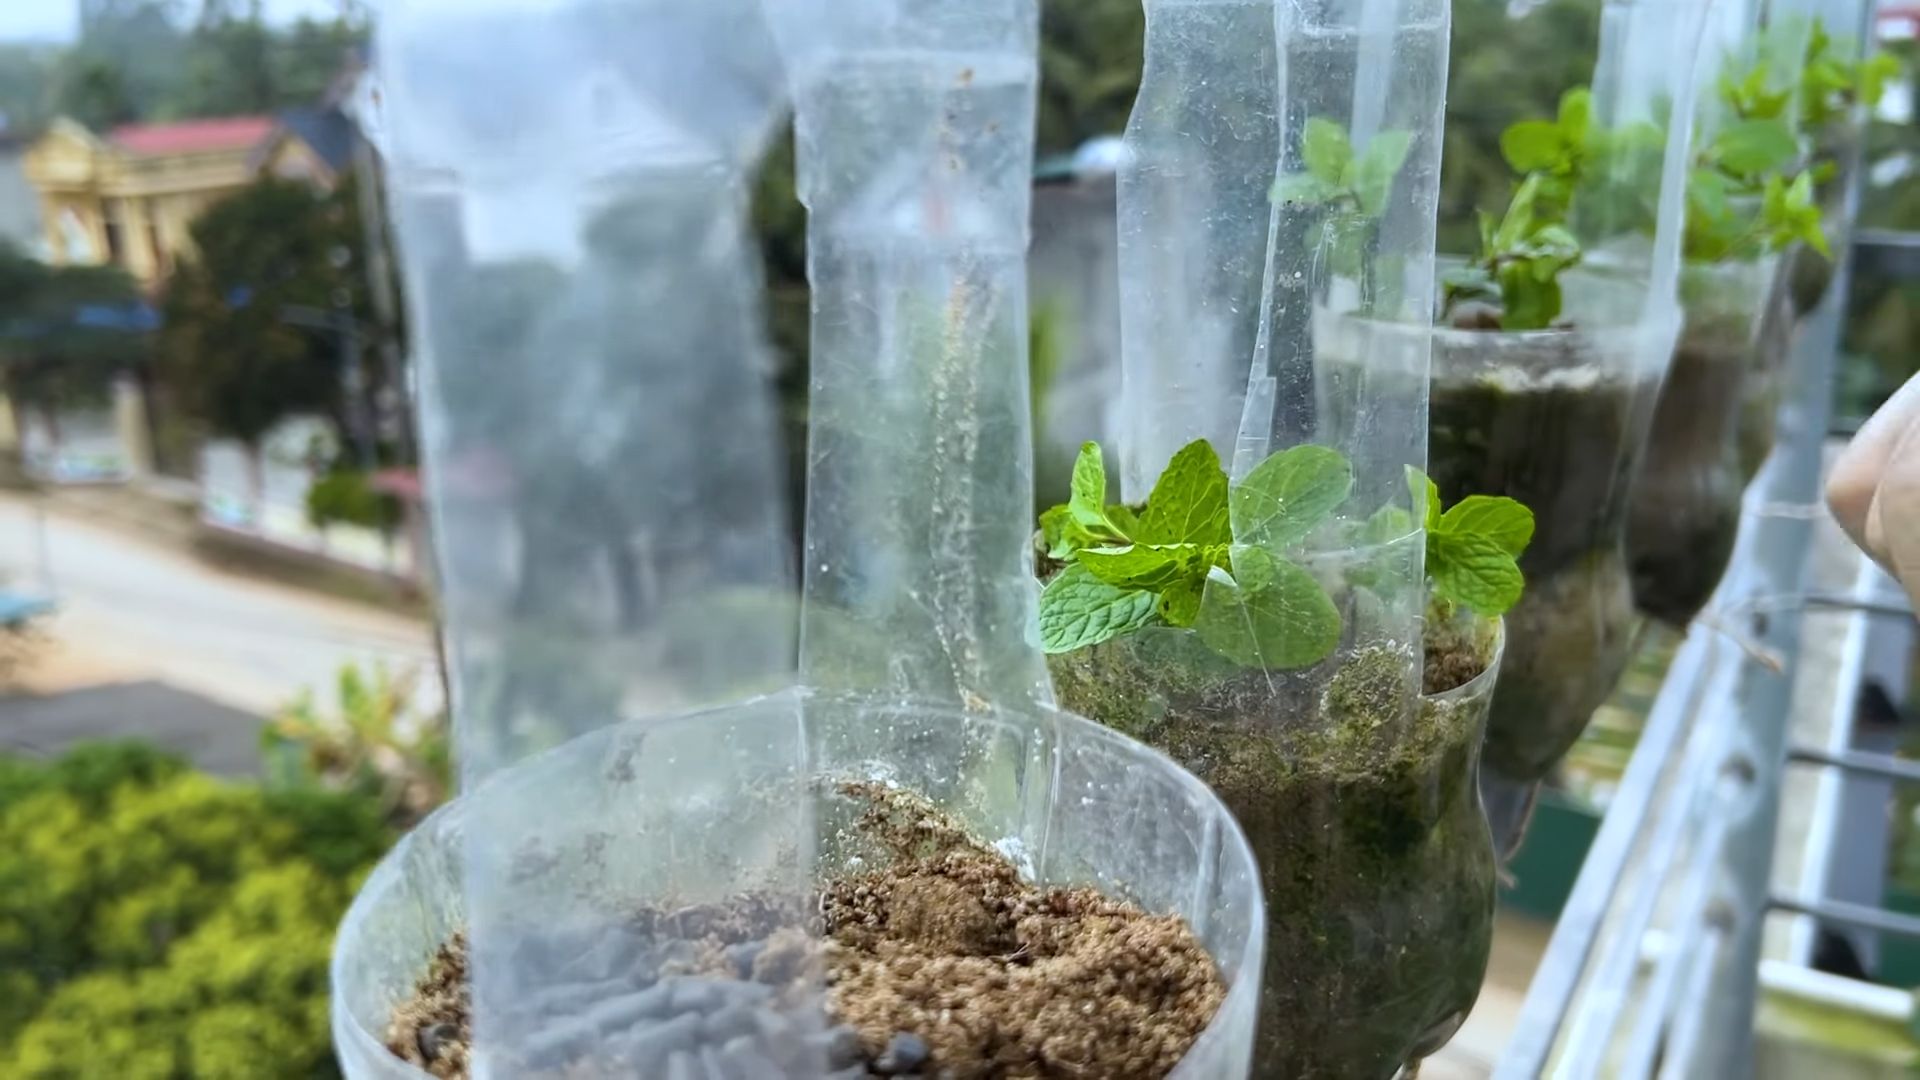
1. Prepare Your Pots: Make sure your pots have drainage holes at the bottom. This is crucial to prevent waterlogging, which can kill your mint. If your pot doesn’t have holes, you can drill some yourself. I like to add a layer of gravel or small stones at the bottom of the pot to further improve drainage.
2. Fill with Potting Mix: Fill your pots with the potting mix, leaving about an inch of space at the top. Gently pat down the soil to remove any air pockets.
3. Plant Your Mint:
* From Seedlings: Carefully remove the seedlings from their containers. Gently loosen the roots with your fingers. Dig a small hole in the potting mix and place the seedling in the hole. Cover the roots with soil and gently pat it down.
* From Seeds: Sprinkle the seeds evenly over the surface of the potting mix. Lightly cover them with a thin layer of soil.
4. Water Thoroughly: Water your newly planted mint thoroughly until water drains out of the bottom of the pot. This helps settle the soil and encourages root growth.
5. Choose the Right Location: Place your pots in a location that receives partial to full sunlight. Mint thrives in sunny spots, but it can also tolerate some shade, especially during the hottest part of the day. My balcony faces east, so my mint gets plenty of morning sun and some afternoon shade, which it seems to love.
Caring for Your Mint Plants
Once your mint is planted, it’s important to provide it with the right care to keep it healthy and productive.
1. Watering: Mint loves moisture, so water it regularly, especially during hot and dry weather. Check the soil moisture by sticking your finger into the soil. If the top inch feels dry, it’s time to water. Avoid overwatering, as this can lead to root rot. I usually water my mint every other day, but I adjust the frequency depending on the weather.
2. Fertilizing: Feed your mint with a balanced liquid fertilizer every 2-4 weeks during the growing season (spring and summer). This will provide it with the nutrients it needs to thrive. Follow the instructions on the fertilizer label for proper application.
3. Pruning: Regular pruning is essential for keeping your mint plants bushy and preventing them from becoming leggy. Pinch off the top leaves and stems to encourage branching. You can also remove any yellow or brown leaves. Don’t be afraid to prune your mint heavily – it will grow back quickly!
4. Controlling Spread: Mint is notorious for spreading aggressively. If you’re growing it in a garden bed, it can quickly take over. That’s why growing it in containers on your balcony is a great way to keep it contained. However, even in containers, mint can sometimes try to spread by sending out runners. Keep an eye out for these runners and trim them off to prevent them from escaping the pot.
5. Pest Control: Mint is generally pest-resistant, but it can sometimes be affected by aphids, spider mites, or whiteflies. If you notice any pests, try spraying them off with a strong stream of water. You can also use insecticidal soap or neem oil to control infestations. I prefer to use natural methods whenever possible to avoid harming beneficial insects.
Harvesting Your Mint
Harvesting your mint is the most rewarding part of the process! You can start harvesting as soon as your plants have enough leaves.
1. When to Harvest: The best time to harvest mint is in the morning, after the dew has dried. This is when the leaves are at their most flavorful.
2. How to Harvest: Use scissors or pruning shears to cut off stems just above a leaf node. This will encourage new growth. You can harvest up to one-third of the plant at a time without harming it.
3. Using Your Harvest: Fresh mint is best used immediately. You can add it to teas, cocktails, salads, desserts, and savory dishes. You can also dry mint for later use. To dry mint, hang the stems upside down in a cool, dry place until the leaves are brittle. Then, crumble the leaves and store them in an airtight container.
Troubleshooting Common Problems
Even with the best care, you might encounter some problems while growing mint. Here are a few common issues and how to address them:
* Yellowing Leaves: This can be caused by overwatering, underwatering, or nutrient deficiencies. Check the soil moisture and adjust your watering accordingly. If the soil is dry, water more frequently. If the soil is soggy, water less frequently. You can also try fertilizing your mint with a balanced liquid fertilizer.
* Brown Spots on Leaves: This can be caused by fungal diseases or pests. Remove any affected leaves and treat the plant with a fungicide or insecticide. Make sure to provide good air circulation to prevent fungal diseases.
* Leggy Growth: This is usually caused by insufficient sunlight. Move your mint to a sunnier location or provide it with supplemental lighting. Prune the plant heavily to encourage bushier growth.
* Slow Growth: This can be caused by poor soil, insufficient nutrients, or pests. Repot your mint in fresh potting mix and fertilize it regularly. Check for pests and treat them accordingly.
Overwintering Your Mint
If you live in a cold climate, you’ll need to overwinter your mint plants to protect them from frost.
1. Bring Indoors: Before the first frost, bring your mint plants indoors. Place them in a sunny window or under grow lights.
2. Reduce Watering: During the winter, mint plants need less water. Water them only when the soil is dry to the touch.
3. Prune Lightly: Prune your mint plants lightly to remove any dead or damaged leaves.
4. Monitor for Pests: Keep an eye out for pests, such as aphids or spider mites, and treat them accordingly.
5. Return Outdoors: In the spring, after the last frost, you can gradually acclimate your mint plants to outdoor conditions and return them to your balcony.
Mint in Different Climates
Mint is a pretty adaptable plant, but here’s a quick guide to how it fares in different climates:
* Warm Climates: Mint thrives in warm climates with plenty of sunshine. Just make sure to provide it with some afternoon shade during the hottest part of the day. Regular watering is essential.
* Temperate Climates: Mint does well in temperate climates with moderate temperatures and rainfall. Provide it with partial to full sunlight and regular watering.
* Cold Climates: Mint can tolerate cold temperatures, but it needs to be protected from frost. Overwinter your mint plants indoors or in a sheltered location.
Creative Uses for Your Balcony Mint
Now that you’re growing your own mint, let’s explore some creative ways to use it!
Conclusion
So, there you have it! Transforming your balcony into a fragrant, flourishing mint garden is not only achievable, but incredibly rewarding. We’ve walked through the simple steps, from selecting the right container and soil to providing the perfect amount of sunlight and water. But more than just a gardening project, growing your own mint is an investment in fresh flavors, aromatic delights, and a touch of green serenity right outside your door.
Why is this DIY balcony mint growing trick a must-try? Because it puts the power of fresh, organic ingredients directly into your hands. Imagine stepping onto your balcony and snipping a few sprigs of vibrant mint to infuse your morning tea, add a refreshing twist to your summer cocktails, or elevate your culinary creations. Store-bought mint simply can’t compare to the intense flavor and invigorating aroma of homegrown. Plus, you’ll be reducing your reliance on plastic packaging and supporting a more sustainable lifestyle.
But the beauty of balcony mint growing lies in its versatility. Feel free to experiment with different varieties of mint. Peppermint, spearmint, chocolate mint, even apple mint – each offers a unique flavor profile that can add a special touch to your recipes. Consider companion planting with other herbs like basil or rosemary to create a miniature herb garden oasis. You can also explore different container options, from traditional terracotta pots to repurposed containers like old buckets or even hanging baskets for a cascading effect.
Don’t be afraid to get creative with your mint harvest! Beyond culinary uses, mint can be used to make refreshing teas, homemade beauty products like toners and scrubs, or even as a natural insect repellent. The possibilities are endless!
We wholeheartedly encourage you to embark on this green adventure. It’s a simple, satisfying, and incredibly rewarding experience that will transform your balcony into a haven of freshness. And most importantly, we want to hear about your journey! Share your successes, your challenges, and your creative uses for your homegrown mint in the comments below. Let’s build a community of balcony mint enthusiasts and inspire others to embrace the joy of growing their own. So, grab your pots, soil, and mint seedlings, and let the balcony mint growing begin! We are confident that you will enjoy the process and the results.
Frequently Asked Questions (FAQs)
What is the best type of container to use for growing mint on a balcony?
The best type of container for growing mint on a balcony depends on your space and aesthetic preferences. However, there are a few key factors to consider. First, ensure the container has adequate drainage holes to prevent waterlogging, which can lead to root rot. Terracotta pots are a classic choice, as they allow for good airflow and drainage. Plastic pots are lightweight and retain moisture well, but be mindful of overwatering. You can also repurpose containers like old buckets, tubs, or even hanging baskets. The size of the container should be at least 12 inches in diameter to allow the mint roots to spread. Remember that mint spreads aggressively, so it’s best to keep it contained in a pot rather than planting it directly in the ground.
How much sunlight does balcony mint need?
Mint thrives in partial shade to full sun, requiring at least 4-6 hours of sunlight per day. On a balcony, observe the amount of sunlight your space receives throughout the day. If your balcony gets intense afternoon sun, consider providing some shade during the hottest hours to prevent the leaves from scorching. Morning sun is generally ideal, as it provides ample light without being too harsh. If your balcony is mostly shaded, you can still grow mint, but the growth may be slower and the flavor less intense. You might consider using a grow light to supplement the natural sunlight.
What kind of soil is best for growing mint in containers?
Mint prefers well-draining, fertile soil. A good potting mix specifically formulated for containers is ideal. You can also create your own mix by combining equal parts of potting soil, compost, and perlite or vermiculite. Compost adds nutrients and improves drainage, while perlite or vermiculite helps to aerate the soil and prevent compaction. Avoid using garden soil directly in containers, as it can become compacted and doesn’t drain well. Ensure the soil is slightly acidic to neutral, with a pH between 6.0 and 7.0.
How often should I water my balcony mint?
Water your balcony mint regularly, keeping the soil consistently moist but not waterlogged. The frequency of watering will depend on the weather conditions, the type of container, and the soil mix. Check the soil moisture by sticking your finger about an inch into the soil. If it feels dry, it’s time to water. Water deeply until water drains out of the drainage holes. Avoid overhead watering, as this can promote fungal diseases. During hot, dry weather, you may need to water daily. In cooler weather, you can water less frequently.
How do I harvest mint from my balcony garden?
Harvesting mint is easy and encourages new growth. Simply snip off stems just above a leaf node (the point where leaves grow from the stem). This will encourage the plant to branch out and produce more leaves. You can harvest mint throughout the growing season, as needed. For the best flavor, harvest mint in the morning, after the dew has dried. Avoid harvesting more than one-third of the plant at a time, as this can stress the plant.
How do I prevent my mint from taking over my balcony?
Mint is known for its aggressive spreading habits, so it’s important to keep it contained. Growing mint in pots is the best way to prevent it from taking over your balcony. You can also prune the plant regularly to control its growth. If you notice any runners (stems that grow along the surface of the soil) escaping from the pot, trim them off immediately.
What are some common pests and diseases that affect balcony mint?
Mint is generally a hardy plant, but it can be susceptible to certain pests and diseases. Common pests include aphids, spider mites, and whiteflies. These pests can be controlled with insecticidal soap or neem oil. Common diseases include powdery mildew and mint rust. Powdery mildew appears as a white, powdery coating on the leaves, while mint rust causes orange or brown spots on the leaves. To prevent these diseases, ensure good air circulation around the plants and avoid overhead watering. If you notice any signs of pests or diseases, treat them promptly to prevent them from spreading.
Can I grow different varieties of mint together in the same container?
While it’s possible to grow different varieties of mint together in the same container, it’s generally not recommended. Mint varieties can cross-pollinate, which can result in unpredictable flavors and growth habits. Additionally, some varieties may be more aggressive than others and outcompete the weaker varieties. If you want to grow multiple varieties of mint, it’s best to keep them in separate containers.
How do I overwinter my balcony mint?
In colder climates, balcony mint may need some protection during the winter months. You can bring the pots indoors and place them in a sunny location. Alternatively, you can insulate the pots by wrapping them in burlap or bubble wrap. Water sparingly during the winter, allowing the soil to dry out slightly between waterings. In the spring, once the weather warms up, you can move the pots back outdoors.
What are some creative uses for my homegrown balcony mint?
The possibilities are endless! Fresh mint can be used in a wide variety of culinary applications, from teas and cocktails to salads and desserts. You can also use mint to make homemade beauty products, such as toners and scrubs. Mint is also a natural insect repellent and can be used to deter mosquitoes and other pests. Get creative and experiment with different ways to use your homegrown mint!
Leave a Comment