

Growing Cabbage with Recycled Bottles might sound like something out of a science fiction novel, but trust me, it’s a surprisingly effective and eco-friendly way to boost your home garden! Have you ever dreamt of harvesting plump, healthy cabbages right from your backyard, but felt intimidated by pests, unpredictable weather, or simply a lack of space? Well, I’m here to tell you that those dreams can absolutely become a reality, and with a little help from something you probably already have lying around: plastic bottles!
The concept of using repurposed materials in gardening isn’t new. For centuries, resourceful gardeners have found innovative ways to protect their crops and maximize yields. From ancient civilizations utilizing clay pots to modern-day permaculture practices, the spirit of ingenuity has always been at the heart of successful gardening. This particular trick, growing cabbage with recycled bottles, taps into that same resourceful spirit, offering a simple yet powerful solution to common gardening challenges.
Why is this DIY hack so essential? Well, cabbage, while delicious and nutritious, can be a bit finicky. Pests like cabbage worms and slugs can wreak havoc on young plants, and fluctuating temperatures can stunt their growth. By using recycled bottles as mini-greenhouses, we can create a protected environment that shields our precious cabbage seedlings from these threats, giving them a head start and significantly increasing our chances of a bountiful harvest. Plus, you’re doing your part for the environment by giving those bottles a new lease on life! So, let’s dive in and discover how you can transform your cabbage-growing game with this simple, sustainable, and incredibly rewarding technique.
Growing Cabbage Like a Pro: My Recycled Bottle Hack!
Hey there, fellow gardeners! I’m so excited to share my super simple and effective method for growing healthy, happy cabbages using something we all have lying around: recycled plastic bottles! This isn’t just about saving money; it’s about creating a mini-ecosystem that protects your precious cabbage seedlings from pests, harsh weather, and even those pesky cutworms. Trust me, once you try this, you’ll never go back to traditional planting.
Why Recycled Bottles?
Before we dive into the how-to, let’s talk about why this method works so well. Using recycled bottles offers a ton of benefits:
* Pest Protection: The bottle acts as a physical barrier against slugs, snails, cabbage moths, and other critters that love to munch on young cabbage plants.
* Microclimate Creation: The bottle creates a warmer, more humid environment, which is perfect for seedlings to thrive, especially during cooler weather. It’s like a mini-greenhouse!
* Wind Protection: Young cabbage plants are delicate. The bottle shields them from strong winds that can damage their leaves and stunt their growth.
* Cutworm Defense: Cutworms are the bane of every gardener’s existence! They love to chew through the stems of young plants at the soil line. The bottle prevents them from reaching the stem.
* Water Conservation: The bottle helps to retain moisture in the soil, reducing the need for frequent watering.
* Upcycling: Of course, the best part is that you’re giving those plastic bottles a new life instead of sending them to the landfill!
What You’ll Need
Okay, let’s gather our supplies. This is a pretty low-cost project, which is always a win in my book!
* Recycled Plastic Bottles: You’ll need one bottle per cabbage plant. I prefer using 2-liter bottles, but any size will work as long as it’s tall enough to cover the seedling. Make sure they are clean and clear.
* Cabbage Seedlings: You can start your own from seed or buy them from a local nursery. I usually opt for seedlings to save time.
* Gardening Gloves: To protect your hands.
* Scissors or a Utility Knife: For cutting the bottles. Be careful!
* Trowel or Small Shovel: For planting the seedlings.
* Watering Can or Hose: For watering the plants.
* Well-Draining Soil: Cabbage loves rich, well-draining soil. Amend your garden soil with compost or other organic matter if needed.
* Optional:
* Drill or Nail: For creating drainage holes in the bottles (if needed).
* Plant Markers: To label your cabbage varieties.
Step-by-Step Guide: Planting Cabbage with Recycled Bottles
Alright, let’s get our hands dirty! Here’s the step-by-step process I use for planting cabbage with recycled bottles:
1. Preparing the Bottles
This is a crucial step, so pay close attention!
1. Clean the Bottles: Make sure your bottles are clean and free of any labels or residue. Wash them with soap and water, and rinse them thoroughly.
2. Cut off the Bottom: Using your scissors or utility knife, carefully cut off the bottom of the bottle. You want to remove the entire bottom section, leaving you with a cylinder. Be extra cautious when using a knife. I usually make a small pilot hole with the knife and then use scissors to finish the cut.
3. Create Drainage Holes (Optional): Depending on your soil and climate, you might want to add some drainage holes to the bottom of the bottle. If you live in a rainy area or have heavy clay soil, this is a good idea. You can use a drill or a nail to poke a few small holes around the base of the bottle. I usually add about 4-5 holes.
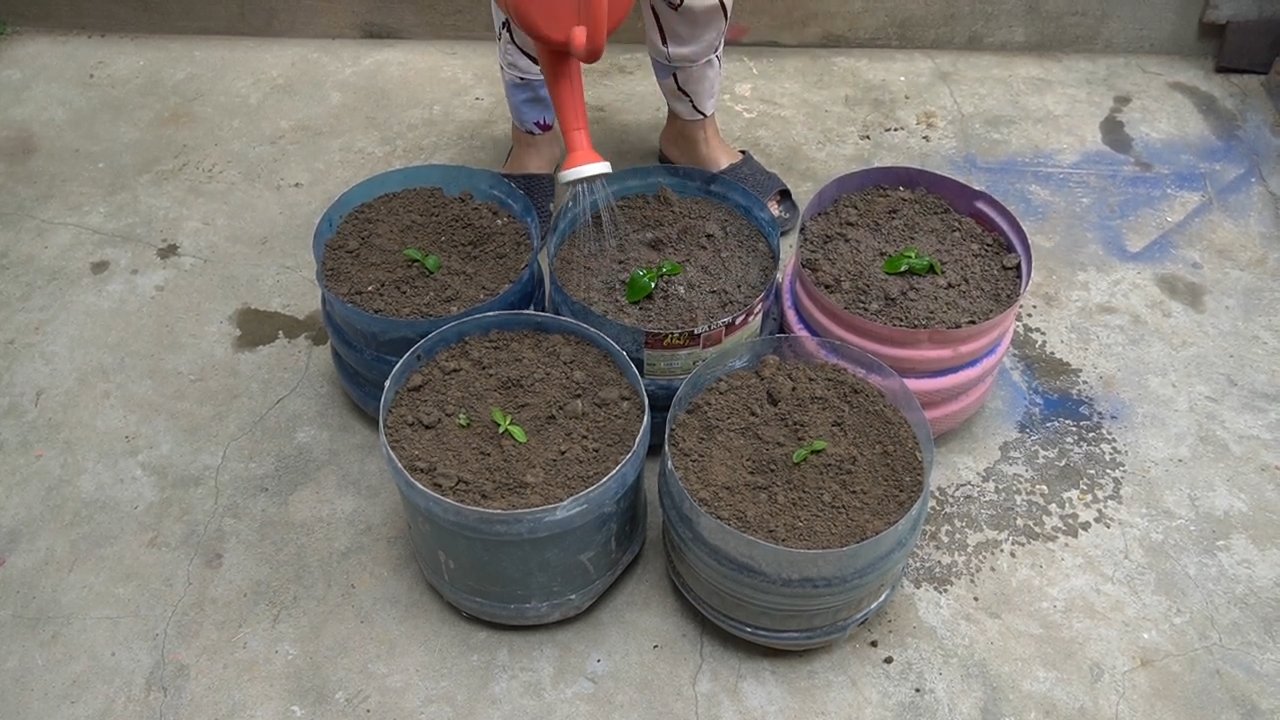
2. Preparing the Planting Area
Now, let’s get our garden bed ready for the cabbage seedlings.
1. Choose a Sunny Location: Cabbage needs at least 6 hours of sunlight per day, so choose a spot in your garden that gets plenty of sun.
2. Prepare the Soil: Cabbage prefers rich, well-draining soil. Dig a hole that is slightly larger than the root ball of your cabbage seedling. Amend the soil with compost or other organic matter to improve drainage and fertility. I like to add a handful of bone meal to the planting hole to provide extra phosphorus, which promotes strong root growth.
3. Space the Plants: Cabbage plants need plenty of space to grow. Space them about 18-24 inches apart. This will allow them to get enough sunlight and air circulation.
3. Planting the Cabbage Seedlings
This is where the magic happens!
1. Gently Remove the Seedling: Carefully remove the cabbage seedling from its container. Gently loosen the roots with your fingers.
2. Place the Seedling in the Hole: Place the seedling in the prepared hole, making sure that the top of the root ball is level with the surrounding soil.
3. Backfill with Soil: Fill the hole with soil, gently firming it around the base of the plant.
4. Water Thoroughly: Water the seedling thoroughly after planting. This will help to settle the soil and encourage root growth.
4. Installing the Bottle Protection
This is the key to the whole operation!
1. Place the Bottle Over the Seedling: Carefully place the cut plastic bottle over the cabbage seedling, pushing it slightly into the soil. You want the bottle to be firmly anchored in the ground so that it doesn’t blow away.
2. Secure the Bottle (Optional): If you live in a windy area, you might want to secure the bottle with stakes or rocks. This will prevent it from being blown over and damaging the plant. I usually just push the bottle a little deeper into the soil.
5. Ongoing Care
Now that your cabbage seedlings are planted and protected, it’s time to provide them with the care they need to thrive.
1. Water Regularly: Cabbage needs consistent moisture, especially during hot, dry weather. Water deeply whenever the soil feels dry to the touch. Avoid overwatering, as this can lead to root rot.
2. Fertilize: Cabbage is a heavy feeder, so it needs regular fertilization. I like to use a balanced organic fertilizer every few weeks. Follow the instructions on the fertilizer package.
3. Weed Control: Keep the area around your cabbage plants free of weeds. Weeds compete with the cabbage for nutrients and water.
4. Monitor for Pests and Diseases: Keep an eye out for any signs of pests or diseases. If you notice any problems, take action immediately. The bottle helps a lot, but sometimes pests can still find their way in.
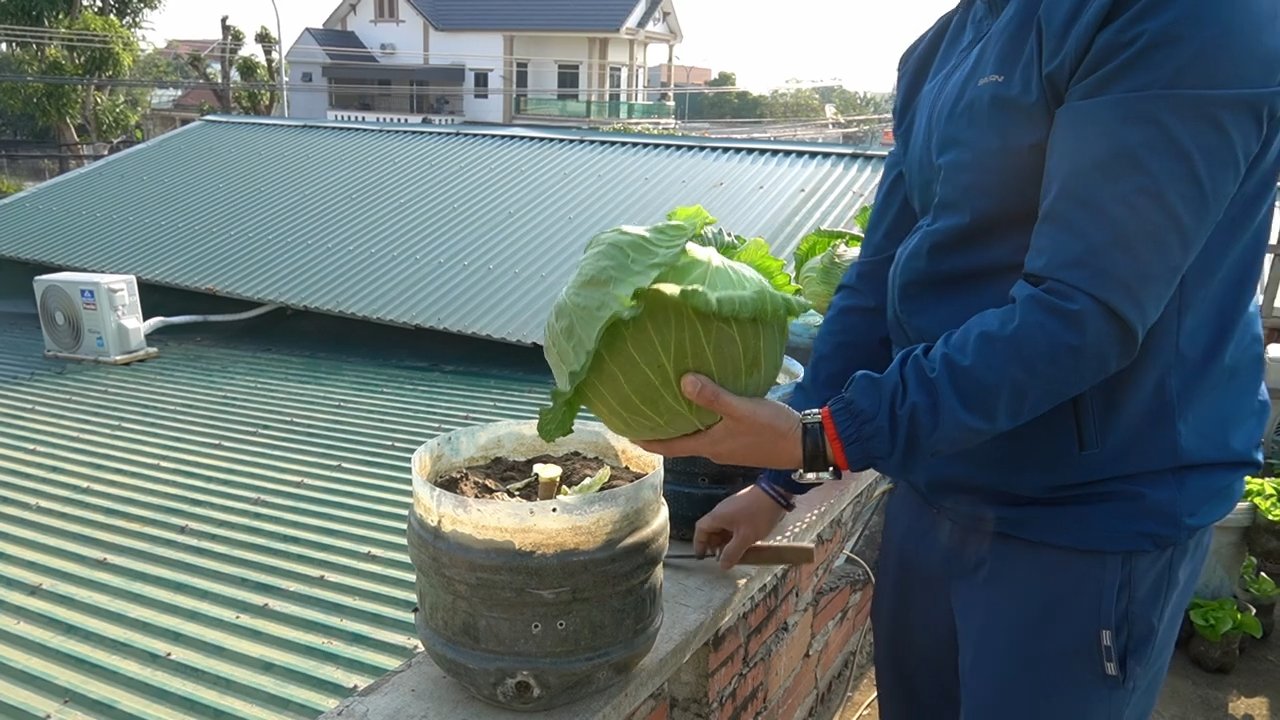
5. Remove the Bottle: As the cabbage plant grows, it will eventually outgrow the bottle. Once the plant is large enough and the weather is consistently warm, you can remove the bottle. This usually happens after a few weeks. I usually wait until the plant is touching the sides of the bottle.
Troubleshooting Tips
Even with the best planning, things can sometimes go wrong. Here are a few troubleshooting tips to help you out:
* Bottle Fogging Up: If the bottle is fogging up, it means that there is too much moisture inside. You can remove the bottle for a few hours each day to allow the plant to air out. You can also add more drainage holes to the bottle.
* Plant Growing Too Quickly: If the plant is growing too quickly and hitting the top of the bottle, you can either remove the bottle or cut the top off to give the plant more room.
* Pests Inside the Bottle: Occasionally, pests may find their way inside the bottle. If this happens, you can try to remove them by hand or use an organic insecticide.
* Bottle Blowing Away: If the bottle is blowing away, make sure it is firmly anchored in the soil. You can also use stakes or rocks to secure it.
Harvesting Your Cabbage
After all your hard work, it’s time to harvest your delicious cabbage!
1. Check for Firmness: Cabbage is ready to harvest when the head is firm and solid. Gently squeeze the head to check for firmness.
2. Cut the Head: Use a sharp knife to cut the head from the stem. Leave a few outer leaves on the stem, as these may produce smaller side heads.
3. Store Properly: Store your cabbage in a cool, dry place. It will keep for several weeks in the refrigerator.
My Personal Experience
I’ve been using this recycled bottle method for growing cabbage for years, and it’s been a game-changer. I’ve had significantly fewer problems with pests and diseases, and my cabbage plants are always healthier and
Conclusion
So, there you have it! Growing cabbage with recycled bottles isn’t just a quirky gardening hack; it’s a game-changer for your cabbage patch. It addresses several key challenges that often plague cabbage cultivation, from deterring pesky cabbage white butterflies and their ravenous caterpillars to providing a mini-greenhouse effect that encourages faster, healthier growth, especially in cooler climates. This simple, cost-effective method transforms readily available waste into a valuable tool for any gardener, regardless of experience level.
The beauty of this DIY trick lies in its adaptability. Feel free to experiment with different types of plastic bottles. Clear bottles work best for maximizing sunlight exposure, but you could also try using colored bottles for a unique aesthetic effect. Just be mindful that darker colors might absorb more heat, so monitor the temperature inside the bottle on particularly sunny days. You can also adjust the size of the bottle based on the size of your cabbage seedlings. For smaller seedlings, a smaller bottle might suffice, while larger seedlings will benefit from the extra space provided by a larger bottle.
Consider adding small ventilation holes to the bottles if you live in a warmer climate to prevent overheating and ensure proper air circulation. This is especially important during the hottest part of the day. You can also use the bottles to create a sort of mini-cloche system, removing the bottle caps during the day for ventilation and replacing them at night to retain warmth.
Beyond pest control and temperature regulation, this method also helps retain moisture in the soil, reducing the need for frequent watering. This is particularly beneficial in drier climates or during periods of drought. The bottle acts as a barrier, preventing water from evaporating too quickly and ensuring that your cabbage plants receive a consistent supply of moisture.
But the real magic happens when you see your cabbages thriving under these recycled guardians. The satisfaction of turning waste into something useful, coupled with the joy of harvesting healthy, vibrant cabbages, is an experience that every gardener should have.
We wholeheartedly encourage you to try this **growing cabbage with recycled bottles** method in your own garden. It’s a sustainable, effective, and incredibly rewarding way to cultivate this versatile vegetable. Don’t be afraid to get creative and adapt the technique to suit your specific needs and growing conditions.
And most importantly, we want to hear about your experiences! Share your photos, tips, and stories with us in the comments below. Let’s build a community of cabbage-loving gardeners who are passionate about sustainable practices and innovative solutions. Together, we can transform our gardens and reduce our environmental impact, one recycled bottle at a time. So, grab those bottles, plant those seedlings, and get ready to witness the amazing power of DIY gardening!
Frequently Asked Questions
What kind of plastic bottles are best to use?
Ideally, you should use clear plastic bottles, such as those from water or soda. Clear bottles allow the maximum amount of sunlight to reach the cabbage seedlings, which is essential for their growth. Avoid using bottles that have contained harmful chemicals or pesticides, as these could contaminate the soil and harm your plants. Thoroughly wash and rinse the bottles before using them to remove any residue. The size of the bottle should be appropriate for the size of your cabbage seedling; larger seedlings will require larger bottles.
How do I prevent the bottles from overheating the plants?
Overheating can be a concern, especially in warmer climates or during the summer months. To prevent this, you can create ventilation holes in the bottles. Use a drill or a sharp knife to make a few small holes near the top of the bottle. This will allow excess heat to escape and ensure proper air circulation. You can also remove the bottle caps during the hottest part of the day to further improve ventilation. Monitor the temperature inside the bottles regularly, and adjust the ventilation as needed. If you notice that the leaves of your cabbage plants are wilting or scorching, it’s a sign that the bottles are overheating.
How long should I keep the bottles on the plants?
The duration for which you keep the bottles on the plants depends on several factors, including the climate, the size of the seedlings, and the presence of pests. Generally, you can keep the bottles on until the cabbage plants have outgrown them or until the risk of pest infestation has subsided. In cooler climates, you might want to keep the bottles on for a longer period to provide extra warmth and protection. In warmer climates, you might need to remove them sooner to prevent overheating. Observe your plants closely and adjust the duration accordingly. Once the plants are strong enough to withstand the elements and resist pests, you can remove the bottles completely.
Will this method work for other plants besides cabbage?
Yes, this method can be adapted for other plants that are susceptible to pests or that benefit from a warmer microclimate. Plants like broccoli, cauliflower, and kale, which are also members of the Brassica family, can benefit from this technique. You can also use it for other vegetables like tomatoes, peppers, and eggplants, especially when starting them from seedlings. The key is to choose plants that are of a suitable size for the bottles and that require similar growing conditions. Experiment with different plants and see what works best in your garden.
How does this method help with watering?
The recycled bottles help with watering in several ways. First, they act as a barrier, preventing water from evaporating too quickly from the soil. This means that you don’t need to water your cabbage plants as frequently. Second, the bottles help to direct water towards the roots of the plants, ensuring that they receive a consistent supply of moisture. When you water your plants, pour the water directly into the bottle, allowing it to slowly seep into the soil. This method also helps to prevent water from splashing onto the leaves, which can reduce the risk of fungal diseases.
What if I don’t have enough recycled bottles?
If you don’t have enough recycled bottles, you can ask friends, family, and neighbors to save them for you. You can also check with local recycling centers or businesses that might have surplus bottles. Alternatively, you can use other materials to create similar protective structures, such as plastic containers, glass jars, or even row covers. The goal is to create a barrier that protects the plants from pests and provides a warmer microclimate. Be creative and resourceful, and you’ll find a solution that works for you.
Does this method affect the taste of the cabbage?
No, this method should not affect the taste of the cabbage. The recycled bottles primarily serve as a protective barrier and a mini-greenhouse, creating a more favorable environment for growth. The taste of the cabbage is primarily determined by factors such as the variety of cabbage, the quality of the soil, and the amount of sunlight and water it receives. As long as you provide your cabbage plants with the proper care and nutrients, they should taste just as delicious as cabbages grown using other methods.
Is this method environmentally friendly?
Yes, this method is very environmentally friendly. It promotes recycling by repurposing plastic bottles that would otherwise end up in landfills. It also reduces the need for pesticides, which can be harmful to the environment and to human health. By growing your own cabbage using this method, you are contributing to a more sustainable food system and reducing your carbon footprint. It’s a win-win situation for both your garden and the planet.
Leave a Comment