

Grow cantaloupes at home? Absolutely! Imagine biting into a juicy, sun-ripened cantaloupe that you nurtured from seed to fruit, right in your own backyard. Forget those bland, store-bought melons – we’re talking about a flavor explosion that only comes from homegrown goodness. For centuries, cantaloupes have been cherished for their sweetness and refreshing qualities, gracing tables from ancient Egypt to modern-day picnics.
But let’s be honest, the thought of growing cantaloupes can seem a little intimidating. Maybe you’ve heard they’re tricky, or that they need a ton of space. That’s where this DIY guide comes in! I’m here to demystify the process and share some simple, effective tricks and hacks that will have you harvesting your own delicious cantaloupes in no time.
Why do you need these DIY tricks? Because everyone deserves to experience the joy of fresh, homegrown produce. Plus, growing your own food is a fantastic way to connect with nature, reduce your carbon footprint, and save money. So, are you ready to grow cantaloupes at home and impress your friends and family with your green thumb? Let’s get started!
Growing Cantaloupes at Home: A Sweet DIY Project
Hey there, fellow gardening enthusiasts! Ever dreamt of biting into a juicy, homegrown cantaloupe, bursting with flavor that store-bought melons just can’t match? Well, dream no more! Growing cantaloupes at home is totally achievable, even if you’re a beginner. It takes a little planning and effort, but trust me, the reward is absolutely worth it. I’m going to walk you through everything you need to know, from seed to sweet success.
Choosing the Right Cantaloupe Variety
First things first, let’s talk about varieties. Not all cantaloupes are created equal, and some are better suited for home gardens than others. Consider your climate and the amount of space you have.
* ‘Minnesota Midget’: This is a great choice for smaller gardens or containers. It produces small, personal-sized melons.
* ‘Hales Best Jumbo’: A classic variety known for its delicious flavor and good disease resistance.
* ‘Athena’: A popular hybrid that’s early-maturing and produces uniform, flavorful melons.
* ‘Ambrosia’: Another excellent hybrid with a sweet, aromatic flavor and good disease resistance.
I personally love ‘Minnesota Midget’ because they are perfect for a single serving and don’t take up too much space. But feel free to experiment and find your favorite!
Getting Started: Seeds or Seedlings?
You have two options here: starting from seed or buying seedlings. Starting from seed gives you more control over the process and can be more economical. However, it requires a bit more time and effort. Buying seedlings is faster and easier, but you’ll have fewer variety choices.
* Starting from Seed: Sow seeds indoors about 4-6 weeks before the last expected frost.
* Buying Seedlings: Look for healthy seedlings with sturdy stems and no signs of disease or pests.
I usually start my cantaloupes from seed indoors. It’s a fun way to get a head start on the growing season!
Preparing the Soil: The Foundation for Success
Cantaloupes are heavy feeders, meaning they need nutrient-rich soil to thrive. Proper soil preparation is crucial for a bountiful harvest.
* Sunlight: Cantaloupes need at least 6-8 hours of direct sunlight per day. Choose a sunny spot in your garden.
* Soil Type: They prefer well-drained, sandy loam soil with a pH of 6.0-6.8.
* Soil Amendment: Amend the soil with plenty of compost or well-rotted manure to improve drainage and fertility.
Here’s how I prepare my soil:
1. Clear the area: Remove any weeds, rocks, or debris from the planting area.
2. Dig it up: Dig the soil to a depth of at least 12 inches.
3. Add compost: Mix in a generous amount of compost (about 2-3 inches) into the soil.
4. Test the pH: Use a soil testing kit to check the pH. If it’s too acidic, add lime. If it’s too alkaline, add sulfur.
5. Create mounds or rows: Cantaloupes grow best on slightly raised mounds or rows to improve drainage.
Planting Your Cantaloupes: Giving Them Room to Grow
Whether you’re transplanting seedlings or direct-sowing seeds, proper spacing is essential. Cantaloupes need plenty of room to spread out.
* Spacing: Space plants 2-3 feet apart in rows that are 4-6 feet apart.
* Planting Depth: Sow seeds about 1 inch deep. Transplant seedlings at the same depth they were growing in their containers.
Planting from Seed:
1. Sow seeds: Sow 2-3 seeds per hill or mound.
2. Water gently: Water the soil gently to avoid disturbing the seeds.
3. Thin seedlings: Once the seedlings emerge, thin them to one plant per hill.
Transplanting Seedlings:
1. Harden off seedlings: Gradually acclimate the seedlings to outdoor conditions by exposing them to increasing amounts of sunlight and wind over a week.
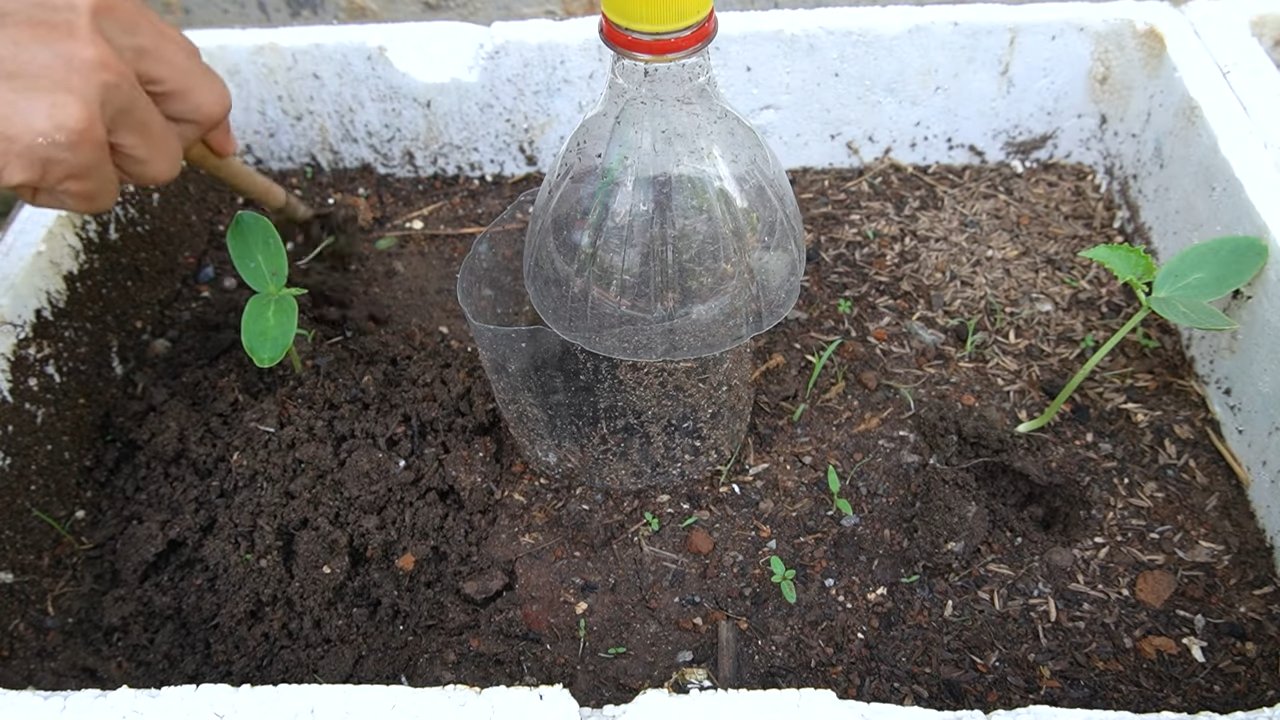
2. Dig a hole: Dig a hole that’s slightly larger than the seedling’s root ball.
3. Remove seedling from container: Gently remove the seedling from its container, being careful not to damage the roots.
4. Place seedling in hole: Place the seedling in the hole and backfill with soil.
5. Water thoroughly: Water the seedling thoroughly.
Caring for Your Cantaloupes: Watering, Fertilizing, and Pruning
Once your cantaloupes are planted, it’s time to provide them with the care they need to thrive.
* Watering: Water deeply and regularly, especially during hot, dry weather. Avoid overhead watering, which can promote fungal diseases. Drip irrigation is ideal.
* Fertilizing: Fertilize every 2-3 weeks with a balanced fertilizer or compost tea.
* Weeding: Keep the area around your cantaloupes free of weeds.
* Pest Control: Monitor your plants for pests like aphids, squash bugs, and cucumber beetles. Use organic pest control methods as needed.
* Pruning: Pruning isn’t strictly necessary, but it can improve air circulation and fruit production. Remove any dead or diseased leaves and stems.
My Watering Routine:
I usually water my cantaloupes deeply 2-3 times a week, depending on the weather. I check the soil moisture before watering to make sure they actually need it. Overwatering can be just as harmful as underwatering!
Fertilizing Tips:
I like to use compost tea as a natural fertilizer. It’s easy to make and provides a gentle boost of nutrients. You can also use a balanced organic fertilizer, following the instructions on the label.
Dealing with Common Problems: Pests and Diseases
Cantaloupes can be susceptible to various pests and diseases. Here’s how to deal with some common problems:
* Aphids: These tiny insects suck sap from plants. Control them with insecticidal soap or neem oil.
* Squash Bugs: These pests can damage leaves and stems. Handpick them or use insecticidal soap.
* Cucumber Beetles: These beetles can spread diseases. Use row covers to protect young plants.
* Powdery Mildew: This fungal disease causes a white, powdery coating on leaves. Improve air circulation and use a fungicide if necessary.
* Fusarium Wilt: This soilborne disease can cause wilting and death. Choose disease-resistant varieties and practice crop rotation.
My Pest Control Strategy:
I prefer to use organic pest control methods whenever possible. I regularly inspect my plants for pests and diseases and take action promptly. Row covers are a great way to protect young plants from pests.
Harvesting Your Cantaloupes: The Sweet Reward
The moment you’ve been waiting for! Knowing when to harvest your cantaloupes is key to enjoying their delicious flavor.
* Days to Maturity: Check the seed packet or plant tag for the days to maturity.
* Color Change: The rind should change from green to a tan or yellowish color.
* Aroma: The melon should have a sweet, musky aroma.
* Stem Separation: The stem should easily slip from the vine with a gentle tug. This is called “full slip.”
My Harvesting Tips:
I usually start checking my cantaloupes for ripeness a few days before the expected harvest date. I gently tug on the stem to see if it slips easily. If it does, it’s ready to pick!
Here’s how I harvest my cantaloupes:
1. Gently tug on the stem: If the stem slips easily from the vine, the melon is ripe.
2. Cut the stem: If the stem doesn’t slip easily, use a sharp knife to cut it close to the melon.
3. Handle with care: Cantaloupes are delicate, so handle them with care to avoid bruising.
4. Store properly: Store ripe cantaloupes in the refrigerator for up to a week.
Enjoying Your Homegrown Cantaloupes: Savor the Flavor
Congratulations! You’ve successfully grown your own cantaloupes. Now it’s time to enjoy the fruits (or rather, melons) of your labor.
* Eat them fresh: Slice them up and enjoy them as a refreshing snack or dessert.
* Make smoothies: Add them to your favorite smoothie recipe for a sweet and healthy treat.
* Grill them: Grilled cantaloupe is a surprisingly delicious side dish.
* Make salsa: Cantaloupe salsa is
Conclusion
So, there you have it! Growing cantaloupes at home, while it might seem daunting at first, is an incredibly rewarding experience that brings the sweet taste of summer right to your backyard. We’ve walked through the essential steps, from selecting the right seeds and preparing your garden to nurturing your vines and harvesting your prize-winning melons.
Why is this DIY trick a must-try? Because store-bought cantaloupes simply can’t compare to the flavor and satisfaction of a homegrown melon. You control the entire process, ensuring the use of organic practices and harvesting at peak ripeness. Plus, you’ll be amazed by the sheer abundance a single cantaloupe plant can produce. Imagine sharing your delicious, homegrown cantaloupes with friends and family – a true testament to your gardening prowess!
But the fun doesn’t stop there! Feel free to experiment with different cantaloupe varieties. Consider trying a ‘Honey Rock’ for its exceptionally sweet flavor or a ‘Hales Best Jumbo’ for its impressive size. You can also explore companion planting to enhance your cantaloupe’s growth. Marigolds, for example, are known to deter pests, while basil can improve the flavor of your melons.
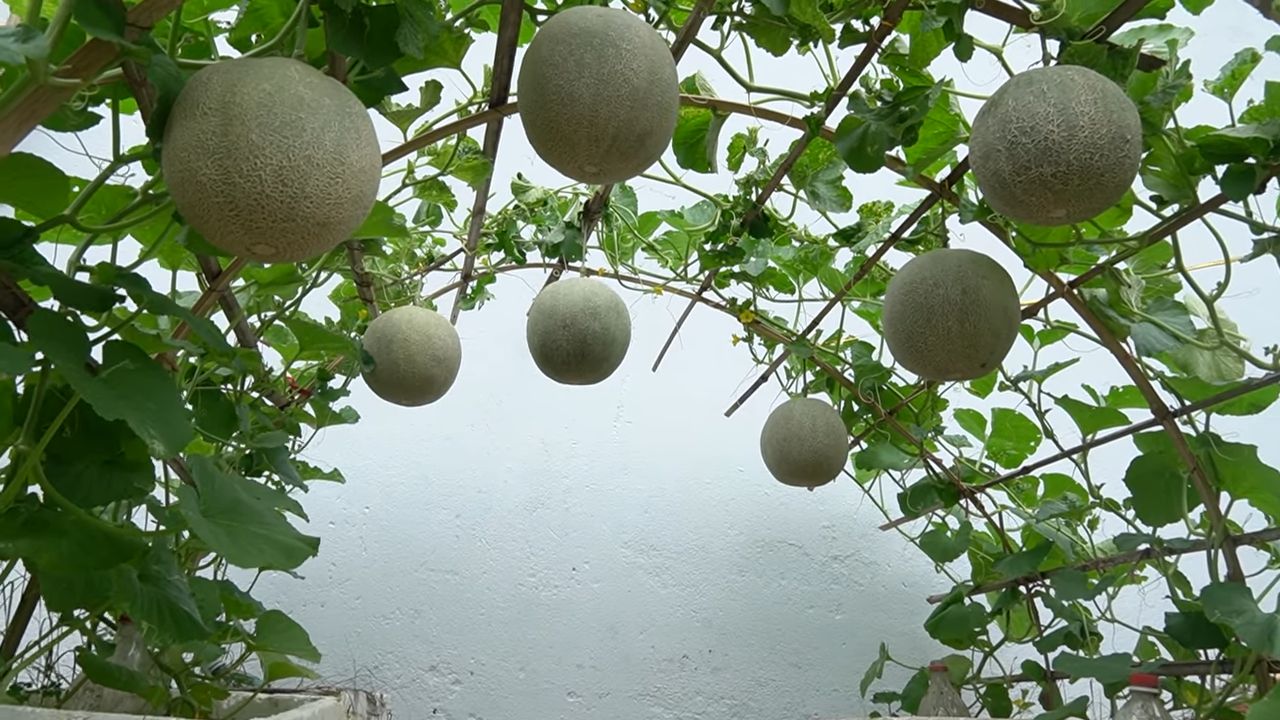
Another exciting variation is vertical gardening. If you’re short on space, train your cantaloupe vines to climb a trellis or fence. This not only saves space but also improves air circulation, reducing the risk of fungal diseases. Just be sure to provide adequate support for the heavy melons as they develop. You can use slings made from old t-shirts or pantyhose to cradle the fruit.
Don’t be afraid to get your hands dirty and embrace the learning process. Gardening is all about experimentation and adapting to your local climate and soil conditions. Even if you encounter a few challenges along the way, the ultimate reward – a juicy, flavorful, homegrown cantaloupe – is well worth the effort.
We wholeheartedly encourage you to try this DIY trick and experience the joy of growing your own cantaloupes. It’s a fantastic way to connect with nature, enjoy fresh, healthy food, and impress your friends and neighbors with your gardening skills.
And now, we want to hear from you! Have you tried growing cantaloupes at home before? What tips and tricks have you learned along the way? Share your experiences, successes, and even your challenges in the comments below. Let’s create a community of cantaloupe enthusiasts and learn from each other. Your insights could be invaluable to other aspiring gardeners. So, grab your seeds, prepare your garden, and get ready to enjoy the sweet taste of success! Let’s all become experts at how to **grow cantaloupes at home**!
Frequently Asked Questions (FAQ)
1. What is the best time to plant cantaloupe seeds?
The ideal time to plant cantaloupe seeds is after the last frost when the soil temperature has warmed to at least 65°F (18°C). In most regions, this is typically in late spring or early summer. You can start seeds indoors 3-4 weeks before the last expected frost to get a head start. This is especially helpful in areas with shorter growing seasons. Starting indoors gives the seedlings a chance to develop a strong root system before being transplanted into the garden. Remember to harden off the seedlings gradually before transplanting them to acclimate them to outdoor conditions.
2. How much sunlight do cantaloupes need?
Cantaloupes require at least 6-8 hours of direct sunlight per day to thrive. Choose a planting location that receives full sun throughout the day. Insufficient sunlight can result in smaller, less flavorful melons. If you live in a particularly hot climate, some afternoon shade may be beneficial to prevent the vines from scorching. However, ensure that the plants still receive ample sunlight during the morning and early afternoon.
3. What type of soil is best for growing cantaloupes?
Cantaloupes prefer well-drained, fertile soil with a pH between 6.0 and 6.8. Amend the soil with compost or other organic matter to improve drainage and fertility. Avoid heavy clay soils, as they can retain too much moisture and lead to root rot. If you have clay soil, consider planting cantaloupes in raised beds or containers to improve drainage. A soil test can help you determine the pH and nutrient levels of your soil and guide you in making necessary amendments.
4. How often should I water cantaloupe plants?
Water cantaloupe plants deeply and regularly, especially during hot, dry weather. Aim to keep the soil consistently moist but not waterlogged. Water at the base of the plants to avoid wetting the foliage, which can increase the risk of fungal diseases. As the fruits begin to ripen, reduce watering slightly to concentrate the sugars and enhance the flavor. Mulching around the plants can help retain moisture and suppress weeds.
5. How do I know when a cantaloupe is ripe?
There are several indicators that a cantaloupe is ripe. The most reliable sign is the stem. When the cantaloupe is ripe, the stem will easily slip from the vine with a gentle tug, leaving a smooth, shallow indentation. Other signs include a change in color from green to tan or yellow, a fragrant aroma, and a slight softening of the blossom end. Avoid picking cantaloupes that are still green or have a hard, unyielding rind.
6. What are some common pests and diseases that affect cantaloupes?
Common pests that affect cantaloupes include aphids, squash bugs, cucumber beetles, and vine borers. Diseases include powdery mildew, downy mildew, and fusarium wilt. Regularly inspect your plants for signs of pests or diseases and take appropriate action. Organic pest control methods, such as insecticidal soap or neem oil, can be effective for controlling aphids and other pests. Ensure good air circulation around the plants to prevent fungal diseases. Crop rotation can also help reduce the risk of soilborne diseases.
7. Can I grow cantaloupes in containers?
Yes, you can grow cantaloupes in containers, but you’ll need a large container (at least 20 gallons) with good drainage. Choose a dwarf or bush variety of cantaloupe that is better suited for container gardening. Use a high-quality potting mix and provide adequate support for the vines. Water and fertilize regularly, as container-grown plants tend to dry out and deplete nutrients more quickly. Place the container in a location that receives at least 6-8 hours of direct sunlight per day.
8. How do I fertilize cantaloupe plants?
Fertilize cantaloupe plants with a balanced fertilizer (e.g., 10-10-10) at planting time. Side-dress with a nitrogen-rich fertilizer when the vines begin to run and again when the fruits start to develop. Avoid over-fertilizing, as this can lead to excessive vine growth and reduced fruit production. Organic fertilizers, such as compost tea or fish emulsion, can also be used to provide nutrients to the plants.
9. How long does it take for cantaloupes to mature?
Cantaloupes typically take 70-90 days to mature from seed to harvest. The exact time will depend on the variety, climate, and growing conditions. Keep track of the planting date and monitor the plants regularly for signs of ripeness.
10. Can I save seeds from my homegrown cantaloupes?
Yes, you can save seeds from your homegrown cantaloupes, but only if they are open-pollinated varieties. Hybrid varieties will not produce true-to-type seeds. To save seeds, scoop them out of a ripe cantaloupe and rinse them thoroughly to remove any pulp. Spread the seeds out on a paper towel to dry completely. Store the dried seeds in an airtight container in a cool, dark place.

Leave a Comment