

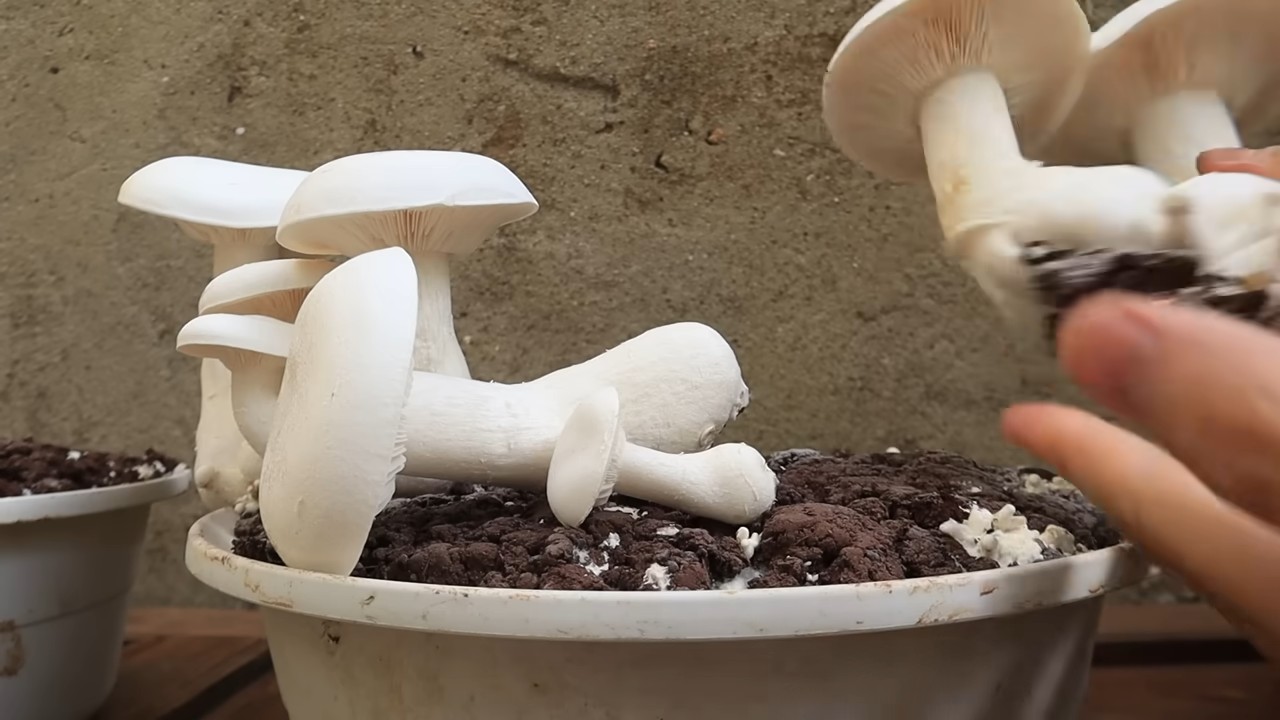
Mushroom Cultivation Bowl Countertop: Imagine harvesting fresh, gourmet mushrooms right from your kitchen countertop! Sounds like a dream, right? Well, it doesn’t have to be! I’m so excited to share a simple and rewarding DIY project that will bring the magic of mushroom growing into your home.
For centuries, mushroom cultivation has been revered in various cultures, from ancient China where they were prized for their medicinal properties to European traditions where foraging for wild mushrooms was a cherished pastime. Now, you can tap into this rich history and experience the joy of growing your own delicious fungi, without needing a sprawling garden.
Why a mushroom cultivation bowl countertop project, you ask? Because it’s accessible, space-saving, and incredibly satisfying! Let’s face it, not everyone has the space or time for a full-blown mushroom farm. This DIY method allows you to enjoy fresh, organic mushrooms even if you live in a small apartment. Plus, it’s a fantastic way to reduce your grocery bill and impress your friends with your newfound green thumb (or should I say, brown thumb?).
This article will guide you through each step of creating your own thriving mushroom cultivation bowl, from selecting the right materials to harvesting your first crop. Get ready to embark on a fun and educational journey into the fascinating world of fungi!
DIY Mushroom Cultivation Bowl: From Countertop to Gourmet Delight
Okay, mushroom lovers, gather ’round! I’m going to walk you through building your very own mushroom cultivation bowl, right on your countertop. Forget those expensive kits – we’re doing this from scratch, and it’s surprisingly easy (and rewarding!). This guide focuses on cultivating oyster mushrooms, as they’re beginner-friendly and produce delicious results.
What You’ll Need: The Essential Supplies
Before we dive in, let’s make sure you have everything you need. This is crucial for a smooth and successful mushroom growing experience.
* A Large Bowl (or Two): I recommend a glass or ceramic bowl that’s at least 8 inches in diameter and 6 inches deep. You’ll need one for the actual cultivation and potentially another for pasteurizing your substrate.
* Oyster Mushroom Spawn: This is the “seed” for your mushrooms. You can purchase oyster mushroom spawn online from reputable suppliers. Make sure it’s fresh!
* Substrate: This is the food source for your mushrooms. Straw is a fantastic and readily available option. You can also use hardwood sawdust, but straw is easier for beginners.
* Microwaveable Bags (Optional but Recommended): These are great for pasteurizing your straw in the microwave. Freezer bags work well.
* Spray Bottle: For misting your mushrooms to maintain humidity.
* Hydrogen Peroxide (3%): A little bit goes a long way to help prevent contamination.
* Rubbing Alcohol (70%): For sanitizing your work area and tools.
* Gloves: To keep your hands clean and prevent contamination.
* A Clean Work Area: This is super important! Wipe down your countertop with rubbing alcohol before you start.
* A Lid or Plastic Wrap: To cover your bowl and maintain humidity during colonization.
* Optional: Perlite: This helps maintain humidity in the fruiting chamber.
* Optional: Fruiting Chamber: A clear plastic tote or container to create a humid environment for fruiting.
Phase 1: Preparing the Substrate (Straw Pasteurization)
This is arguably the most important step. Proper pasteurization kills off competing organisms, giving your oyster mushrooms a head start.
1. Chop the Straw: Cut the straw into small pieces, about 1-3 inches long. This makes it easier for the mushroom mycelium to colonize. I like to use scissors or a sharp knife.
2. Soak the Straw: Place the chopped straw in a large container (like a bucket or another bowl) and cover it with water. Add a tablespoon of hydrogen peroxide to the water. This helps to further inhibit unwanted mold and bacteria. Let it soak for at least 24 hours. This step is crucial for hydrating the straw.
3. Microwave Pasteurization (Recommended): Divide the soaked straw into microwaveable bags. Don’t pack them too tightly. Add a little bit of the soaking water to each bag to keep the straw moist. Seal the bags loosely, leaving a small vent for steam to escape. Microwave each bag on high for 2-3 minutes, or until the straw is steaming hot. The goal is to heat the straw to around 160-180°F (71-82°C) to kill off competing organisms.
4. Alternative Pasteurization (If No Microwave): If you don’t have a microwave, you can pasteurize the straw in a large pot on the stovetop. Bring the water to a simmer (not a boil!) and keep the straw submerged for about an hour.
5. Cool Down: After pasteurization, let the straw cool down completely. This is really important! You don’t want to introduce your mushroom spawn to hot straw. I usually let it cool overnight.
Phase 2: Inoculating the Substrate (Mixing Spawn and Straw)
Now for the fun part – introducing the mushroom spawn to the prepared straw!
1. Sanitize Everything: Before you start, thoroughly sanitize your work area, your bowl, and your hands with rubbing alcohol. Wear gloves to prevent contamination.
2. Break Up the Spawn: Gently break up the oyster mushroom spawn into smaller pieces. This will help it spread more evenly throughout the straw.
3. Layering Time: In your clean bowl, create a layer of pasteurized straw. Then, sprinkle a layer of mushroom spawn on top of the straw. Repeat this process, alternating layers of straw and spawn, until you’ve used up all the straw and spawn. The final layer should be straw. I aim for about a 1:10 spawn-to-substrate ratio.
4. Gentle Press: Lightly press down on the straw to compact it slightly. This helps the mycelium make good contact with the substrate.
5. Cover and Wait: Cover the bowl with a lid or plastic wrap. If using plastic wrap, poke a few small holes for air exchange. Place the bowl in a dark, warm place (around 70-75°F or 21-24°C).
Phase 3: Colonization (Mycelium Growth)
This is where the magic happens! The mushroom mycelium will start to grow and colonize the straw.
1. Patience is Key: This process can take anywhere from 2 to 4 weeks, depending on the temperature and humidity. Before we dive in, let’s make sure you have everything you need. This is crucial for a smooth and successful mushroom growing experience. * A Large Bowl (or Two): I recommend a glass or ceramic bowl that’s at least 8 inches in diameter and 6 inches deep. You’ll need one for the actual cultivation and potentially another for pasteurizing your substrate. This is arguably the most important step. Proper pasteurization kills off competing organisms, giving your oyster mushrooms a head start. 1. Chop the Straw: Cut the straw into small pieces, about 1-3 inches long. This makes it easier for the mushroom mycelium to colonize. I like to use scissors or a sharp knife. Now for the fun part – introducing the mushroom spawn to the prepared straw! 1. Sanitize Everything: Before you start, thoroughly sanitize your work area, your bowl, and your hands with rubbing alcohol. Wear gloves to prevent contamination. This is where the magic happens! The mushroom mycelium will start to grow and colonize the straw. 1. Patience is Key: This process can take anywhere from 2 to 4 weeks, depending on the temperature and humidity. Once the straw is fully colonized (covered in white mycelium), it’s time to trigger fruiting! 1. Create a Fruiting Chamber (Recommended): A fruiting chamber helps maintain the high humidity that oyster mushrooms need to fruit. A clear plastic tote or container works well. Place a layer of perlite at the bottom of the tote and moisten it with water. This will help increase humidity. * Contamination: The biggest challenge in mushroom cultivation is contamination. Always sanitize your work area and tools thoroughly. Use hydrogen peroxide in your soaking water to help prevent contamination. Congratulations! You’ve successfully grown your own oyster mushrooms. Now it’s time to enjoy the fruits (or rather, fungi) of your labor. Oyster mushrooms are delicious sautéed, grilled, or added to soups and stews. Happy growing! So, there you have it! Transforming your countertop into a thriving mushroom cultivation bowl is not just a fun project; it’s a gateway to fresh, flavorful fungi right in your own kitchen. We’ve walked you through the simple steps, highlighting the ease and accessibility of this DIY method. Forget expensive kits and complicated setups. This approach is all about embracing simplicity and sustainability, allowing you to enjoy the fruits (or rather, the mushrooms!) of your labor with minimal effort. Why is this a must-try? Because it empowers you to take control of your food source, reduces your reliance on store-bought produce, and connects you with the fascinating world of mycology. Imagine the satisfaction of harvesting your own oyster mushrooms for a creamy pasta dish, or adding shiitakes to a savory stir-fry, all grown from your very own countertop mushroom cultivation bowl. The flavor is unparalleled, the freshness unmatched, and the bragging rights? Priceless. But the beauty of this project lies in its adaptability. Feel free to experiment with different mushroom varieties. Oyster mushrooms are a great starting point due to their resilience and rapid growth, but don’t be afraid to venture into the realm of shiitakes, lion’s mane, or even wine caps as you gain experience. Consider incorporating different substrates to see how they impact growth and flavor. Coffee grounds, straw, and hardwood sawdust all offer unique nutritional profiles for your fungal friends. Don’t be afraid to get creative with your container! While we’ve focused on a bowl, you could adapt this method to a repurposed bucket, a plastic storage bin, or even a decorative planter. Just ensure proper ventilation and drainage to prevent mold and ensure healthy mushroom development. We encourage you to embark on this exciting journey of home mushroom cultivation. It’s a rewarding experience that will not only enhance your culinary creations but also deepen your appreciation for the natural world. Share your experiences with us! We’d love to see your countertop mushroom cultivation bowl setups, hear about your successes (and even your challenges!), and learn from your unique adaptations. Post photos and stories on social media using #CountertopMushrooms and let’s build a community of home-growing enthusiasts. Ready to ditch the grocery store mushrooms and embrace the deliciousness of homegrown fungi? Give this DIY trick a try. You won’t regret it! Oyster mushrooms are generally considered the easiest and most forgiving for beginners. They are fast-growing, relatively resistant to contamination, and produce abundant yields. Shiitake mushrooms are another popular choice, although they require a bit more patience and attention to detail. Lion’s mane mushrooms are gaining popularity, but they can be more challenging to cultivate indoors. Ultimately, the best type of mushroom depends on your experience level, the available resources, and your personal preferences. Start with oyster mushrooms and then branch out as you become more confident. The ideal substrate depends on the type of mushroom you are growing. Oyster mushrooms thrive on a variety of substrates, including straw, coffee grounds, and hardwood sawdust. Shiitake mushrooms prefer hardwood sawdust, particularly oak or maple. Lion’s mane mushrooms also do well on hardwood sawdust. It’s crucial to properly pasteurize or sterilize your substrate before inoculation to eliminate competing microorganisms. Pasteurization can be achieved by soaking the substrate in hot water (around 160-180°F) for an hour or two. Sterilization requires a pressure cooker and is more effective at eliminating contaminants. Maintaining adequate humidity is essential for successful mushroom cultivation. Mushrooms require a humid environment to develop properly. You can increase humidity by misting the mushrooms regularly with water, covering the bowl with a clear plastic bag or dome (creating a mini-greenhouse effect), or placing the bowl in a humid location, such as a bathroom or basement. Avoid over-misting, as this can lead to mold growth. Aim for a humidity level of around 80-90%. A hygrometer can help you monitor the humidity levels accurately. Mushrooms don’t require a lot of light, but they do need some light to fruit properly. Indirect sunlight or artificial light is sufficient. Avoid direct sunlight, as it can dry out the mushrooms and damage them. A north-facing window or a fluorescent light source is ideal. The light helps the mushrooms orient themselves and develop their characteristic shape and color. The time it takes for mushrooms to grow depends on the variety, the substrate, and the environmental conditions. Oyster mushrooms typically fruit within a week or two of inoculation. Shiitake mushrooms can take several weeks or even months to fruit. Patience is key! Monitor your mushrooms regularly and adjust the humidity, temperature, and light as needed. Contamination is a common problem in mushroom cultivation. Signs of contamination include mold growth (green, black, or other unusual colors), foul odors, and unusual textures on the substrate. If you suspect contamination, it’s best to remove the affected area immediately to prevent it from spreading. In severe cases, you may need to discard the entire bowl. Maintaining proper hygiene and using sterile techniques can help prevent contamination. Yes, you can often get multiple flushes (harvests) from a single substrate block. After harvesting, allow the substrate to rest for a week or two, then rehydrate it by soaking it in water. This will encourage another flush of mushrooms. The number of flushes you can get depends on the type of mushroom and the quality of the substrate. Eventually, the substrate will become depleted of nutrients and will no longer produce mushrooms. At that point, you can compost it and use it to enrich your garden soil. Unusual shapes or colors can be caused by a variety of factors, including insufficient light, improper humidity, or genetic mutations. If your mushrooms are growing in strange shapes, try increasing the light levels or adjusting the humidity. If the color is unusual, it could be a sign of contamination. If you’re unsure, it’s best to consult with an experienced mushroom grower or mycologist. Yes, it is generally safe to eat mushrooms grown in a countertop cultivation bowl, provided that you have properly identified the species and followed safe cultivation practices. Only consume mushrooms that you are 100% certain are edible. If you are unsure, it’s best to err on the side of caution and discard them. Always cook mushrooms thoroughly before eating them. Mushroom spawn or cultures can be purchased from a variety of online retailers and local nurseries. Look for reputable suppliers that offer high-quality spawn and cultures. When selecting spawn, make sure it is compatible with the type of mushroom you want to grow and the substrate you plan to use. Liquid cultures are another option, but they require more advanced techniques.
2. Check for Contamination:What You’ll Need: The Essential Supplies
* Oyster Mushroom Spawn: This is the “seed” for your mushrooms. You can purchase oyster mushroom spawn online from reputable suppliers. Make sure it’s fresh!
* Substrate: This is the food source for your mushrooms. Straw is a fantastic and readily available option. You can also use hardwood sawdust, but straw is easier for beginners.
* Microwaveable Bags (Optional but Recommended): These are great for pasteurizing your straw in the microwave. Freezer bags work well.
* Spray Bottle: For misting your mushrooms to maintain humidity.
* Hydrogen Peroxide (3%): A little bit goes a long way to help prevent contamination.
* Rubbing Alcohol (70%): For sanitizing your work area and tools.
* Gloves: To keep your hands clean and prevent contamination.
* A Clean Work Area: This is super important! Wipe down your countertop with rubbing alcohol before you start.
* A Lid or Plastic Wrap: To cover your bowl and maintain humidity during colonization.
* Optional: Perlite: This helps maintain humidity in the fruiting chamber.
* Optional: Fruiting Chamber: A clear plastic tote or container to create a humid environment for fruiting.Phase 1: Preparing the Substrate (Straw Pasteurization)
2. Soak the Straw: Place the chopped straw in a large container (like a bucket or another bowl) and cover it with water. Add a tablespoon of hydrogen peroxide to the water. This helps to further inhibit unwanted mold and bacteria. Let it soak for at least 24 hours. This step is crucial for hydrating the straw.
3. Microwave Pasteurization (Recommended): Divide the soaked straw into microwaveable bags. Don’t pack them too tightly. Add a little bit of the soaking water to each bag to keep the straw moist. Seal the bags loosely, leaving a small vent for steam to escape. Microwave each bag on high for 2-3 minutes, or until the straw is steaming hot. The goal is to heat the straw to around 160-180°F (71-82°C) to kill off competing organisms.
4. Alternative Pasteurization (If No Microwave): If you don’t have a microwave, you can pasteurize the straw in a large pot on the stovetop. Bring the water to a simmer (not a boil!) and keep the straw submerged for about an hour.
5. Cool Down: After pasteurization, let the straw cool down completely. This is really important! You don’t want to introduce your mushroom spawn to hot straw. I usually let it cool overnight.Phase 2: Inoculating the Substrate (Mixing Spawn and Straw)
2. Break Up the Spawn: Gently break up the oyster mushroom spawn into smaller pieces. This will help it spread more evenly throughout the straw.
3. Layering Time: In your clean bowl, create a layer of pasteurized straw. Then, sprinkle a layer of mushroom spawn on top of the straw. Repeat this process, alternating layers of straw and spawn, until you’ve used up all the straw and spawn. The final layer should be straw. I aim for about a 1:10 spawn-to-substrate ratio.
4. Gentle Press: Lightly press down on the straw to compact it slightly. This helps the mycelium make good contact with the substrate.
5. Cover and Wait: Cover the bowl with a lid or plastic wrap. If using plastic wrap, poke a few small holes for air exchange. Place the bowl in a dark, warm place (around 70-75°F or 21-24°C).Phase 3: Colonization (Mycelium Growth)
2. Check for Contamination: Keep an eye on the bowl for any signs of contamination, such as green, black, or orange mold. If you see any contamination, unfortunately, you’ll need to discard the entire batch.
3. Maintain Humidity: If the straw starts to look dry, lightly mist it with water.
4. Observe the Mycelium: You’ll start to see white, fuzzy growth spreading throughout the straw. This is the mushroom mycelium, and it’s a good sign!Phase 4: Fruiting (Mushroom Production)
2. Introduce Light and Fresh Air: Move the bowl to a location with indirect light and good air circulation. Oyster mushrooms need light to fruit properly.
3. Maintain High Humidity: Mist the mushrooms several times a day to keep them moist. The humidity should be around 80-90%. If you’re using a fruiting chamber, mist the perlite regularly.
4. Observe Pinning: After a few days, you’ll start to see small mushroom “pins” forming. These are the baby mushrooms!
5. Harvest Time: The mushrooms will grow rapidly. Harvest them when the caps are fully formed but before they start to drop spores. You can gently twist or cut the mushrooms off the straw.Tips and Troubleshooting
* Humidity: Oyster mushrooms need high humidity to fruit properly. If you’re having trouble maintaining humidity, try using a fruiting chamber or covering the bowl with a plastic bag.
* Temperature: Oyster mushrooms prefer temperatures around 60-70°F (15-21°C) for fruiting.
* Patience: Mushroom cultivation takes time and patience. Don’t get discouraged if your first attempt isn’t perfect. Keep trying, and you’ll eventually be rewarded with delicious, homegrown mushrooms!
* Experiment: Once you’ve mastered the basics, try experimenting with different substrates, such as coffee grounds or cardboard.Enjoy Your Homegrown Mushrooms!

Conclusion
Frequently Asked Questions (FAQ)
What type of mushrooms are best for countertop cultivation?
What is the best substrate to use for my mushroom cultivation bowl?
How do I maintain the humidity levels in my mushroom cultivation bowl?
How much light do mushrooms need to grow?
How long does it take for mushrooms to grow in a countertop cultivation bowl?
What are the signs of contamination in my mushroom cultivation bowl?
Can I reuse the substrate after harvesting mushrooms?
What if my mushrooms are growing in strange shapes or colors?
Is it safe to eat mushrooms grown in a countertop cultivation bowl?
Where can I find mushroom spawn or cultures for my countertop cultivation bowl?
Leave a Comment