

Balcony Gardening Bell Peppers Bottles – sounds like a recipe for a quirky, colorful, and incredibly rewarding DIY project, doesn’t it? Forget those sprawling suburban gardens; we’re bringing the farm-to-table experience right to your apartment! For centuries, humans have cultivated food in limited spaces, from ancient rooftop gardens in Babylon to the window boxes of Victorian London. This innate desire to nurture and grow our own food is deeply ingrained within us.
But why Balcony Gardening Bell Peppers Bottles, specifically? Well, let’s face it: fresh, flavorful bell peppers from the grocery store can be expensive and sometimes lack that vibrant taste. Plus, there’s nothing quite like the satisfaction of harvesting something you’ve grown yourself. This DIY guide will show you how to transform ordinary plastic bottles into thriving mini-gardens, perfect for growing juicy bell peppers even if you only have a small balcony.
I’m going to show you how to create a vertical garden that’s not only space-saving but also incredibly eco-friendly. Imagine stepping onto your balcony and plucking a sun-ripened bell pepper for your salad or stir-fry. This isn’t just about growing food; it’s about connecting with nature, reducing waste, and adding a touch of green to your urban oasis. Let’s get started!
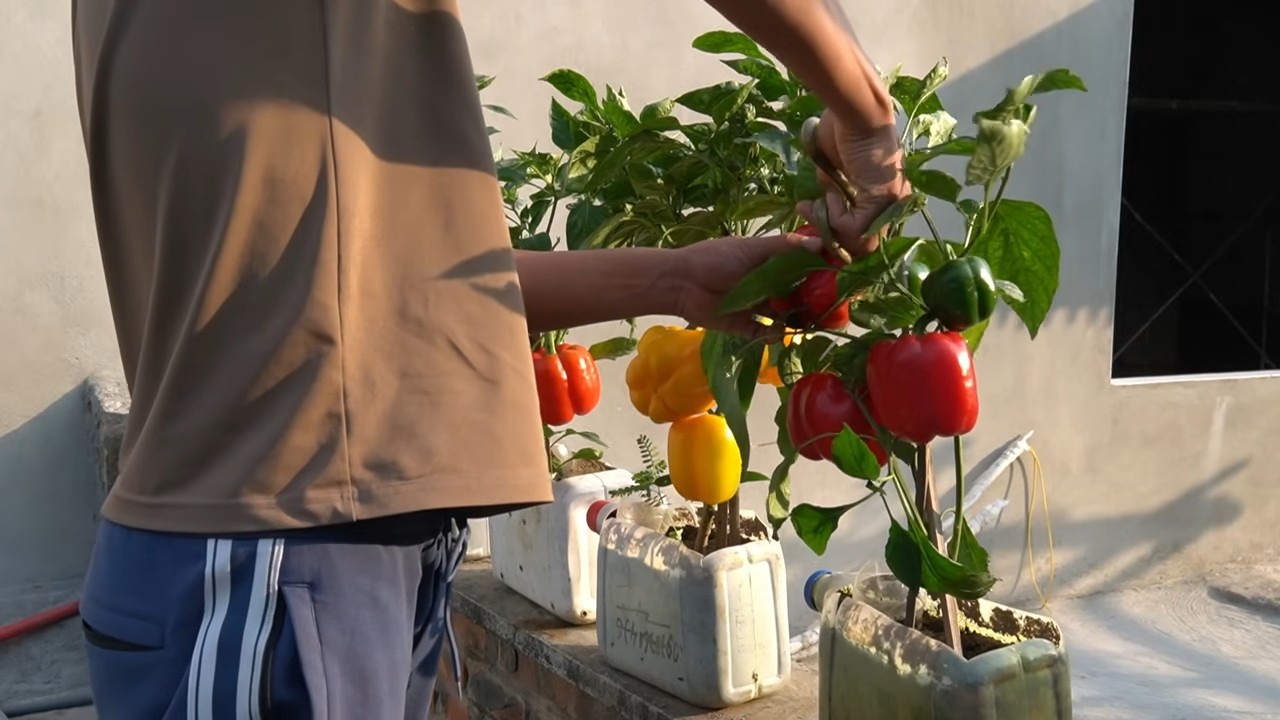
DIY Balcony Bell Pepper Garden Using Recycled Bottles
Hey there, fellow gardening enthusiasts! Dreaming of fresh, crunchy bell peppers right outside your door, even if you only have a balcony? Well, you’ve come to the right place! I’m going to walk you through creating a thriving bell pepper garden using something you probably already have lying around: plastic bottles! This is a super budget-friendly and eco-conscious way to enjoy homegrown goodness. Let’s get started!
What You’ll Need:
Before we dive in, let’s gather our supplies. This is a pretty simple project, so the list is short and sweet:
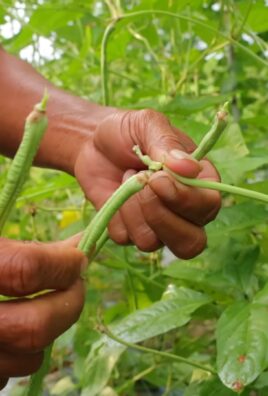
* Plastic Bottles: The star of the show! Aim for bottles that are at least 2 liters in size. The bigger, the better, as they’ll provide more room for your bell pepper plants to grow. I usually use soda or water bottles.
* Bell Pepper Seeds or Seedlings: You can start from seeds if you’re patient, or buy seedlings from your local garden center for a quicker harvest. I personally prefer seedlings for my balcony garden because they give me a head start.
* Potting Soil: This is crucial! Don’t use garden soil; it’s too dense for containers. Opt for a good quality potting mix that drains well.
* Drill or Sharp Knife: For creating drainage holes and cutting the bottles. Be careful!
* Measuring Tape or Ruler: To ensure consistent cuts.
* Permanent Marker: For marking cutting lines.
* Watering Can or Hose: To keep your bell peppers hydrated.
* Optional: Twine or Rope: If you want to hang your bottle planters.
* Optional: Spray Paint: To decorate your bottles and make them look more appealing.
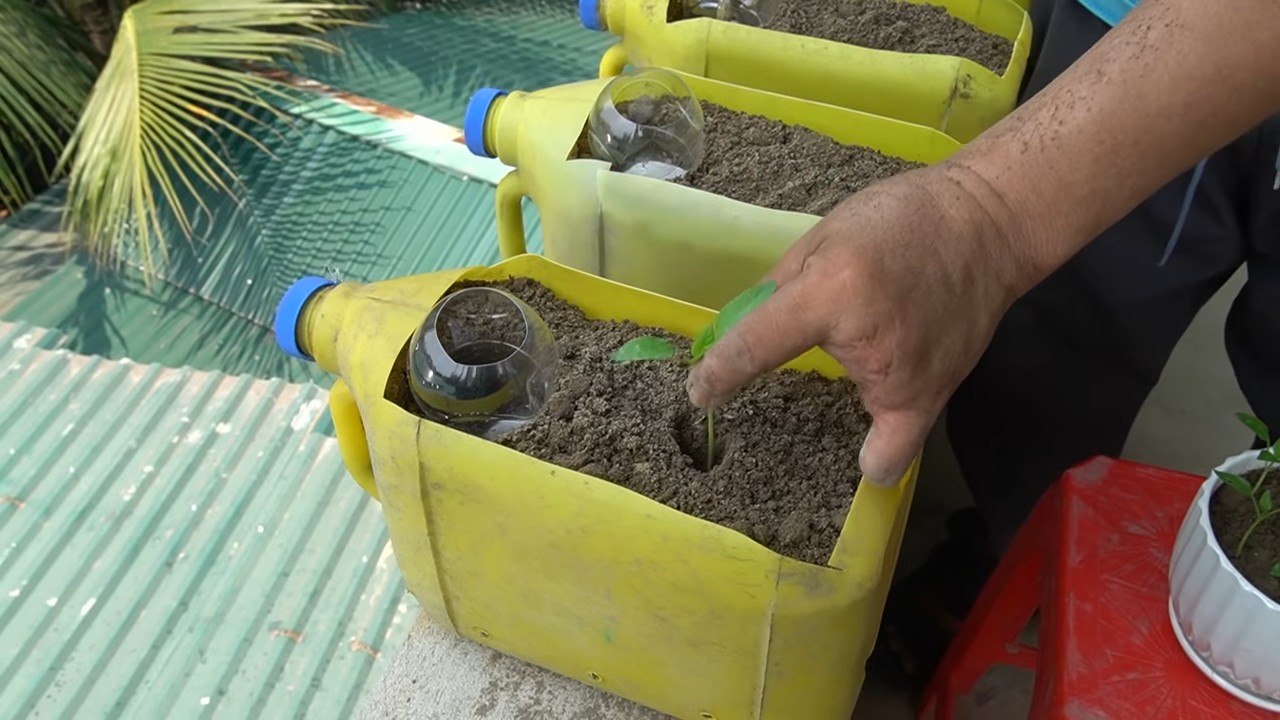
Preparing the Bottles:
This is where the magic begins! We’re going to transform those ordinary plastic bottles into mini-gardens.
1. Clean the Bottles: Thoroughly wash the bottles with soap and water to remove any residue. This is important to prevent any contamination that could harm your plants. Rinse them well and let them dry completely.
2. Mark the Cutting Line: Decide how you want to cut your bottles. There are a few options:
* Option 1: Horizontal Cut (Hanging Planter): Measure about 2/3 of the way up from the bottom of the bottle and draw a horizontal line all the way around. This will create a hanging planter where the top part of the bottle acts as a reservoir.
* Option 2: Vertical Cut (Two Separate Planters): Cut the bottle in half vertically. This will give you two smaller planters. This is great if you want to plant different varieties or have limited space.
* Option 3: Top Removed (Standard Planter): Cut off the top portion of the bottle, leaving the bottom part as the planter. This is the simplest method and works well if you’re placing the bottles on a surface.
I usually go with Option 1 for a few bottles and Option 3 for the rest, just to add some variety to my balcony garden.
3. Cut the Bottles: Using your drill or sharp knife, carefully cut along the marked line. If you’re using a knife, start by making a small incision and then gradually work your way around the bottle. Be extra cautious to avoid accidents. If you’re using a drill, use a large drill bit to create a hole and then use scissors to cut along the line.
4. Create Drainage Holes: This is absolutely essential! Bell peppers need well-draining soil to thrive. Drill or poke several drainage holes in the bottom of each bottle. I usually make about 5-6 holes, evenly spaced.
5. (Optional) Decorate the Bottles: If you want to add a personal touch, now’s the time to decorate your bottles. You can use spray paint, markers, or even decoupage techniques. Get creative! I sometimes paint mine with bright colors or add fun patterns. Just make sure the paint is non-toxic and safe for plants.
Planting Your Bell Peppers:
Now for the fun part – planting your bell peppers!
1. Prepare the Soil: Fill your prepared bottles with potting soil, leaving about an inch of space at the top. Gently pat the soil down to remove any air pockets.
2. Plant the Seeds or Seedlings:
* From Seeds: Sow the bell pepper seeds according to the instructions on the seed packet. Usually, you’ll need to plant them about ¼ inch deep. Water gently after planting.
* From Seedlings: Gently remove the bell pepper seedling from its container. Loosen the roots slightly and place the seedling in the center of the bottle. Fill in around the seedling with potting soil, making sure the top of the root ball is level with the soil surface. Water thoroughly after planting.
When using seedlings, I like to add a little bit of compost to the potting mix to give them an extra boost.
3. Water Thoroughly: After planting, water your bell peppers thoroughly until water drains out of the drainage holes. This will help settle the soil and ensure the roots are properly hydrated.
4. (Optional) Add Support: As your bell pepper plants grow, they may need some support to prevent them from toppling over. You can use small stakes or bamboo skewers to provide support. I usually use twine to tie the stems to the stakes.
Caring for Your Bell Pepper Plants:
Now that your bell peppers are planted, it’s time to provide them with the care they need to flourish.
1. Sunlight: Bell peppers need at least 6-8 hours of sunlight per day. Place your bottle planters in a sunny spot on your balcony. If you don’t have enough sunlight, you may need to supplement with grow lights.
2. Watering: Water your bell pepper plants regularly, especially during hot weather. Check the soil moisture by sticking your finger into the soil. If the top inch of soil feels dry, it’s time to water. Avoid overwatering, as this can lead to root rot.
3. Fertilizing: Bell peppers are heavy feeders, so they need regular fertilization. Use a balanced fertilizer specifically formulated for vegetables. Follow the instructions on the fertilizer package. I usually fertilize my bell peppers every two weeks.
4. Pruning: Pruning can help improve air circulation and encourage fruit production. Remove any yellowing or dead leaves. You can also pinch off the suckers that grow between the main stem and the branches.
5. Pest Control: Keep an eye out for pests such as aphids, whiteflies, and spider mites. If you notice any pests, treat them with an organic insecticide or insecticidal soap. I like to use neem oil as a natural pest control solution.
6. Pollination: Bell peppers are self-pollinating, but you can help them along by gently shaking the plants or using a small paintbrush to transfer pollen from one flower to another. This is especially important if you’re growing your bell peppers indoors.
Harvesting Your Bell Peppers:
The moment you’ve been waiting for! Harvesting your homegrown bell peppers!
1. When to Harvest: Bell peppers are typically ready to harvest about 60-90 days after planting. The peppers should be firm, glossy, and fully colored.
2. How to Harvest: Use a sharp knife or scissors to cut the bell pepper from the plant. Leave a small piece of stem attached to the pepper.
3. Enjoy Your Harvest: Now you can enjoy your delicious, homegrown bell peppers! Use them in salads, stir-fries, or any of your favorite recipes.
Tips and Tricks for Success:
Here are a few extra tips to help you succeed with your balcony bell pepper garden:
* Choose the Right Variety: Some bell pepper varieties are better suited for container gardening than others. Look for compact or dwarf varieties.
* Use a Large Enough Container: Bell peppers need plenty of room to grow. Use bottles that are at least 2 liters in size.
* Provide Adequate Drainage: Drainage is crucial for preventing root rot. Make sure your bottles have plenty of drainage holes.
* Water Regularly: Bell peppers need consistent moisture. Water them regularly, especially during hot weather.
* Fertilize Regularly: Bell peppers are heavy feeders. Fertilize them every two weeks with a balanced fertilizer.
* Protect from Wind: Strong winds can damage your bell pepper plants. If your balcony is windy, provide some protection.
* Monitor for Pests: Keep an eye out for pests and treat them promptly.
* Be Patient: Growing bell peppers takes time and effort. Don’t get discouraged if you don’t see results immediately.
And there you have it! A complete guide to creating your own balcony bell pepper garden using recycled bottles. I hope you found this helpful and inspiring. Happy gardening! I’m sure you’ll be enjoying fresh, delicious bell peppers in no time!
Conclusion
So, there you have it! Transforming discarded plastic bottles into thriving bell pepper planters for your balcony garden is not just a clever upcycling project; it’s a gateway to fresh, homegrown flavor right outside your door. We’ve explored a simple, cost-effective, and environmentally conscious method to cultivate these vibrant vegetables, even in the most limited of spaces.
Why is this DIY trick a must-try? Because it empowers you to take control of your food source, reduce waste, and add a touch of green to your urban landscape. Imagine stepping onto your balcony and plucking a sun-ripened bell pepper, bursting with sweetness, for your next salad or stir-fry. That’s the magic this project unlocks.
But the beauty of this method lies in its adaptability. Feel free to experiment with different varieties of bell peppers. Perhaps you’d prefer the fiery kick of a jalapeño or the mild sweetness of a banana pepper. The choice is yours! You can also explore different soil mixes to optimize growth. Consider adding compost or worm castings for extra nutrients.
Don’t limit yourself to just bell peppers either. This bottle gardening technique can be adapted for other small vegetables and herbs, such as cherry tomatoes, lettuce, or basil. The possibilities are endless! Get creative with the design of your bottle planters. Paint them, decorate them with twine, or arrange them in visually appealing patterns.
This DIY project is more than just a gardening hack; it’s a statement. It’s a statement about sustainability, resourcefulness, and the joy of connecting with nature, even in the heart of the city. It’s about proving that you don’t need a sprawling garden to enjoy the taste of fresh, homegrown produce.
We are confident that you will find this method rewarding and enjoyable. The satisfaction of nurturing a plant from seed to harvest is unparalleled. And the taste of a homegrown bell pepper is simply unmatched.
So, what are you waiting for? Gather your empty plastic bottles, grab some soil, and let’s get gardening! We encourage you to try this DIY trick and share your experience with us. Post photos of your balcony garden on social media using #BottleBellPeppers and #BalconyGardening. We can’t wait to see your creations! Let’s inspire others to embrace sustainable gardening practices and transform their balconies into vibrant, edible oases.
Remember, every small step towards sustainability makes a big difference. And with this simple DIY project, you can contribute to a greener planet while enjoying the delicious rewards of homegrown bell peppers. Happy gardening!
Frequently Asked Questions (FAQ)
What type of plastic bottles are best for this project?
Ideally, you should use sturdy, food-grade plastic bottles. Two-liter soda bottles or larger water bottles work well. Avoid using bottles that have contained harsh chemicals or cleaning products, as these could contaminate the soil and affect the growth of your bell peppers. Make sure to thoroughly clean the bottles with soap and water before using them.
How often should I water my bell pepper plants in bottle planters?
The watering frequency will depend on several factors, including the weather, the size of the bottle, and the type of soil you’re using. Generally, you should water your plants when the top inch of soil feels dry to the touch. Avoid overwatering, as this can lead to root rot. Ensure that your bottle planters have adequate drainage holes to prevent water from accumulating at the bottom. During hot, sunny weather, you may need to water your plants daily. In cooler, cloudier weather, you may only need to water them every few days.
What kind of soil should I use for growing bell peppers in bottles?
A well-draining potting mix is essential for growing healthy bell peppers in bottle planters. You can purchase a pre-made potting mix from your local garden center or create your own by combining equal parts of garden soil, compost, and perlite or vermiculite. The compost will provide nutrients for your plants, while the perlite or vermiculite will improve drainage and aeration. Avoid using heavy clay soil, as this can become waterlogged and suffocate the roots of your bell peppers.
How much sunlight do bell pepper plants need?
Bell peppers require at least six to eight hours of direct sunlight per day to thrive. Choose a sunny spot on your balcony for your bottle planters. If your balcony doesn’t receive enough sunlight, you may need to supplement with artificial grow lights. Rotate your bottle planters regularly to ensure that all sides of the plants receive adequate sunlight.
Do I need to fertilize my bell pepper plants in bottle planters?
Yes, bell peppers are heavy feeders and will benefit from regular fertilization. Use a balanced fertilizer specifically formulated for vegetables. Follow the instructions on the fertilizer packaging for application rates and frequency. You can also add compost or worm castings to the soil to provide a slow-release source of nutrients. Avoid over-fertilizing, as this can burn the roots of your plants.
How do I prevent pests and diseases from affecting my bell pepper plants?
Regularly inspect your plants for signs of pests or diseases. Common pests that affect bell peppers include aphids, spider mites, and whiteflies. You can control these pests by spraying your plants with insecticidal soap or neem oil. Common diseases that affect bell peppers include blossom end rot and fungal infections. Blossom end rot is caused by a calcium deficiency and can be prevented by adding calcium to the soil. Fungal infections can be prevented by ensuring good air circulation around your plants and avoiding overwatering.
How long does it take for bell peppers to mature?
The time it takes for bell peppers to mature depends on the variety and growing conditions. Generally, it takes about 60 to 90 days from transplanting for bell peppers to be ready for harvest. You can harvest your bell peppers when they have reached their mature size and color. Use a sharp knife or pruning shears to cut the peppers from the plant.
Can I grow bell peppers in bottles indoors?
Yes, you can grow bell peppers in bottles indoors, but you will need to provide them with adequate light. Place your bottle planters near a sunny window or use artificial grow lights. You will also need to ensure that your plants receive adequate ventilation and humidity.
What are some variations I can try with this DIY bottle gardening method?
You can experiment with different types of bottles, such as wine bottles or milk jugs. You can also try different planting techniques, such as vertical gardening or hanging planters. Get creative with the design of your bottle planters by painting them, decorating them with twine, or arranging them in visually appealing patterns. You can also try growing other vegetables and herbs in bottle planters, such as cherry tomatoes, lettuce, or basil.
How do I support the bell pepper plant as it grows bigger in the bottle?
As your bell pepper plant grows, it may become top-heavy and require support. You can use bamboo stakes or tomato cages to provide support. Insert the stakes or cages into the soil around the plant and tie the stems to the support with twine or plant ties. This will prevent the plant from falling over and breaking.
Leave a Comment