

Vertical Spinach Growing: Imagine harvesting fresh, vibrant spinach right from your own backyard, even if you’re short on space! For centuries, humans have cultivated spinach, tracing its origins back to ancient Persia. It gradually spread across the globe, becoming a staple in cuisines worldwide. But let’s face it, traditional gardening can be a challenge, especially with limited space or less-than-ideal soil conditions.
That’s where the magic of vertical gardening comes in! I’m excited to share some fantastic DIY tricks and hacks that will revolutionize how you grow spinach. Forget sprawling gardens and back-breaking weeding. With vertical spinach growing, you can maximize your yield in a minimal footprint. Think lush, green walls of deliciousness, right at your fingertips.
This article is your ultimate guide to creating your own thriving vertical spinach garden. We’ll explore easy-to-build structures, the best soil mixes, and essential tips for keeping your spinach happy and healthy. Whether you’re a seasoned gardener or a complete beginner, these DIY projects will empower you to enjoy fresh, homegrown spinach all season long. Let’s get started and transform your space into a verdant oasis!
Vertical Spinach Cultivation: Your DIY Guide for a Space-Saving Harvest
Hello, dear garden friends! Do you also have the problem that your garden is too small for all your planting ideas? Or maybe you don’t have a garden at all, but only a balcony or a terrace? Don’t worry, I have the solution: Vertical spinach cultivation! This is not only space-saving, but it also looks great and is a lot of fun. In this guide, I will show you how you can easily build your own vertical spinach wall. Let’s get started!
Why vertical spinach cultivation?
Before we start, here are a few advantages that have convinced me of this method:
- Space-saving: Ideal for small gardens, balconies, or terraces.
- Ergonomic: No more tedious bending down when harvesting.
- Aesthetic: A green wall is a real eye-catcher.
- Fewer pests: Due to the elevated position, the plants are less susceptible to slugs and other pests.
- Better ventilation: The plants dry off more quickly, which reduces the risk of fungal diseases.
Material list: What you need
For our vertical spinach wall, we need the following materials:
- Wooden pallets: Preferably a Euro pallet (EPAL), as they are stable and easy to work with. Make sure that the pallet is untreated or has been treated with non-toxic agents.
- Garden fleece: To line the gaps so that the soil does not fall out.
- Stapler: To fasten the garden fleece.
- Soil: High-quality vegetable soil, ideally organic soil.
- Spinach seeds or young plants: Depending on your preference. I recommend varieties like ‘Matador’ or ‘Butterspinat’.
- Scissors or utility knife: To cut the garden fleece to size.
- Gloves: To protect your hands.
- Optional: Wood stain: To protect the pallet from weathering.
- Optional: Sandpaper: To smooth rough spots on the pallet.
- Optional: Measuring tool and pencil: For precise cutting.
Step-by-step guide: How to build your spinach wall
Now let’s get down to it! Follow these steps to build your own vertical spinach wall:
1. Preparing the pallet
- Cleaning: First, I thoroughly clean the pallet with a brush and water. Remove all dirt, dust, and loose wood splinters. Then let the pallet dry well.
- Sanding (optional): If the pallet is very rough, I sand it down with sandpaper to avoid splinters. This is especially important if children are around.
- Wood protection (optional): To extend the life of the pallet, I apply a non-toxic wood stain. Make sure that the stain is suitable for outdoor use and does not contain any harmful substances. Let the stain dry well before you proceed to the next step.
2. Lining the gaps
- Cutting the garden fleece to size: Measure the internal dimensions of the gaps in the pallet and cut the garden fleece accordingly. I always cut the fleece a little larger so that it overlaps and can be securely fastened.
- Fastening the garden fleece: Place the cut garden fleece in a gap in the pallet and fasten it to the inside with the stapler. Make sure that the fleece is taut and that there are no holes. Repeat this step for all the gaps you want to plant. I always staple the fleece twice to make sure it holds.
3. Filling with soil
- Filling with soil: Fill the gaps lined with garden fleece with high-quality vegetable soil. Make sure that the soil is loose and airy. I fill the soil to just below the edge so that nothing spills over when watering.
- Pressing down: Press the soil down lightly so that it settles.
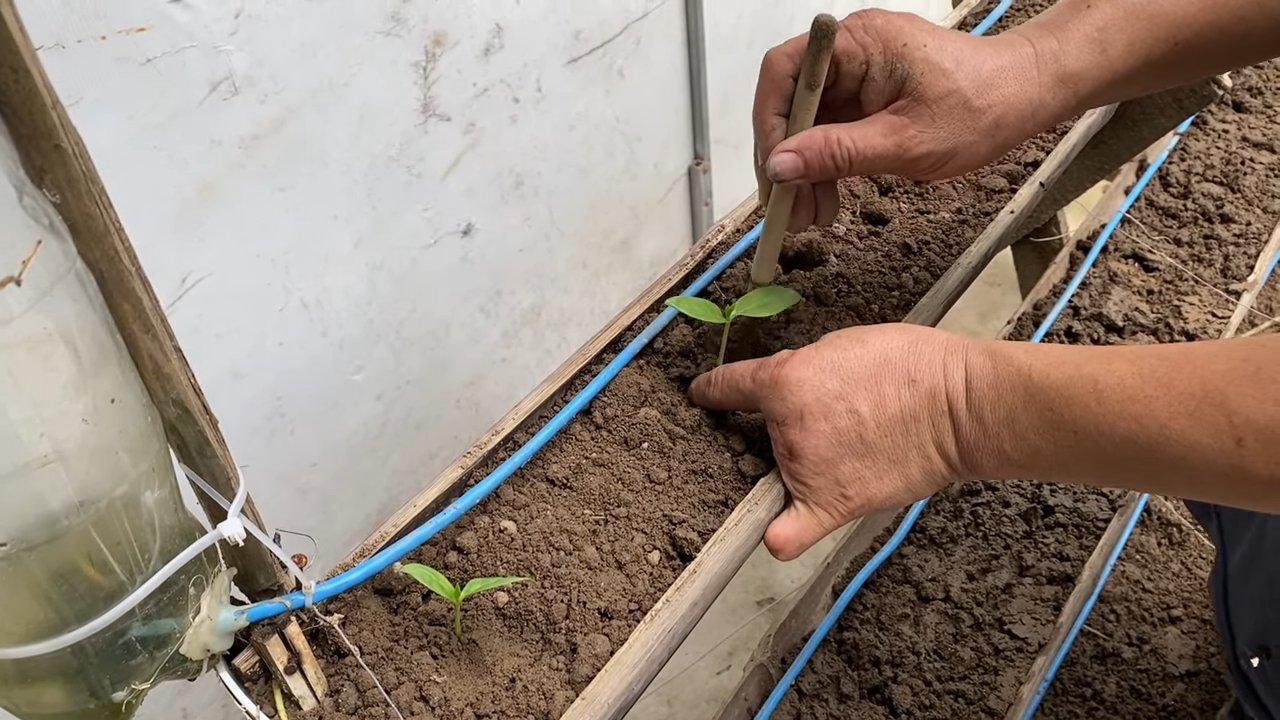
4. Planting with spinach
- Sowing or planting: Now comes the most fun part: planting! You have two options: Either you sow spinach seeds directly into the soil or you plant young plants.
- Sowing: Distribute the spinach seeds evenly in the soil and cover them lightly with soil. Water the soil carefully.
- Planting: Dig small holes in the soil and place the young spinach plants in them. Fill the holes with soil and press them down lightly. Water the plants well. I prefer young plants because they grow faster and I can harvest them sooner.
- Mind the spacing: Make sure that the plants have enough space between them so that they can develop well. I keep a distance of about 10-15 cm between the plants.
5. Care and harvesting
- Watering: Water the spinach plants regularly, especially in the first few weeks after sowing or planting. Make sure that the soil is always slightly moist, but not too wet. I prefer to water in the morning so that the plants can dry off during the day.
- Fertilizing (optional): If you like, you can fertilize the spinach plants regularly with an organic fertilizer. I prefer to use compost tea or nettle manure.
- Pest control: Check the plants regularly for pests such as aphids or slugs. If necessary, you can use natural pesticides. I have had good experiences with neem oil.
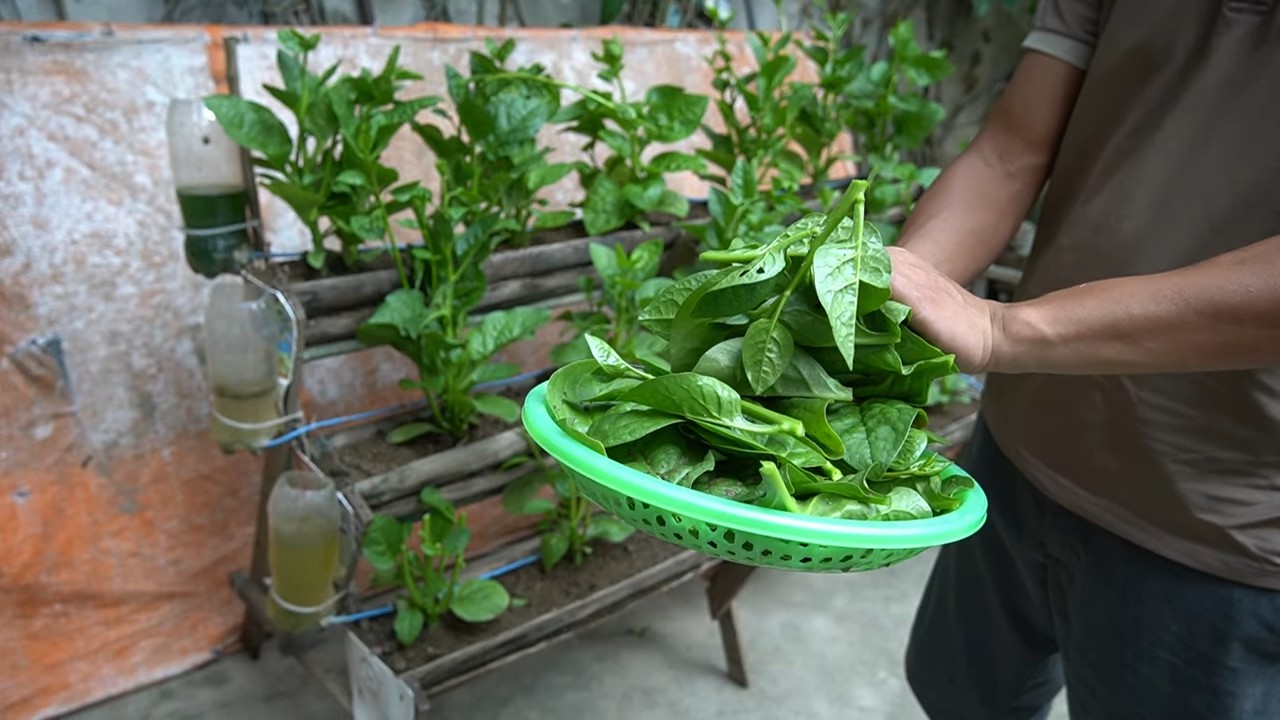
- Harvesting: After about 4-6 weeks, you can harvest the first spinach. Simply cut off the leaves with scissors. You can harvest the outer leaves and let the inner leaves continue to grow. This way you will have fresh spinach over a longer period of time. I prefer to harvest spinach in the morning because it is particularly crisp then.
Tips and tricks for successful spinach cultivation
Here are a few additional tips that will help you achieve a rich spinach harvest:
- Location: Spinach prefers a semi-shady location. Too much sun can cause the leaves to burn.
- Soil: Ensure good drainage so that the water can drain well. Avoid waterlogging.
- Variety selection: Choose spinach varieties that are suitable for summer cultivation if you also want to harvest in the warm months.
- Reseeding: Sow spinach regularly to ensure a continuous harvest.
- Mulching: Mulch the soil with straw or grass clippings to retain moisture and suppress weeds.
- Frost protection: In case of frost, you can cover the spinach plants with a fleece.
Variations and extensions
You can of course also expand and individualize your vertical spinach wall:
- Different pallets: Use different pallet sizes and shapes to create an interesting design.
- Herbs and other vegetables: In addition to spinach, also plant other herbs and vegetables in your vertical wall.
- Irrigation system: Install an automatic irrigation system to make watering easier for you.
- Lighting: If you set up the spinach wall indoors, you can illuminate it with plant lamps.
I hope this guide has helped and inspired you to build your own vertical spinach wall. Have fun gardening and a rich harvest! Let me know how it goes and share your experiences in the comments.
Conclusion
So, there you have it! Transforming your gardening game with vertical spinach growing is not just a trend; it’s a practical, space-saving, and highly rewarding way to enjoy fresh, nutritious spinach right at your fingertips. We’ve explored the simplicity and efficiency of this method, highlighting how it maximizes yield, minimizes pest problems, and adds a touch of green elegance to any environment, whether you have a sprawling backyard or a tiny balcony.
Why is this a must-try? Because it democratizes access to fresh produce. No longer are you limited by the size of your garden or the availability of spinach at the grocery store. You become the master of your own leafy green destiny, cultivating a continuous supply of this vitamin-packed superfood. Imagine stepping outside and harvesting a handful of vibrant spinach leaves for your morning smoothie, a quick salad, or a delicious addition to your favorite pasta dish. The freshness and flavor are simply unmatched.
But the benefits extend beyond mere convenience. Vertical spinach growing is also an environmentally conscious choice. By growing your own food, you reduce your carbon footprint associated with transportation and packaging. You also have complete control over the growing process, ensuring that your spinach is free from harmful pesticides and herbicides. It’s a win-win for your health and the planet.
Ready to take your vertical garden to the next level? Consider these variations to personalize your spinach-growing experience:
* Experiment with different containers: While we’ve focused on readily available options like plastic bottles and stacked planters, feel free to get creative. Old gutters, repurposed pallets, or even hanging baskets can all be transformed into thriving vertical spinach gardens. Just ensure adequate drainage and sunlight exposure.
* Try companion planting: Enhance your spinach’s growth and deter pests by planting compatible herbs and flowers nearby. Marigolds, basil, and chamomile are excellent choices that can add beauty and functionality to your vertical garden.
* Succession planting: To ensure a continuous harvest, plant new spinach seeds every few weeks. This will stagger your yields and prevent you from being overwhelmed with spinach all at once.
* Explore different spinach varieties: From smooth-leafed to savoy, there’s a spinach variety to suit every taste and preference. Experiment with different types to discover your favorites and add variety to your meals.
We are confident that you’ll find vertical spinach growing to be a fulfilling and rewarding experience. It’s a simple yet powerful way to connect with nature, nourish your body, and beautify your surroundings.
So, what are you waiting for? Gather your supplies, choose your preferred method, and get started on your vertical spinach growing adventure today! We encourage you to share your experiences, tips, and photos with us and the wider gardening community. Let’s inspire each other to cultivate a greener, healthier world, one vertical spinach garden at a time. We can’t wait to see your leafy creations!
Frequently Asked Questions (FAQ)
What are the best spinach varieties for vertical growing?
While most spinach varieties will thrive in a vertical setup, some are particularly well-suited due to their compact growth habits and resistance to bolting (going to seed prematurely). Consider varieties like ‘Baby’s Leaf Hybrid,’ ‘Space,’ or ‘Winter Bloomsdale.’ These varieties tend to produce smaller, more manageable leaves and are less prone to bolting in warmer weather. However, don’t be afraid to experiment with other varieties to see what works best in your specific climate and growing conditions. Remember to check the seed packet for information on days to maturity and recommended planting times.
How much sunlight does vertical spinach need?
Spinach thrives in partial shade, especially in warmer climates. Aim for at least 4-6 hours of direct sunlight per day, but be mindful of intense afternoon sun, which can scorch the leaves. If you live in a hot climate, consider providing some shade during the hottest part of the day, either by moving your vertical garden to a shadier location or using shade cloth. In cooler climates, spinach can tolerate more direct sunlight. Observe your plants closely and adjust their position as needed to ensure they are receiving the optimal amount of light.
What type of soil is best for vertical spinach growing?
Spinach prefers well-draining, fertile soil that is rich in organic matter. A good potting mix specifically formulated for vegetables is an excellent choice. You can also amend your own soil by adding compost, aged manure, or other organic materials. Ensure the soil has a slightly acidic to neutral pH (around 6.0 to 7.0). Proper drainage is crucial to prevent root rot, so avoid using heavy clay soils that retain too much moisture.
How often should I water my vertical spinach garden?
Watering frequency will depend on several factors, including the type of container you are using, the weather conditions, and the maturity of your plants. Generally, you should water your spinach when the top inch of soil feels dry to the touch. Avoid overwatering, as this can lead to root rot. Vertical gardens tend to dry out more quickly than traditional gardens, so check the soil moisture regularly, especially during hot or windy weather. Water deeply and thoroughly, ensuring that the water reaches the roots.
How do I fertilize my vertical spinach?
Spinach is a heavy feeder and benefits from regular fertilization. Use a balanced, water-soluble fertilizer specifically formulated for leafy greens. Follow the instructions on the fertilizer package for application rates and frequency. You can also supplement with organic fertilizers like compost tea or fish emulsion. Avoid over-fertilizing, as this can lead to excessive leaf growth and reduced flavor.
How do I prevent pests and diseases in my vertical spinach garden?
Vertical growing naturally reduces some pest and disease problems by elevating the plants off the ground and improving air circulation. However, it’s still important to take preventative measures. Inspect your plants regularly for signs of pests or diseases. Handpick any pests you find, such as aphids or slugs. Use organic pest control methods like insecticidal soap or neem oil if necessary. Ensure good air circulation to prevent fungal diseases. Remove any dead or diseased leaves promptly.
When is the best time to harvest my vertical spinach?
You can begin harvesting spinach leaves as soon as they are large enough to eat, typically when they are about 4-6 inches long. Harvest the outer leaves first, allowing the inner leaves to continue growing. This will encourage continuous production. Avoid harvesting during the hottest part of the day, as the leaves will be more wilted. Spinach is best eaten fresh, but it can also be stored in the refrigerator for several days.
Can I grow spinach vertically indoors?
Yes, you can grow spinach vertically indoors, but you will need to provide adequate light. A sunny windowsill may suffice if it receives at least 4-6 hours of direct sunlight per day. However, for optimal growth, consider using grow lights. LED grow lights are energy-efficient and provide the full spectrum of light that spinach needs to thrive. Ensure good air circulation and maintain a consistent temperature.
What do I do if my spinach starts to bolt?
Bolting is when spinach plants send up a flower stalk and the leaves become bitter. This is usually triggered by hot weather or long days. To prevent bolting, choose bolt-resistant varieties, provide shade during the hottest part of the day, and water regularly. If your spinach starts to bolt, you can still harvest the leaves, but they may not taste as good. You can also try cutting off the flower stalk to prolong the harvest, but this is not always effective.
How long will my vertical spinach garden last?
The lifespan of your vertical spinach garden will depend on several factors, including the variety of spinach you are growing, the weather conditions, and your care practices. Generally, spinach is a cool-season crop that thrives in spring and fall. With proper care, you can expect to harvest spinach for several weeks or even months. Succession planting will help ensure a continuous supply of fresh spinach throughout the growing season.


Leave a Comment