

Chili pepper soil bag growing – sounds intriguing, right? I’m so excited to share this incredibly simple and rewarding DIY trick that will have you harvesting fiery peppers in no time, even if you’re short on space or gardening experience! Forget complicated setups and endless weeding; we’re going back to basics with a method that’s both cost-effective and surprisingly productive.
Growing chili peppers has a rich history, dating back thousands of years in South America. These vibrant fruits weren’t just a source of spice; they held cultural and medicinal significance. Today, the love for chili peppers has spread worldwide, and I believe everyone should have the opportunity to grow their own.
Why is this chili pepper soil bag growing method so essential? Well, let’s face it, not everyone has a sprawling garden. Apartment dwellers, balcony gardeners, and even those with limited mobility can benefit from this accessible technique. Plus, it’s a fantastic way to recycle those empty soil bags and reduce waste. Imagine the satisfaction of plucking fresh, homegrown chili peppers, knowing you nurtured them from seed to spice using a simple, sustainable method. This DIY project isn’t just about growing peppers; it’s about connecting with nature, saving money, and adding a little zest to your life!
Chili Plants in Grow Bags: Your DIY Guide for a Bountiful Harvest
Hey chili lovers! Do you want to grow your own hot peppers but have limited space in your garden? No problem! With this DIY guide, I’ll show you how to successfully grow chili plants in grow bags. It’s easier than you think and incredibly fun!
What you need for your chili grow bag project:
- Chili seeds or young plants: Choose your favorite varieties! Everything from mild to fiery is possible.
- Grow bags: Look for a size of at least 10 liters (about 2.5 gallons) per plant, though 20 liters (about 5 gallons) or more is better, especially for larger varieties. Grow bags made of breathable material (e.g., felt) are ideal as they prevent waterlogging.
- High-quality potting soil: Special chili soil is optimal, but a good vegetable potting mix blended with some sand and perlite works great too.
- Fertilizer: Slow-release fertilizer for vegetables or liquid fertilizer for chili plants.
- Watering can or hose: For watering your plants.
- Trowel: For repotting the plants.
- Support stakes (optional): For larger chili varieties that need to support a lot of weight.
- Gloves: To protect your hands.
- A sunny location: Chili plants love the sun!
- Patience and love: The most important things of all!
Preparation: The Foundation for Your Chili Success
Before we start, it’s important to prepare everything. This saves time and nerves!
- Choosing a location: Chili plants need at least 6 hours of sun per day. So find a sunny spot on your balcony, patio, or in the garden. Make sure the location is sheltered from the wind, as strong winds can damage the plants.
- Selecting grow bags: As mentioned, breathable grow bags are ideal. They prevent waterlogging and ensure good root aeration. Make sure they are large enough. Grow bags that are too small can restrict the plants’ growth.
- Preparing the soil: Chili plants need well-draining, nutrient-rich soil. If you don’t have special chili soil, you can mix a good vegetable potting mix with some sand and perlite. This improves drainage and prevents waterlogging.
- Getting fertilizer: Chili plants are heavy feeders and need regular fertilizer. Slow-release fertilizer is convenient as it releases nutrients slowly. Liquid fertilizer is ideal for specifically feeding the plants during their growth and flowering periods.
Sowing or Repotting: The Start for Your Chili Plants
Now let’s get down to it! You can either grow your chili plants from seed or repot young plants.
Sowing (if you’re starting with seeds):
- Starting indoors: Chili seeds need warmth to germinate. It’s best to start them indoors in February or March. Fill small seed pots with seed starting mix and sow the seeds about 0.5 cm (0.2 inches) deep.
- Moisture: Keep the soil moist, but not wet. It’s best to spray the soil regularly with a spray bottle.
- Warmth: Place the seed pots in a warm place (approx. 22-25°C / 72-77°F). A heating mat can help speed up germination.
- Light: Once the seeds have germinated, the little seedlings need a lot of light. Place them by a bright window or use a plant lamp.
- Pricking out: When the seedlings have their first true leaves (after the cotyledons), you can prick them out into larger pots. Use a good vegetable potting mix for this.
- Hardening off: Before you plant the plants outdoors, you should slowly acclimate them to the sun and outdoor temperatures. Place them outside for a few hours during the day and bring them back in at night.
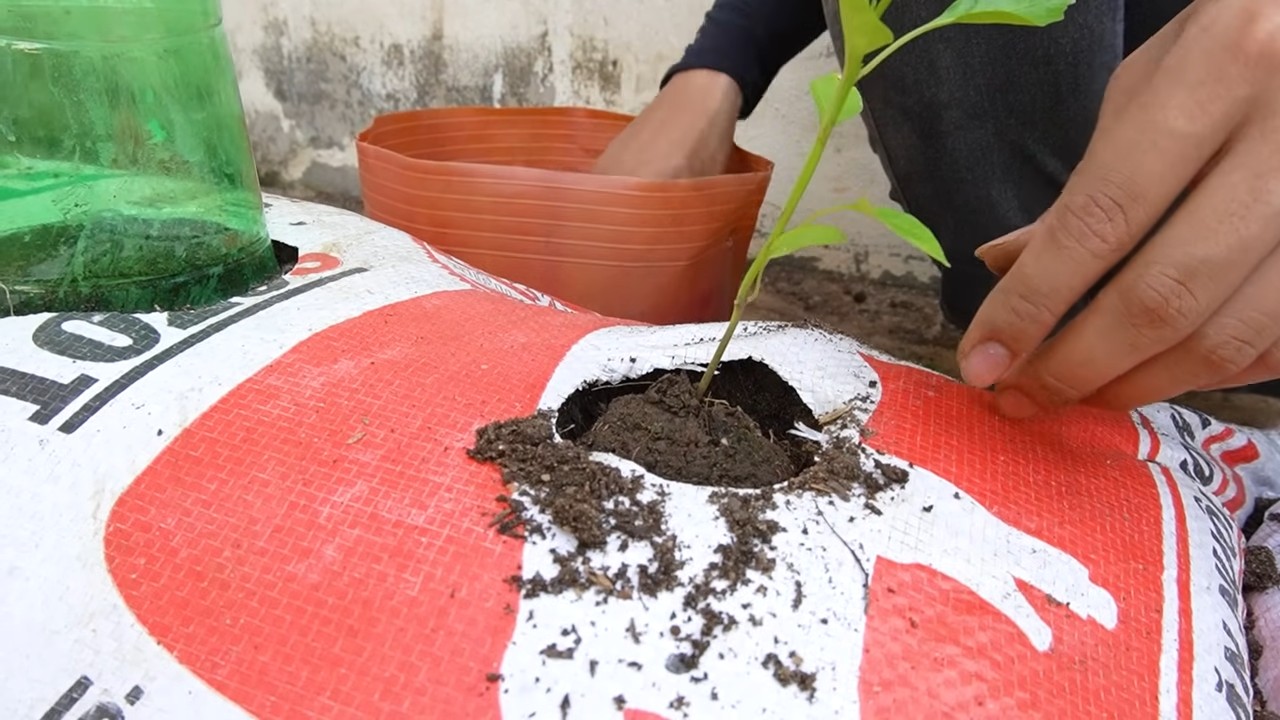
Repotting (if you’re buying young plants):
- Prepare the grow bag: Fill the grow bag with soil, but leave a few centimeters of space at the top.
- Carefully remove the plant: Gently squeeze the young plant’s pot and carefully pull the plant out. Be careful not to damage the roots.
- Planting: Place the plant in the center of the grow bag and fill the remaining space with soil. The top of the root ball should be level with the soil surface.
- Watering in: Water the plant thoroughly.
Care: So Your Chili Plants Thrive Magnificently
Proper care is crucial for a bountiful chili harvest.
- Watering: Chili plants need regular water, especially on hot days. The soil should always be slightly moist, but not wet. Avoid waterlogging, as this can lead to root rot. It’s best to water in the morning or evening when the sun is not as strong.
- Fertilizing: Chili plants are heavy feeders and need regular fertilizer. Fertilize them every 2-3 weeks with a liquid chili fertilizer or use a slow-release fertilizer. Follow the dosage instructions on the packaging.
- Pruning (optional): You can prune your chili plants to encourage growth and increase the harvest. Remove the side shoots that grow between the main stem and the leaves.
- Pest control: Chili plants can be infested by aphids, spider mites, or other pests. Check your plants regularly and combat pests with natural remedies like neem oil or soapy water solution if needed.
- Staking: Larger chili varieties may need to carry a lot of weight. Support the plants with stakes to prevent them from breaking.
- Removing suckers: Similar to tomatoes, you should also remove the side shoots (suckers) that grow in the leaf axils of chili plants. This promotes the formation of fruit on the main stem.
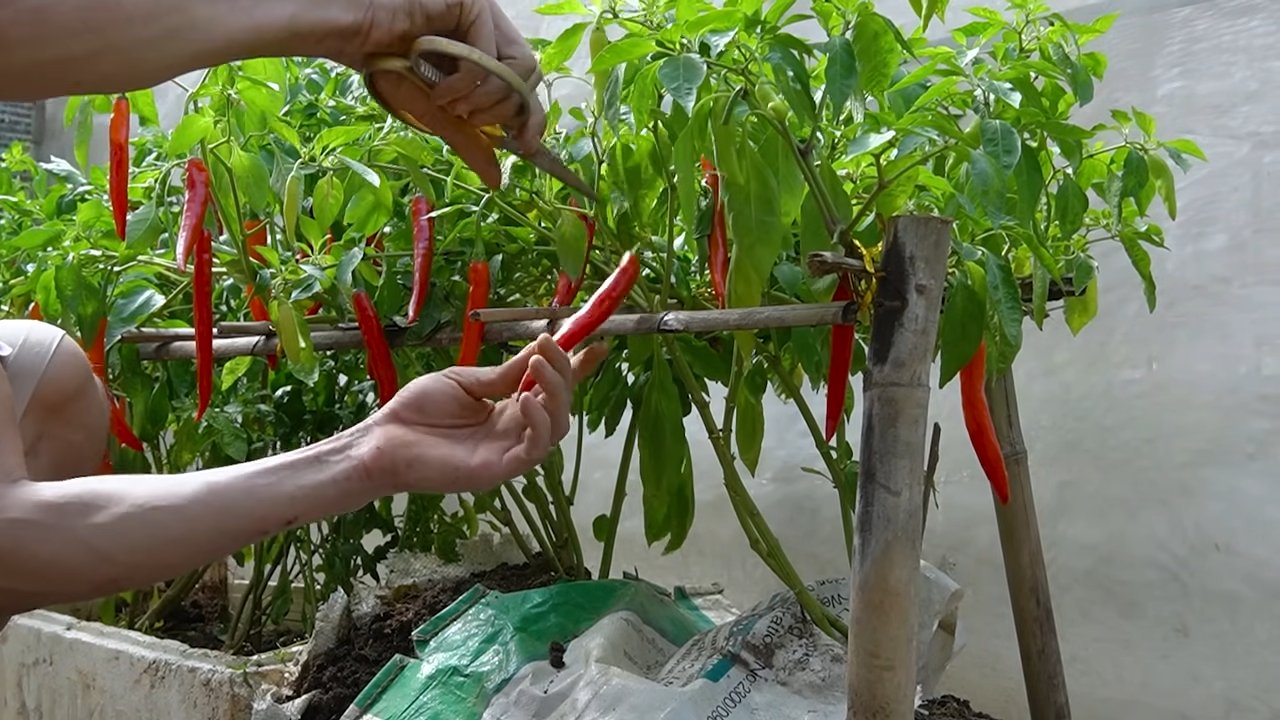
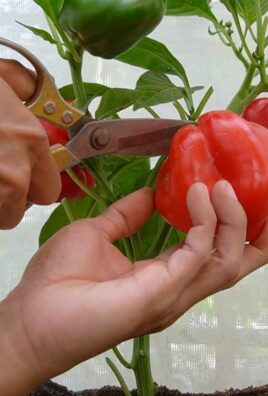
The Harvest: The Reward for Your Effort
The time has finally come! The chili peppers are ripe and can be harvested.
- Recognizing ripeness: The color of the chili peppers changes when they are ripe. Depending on the variety, they will turn red, yellow, orange, or brown. The peppers should also feel firm.
- Harvesting: Cut the chili peppers off with scissors or a knife. Wear gloves to protect your hands from the heat.
- Use: You can use the chili peppers fresh, dry them, pickle them, or process them into chili powder.
Additional Tips for a Successful Chili Harvest:
Mulching: Cover the soil with a layer of mulch (e.g., straw or wood chips) to retain moisture and suppress weeds.
Variety choice: Choose chili varieties that are suitable for growing in a grow bag. Smaller varieties like Jalapeño or Serrano are ideal.
Soil improvement: Mix some compost or horn shavings into the soil to improve the nutrient supply.
Conclusion
So, there you have it! Creating your own chili pepper soil bag growing system is not just a cost-effective alternative to pre-made solutions; it’s a gateway to a more rewarding and personalized gardening experience. You’re in control of the ingredients, ensuring your chili peppers receive the precise nutrients they need to thrive. Forget the guesswork and embrace the satisfaction of nurturing your plants from the ground up, literally!
Why is this a must-try? Because it empowers you to cultivate healthier, more vibrant chili peppers, bursting with flavor and ready to spice up your culinary creations. You’ll avoid the potentially harmful chemicals and additives found in some commercial potting mixes, opting instead for a natural, sustainable approach. Plus, it’s incredibly satisfying to know you’ve created the perfect environment for your plants to flourish.
But the beauty of this DIY project lies in its adaptability. Feel free to experiment with different amendments to tailor the soil mix to your specific chili pepper variety. For example, if you’re growing hotter varieties like habaneros or scotch bonnets, consider adding a bit more bone meal to encourage robust root development and fruit production. Or, if you’re in a particularly humid climate, incorporating perlite or vermiculite will improve drainage and prevent root rot. You can also add compost tea to the soil bag every few weeks to give your plants an extra boost of nutrients.
Don’t be afraid to get creative with your container choices, too. While a standard grow bag works perfectly well, you can also repurpose old burlap sacks, plastic storage bins (with drainage holes, of course!), or even large, sturdy shopping bags. The key is to ensure adequate drainage and enough space for your chili pepper plants to grow.
We’ve found that adding a layer of mulch, such as straw or wood chips, on top of the soil helps retain moisture and suppress weeds. This simple step can significantly reduce the amount of watering required and keep your chili pepper plants healthy and happy.
Ultimately, the best way to discover the perfect chili pepper soil bag growing recipe for your needs is to experiment and observe. Pay attention to how your plants respond to different amendments and adjust your mix accordingly. Gardening is a journey, not a destination, and the more you learn, the more successful you’ll become.
We wholeheartedly encourage you to give this DIY trick a try. It’s a fun, rewarding, and sustainable way to grow your own delicious chili peppers. And most importantly, don’t forget to share your experiences with us! We’d love to hear about your successes, your challenges, and any variations you’ve discovered. Share your photos, tips, and tricks in the comments below, and let’s create a community of chili pepper enthusiasts! Let’s get growing!
FAQ
What exactly is a chili pepper soil bag growing system?
A chili pepper soil bag growing system is a method of cultivating chili peppers in a container, typically a grow bag, filled with a specially formulated soil mix. This allows you to control the growing environment and provide your plants with the precise nutrients they need, regardless of the quality of your native soil. It’s a great option for urban gardeners, those with limited space, or anyone who wants to ensure optimal growing conditions for their chili peppers.
What are the benefits of using a soil bag instead of planting directly in the ground?
There are several advantages to using a soil bag. First, you have complete control over the soil composition, ensuring it’s well-draining, nutrient-rich, and free from pests and diseases. Second, soil bags are portable, allowing you to move your plants to the sunniest location or protect them from harsh weather conditions. Third, they can be used in areas with poor soil quality or limited space, such as balconies, patios, or rooftops. Finally, soil bags often warm up faster than the ground in spring, giving your chili pepper plants a head start.
What kind of soil mix should I use for my chili pepper soil bag?
A good soil mix for chili peppers should be well-draining, nutrient-rich, and slightly acidic. A common recipe includes equal parts of the following:
* **Compost:** Provides essential nutrients and improves soil structure.
* **Peat Moss or Coco Coir:** Retains moisture and provides aeration.
* **Perlite or Vermiculite:** Improves drainage and prevents compaction.
* **Aged Manure:** Adds slow-release nutrients and beneficial microbes.
You can also add amendments like bone meal (for phosphorus), blood meal (for nitrogen), and Epsom salts (for magnesium) to further enhance the soil’s nutrient content.
How often should I water my chili pepper plants in a soil bag?
The frequency of watering depends on several factors, including the weather, the size of the bag, and the type of soil mix you’re using. As a general rule, water your chili pepper plants when the top inch of soil feels dry to the touch. Avoid overwatering, as this can lead to root rot. During hot, dry weather, you may need to water daily, while during cooler, wetter periods, you may only need to water every few days.
What kind of fertilizer should I use for my chili pepper plants in a soil bag?
Chili peppers are heavy feeders and benefit from regular fertilization. Use a balanced fertilizer with an NPK ratio (nitrogen, phosphorus, potassium) of around 5-10-10 or 10-10-10. You can also use a fertilizer specifically formulated for tomatoes or peppers. Apply the fertilizer according to the manufacturer’s instructions, typically every 2-3 weeks during the growing season. Consider supplementing with compost tea or liquid seaweed extract for an extra boost of nutrients.
How much sunlight do chili pepper plants need in a soil bag?
Chili pepper plants need at least 6-8 hours of direct sunlight per day to thrive. Choose a location that receives plenty of sunlight throughout the day. If you’re growing your plants indoors, you may need to supplement with grow lights.
What size soil bag should I use for my chili pepper plants?
The size of the soil bag depends on the variety of chili pepper you’re growing. For smaller varieties, such as cayenne peppers or Thai chilies, a 5-gallon bag may be sufficient. For larger varieties, such as bell peppers or jalapeños, a 10-gallon or larger bag is recommended. Ensure the bag is deep enough to accommodate the plant’s root system.
How do I prevent pests and diseases in my chili pepper soil bag?
Prevention is key when it comes to pests and diseases. Start with a clean soil mix and inspect your plants regularly for any signs of trouble. Common pests that affect chili peppers include aphids, spider mites, and whiteflies. You can control these pests with insecticidal soap, neem oil, or by introducing beneficial insects like ladybugs. Diseases like powdery mildew and blossom end rot can be prevented by ensuring good air circulation, avoiding overwatering, and providing adequate calcium.
Can I reuse the soil from my chili pepper soil bag?
Yes, you can reuse the soil from your chili pepper soil bag, but it’s important to amend it before replanting. Remove any old roots or plant debris and add fresh compost, aged manure, and other amendments to replenish the nutrients. You may also want to sterilize the soil by baking it in the oven or microwaving it to kill any potential pathogens.
What are some common problems I might encounter when growing chili peppers in a soil bag?
Some common problems include blossom end rot (caused by calcium deficiency), leaf curl (caused by aphids or other pests), and stunted growth (caused by nutrient deficiencies or poor drainage). By monitoring your plants closely and addressing any issues promptly, you can ensure a successful harvest. Remember to research the specific needs of your chili pepper variety for optimal results.
Leave a Comment