

Home mushroom growing might sound like something reserved for seasoned botanists or quirky homesteaders, but I’m here to tell you it’s surprisingly accessible and incredibly rewarding! Forget those bland, store-bought fungi – imagine harvesting your own flavorful, organic mushrooms right from your kitchen counter.
Mushrooms have been revered for centuries across various cultures, not just for their culinary uses but also for their medicinal properties. From ancient Chinese emperors seeking longevity elixirs to European foragers carefully guarding their secret mushroom patches, these fascinating fungi have always held a special place in human history. Now, you can tap into that rich tradition without needing a sprawling forest or years of mycological expertise.
Why should you consider diving into home mushroom growing? Well, for starters, it’s a fantastic way to reduce your grocery bill and ensure you’re eating the freshest possible produce. Plus, it’s an incredibly satisfying project that connects you with nature in a unique and tangible way. In this article, I’ll share some simple, DIY tricks and hacks that will empower you to cultivate your own delicious mushrooms at home, even if you have limited space or experience. Get ready to unlock the secrets of the fungal kingdom and enjoy the delightful taste of homegrown goodness!
Mushroom Cultivation at Home: Your Comprehensive DIY Guide
Hello, dear mushroom friends! Have you ever wondered what it would be like to grow your own delicious mushrooms at home? It’s easier than you think and incredibly satisfying! In this article, I’ll show you step-by-step how to create your own little mushroom paradise. Don’t worry, it’s not rocket science!
What you need to get started: The Basic Equipment
Before we begin, we need a few things. Don’t worry, most of them are easy to get or you might even have them at home already!
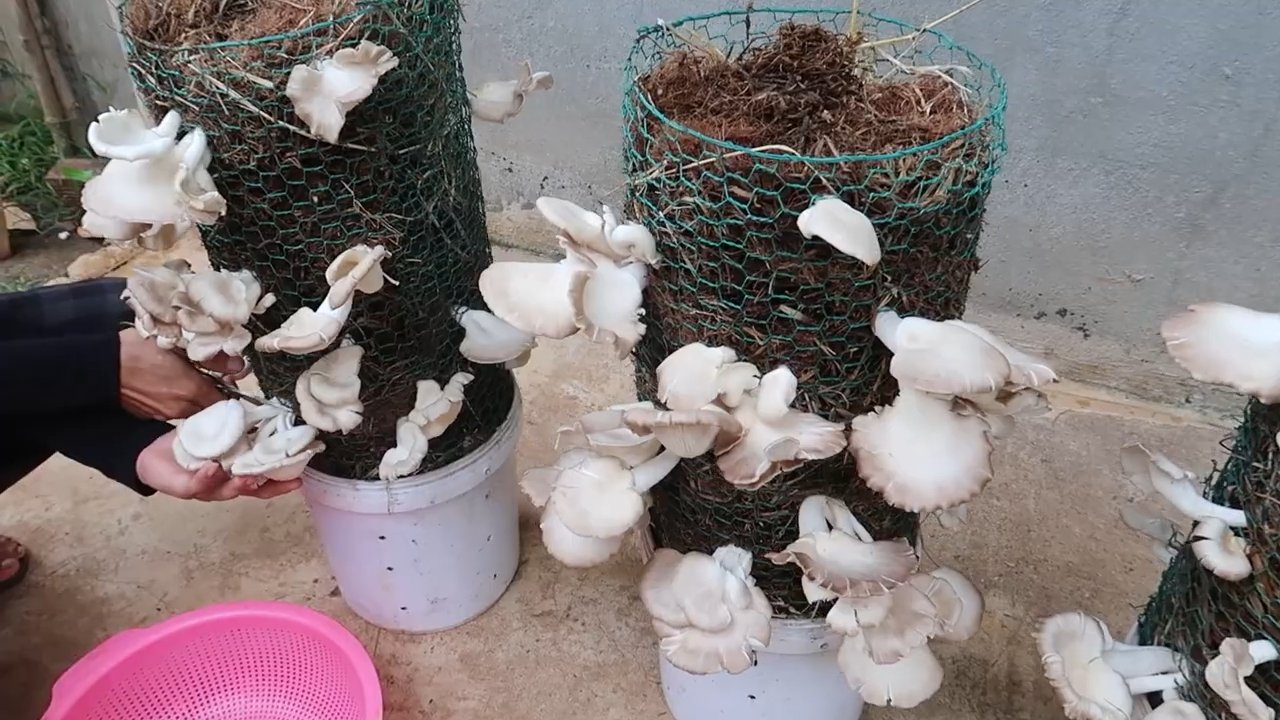
- Mushroom spawn: This is the most important thing! You can buy it online or in specialized garden centers. Be sure to choose the right variety for your conditions. Oyster mushrooms, shiitake, or king trumpet mushrooms are good beginner mushrooms.
- Substrate: This is the “food” for your mushrooms. Straw, wood chips, coffee grounds, or even old newspapers can be used, depending on the mushroom variety.
- Containers: Buckets, plastic bags, jars – anything that can hold the substrate and be sealed well.
- Spray bottle: For regular misting.
- Disinfectant: Cleanliness is key to avoiding mold.
- Gloves: To protect the spawn from contamination.
- Optional: A thermometer and a hygrometer to monitor temperature and humidity.
The Preparation: Cleanliness is Key!
Before we start the actual process, it is super important to clean and disinfect everything thoroughly. Mushrooms are susceptible to mold, and we want to harvest delicious mushrooms, not cultivate mold cultures!
- Cleaning the work surface: Wipe your work surface thoroughly with disinfectant.
- Cleaning the containers: The containers in which you will prepare the substrate must also be clean. It’s best to clean them with hot water and dish soap and then rinse with disinfectant.
- Disinfect your hands: Before you touch the mushroom spawn, disinfect your hands or wear gloves.
Preparing the Substrate: The Food for the Mushrooms
The substrate is the foundation for the growth of your mushrooms. Depending on the mushroom variety, you need to prepare the substrate differently. Here are a few examples:
Straw as a substrate (ideal for oyster mushrooms)
- Pasteurize the straw: The straw must be pasteurized to kill unwanted microorganisms. The best way to do this is to soak the straw in a large pot or tub with hot water (approx. 70-80°C) for about an hour.
- Let it cool: Let the straw cool down until you can touch it without burning yourself.
- Squeeze out excess water: The straw should be damp, but not dripping wet.
Wood chips as a substrate (ideal for shiitake)
- Moisten the wood chips: The wood chips should also be damp. Pour hot water over them and let them swell for a few hours.
- Pasteurize (optional): For better hygiene, you can also pasteurize the wood chips by heating them in a pot with hot water for an hour.
- Let it cool: Let the wood chips cool down before mixing them with the mushroom spawn.
Coffee grounds as a substrate (ideal for oyster mushrooms)
- Collect coffee grounds: Collect your coffee grounds over a few days. Make sure they don’t get moldy.
- Pasteurize the coffee grounds: Put the coffee grounds in a container and pour boiling water over them. Let them cool down.
- Drain excess water: Drain the excess water before mixing the coffee grounds with the mushroom spawn.
The Inoculation: Introducing the Mushroom Spawn to the Substrate
Now comes the exciting part: we mix the mushroom spawn with the prepared substrate.
- Fill the container with substrate: Fill the container of your choice with a layer of the prepared substrate.
- Distribute the mushroom spawn: Distribute a layer of mushroom spawn on the substrate.
- Repeat: Repeat steps 1 and 2 until the container is full. The last layer should be substrate.
- Press down: Press the substrate down lightly.
- Seal: Seal the container. If you are using a plastic bag, seal it tightly with a cable tie or tape. If you are using a bucket, make sure the lid closes well.
- Ventilation holes (optional): If you are using an airtight container, you can drill or poke a few small ventilation holes. However, this is not strictly necessary.
The Incubation Phase: Waiting and Being Patient
Now it’s time to wait! The mushroom spawn needs to grow through the substrate. This phase is called incubation.
- Choose a location: Place the container in a dark, cool place (approx. 20-25°C). Avoid direct sunlight.
- Regular checks: Check the container regularly for mold. If you find mold, you unfortunately have to dispose of the container.
- Be patient: The incubation phase can last several weeks, depending on the mushroom variety and substrate. You will see a white mycelium (the mushroom network) spreading through the substrate.
The Fruiting Phase: Letting the Mushrooms Grow
Once the substrate is completely colonized with mycelium, the fruiting phase begins. Now we want to make the mushrooms grow!
- Change the location: Move the container to a brighter place, but still without direct sunlight.
- Increase humidity: The humidity should be high (approx. 80-90%). Spray the container regularly with water or place it in a plastic bag with a few holes to maintain moisture.
- Ventilation: Ensure sufficient ventilation to prevent mold growth.
- Wait and observe: After a few days or weeks, the first mushrooms should start to form.
The Harvest: Finally Harvesting!
When the mushrooms have reached the desired size, you can harvest them.
- Harvest mushrooms: Gently twist the mushrooms off or cut them with a knife.
- Let the substrate rest: After harvesting, you can let the substrate rest for a few days and then moisten it again. Often, there is a second or even a third wave of harvest.
Tips and Tricks for Successful Mushroom Cultivation
Experiment: Try different substrates and cultivation methods to find out what works best for you.
Cleanliness is key: Always maintain cleanliness to prevent mold growth.
Choose the right mushroom variety: Not all mushrooms are equally easy to grow. Start with a beginner-friendly variety like oyster mushrooms.
The right temperature and humidity: Temperature and humidity play an important role in the growth of mushrooms. Inform yourself about the optimal conditions for your mushroom variety.
Be patient: Mushroom cultivation takes time and patience. Don’t be discouraged if it doesn’t work out the first time.

Conclusion
So, there you have it! Embarking on the journey of home mushroom growing is not only surprisingly simple, but also incredibly rewarding. Imagine the satisfaction of harvesting fresh, flavorful mushrooms right from your own home, knowing exactly where they came from and how they were grown. No more mysterious origins or questionable freshness from the supermarket – just pure, unadulterated fungal goodness at your fingertips.
This DIY trick isn’t just about saving money (although that’s certainly a perk!). It’s about connecting with nature, learning a new skill, and enjoying the unparalleled taste of homegrown produce. It’s about reducing your carbon footprint by minimizing transportation and packaging. And, let’s be honest, it’s just plain cool to be able to say, “I grew these myself!”
But the beauty of home mushroom growing lies in its adaptability. Feel free to experiment with different substrates. While we’ve focused on coffee grounds, straw, and cardboard, you can also explore using wood chips, sawdust, or even old cotton clothing. Each substrate will impart a slightly different flavor profile to your mushrooms, allowing you to tailor your harvest to your specific culinary preferences.
Consider trying different mushroom varieties as well. While oyster mushrooms are a fantastic starting point due to their resilience and ease of cultivation, you can eventually branch out to shiitake, lion’s mane, or even more exotic species. Just be sure to research the specific growing conditions required for each variety to ensure success.
Don’t be afraid to get creative with your growing environment. While a dark, humid space is ideal, you can adapt your setup to fit your available resources. A repurposed plastic tub, a spare closet, or even a shaded corner of your basement can all be transformed into a thriving mushroom farm.
The key to successful home mushroom growing is patience and observation. Pay close attention to your mushrooms, monitor their growth, and adjust your environment as needed. Don’t be discouraged if your first attempt isn’t perfect – every mistake is a learning opportunity.
We wholeheartedly encourage you to give this DIY trick a try. It’s a fun, educational, and ultimately delicious experience that will transform the way you think about food. And most importantly, we want to hear about your adventures! Share your successes, your failures, and your unique variations in the comments below. Let’s build a community of home mushroom growers and learn from each other. What substrate worked best for you? What challenges did you encounter? What delicious dishes did you create with your homegrown mushrooms? Your experiences will inspire others to take the plunge and discover the joys of home mushroom growing for themselves. So, grab your coffee grounds, your cardboard, and your sense of adventure, and get ready to cultivate your own little piece of fungal paradise!
Frequently Asked Questions (FAQ)
What exactly are the benefits of growing mushrooms at home?
Growing mushrooms at home offers a multitude of advantages. Firstly, you gain access to incredibly fresh, flavorful mushrooms that surpass the quality of store-bought varieties. You control the entire growing process, ensuring they are free from pesticides and other harmful chemicals. Secondly, it’s a sustainable practice, especially when utilizing recycled materials like coffee grounds and cardboard. This reduces waste and minimizes your environmental impact. Thirdly, it’s a cost-effective way to enjoy gourmet mushrooms, saving you money in the long run. Finally, it’s an incredibly rewarding and educational experience, connecting you with nature and teaching you about the fascinating world of fungi.
Is home mushroom growing really that easy? I’ve heard it’s complicated.
While some advanced mushroom cultivation techniques can be complex, the method we’ve outlined is designed for beginners and is surprisingly straightforward. The key is to start with a resilient and forgiving variety like oyster mushrooms. By following the instructions carefully and maintaining a clean and humid environment, you can significantly increase your chances of success. Don’t be intimidated by the process – it’s more about creating the right conditions and letting nature do its thing. Remember, even experienced growers encounter challenges, so don’t be discouraged by initial setbacks.
What if I don’t have access to coffee grounds? Can I use something else?
Absolutely! While coffee grounds are an excellent substrate due to their nitrogen content and readily available nature, you can certainly experiment with other materials. Straw, cardboard, and wood chips are all viable alternatives. Just be sure to pasteurize or sterilize your chosen substrate to eliminate competing organisms before introducing your mushroom spawn. The specific preparation method will vary depending on the substrate, so do your research beforehand. For example, straw can be pasteurized by soaking it in hot water for an hour, while wood chips may require sterilization in an autoclave.
How long does it take to grow mushrooms at home using this method?
The timeline for home mushroom growing can vary depending on several factors, including the mushroom variety, the substrate used, and the environmental conditions. Generally, you can expect to see the first signs of mycelial growth (the white, thread-like network of the mushroom) within a week or two after inoculation. From there, it typically takes another two to three weeks for the mushrooms to fully mature and be ready for harvest. So, from start to finish, you’re looking at a timeframe of approximately one to two months.
What are some common problems I might encounter, and how can I fix them?
One common problem is contamination, which can manifest as mold or other unwanted fungi growing in your substrate. To prevent contamination, ensure you’re using clean materials and maintaining a sterile environment. If you do encounter contamination, remove the affected area immediately to prevent it from spreading. Another common issue is insufficient humidity. Mushrooms require a humid environment to thrive, so be sure to mist your growing area regularly or use a humidity tent. Finally, pests like fungus gnats can sometimes be a nuisance. You can control fungus gnats by using sticky traps or introducing beneficial nematodes to your substrate.
How do I know when my mushrooms are ready to harvest?
The ideal time to harvest your mushrooms depends on the variety. For oyster mushrooms, you’ll want to harvest them when the caps are fully formed but before they start to release spores. The edges of the caps will typically be slightly curled upwards. Shiitake mushrooms are ready to harvest when the caps have fully opened and the gills are visible. Lion’s mane mushrooms are ready when they are firm and have developed a dense, shaggy appearance. When in doubt, it’s always better to harvest a little early than to wait too long.
Can I grow mushrooms indoors year-round?
Yes, absolutely! One of the great advantages of home mushroom growing is that you can control the environment, allowing you to cultivate mushrooms indoors year-round, regardless of the external weather conditions. As long as you can provide the necessary temperature, humidity, and light levels, you can enjoy a continuous harvest of fresh mushrooms.
Where can I buy mushroom spawn?
Mushroom spawn is readily available from a variety of sources, including online retailers, garden centers, and specialty mushroom suppliers. When purchasing spawn, be sure to choose a reputable supplier and select a strain that is well-suited to your growing environment and experience level. Look for spawn that is fresh and free from contamination.
Is it safe to eat mushrooms I grow at home?
Yes, as long as you are absolutely certain that you have correctly identified the mushroom species and that it is a known edible variety. Never consume wild mushrooms unless you are an experienced mycologist or have consulted with an expert. When growing mushrooms at home, always purchase spawn from a reputable source and follow the instructions carefully. If you are ever in doubt about the identity of a mushroom, it’s always best to err on the side of caution and discard it.
What are some delicious ways to use my homegrown mushrooms?
The culinary possibilities with homegrown mushrooms are endless! You can sauté them with garlic and herbs for a simple and flavorful side dish. Add them to soups, stews, and sauces for a boost of umami flavor. Use them as a topping for pizzas, omelets, and salads. Grill them, roast them, or even pickle them. The only limit is your imagination! Experiment with different recipes and discover your favorite ways to enjoy the unique taste and texture of your homegrown mushrooms.
Leave a Comment