

Growing grape tomatoes at home can be incredibly rewarding, offering a burst of fresh, sweet flavor right at your fingertips! Imagine plucking sun-ripened, juicy grape tomatoes straight from your own garden – a taste far superior to anything you’ll find in the grocery store. But let’s be honest, sometimes getting those tiny tomatoes to thrive can feel like a real challenge.
For centuries, home gardening has been a source of sustenance and joy. From ancient Roman courtyards to victory gardens during wartime, cultivating our own food connects us to a rich history of self-sufficiency and a deeper understanding of nature. And while the humble grape tomato might seem like a modern convenience, its lineage traces back to the larger tomato varieties enjoyed for generations.
That’s why I’ve put together this guide packed with easy DIY tricks and hacks to help you master the art of growing grape tomatoes at home. Whether you’re a seasoned gardener or just starting out, these tips will empower you to overcome common challenges like blossom end rot, pests, and lack of sunlight. We’ll explore simple solutions using everyday materials, saving you money and ensuring a bountiful harvest. Get ready to transform your backyard, balcony, or even a sunny windowsill into a thriving grape tomato paradise!
DIY: Growing Juicy Cherry Tomatoes Yourself – Guaranteed Success!
Hello, dear garden friends! I love cherry tomatoes. Snacking on these little, sweet things straight from the vine is simply unbeatable. And the best part: it’s super easy to grow them yourself! I’ll show you how to harvest your own cherry tomatoes with simple tools and a little patience. Don’t worry, even if you don’t have a huge garden, this works great on a balcony or terrace. Let’s get started!
What You Need: The Materials List
Before we begin, here’s a list of everything you’ll need:
- Cherry tomato seeds: Organic quality is best, then you know what you’re getting. There are countless varieties, so choose your favorite! I personally love ‘Sungold’ because they are so incredibly sweet.
- Seed starting mix: Regular potting soil is too nutrient-rich for the delicate seedlings. Seed starting mix is loose and low in nutrients, perfect for the start.
- Seedling pots or trays: Small pots or trays with holes in the bottom are ideal. You can also use egg cartons or yogurt cups if you poke holes in them.
- A dibber or pencil: For separating the seedlings.
- Larger pots or containers: For the mature plants. They should have a capacity of at least 10 liters, even better more.
- Tomato soil: Special soil for tomatoes that is rich in nutrients.
- Tomato stakes or trellises: Cherry tomatoes can grow quite tall and need support.
- Watering can or spray bottle: For watering.
- Fertilizer: Liquid fertilizer for tomatoes or organic fertilizer like horn shavings.
- A sunny location: Tomatoes love the sun!
Phase 1: Sowing – The Start of a Tomato-Rich Life
Sowing is the first step and actually quite simple. I usually start sowing in March or April so the plants have enough time to grow big by summer.
- Prepare the seedling pots: Fill the seedling pots or trays with seed starting mix. Lightly press the soil down.
- Sow the seeds: Place 2-3 seeds per pot on the soil. Cover the seeds with a thin layer of soil (approx. 0.5 cm).
- Watering: Gently moisten the soil with a spray bottle. The soil should be damp, but not wet.
- Location: Place the seedling pots in a bright and warm place. A windowsill is ideal. The temperature should ideally be between 20 and 25 degrees Celsius.
- Moisture: To increase humidity, you can put a clear plastic wrap or a plastic dome over the pots. But be sure to air out the pots daily to prevent mold.
- Patience: Now it’s time to wait! After about 1-2 weeks, the first seedlings should be visible.
Phase 2: Pricking Out – Giving the Little Plants More Space
As soon as the seedlings have developed their first true leaves (besides the seed leaves), it’s time for pricking out. This means you separate the small plants and transplant them into larger pots.
- Preparation: Fill small pots (approx. 8-10 cm in diameter) with seed starting mix.
- Separating: Carefully loosen the seedlings from the seed tray with a dibber or pencil. Try to damage the roots as little as possible.
- Transplanting: Place each seedling in its own pot. Make sure the roots are not bent. The plant should sit in the soil up to the seed leaves.
- Watering: Water the plants gently.
- Location: Place the pricked-out plants back in a bright and warm place.
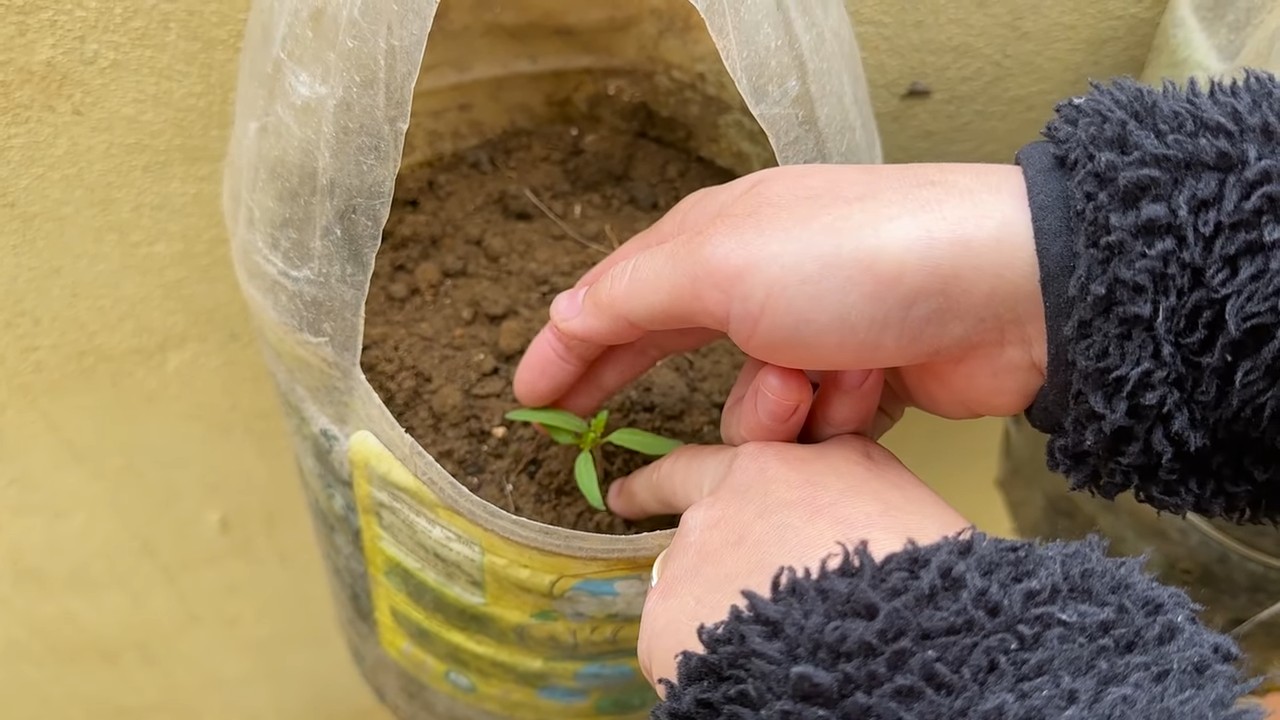
Phase 3: Planting Out – Off to the Outdoors!
After the last frost (mid-May in many regions), it’s finally time: the cherry tomatoes can go outside! Make sure there is no more danger of frost.
- Prepare the pots/containers: Fill the larger pots or containers with tomato soil.
- Planting out: Carefully remove the plants from their pots. Loosen the roots a bit.
- Planting: Place the plants in the prepared pots/containers. The plants should sit a little deeper than before. This promotes root formation.
- Tomato stakes/trellises: Insert the tomato stakes or trellises into the soil right when you plant. This way, you avoid damaging the roots later.
- Watering: Water the plants thoroughly.
- Location: Place the pots/containers in a sunny and sheltered spot.
Phase 4: Care – So Your Cherry Tomatoes Thrive
Proper care is crucial for a bountiful harvest. Here are a few tips:
- Watering: Tomatoes need regular water, especially on hot days. It’s best to water in the morning or evening so the water doesn’t evaporate as quickly. Avoid watering the leaves, as this can promote fungal diseases.
- Fertilizing: Tomatoes are heavy feeders and need a lot of nutrients. Fertilize the plants regularly with liquid fertilizer for tomatoes or organic fertilizer like horn shavings. Start fertilizing about 2-3 weeks after planting out.
- Pruning suckers: Regularly remove the side shoots that form in the leaf axils. These so-called “suckers” unnecessarily drain the plant’s energy. Simply break them off with your fingers.
- Supporting: Regularly tie the tomato plants to the tomato stakes or trellises so they don’t break.
- Diseases and Pests: Watch for signs of diseases or pests. If necessary, you can use biological pesticides. Late blight is a common disease in tomatoes. Look for brown spots on the leaves and fruits. Remove affected leaves immediately.
- Mulching: A layer of mulch made of straw or grass clippings keeps the soil moist and suppresses weeds.
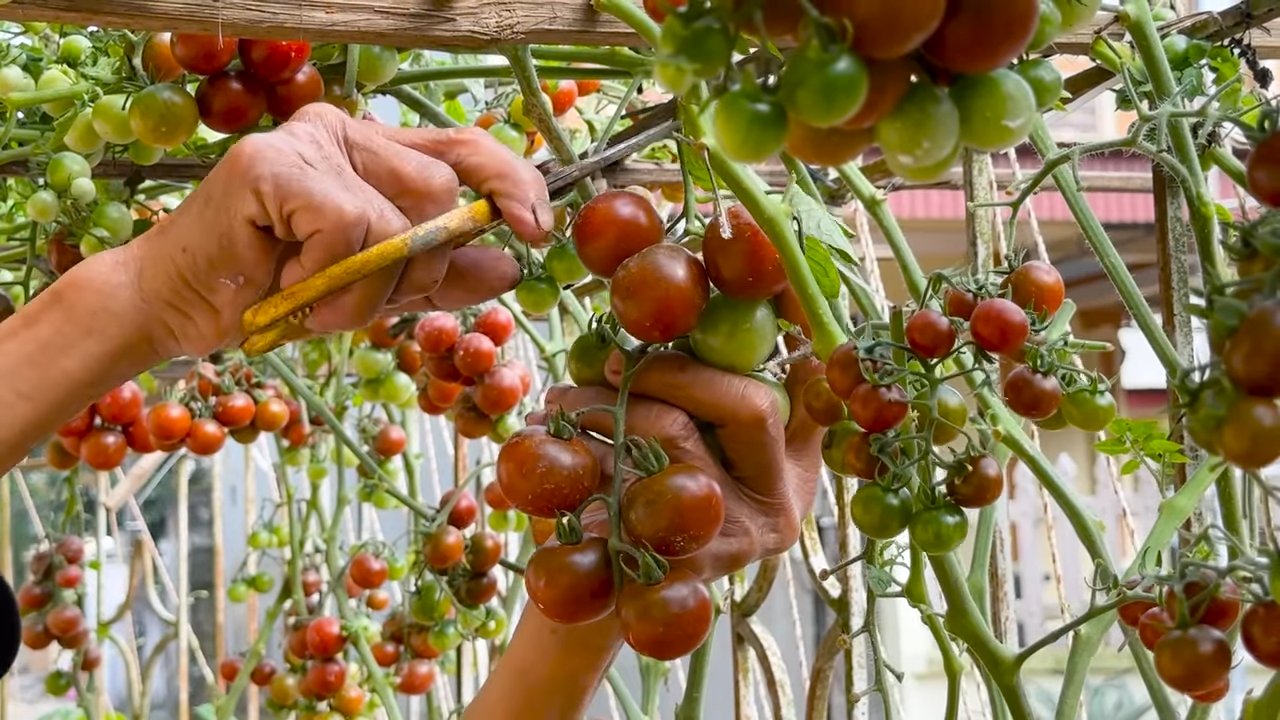
Phase 5: Harvest – The Reward for Your Effort
Finally, the time has come: the cherry tomatoes are ripe! They will be a beautiful red (or yellow, depending on the variety) and will easily come off the stem.
- Harvest time: Harvest the tomatoes when they are fully ripe. They taste best then.
- Harvesting method: Gently twist the tomatoes off the stem.
- Storage: Cherry tomatoes taste best fresh from the vine. But you can also store them in the refrigerator for a few days.
Extra Tips for a Bountiful Harvest
Variety selection: Choose varieties that are suitable for growing in pots. There are many special balcony tomatoes.
Sunny location: Tomatoes need at least 6 hours of sun per day.
Good ventilation: Ensure good air circulation around the plants to prevent fungal diseases.
Regular watering and fertilizing: Tomatoes are demanding when it comes to water and nutrients.
Conclusion
So, there you have it! Growing grape tomatoes at home isn’t just a gardening project; it’s an investment in flavor, freshness, and a deeper connection to your food. We’ve walked through the simple steps, debunked common myths, and armed you with the knowledge to cultivate your own thriving miniature tomato jungle.
Why is this DIY trick a must-try? Because store-bought grape tomatoes, while convenient, often lack the vibrant, sun-ripened sweetness that homegrown varieties possess. You control the entire process, from the quality of the soil to the amount of sunlight, ensuring that each tiny tomato bursts with unparalleled flavor. Plus, there’s an undeniable satisfaction in harvesting something you’ve nurtured from seed to fruit. It’s a rewarding experience that connects you to the natural world and provides a delicious, healthy snack right at your fingertips.
But the beauty of growing grape tomatoes at home lies in its adaptability. Feel free to experiment! Try different varieties of grape tomatoes – some are sweeter, some are tangier, and some even come in unique colors like yellow or black. Consider companion planting basil or marigolds alongside your tomatoes to deter pests and enhance their flavor. If you’re short on space, explore growing them in hanging baskets or vertical planters. The possibilities are endless!
Don’t be afraid to get your hands dirty and embrace the learning process. Gardening is a journey, not a destination. There will be successes and setbacks, but each experience will teach you something new. And remember, even a small harvest of homegrown grape tomatoes is a victory worth celebrating.
We wholeheartedly encourage you to try this DIY trick and experience the joy of growing your own delicious grape tomatoes. It’s a simple, rewarding, and flavorful way to enhance your meals and connect with nature. Once you taste the difference between store-bought and homegrown, you’ll never look back.
Now, grab your seeds, prepare your soil, and get ready to embark on a tomato-growing adventure! And most importantly, don’t forget to share your experiences with us. We’d love to hear about your successes, your challenges, and any unique tips or tricks you discover along the way. Share your photos, stories, and questions in the comments below. Let’s create a community of thriving grape tomato growers!
Frequently Asked Questions (FAQ)
What is the best time of year to start growing grape tomatoes?
The ideal time to start growing grape tomatoes depends on your climate. In general, you should start seeds indoors 6-8 weeks before the last expected frost. If you’re buying seedlings from a nursery, wait until after the last frost to transplant them outdoors. Grape tomatoes thrive in warm weather, so ensure the soil temperature is consistently above 60°F (15°C) before planting. In warmer climates with longer growing seasons, you can often plant a second crop in late summer for a fall harvest.
How much sunlight do grape tomatoes need?
Grape tomatoes require at least 6-8 hours of direct sunlight per day to thrive. Choose a location in your garden that receives ample sunlight throughout the day. If you’re growing them indoors, supplement with grow lights if necessary. Insufficient sunlight can lead to leggy plants, reduced fruit production, and less flavorful tomatoes.
What kind of soil is best for growing grape tomatoes?
Grape tomatoes prefer well-draining soil that is rich in organic matter. Amend your soil with compost or aged manure before planting to improve its fertility and drainage. A slightly acidic soil pH of 6.0 to 6.8 is ideal. You can test your soil pH with a home testing kit and adjust it accordingly. Avoid heavy clay soils, as they can retain too much water and lead to root rot.
How often should I water my grape tomato plants?
Water your grape tomato plants deeply and regularly, especially during hot, dry weather. Aim to keep the soil consistently moist but not waterlogged. Water at the base of the plant to avoid wetting the foliage, which can increase the risk of fungal diseases. Mulching around the plants can help retain moisture and suppress weeds. As the tomatoes begin to ripen, you may want to reduce watering slightly to concentrate the flavors.
Do grape tomato plants need fertilizer?
Yes, grape tomato plants benefit from regular fertilization. Use a balanced fertilizer that is specifically formulated for tomatoes. Apply fertilizer according to the package instructions, typically every 2-3 weeks during the growing season. Avoid over-fertilizing, as this can lead to excessive foliage growth and reduced fruit production. You can also supplement with organic fertilizers like compost tea or fish emulsion.
How do I prevent pests and diseases from affecting my grape tomato plants?
Prevention is key when it comes to pests and diseases. Choose disease-resistant varieties of grape tomatoes whenever possible. Practice good garden hygiene by removing any dead or diseased leaves and debris. Water at the base of the plant to avoid wetting the foliage. Use organic pest control methods like insecticidal soap or neem oil to control common pests like aphids and whiteflies. Companion planting with basil or marigolds can also help deter pests.
When are grape tomatoes ready to harvest?
Grape tomatoes are typically ready to harvest about 60-70 days after transplanting. They should be fully colored and slightly soft to the touch. Gently twist the tomatoes off the vine, being careful not to damage the plant. Harvest regularly to encourage continued fruit production. The flavor of grape tomatoes is best when they are allowed to ripen fully on the vine.
Can I grow grape tomatoes in containers?
Yes, grape tomatoes are well-suited for container gardening. Choose a large container that is at least 12 inches in diameter and has good drainage. Use a high-quality potting mix that is specifically formulated for vegetables. Provide adequate support for the plants, such as a stake or cage. Water and fertilize regularly, as container-grown plants tend to dry out and deplete nutrients more quickly than those grown in the ground.
What are some common problems when growing grape tomatoes and how can I fix them?
Some common problems include blossom end rot (caused by calcium deficiency), cracking (caused by inconsistent watering), and pests like aphids and whiteflies. Blossom end rot can be prevented by adding calcium to the soil and ensuring consistent watering. Cracking can be minimized by watering regularly and evenly. Pests can be controlled with organic pest control methods.
How can I store my harvested grape tomatoes?
Store your harvested grape tomatoes at room temperature for the best flavor. Avoid refrigerating them, as this can dull their flavor and texture. If you have a large harvest, you can preserve them by canning, freezing, or drying them. You can also make grape tomato sauce or salsa.
Leave a Comment