

Growing cabbage in plastic bottles might sound a little unconventional, but trust me, it’s a game-changer for any home gardener looking to maximize space and minimize pests! Have you ever dreamed of harvesting plump, healthy cabbages right from your balcony or patio, even if you don’t have a sprawling backyard? Well, this simple DIY trick makes that dream a reality.
The concept of container gardening, in general, has been around for centuries, with roots tracing back to ancient civilizations who used pots and vessels to cultivate plants in limited spaces. But repurposing plastic bottles? That’s a modern twist on an age-old practice, born out of a desire for sustainability and resourcefulness. It’s a beautiful way to give discarded materials a new life while simultaneously providing fresh, homegrown produce.
Let’s face it, traditional cabbage cultivation can be tricky. Pests like cabbage worms and root maggots can wreak havoc, and finding enough space in a garden bed can be a challenge. That’s where this DIY hack shines! By growing cabbage in plastic bottles, you create a physical barrier against many common pests, elevate your plants for better air circulation, and control the soil conditions more effectively. Plus, it’s incredibly budget-friendly and a fun project for the whole family. I’m excited to share this easy and effective method with you, so you can enjoy fresh, delicious cabbage straight from your own little urban garden!
Cabbage in a Plastic Bottle Garden: A DIY Guide for Small Spaces
Hello, garden friends! Do you also have the problem of not having the largest garden, but still wanting to grow fresh vegetables? Then I have just the thing for you today: growing cabbage in plastic bottles! Yes, you read that right. With this simple and inexpensive method, you can harvest delicious cabbage on your balcony, terrace, or even in a small backyard. And the best part: you’re recycling plastic waste at the same time! Let’s get started!
What you need:
- Plastic bottles: Large PET bottles (1.5 liters or larger) are best. The larger the bottle, the better for the cabbage.
- Cabbage seedlings: You can either buy ready-made seedlings at a garden center or grow your own from seed.
- Soil: A good, nutrient-rich potting soil is ideal. You can also mix in compost.
- Knife or scissors: For cutting the plastic bottles.
- Drill or nail: For the drainage holes.
- Watering can or hose: For watering the plants.
- Optional: Fertilizer (organic or mineral) for the growth phase.
- Optional: Small stones or clay shards for drainage.
Preparation of the Plastic Bottles:
- Cleaning: First, you need to clean the plastic bottles thoroughly. Remove all labels and rinse them with warm water and dish soap. Make sure no soap residue remains.
- Cutting: Now comes the fun part! You have two options for cutting the bottles:
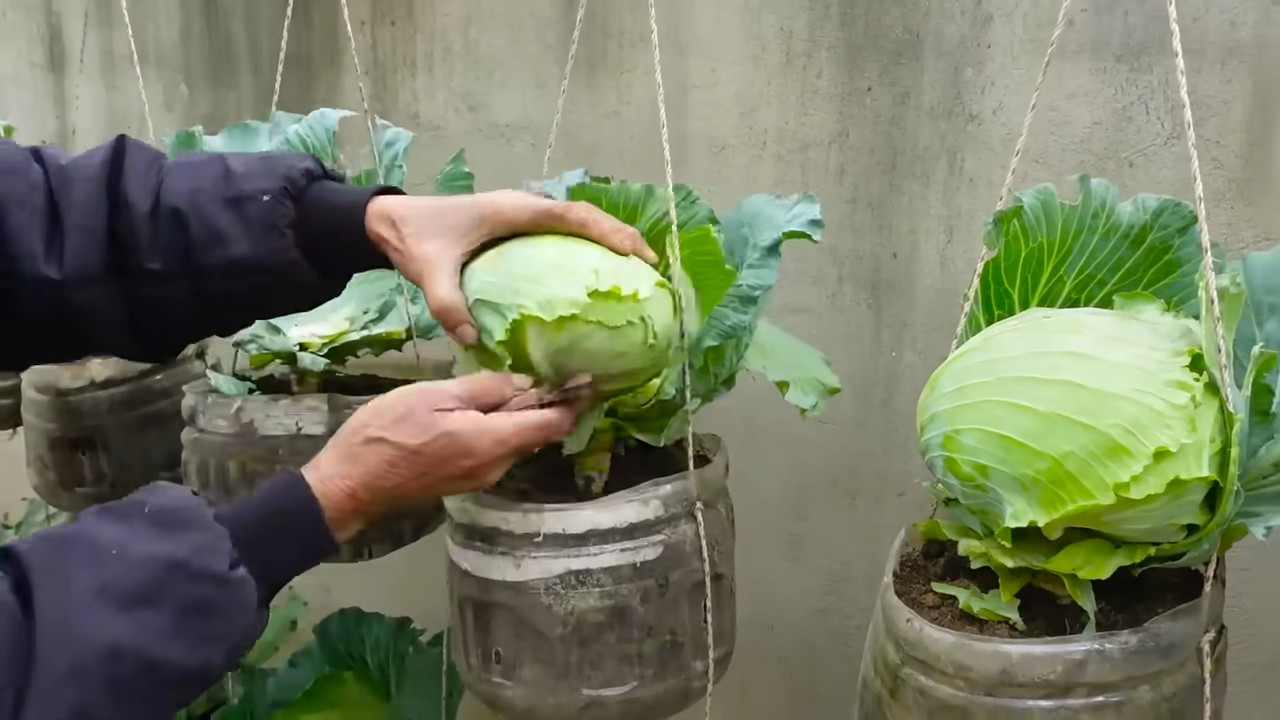
- Option 1: Horizontal cut. Cut the bottle horizontally in the middle. The upper part is later turned upside down and inserted into the lower part, creating a small pot. This option is well-suited if you want to repot the plants later.
- Option 2: Vertical cut. Cut the bottle vertically on one side. Leave a few centimeters at the bottom so that the bottle does not fall apart. This option is ideal if you want to place several plants next to each other.
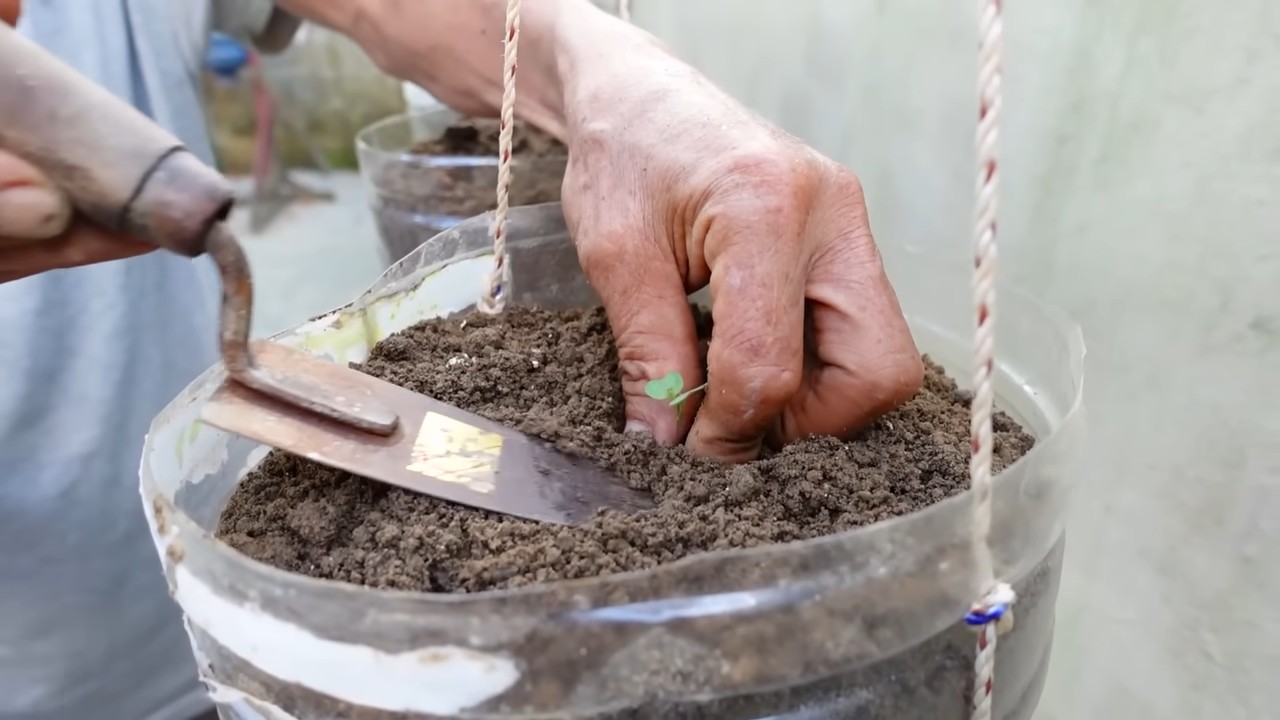
- Drainage holes: Regardless of which option you have chosen, you now need to drill or punch drainage holes in the bottom of the bottles. This is important so that excess water can drain away and the roots do not rot. I usually use a drill with a small bit for this, but a nail and a hammer will do the trick as well. Make about 4-5 holes per bottle.
Planting the Bottles:
- Drainage (optional): If you wish, you can place a small layer of stones or clay shards at the bottom of the bottle. This further improves drainage and prevents waterlogging.
- Fill with soil: Fill the bottles with soil. Leave about 2-3 centimeters of space to the edge. The soil should be loose and airy.
- Insert seedlings: Make a small hole in the soil and carefully insert the cabbage seedlings. Make sure the roots are well covered with soil. The distance between the plants should be about 30-40 centimeters so they have enough space to grow.
- Watering in: Water the plants thoroughly after planting. This helps the soil to settle and moisten the roots.
Care of the Cabbage Plants:
- Location: Cabbage needs a lot of sun! Place the planted bottles in a sunny location where they get at least 6 hours of sun per day.
- Watering: Cabbage needs regular water, especially during the growth phase. Water the plants when the top layer of soil is dry. Avoid waterlogging, as this can lead to root rot.
- Fertilizing (optional): To promote the growth of the plants, you can fertilize them regularly. Use an organic or mineral fertilizer for vegetables. Pay attention to the manufacturer’s dosage instructions. I usually fertilize my cabbage plants every two weeks with a liquid fertilizer.
- Pest protection: Unfortunately, cabbage is susceptible to various pests, such as cabbage whites, aphids, or slugs. Check the plants regularly and remove pests by hand if necessary. You can also use natural pesticides, such as nettle tea or neem oil. A net over the plants can also help keep cabbage whites away.
- Support (optional): As the cabbage heads get larger, the plants may need some support. You can stabilize them with stakes or strings to prevent them from falling over.
Harvest Time:
The harvest time for cabbage depends on the variety. As a rule, you can harvest the cabbage about 2-3 months after planting the seedlings. The cabbage is ripe when the heads are firm and closed. Cut the heads off with a sharp knife. Leave a few leaves on the stalk so that the plant may still be able to form side shoots.
Additional Tips and Tricks:
- Variety selection: Choose cabbage varieties that are suitable for growing in pots. Early cabbage, pointed cabbage, or Brussels sprouts are good options.
- Crop rotation: Do not grow cabbage in the same location every year to prevent diseases and pests.
- Mulching: Mulch the soil around the plants with straw or grass clippings. This keeps the moisture in the soil and suppresses weeds.
- Companion planting: Plant cabbage together with other plants that protect it from pests or promote its growth. Good neighbors are, for example, marigolds, nasturtiums, or sage.
- Upcycling: Use not only plastic bottles but also other recycled materials for growing cabbage, such as old buckets, pots, or car tires.
Common Problems and Solutions:
- Yellow leaves: Yellow leaves can be a sign of a nutrient deficiency. Fertilize the plants with a suitable fertilizer.
- Root rot: Root rot is caused by waterlogging. Make sure the soil is well-drained and do not overwater the plants.
- Pests: Check the plants regularly for pests and combat them with natural or chemical means if necessary.
- Diseases: Cabbage can be affected by various diseases, such as clubroot or downy mildew. Ensure good crop rotation and remove infected plants immediately.
Conclusion:
Growing cabbage in plastic bottles is a simple, inexpensive, and environmentally friendly way to grow fresh vegetables in a small space. With a little care and attention, you can soon harvest and enjoy your own cabbage heads. So, what are you waiting for? Collect your plastic bottles and get started! Happy gardening!
Conclusion
So, there you have it! Growing cabbage in plastic bottles isn’t just a quirky gardening experiment; it’s a surprisingly effective method for maximizing space, protecting your precious plants, and enjoying a bountiful harvest, even in limited areas. This DIY trick transforms discarded plastic into a valuable resource, contributing to a more sustainable gardening practice.
We’ve explored how this method offers several advantages. The bottles act as mini-greenhouses, providing warmth and shelter, especially crucial during the early stages of growth or in regions with unpredictable weather. They also offer a physical barrier against common pests like slugs and snails, reducing the need for harmful pesticides. Furthermore, the controlled environment within the bottle allows for better water management, minimizing water waste and ensuring your cabbage receives the precise amount it needs.
But the beauty of this method lies in its adaptability. Feel free to experiment with different sizes of plastic bottles. Larger bottles can accommodate larger cabbage varieties, while smaller bottles are perfect for starting seedlings or growing smaller, more compact cabbages. You can also try painting the bottles white to reflect sunlight and prevent overheating in hotter climates. Consider adding drainage holes at different levels to control moisture and prevent root rot.
Beyond the standard green cabbage, why not explore other varieties? Red cabbage, with its vibrant color and slightly peppery flavor, thrives just as well in plastic bottles. Savoy cabbage, known for its crinkled leaves and mild taste, is another excellent option. Even Chinese cabbage, like Napa cabbage, can be successfully grown using this method, offering a delicious addition to your stir-fries and salads.
Don’t be afraid to get creative with your setup. You can arrange the bottles vertically on a wall or fence to create a stunning green display. Or, you can group them together in a raised bed or container garden for a more traditional look. The possibilities are endless!
Ultimately, growing cabbage in plastic bottles is a rewarding and environmentally friendly way to enjoy fresh, homegrown produce. It’s a testament to the power of resourcefulness and the joy of connecting with nature. We wholeheartedly encourage you to give this DIY trick a try. It’s easier than you might think, and the results are well worth the effort.
Once you’ve embarked on your plastic bottle cabbage-growing adventure, we’d love to hear about your experience! Share your tips, tricks, and photos with us in the comments below. Let’s build a community of resourceful gardeners and inspire others to embrace sustainable practices. Your insights could be invaluable to someone just starting out, and together, we can make a positive impact on our planet, one cabbage at a time. So, grab those plastic bottles, get your hands dirty, and prepare to be amazed by the magic of homegrown cabbage!
Frequently Asked Questions (FAQ)
What type of plastic bottles are best for growing cabbage?
Ideally, you should use food-grade plastic bottles, such as those used for water, soda, or juice. These are generally made from PET (polyethylene terephthalate) or HDPE (high-density polyethylene), which are considered safe for growing food. Avoid using bottles that have contained harsh chemicals or cleaning products. Thoroughly wash and rinse the bottles before using them to remove any residue. The size of the bottle will depend on the variety of cabbage you intend to grow. Larger varieties will require larger bottles.
How do I prepare the plastic bottles for planting?
First, thoroughly clean the bottles with soap and water to remove any residue. Then, cut off the top portion of the bottle, leaving enough space for the cabbage to grow. Drill drainage holes in the bottom of the bottle to prevent waterlogging. You can also add a layer of gravel or small stones at the bottom for improved drainage. If you live in a hot climate, consider painting the outside of the bottles white to reflect sunlight and prevent the soil from overheating.
What type of soil should I use for growing cabbage in plastic bottles?
Use a well-draining potting mix that is rich in organic matter. You can also amend your existing garden soil with compost or other organic materials to improve its fertility and drainage. Cabbage prefers slightly acidic soil with a pH between 6.0 and 7.0. You can test your soil’s pH using a soil testing kit and adjust it accordingly.
How often should I water my cabbage plants in plastic bottles?
Water your cabbage plants regularly, keeping the soil consistently moist but not waterlogged. The frequency of watering will depend on the weather conditions and the type of soil you are using. Check the soil moisture level regularly by sticking your finger into the soil. If the top inch of soil feels dry, it’s time to water. Avoid overwatering, as this can lead to root rot.
How much sunlight do cabbage plants need?
Cabbage plants need at least 6 hours of direct sunlight per day. Choose a sunny location for your plastic bottle garden. If you live in a hot climate, provide some afternoon shade to prevent the plants from overheating. You can also use shade cloth to protect the plants from intense sunlight.
How do I fertilize my cabbage plants in plastic bottles?
Cabbage plants are heavy feeders and require regular fertilization. Use a balanced fertilizer that is specifically formulated for vegetables. Follow the instructions on the fertilizer package for application rates and frequency. You can also use organic fertilizers, such as compost tea or fish emulsion. Fertilize your cabbage plants every 2-3 weeks during the growing season.
How do I protect my cabbage plants from pests and diseases?
Plastic bottles offer some protection against pests, but it’s still important to monitor your plants regularly for signs of infestation or disease. Common cabbage pests include cabbage worms, aphids, and slugs. You can control these pests with organic insecticides, such as neem oil or insecticidal soap. Diseases that can affect cabbage include black rot and clubroot. Prevent these diseases by practicing good sanitation and crop rotation.
When is the best time to harvest my cabbage?
Cabbage is typically ready to harvest 60-100 days after planting, depending on the variety. The head should be firm and compact. To harvest, cut the head off at the base of the plant with a sharp knife. Leave the roots in the ground, as they may produce new shoots.
Can I reuse the plastic bottles for growing other plants?
Yes, you can reuse the plastic bottles for growing other plants. Just make sure to clean them thoroughly before using them again. You can also use them for starting seedlings or propagating cuttings.
What are some other vegetables I can grow in plastic bottles?
Many other vegetables can be successfully grown in plastic bottles, including lettuce, spinach, herbs, tomatoes, peppers, and strawberries. The key is to choose varieties that are well-suited to container gardening and to provide them with the proper care and attention. Experiment and see what works best for you!

Leave a Comment