

Grow Malabar Spinach Successfully and unlock a world of vibrant, nutritious greens right in your backyard! Have you ever dreamed of harvesting your own delicious, leafy vegetables without the hassle of complicated gardening techniques? Well, get ready to turn that dream into reality! This DIY guide is packed with simple yet effective tricks to help you cultivate thriving Malabar spinach, even if you’re a complete beginner.
Malabar spinach, also known as Basella alba, isn’t just another leafy green; it’s a culinary treasure with roots stretching back centuries in Asia and Africa. Traditionally used in soups, stews, and stir-fries, this climbing vine offers a unique, slightly peppery flavor and a wealth of vitamins and minerals. But beyond its nutritional value, growing your own Malabar spinach connects you to a rich history of sustainable food practices.
Why should you learn to grow Malabar Spinach Successfully? Because it’s incredibly rewarding! Imagine stepping outside your door and picking fresh, organic greens for your dinner. Plus, Malabar spinach is a vigorous grower, providing a continuous harvest throughout the warm season. This DIY guide will equip you with the knowledge to overcome common challenges, from choosing the right location to providing adequate support for its climbing habit. I’m excited to share these easy-to-follow tips and tricks that will transform your garden and your plate!
Successfully Growing Malabar Spinach Yourself: A Comprehensive DIY Guide
Hello garden friends! I’m excited to show you today how you can successfully grow Malabar spinach (Basella alba) in your own garden. This climbing spinach is not only a delicious and nutritious addition to your meals, but also a beautiful ornamental plant. Let’s get started together!
What you need to grow Malabar Spinach:
- Seeds or cuttings: You can either grow Malabar spinach from seeds or use cuttings from an existing plant.
- Suitable soil: The spinach prefers well-drained, fertile soil with a pH between 6.5 and 7.5.
- Planters (optional): If you want to grow the spinach in pots, you will need sufficiently large containers with drainage holes.
- Trellis: Since Malabar spinach is a climber, it needs a support such as a trellis, a fence, or a climbing frame.
- Watering can or hose: For regular watering of the plants.
- Fertilizer (optional): An organic fertilizer can promote growth.
- Pruning shears: For harvesting and pruning the plant.
- Sunlight: Malabar spinach needs at least 6 hours of sunlight per day.
Growing Malabar Spinach from Seed:
- Prepare seeds: The seeds of Malabar spinach have a hard shell, so it is advisable to pretreat them before sowing. Place the seeds in warm water for 24 hours. This helps to speed up germination.
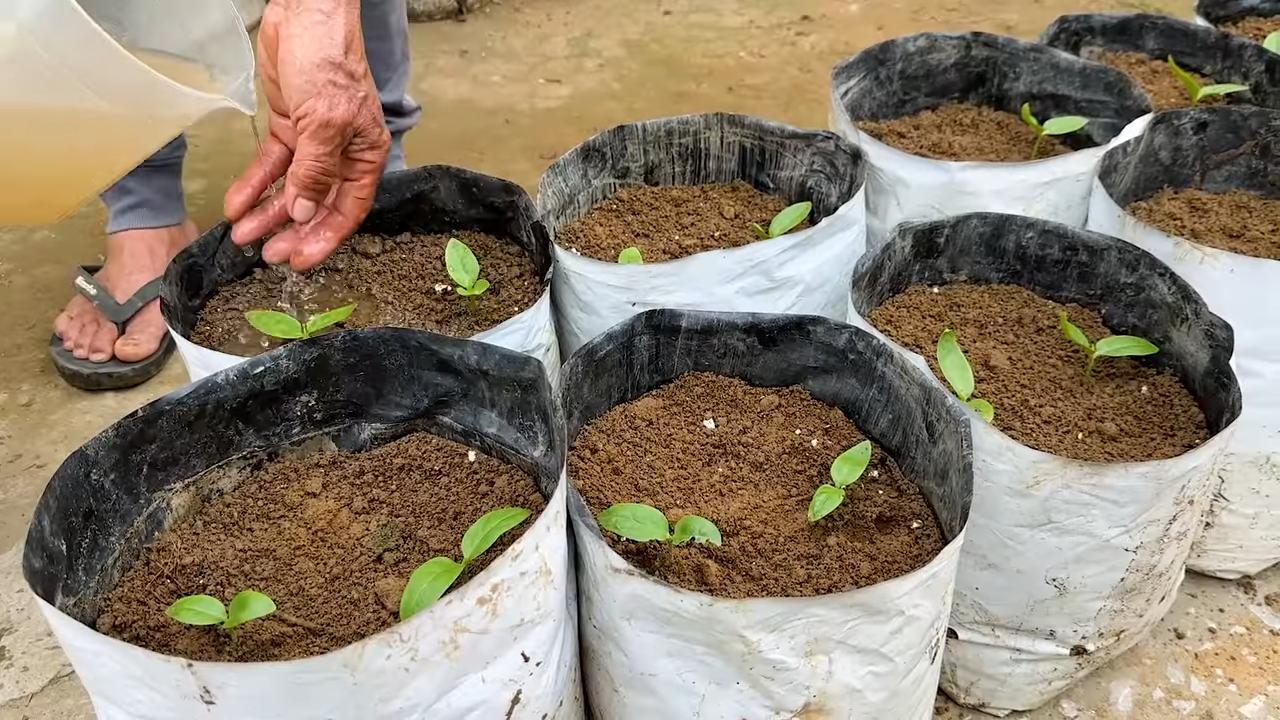
- Sowing: Fill small seed pots or a seed tray with seed starting mix. Press the soil down lightly and sow the seeds about 1 cm deep. Cover the seeds with soil and water them carefully.
- Germination: Place the seed pots in a warm, bright place. Germination can take 10 to 21 days. Keep the soil moist but not wet during this time.
- Pricking out (optional): When the seedlings are large enough to handle (about 5-7 cm high), you can prick them out into larger pots. This gives them more space to grow before they are planted outdoors.
- Hardening off: Before you plant the young plants outdoors, you should harden them off. To do this, place them outdoors for a few hours a day, starting with one hour and gradually increasing the time over a week. This helps them to get used to the outdoor conditions.
Propagating Malabar Spinach from Cuttings:
- Cut cuttings: Choose healthy, strong shoots from an existing Malabar spinach plant. Cut about 10-15 cm long cuttings just below a leaf node.
- Remove leaves: Remove the lower leaves of the cutting, leaving only the upper leaves.
- Rooting: You can root the cuttings either directly in soil or in water.
- Rooting in soil: Dip the lower end of the cutting in rooting powder (optional) and stick it in a pot with moist seed starting mix.
- Rooting in water: Place the cutting in a glass of water so that the lower leaf nodes are under water. Change the water every few days.
- Root formation: The cuttings should form roots within 2-3 weeks. If you have rooted them in water, you can plant them in pots with soil as soon as the roots are about 2-3 cm long.
Planting Malabar Spinach Outdoors:
- Location selection: Choose a sunny location with well-drained soil. Malabar spinach needs at least 6 hours of sunlight per day.
- Soil preparation: Loosen the soil and remove weeds. Improve the soil quality by incorporating compost or well-rotted manure.
- Planting: Dig holes that are slightly larger than the root balls of the young plants. Place the plants in the holes and fill them with soil. Press the soil down lightly and water the plants thoroughly.
- Install trellis: Make sure the trellis is close to the plants so they can cling to it.
Care of Malabar Spinach:
- Watering: Water the Malabar spinach regularly, especially during dry periods. The soil should always be slightly moist, but not wet.
- Fertilizing: Fertilize the plants every 2-3 weeks with an organic fertilizer. This promotes growth and leaf production.
- Pruning: Prune the plants regularly to promote growth and maintain their shape. Remove yellow or damaged leaves.
- Trellis: Guide the shoots of the Malabar spinach along the trellis so they can cling to it.
- Pest protection: Malabar spinach is relatively resistant to pests. Occasionally, aphids may appear. You can combat these with a jet of water or a mild soap solution.
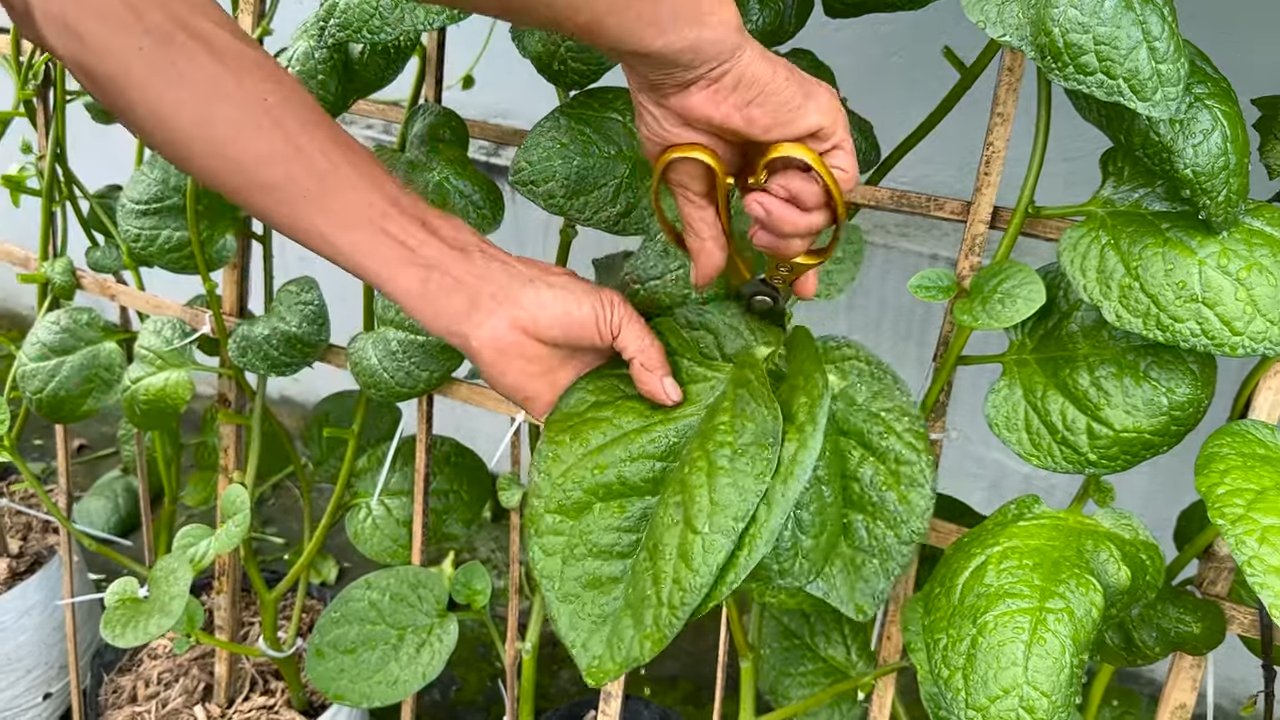
Harvesting Malabar Spinach:
- Harvest time: You can harvest the leaves of the Malabar spinach as soon as they are large enough to use. This is usually about 6-8 weeks after sowing or planting.
- Harvesting method: Cut the leaves with pruning shears. You can either harvest individual leaves or whole shoots.
- Regular harvesting: By harvesting regularly, you encourage the growth of new leaves.
Use of Malabar Spinach:
Malabar spinach can be eaten raw or cooked. The leaves have a mild, slightly sour taste. They are excellent for salads, soups, stews, and stir-fries. The thicker leaves can be prepared like spinach.
Additional Tips for Successful Cultivation:
- Mulching: A layer of mulch around the plants helps to retain moisture in the soil and suppress weeds.
- Companion planting: Malabar spinach gets along well with other vegetables such as tomatoes, peppers, and eggplants.
- Overwintering: In colder climates, Malabar spinach is not winter-hardy. You can either dig up the plants in the fall and overwinter them in pots indoors or grow them as an annual.
Common Problems and Solutions:
- Yellow leaves: Yellow leaves can be a sign of a nutrient deficiency or overwatering. Fertilize the plants and make sure the soil is well-drained.
- Poor germination: If the seeds do not germinate, it may be due to too low temperatures or too dry soil. Place the seed pots in a warmer place and keep the soil moist.
- Pests: Check the plants regularly for pests and combat them if necessary with appropriate means.
Conclusion:
With a little patience and care, you can successfully grow Malabar spinach in your own garden. I hope this guide has helped you to understand the basics and encouraged you to try it yourself. Happy gardening and enjoy your meal!
Conclusion
So, there you have it! Growing Malabar Spinach successfully doesn’t require a green thumb blessed by the gardening gods. It’s an achievable feat for anyone, regardless of their prior gardening experience. This DIY trick, focusing on creating the optimal growing environment and providing consistent care, is a game-changer for anyone looking to enjoy a bountiful harvest of this nutritious and delicious leafy green.
Why is this a must-try? Because it simplifies the process, maximizes your yield, and allows you to enjoy fresh, homegrown Malabar Spinach right from your backyard or balcony. Imagine the satisfaction of adding vibrant, healthy greens to your salads, stir-fries, and soups, knowing you cultivated them yourself. You’ll not only save money on grocery bills but also gain a deeper connection to the food you eat. Plus, you’ll be reducing your carbon footprint by avoiding the transportation and packaging associated with store-bought produce.
But the beauty of gardening lies in its adaptability. Feel free to experiment with different variations to suit your specific needs and preferences. For example, if you live in a particularly hot climate, consider providing your Malabar Spinach with some afternoon shade to prevent leaf scorch. If you’re growing it in containers, ensure they have adequate drainage to avoid root rot. You can also try different trellising methods to see which one works best for your space and aesthetic preferences. Some gardeners even report success growing Malabar Spinach indoors with the help of grow lights, making it a viable option for those with limited outdoor space.
Consider companion planting! Malabar Spinach thrives alongside plants like basil, which can help deter pests. Marigolds are another excellent choice, known for their pest-repelling properties and ability to attract beneficial insects. Avoid planting it near fennel, as it can inhibit its growth.
Don’t be afraid to get creative with your fertilizer choices, too. While a balanced liquid fertilizer works well, you can also supplement with organic options like compost tea or worm castings. These natural fertilizers provide essential nutrients and improve soil health.
The key is to observe your plants closely and adjust your care routine accordingly. Are the leaves turning yellow? It could be a sign of nutrient deficiency. Are you noticing any pests? Take action promptly to prevent them from spreading.
We wholeheartedly encourage you to try this DIY trick for growing Malabar Spinach successfully. It’s a rewarding experience that will bring you closer to nature and provide you with a delicious and nutritious harvest. Once you’ve given it a try, we’d love to hear about your experience! Share your tips, tricks, and photos in the comments below. Let’s build a community of Malabar Spinach enthusiasts and learn from each other’s successes and challenges. Happy gardening!
Frequently Asked Questions (FAQ)
What are the ideal growing conditions for Malabar Spinach?
Malabar Spinach thrives in warm, humid climates with plenty of sunlight. Aim for at least 6-8 hours of direct sunlight per day. The ideal temperature range is between 70°F and 90°F (21°C and 32°C). The soil should be well-draining and rich in organic matter. Amend your soil with compost or aged manure before planting to improve its fertility and drainage. Consistent moisture is crucial, but avoid overwatering, which can lead to root rot.
How often should I water my Malabar Spinach?
Water your Malabar Spinach regularly, especially during hot and dry periods. The goal is to keep the soil consistently moist but not waterlogged. Check the soil moisture level by sticking your finger about an inch deep into the soil. If it feels dry, it’s time to water. Water deeply and thoroughly, allowing the water to soak into the soil. Avoid overhead watering, as it can promote fungal diseases. Mulching around the base of the plants can help retain moisture and suppress weeds.
What kind of fertilizer should I use for Malabar Spinach?
Malabar Spinach is a heavy feeder, so regular fertilization is essential for optimal growth. Use a balanced liquid fertilizer, such as a 10-10-10 or 20-20-20, diluted to half strength. Apply the fertilizer every 2-3 weeks during the growing season. You can also supplement with organic fertilizers like compost tea, worm castings, or fish emulsion. These natural fertilizers provide essential nutrients and improve soil health. Avoid over-fertilizing, as it can lead to excessive foliage growth at the expense of flower and fruit production.
How do I harvest Malabar Spinach?
You can start harvesting Malabar Spinach leaves as soon as the plants are established and have reached a reasonable size. Simply snip off the leaves and stems as needed, leaving at least a few inches of growth on the plant. Regular harvesting encourages new growth and keeps the plants productive. Harvest in the morning when the leaves are at their freshest. You can store the harvested leaves in the refrigerator for up to a week.
What are some common pests and diseases that affect Malabar Spinach?
Malabar Spinach is generally resistant to pests and diseases, but it can occasionally be affected by aphids, spider mites, and fungal diseases. Aphids and spider mites can be controlled with insecticidal soap or neem oil. Fungal diseases can be prevented by providing good air circulation and avoiding overhead watering. If you notice any signs of disease, remove the affected leaves promptly to prevent the spread.
Can I grow Malabar Spinach in containers?
Yes, Malabar Spinach can be successfully grown in containers. Choose a large container with good drainage holes. Use a well-draining potting mix that is rich in organic matter. Provide a trellis or other support for the vines to climb on. Water regularly and fertilize every 2-3 weeks. Place the container in a sunny location that receives at least 6-8 hours of direct sunlight per day.
Is Malabar Spinach a perennial or an annual?
Malabar Spinach is a tender perennial that is typically grown as an annual in most climates. It can survive mild winters in warmer regions, but it will die back in colder climates. You can save seeds from your Malabar Spinach plants to grow them again the following year.
How do I save seeds from Malabar Spinach?
To save seeds from Malabar Spinach, allow the flowers to develop into small, dark berries. Once the berries are fully ripe and have started to dry out, harvest them and remove the seeds. Spread the seeds out on a paper towel to dry completely. Store the dried seeds in an airtight container in a cool, dark place.
What are some ways to use Malabar Spinach in cooking?
Malabar Spinach can be used in a variety of culinary applications. The leaves can be eaten raw in salads or cooked in stir-fries, soups, and stews. The stems can also be cooked and eaten. Malabar Spinach has a slightly mucilaginous texture, similar to okra, which can help thicken soups and stews. It is a good source of vitamins A and C, as well as iron and calcium.
How does growing Malabar Spinach successfully contribute to a sustainable lifestyle?
Growing your own Malabar Spinach reduces your reliance on commercially grown produce, which often involves long-distance transportation and the use of pesticides and herbicides. By growing your own food, you can reduce your carbon footprint and support sustainable agriculture practices. Additionally, gardening can be a therapeutic and rewarding activity that connects you with nature and promotes a healthier lifestyle.

Leave a Comment