

Grow Garlic with Plastic Bottle: Imagine harvesting plump, flavorful garlic bulbs right from your own backyard, without needing a sprawling garden! Sounds too good to be true? Well, get ready to be amazed because this DIY trick is about to revolutionize your home gardening experience. For centuries, garlic has been a staple in cuisines around the world, revered not only for its pungent flavor but also for its medicinal properties. From ancient Egypt, where it fueled the pyramid builders, to modern-day kitchens, garlic has always held a special place.
But let’s face it, not everyone has the space or the ideal soil conditions for traditional garlic farming. That’s where this ingenious hack comes in. I’m going to show you how to grow garlic with plastic bottle, transforming discarded containers into mini-gardens bursting with fresh, homegrown goodness. This method is perfect for apartment dwellers, balcony gardeners, or anyone looking for a simple, sustainable way to enjoy the taste of freshly grown garlic.
Why spend money on store-bought garlic when you can easily cultivate your own supply? This DIY project is not only cost-effective but also incredibly rewarding. Plus, you’ll be reducing waste by repurposing plastic bottles. Get ready to unleash your inner gardener and discover the joy of growing your own garlic, one plastic bottle at a time!

Grow Garlic Indoors with a Recycled Plastic Bottle: A Step-by-Step Guide
Hey there, fellow gardening enthusiasts! Ever thought about growing your own garlic indoors? It’s surprisingly easy, and you don’t need a fancy garden setup. All you need is a recycled plastic bottle and a little bit of patience. I’m going to walk you through the whole process, step-by-step, so you can enjoy fresh garlic greens right from your windowsill!
What You’ll Need
Before we dive in, let’s gather our supplies. This is a super budget-friendly project, so you probably have most of these items lying around already.
* A large plastic bottle (like a 2-liter soda bottle or a larger water bottle)
* A sharp knife or scissors
* Potting soil
* Garlic cloves (organic is best to avoid treated cloves that might inhibit growth)
* Water
* A sunny windowsill or grow light
* Optional: Pebbles or gravel for drainage
* Optional: Spray paint or decorative materials to personalize your bottle
Preparing the Plastic Bottle Planter
Okay, let’s get our hands dirty! The first step is to transform that plastic bottle into a functional planter.
1. Clean the Bottle: Give your plastic bottle a good rinse with soap and water. Make sure to remove any sticky residue or labels. A clean bottle will help prevent mold growth.
2. Cut the Bottle: This is where the knife or scissors come in. You have a couple of options here, depending on the look you’re going for.
* Option 1: Vertical Planter: Cut the bottle in half horizontally. You’ll be using the bottom half as your planter. The top half can be discarded or used as a mini-greenhouse cover initially.
* Option 2: Horizontal Planter: Cut a large rectangular opening along one side of the bottle. This will create a trough-like planter. Be careful to leave enough plastic on the bottom and sides for stability.
I personally prefer the vertical planter because it’s simpler and uses less soil, but the horizontal planter can look really cool if you decorate it nicely.
3. Create Drainage Holes: This is crucial! Garlic doesn’t like soggy roots. Use your knife or scissors to poke several drainage holes in the bottom of the bottle. I usually make about 5-7 holes, depending on the size of the bottle.
4. Add Drainage Layer (Optional): To further improve drainage, you can add a layer of pebbles or gravel to the bottom of the bottle before adding the soil. This will help prevent the roots from sitting in water. About an inch or two of pebbles is usually sufficient.
5. Decorate (Optional): Now’s the time to get creative! If you want to personalize your planter, you can paint it, cover it with fabric, or decorate it with stickers. Just make sure any paint or glue you use is non-toxic. Let it dry completely before moving on to the next step.
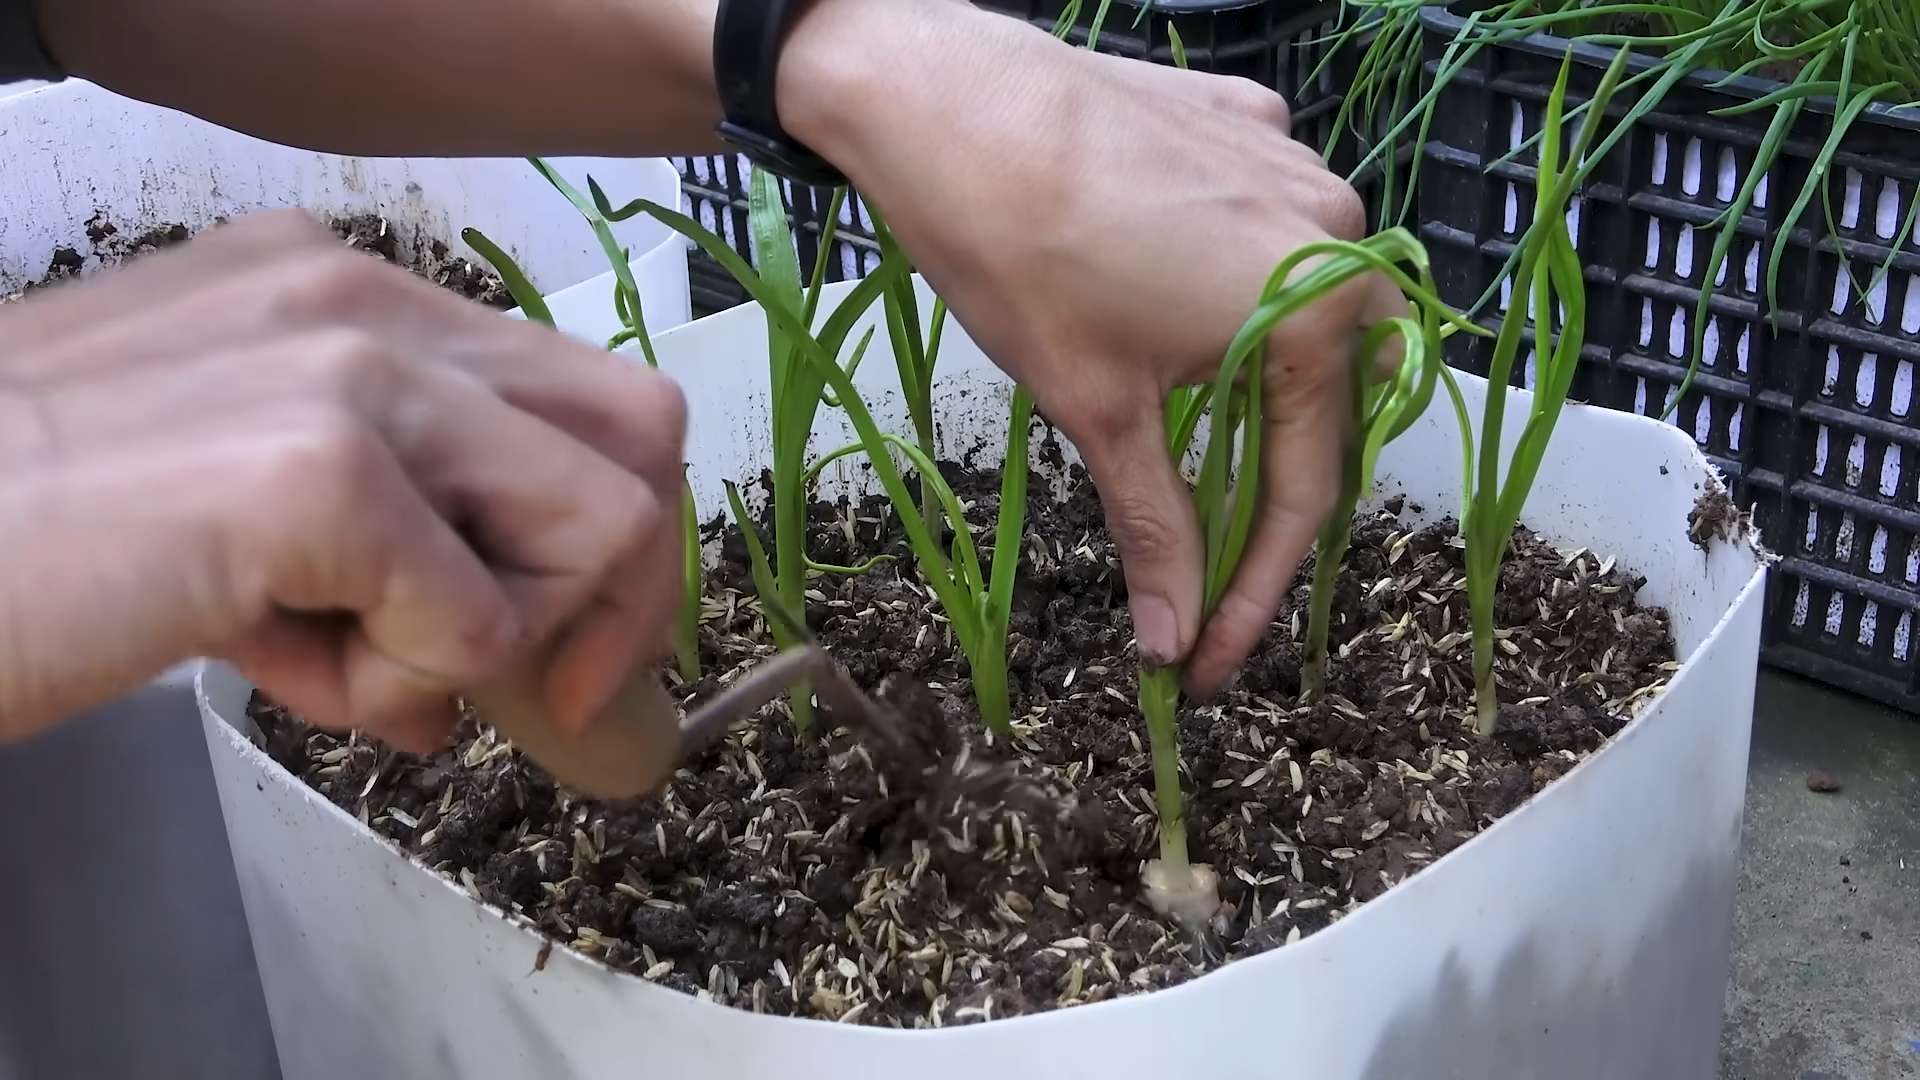
Planting the Garlic Cloves
Alright, our planter is ready! Now for the fun part: planting the garlic.
1. Fill with Potting Soil: Fill the bottle with potting soil, leaving about an inch of space at the top. Don’t pack the soil down too tightly, as this can hinder root growth.
2. Prepare the Garlic Cloves: Gently separate the cloves from the garlic bulb. Leave the papery skin on each clove intact. This protects the clove and helps prevent it from drying out.
3. Plant the Cloves: Plant the garlic cloves pointy-side up, about 2 inches deep and 2-3 inches apart. If you’re using a smaller bottle, you might only be able to plant a few cloves.
4. Water Gently: After planting, water the soil gently until it’s evenly moist. Be careful not to overwater, as this can lead to rot.
Caring for Your Garlic
Now that our garlic is planted, it’s time to provide it with the care it needs to thrive.
1. Location, Location, Location: Place your bottle planter on a sunny windowsill or under a grow light. Garlic needs at least 6 hours of sunlight per day to grow properly. If you don’t have enough natural light, a grow light is a great investment.
2. Watering: Water your garlic whenever the top inch of soil feels dry to the touch. Be careful not to overwater, as this can lead to root rot. The soil should be moist, but not soggy.
3. Fertilizing (Optional): You can fertilize your garlic every few weeks with a diluted liquid fertilizer. This will help promote healthy growth. I like to use a balanced fertilizer, but you can also use a fertilizer specifically formulated for vegetables.
4. Pest Control: Keep an eye out for pests, such as aphids or spider mites. If you notice any pests, you can try spraying them with insecticidal soap or neem oil.
Harvesting Garlic Greens
The best part about growing garlic indoors is enjoying the fresh greens!
1. When to Harvest: You can start harvesting garlic greens when they are about 6-8 inches tall.
2. How to Harvest: Use scissors to snip off the greens, leaving about an inch or two of growth at the base. This will allow the plant to continue growing and producing more greens.
3. Enjoy Your Harvest: Garlic greens have a mild garlic flavor and can be used in a variety of dishes. I love adding them to salads, soups, stir-fries, and omelets. You can also use them to make garlic butter or pesto.
Growing Garlic Bulbs (Advanced)
While this guide focuses on growing garlic greens, you can also try to grow garlic bulbs indoors. However, it’s important to note that growing garlic bulbs indoors can be challenging, and you might not get the same size bulbs as you would if you were growing them outdoors.
1. Choose the Right Variety: Softneck garlic varieties are generally better suited for indoor growing than hardneck varieties.
2. Provide Enough Space: Garlic bulbs need plenty of space to grow. Use a larger container and plant the cloves further apart.
3. Provide Enough Light: Garlic bulbs need at least 8 hours of sunlight per day. A strong grow light is essential for growing garlic bulbs indoors.
4. Fertilize Regularly: Garlic bulbs need regular fertilization to grow properly. Use a fertilizer specifically formulated for bulbs.
5. Be Patient: It takes about 8-9 months for garlic bulbs to mature. Be patient and continue to care for your plants.
6. Harvesting Garlic Bulbs: When the leaves start to turn yellow and brown, it’s time to harvest the garlic bulbs. Gently dig up the bulbs and let them dry in a well-ventilated area for a few weeks.
Troubleshooting
Even with the best care, you might encounter some problems while growing garlic indoors. Here are some common issues and how to address them:
* Yellowing Leaves: Yellowing leaves can be caused by overwatering, underwatering, or nutrient deficiencies. Adjust your watering schedule and fertilize your plants regularly.
* Slow Growth: Slow growth can be caused by insufficient light or poor soil. Make sure your plants are getting enough sunlight and use a good quality potting soil.
* Root Rot: Root rot is caused by overwatering. Make sure your planter has good drainage and avoid overwatering.
* Pests: Pests can damage your plants and stunt their growth. Inspect your plants regularly and treat any infestations promptly.
Final Thoughts
Growing garlic indoors from a recycled plastic bottle is a fun and rewarding project. It’s a great way to reduce waste, save money, and enjoy fresh garlic greens all year round. With a little bit of care and attention, you can have a thriving garlic garden right on your windowsill. Happy gardening!
Conclusion
So, there you have it! Growing garlic in a plastic bottle is more than just a quirky gardening hack; it’s a game-changer for urban gardeners, space-conscious foodies, and anyone looking to add a touch of green to their lives. This method offers a surprising number of benefits, from maximizing your yield in a limited area to providing a controlled environment that protects your precious garlic from pests and harsh weather.
But why is this DIY trick a must-try? First and foremost, it’s incredibly accessible. You likely already have the necessary materials – a plastic bottle, some soil, and a garlic clove. No need for expensive equipment or specialized knowledge. Second, it’s a fantastic way to recycle and repurpose, turning waste into something productive and beautiful. Third, it’s a learning experience. You’ll gain a deeper understanding of plant growth, soil composition, and the magic of turning a single clove into a bountiful harvest.
Beyond the basic method, there’s plenty of room for experimentation. Try different types of soil to see which yields the best results. Consider adding companion plants like chamomile or marigolds to deter pests and attract beneficial insects. You can even get creative with the bottle itself, painting it or decorating it to add a personal touch to your mini-garden.
Variations to consider:
* Vertical Garden: Stack multiple bottle gardens on top of each other to create a stunning vertical display.
* Hydroponic Garlic: Experiment with growing garlic hydroponically in a bottle using nutrient-rich water instead of soil.
* Different Garlic Varieties: Try different garlic varieties to see which thrives best in your bottle garden. Softneck varieties, which tend to be more adaptable, are a good starting point.
* Indoor vs. Outdoor: While this method works well outdoors, you can also grow garlic indoors with sufficient sunlight or a grow light.
This method of growing garlic with plastic bottle is not just about the end product – the delicious, pungent garlic cloves. It’s about the journey, the connection to nature, and the satisfaction of creating something with your own hands. It’s about proving that even in the smallest of spaces, you can cultivate abundance.
We wholeheartedly encourage you to give this DIY trick a try. It’s simple, rewarding, and a fantastic way to experience the joy of gardening. Don’t be afraid to experiment, adapt, and make it your own. And most importantly, share your experience with us! We’d love to hear about your successes, your challenges, and any tips you discover along the way. Let’s build a community of bottle-gardeners and spread the word about this amazing method of growing garlic. Share your photos and stories on social media using #BottleGarlic and let’s inspire others to get their hands dirty (or, in this case, bottle-soiled!). Happy growing!
Frequently Asked Questions (FAQ)
What kind of plastic bottle is best for growing garlic?
Ideally, you should use a clear or translucent plastic bottle that is at least 2 liters in size. This provides enough space for the garlic roots to develop. Avoid using dark-colored bottles, as they can absorb too much heat and potentially harm the plant. Make sure the bottle is clean and free of any residue before planting. Recycled soda or water bottles work perfectly.
What type of soil should I use?
A well-draining potting mix is essential for growing garlic in a plastic bottle. Avoid using garden soil, as it can be too dense and may not provide adequate drainage. A mix of potting soil, compost, and perlite or vermiculite will create an ideal growing medium. The compost provides nutrients, while the perlite or vermiculite improves drainage and aeration.
How often should I water my garlic plant in a bottle?
Water your garlic plant regularly, but avoid overwatering. The soil should be consistently moist, but not soggy. Check the soil moisture by sticking your finger about an inch into the soil. If it feels dry, it’s time to water. During hot weather, you may need to water more frequently. Ensure the bottle has drainage holes to prevent waterlogging.
How much sunlight does garlic need when grown in a bottle?
Garlic needs at least 6-8 hours of direct sunlight per day to thrive. Place your bottle garden in a sunny location, such as a windowsill or balcony. If you don’t have access to enough natural sunlight, you can supplement with a grow light. Rotate the bottle regularly to ensure all sides of the plant receive adequate sunlight.
When is the best time to plant garlic in a bottle?
The best time to plant garlic in a bottle is in the fall, about 4-6 weeks before the first frost. This allows the garlic to establish roots before winter. In warmer climates, you can plant garlic in late winter or early spring. Make sure the soil temperature is above 40°F (4°C) for optimal growth.
How long does it take for garlic to grow in a bottle?
Garlic typically takes about 6-9 months to mature. You’ll know it’s ready to harvest when the leaves start to turn yellow and brown. The exact time will depend on the variety of garlic, the climate, and the growing conditions. Be patient and monitor your plant regularly.
Can I grow multiple garlic cloves in one bottle?
While you can grow multiple garlic cloves in one bottle, it’s best to limit it to one or two cloves per bottle to ensure adequate space and nutrients for each plant. Overcrowding can lead to smaller bulbs and reduced yields. If you want to grow more garlic, simply use more bottles.
How do I harvest garlic from a plastic bottle?
When the leaves of your garlic plant start to turn yellow and brown, it’s time to harvest. Gently tip the bottle over and carefully remove the soil and garlic bulb. Be careful not to damage the bulb. Brush off any excess soil and allow the garlic to cure in a cool, dry place for a few weeks before storing.
What are some common problems when growing garlic in a bottle and how can I fix them?
Some common problems include pests, diseases, and nutrient deficiencies. Pests like aphids and spider mites can be controlled with insecticidal soap or neem oil. Diseases like fungal infections can be prevented by ensuring good air circulation and avoiding overwatering. Nutrient deficiencies can be addressed by adding compost or a balanced fertilizer to the soil.
Can I reuse the plastic bottle for growing garlic again?
Yes, you can reuse the plastic bottle for growing garlic again, but it’s important to clean it thoroughly before replanting. Wash the bottle with soap and water to remove any soil or debris. You can also disinfect it with a diluted bleach solution to kill any bacteria or fungi. Make sure to rinse the bottle thoroughly before using it again.
Leave a Comment