

Grow Potatoes Easily, even if you think you don’t have the space! Have you ever dreamt of harvesting your own creamy, earthy potatoes, fresh from the soil? Imagine the taste of homegrown potato salad, crispy roasted potatoes, or comforting mashed potatoes made with ingredients you nurtured yourself. This isn’t just a pipe dream; it’s an achievable reality with a few simple DIY tricks!
Potatoes have been a staple food for centuries, with their cultivation dating back to the Inca civilization in South America. They’ve nourished populations and fueled culinary traditions across the globe. But you don’t need vast fields to enjoy the fruits (or rather, tubers!) of your labor.
In today’s world, where we’re increasingly conscious of food sources and sustainability, growing your own potatoes is more relevant than ever. Store-bought potatoes can be laden with pesticides and travel long distances, impacting both your health and the environment. Plus, let’s be honest, the taste of a freshly dug, homegrown potato is simply unmatched! I’m going to show you some fantastic DIY hacks that will allow you to grow potatoes easily, even in small spaces like balconies, patios, or even indoors. Get ready to roll up your sleeves and discover the joy of homegrown goodness!
Grow Potatoes Like a Pro: The Ultimate DIY Guide
Hey there, fellow garden enthusiasts! Ever dreamt of harvesting your own delicious, homegrown potatoes? Well, dream no more! I’m going to walk you through a super easy and rewarding method for growing potatoes, even if you’re a complete beginner. Get ready to impress your friends and family with your spud-tastic skills!
Choosing Your Potatoes and Preparing Them for Planting
Before we get our hands dirty, let’s talk about the stars of the show: the potatoes themselves!
* Seed Potatoes vs. Store-Bought: While you *can* technically try growing potatoes from store-bought ones, I highly recommend using certified seed potatoes. These are specifically grown to be disease-free and produce a better yield. You can find them at most garden centers or online retailers.
* Variety is the Spice of Life (and Potatoes!): Consider what kind of potatoes you enjoy eating. Do you prefer Yukon Golds for their creamy texture? Or maybe Russets for fluffy baked potatoes? There are tons of varieties to choose from, so do a little research and pick what tickles your taste buds.
* Chitting (Sprouting) Your Potatoes: This is a crucial step that gives your potatoes a head start. About 2-3 weeks before planting, place your seed potatoes in a cool, bright location (but not in direct sunlight). An egg carton works great for this! You’ll notice little sprouts, called “eyes,” starting to grow. This process is called chitting.
Step-by-Step Chitting Instructions:
1. Gather Your Supplies: You’ll need your seed potatoes, an egg carton or similar container, and a cool, bright space.
2. Arrange the Potatoes: Place each potato in its own compartment in the egg carton, with the end that has the most “eyes” facing upwards.
3. Provide Light and Cool Temperatures: The ideal temperature for chitting is around 50-60°F (10-15°C). Avoid direct sunlight, as it can dry out the potatoes.
4. Wait and Watch: Over the next few weeks, the “eyes” will start to sprout. You’re aiming for short, green sprouts about 1/2 to 1 inch long.
Preparing Your Potato Patch
Now that our potatoes are getting ready to grow, let’s prepare their new home!
* Sunlight is Key: Potatoes need at least 6-8 hours of sunlight per day, so choose a sunny spot in your garden.
* Well-Drained Soil is a Must: Potatoes don’t like soggy feet! Make sure your soil drains well. If you have heavy clay soil, amend it with compost or other organic matter to improve drainage.
* Loosen the Soil: Use a garden fork or tiller to loosen the soil to a depth of at least 12 inches. This will make it easier for the potato roots to grow.
* Amend with Compost: Potatoes are heavy feeders, so adding compost to the soil will provide them with the nutrients they need to thrive.
Step-by-Step Soil Preparation Instructions:
1. Clear the Area: Remove any weeds, rocks, or debris from the planting area.
2. Loosen the Soil: Use a garden fork or tiller to loosen the soil to a depth of at least 12 inches. Break up any large clumps of soil.
3. Incorporate Compost: Spread a 2-3 inch layer of compost over the soil surface.
4. Mix it In: Use the garden fork or tiller to mix the compost into the soil.
Planting Your Potatoes
Alright, the moment we’ve been waiting for! Let’s get those potatoes in the ground!
* Timing is Everything: Plant your potatoes in the spring, after the last frost. The soil temperature should be at least 45°F (7°C).
* Trench Warfare: Dig trenches that are about 4-6 inches deep and 2-3 feet apart.
* Spacing is Important: Place the seed potatoes in the trenches, with the sprouts facing upwards, about 12 inches apart.
* Cover Them Up: Gently cover the potatoes with soil.
Step-by-Step Planting Instructions:
1. Dig the Trenches: Use a shovel or hoe to dig trenches that are 4-6 inches deep and 2-3 feet apart.
2. Place the Seed Potatoes: Place the seed potatoes in the trenches, with the sprouts facing upwards, about 12 inches apart.
3. Cover with Soil: Gently cover the potatoes with soil, making sure the sprouts are still visible.
4. Water Well: Water the planted potatoes thoroughly.
Hilling Your Potatoes
This is where the magic happens! Hilling is the process of gradually covering the potato plants with soil as they grow. This encourages the plants to produce more potatoes along the stems.
* Why Hilling Matters: Potatoes form along the underground stems of the plant. By hilling, you’re creating more space for them to grow and increasing your yield.
* When to Hill: When the potato plants are about 6-8 inches tall, it’s time to start hilling.
* How to Hill: Use a hoe or shovel to gently pull soil from the sides of the trench and mound it around the base of the plants, leaving only the top few inches of the plant exposed.
* Repeat the Process: Continue hilling every few weeks as the plants grow, until the mounds are about 12 inches high.
Step-by-Step Hilling Instructions:
1. Wait for Growth: Wait until the potato plants are about 6-8 inches tall.
2. Gather Soil: Use a hoe or shovel to gather soil from the sides of the trench.
3. Mound the Soil: Gently mound the soil around the base of the plants, leaving only the top few inches of the plant exposed.
4. Repeat Regularly: Repeat the hilling process every few weeks as the plants grow, until the mounds are about 12 inches high.
Caring for Your Potato Plants
Now that your potatoes are planted and hilled, it’s time to give them some TLC!
* Watering: Potatoes need consistent moisture, especially during tuber formation. Water deeply whenever the soil feels dry to the touch.
* Fertilizing: If your soil is poor, you may need to fertilize your potato plants. Use a balanced fertilizer, following the instructions on the package.
* Weed Control: Keep the area around your potato plants free of weeds. Weeds can compete with the potatoes for nutrients and water.
* Pest and Disease Control: Keep an eye out for pests and diseases. Common potato pests include potato beetles and aphids. Common diseases include blight and scab. Treat any problems promptly.
Watering Tips:
* Water deeply and infrequently: This encourages deep root growth.
* Water in the morning: This allows the foliage to dry before nightfall, reducing the risk of disease.
* Avoid overhead watering: This can spread diseases.
Pest and Disease Control Tips:
* Inspect your plants regularly: Catch problems early before they become severe.
* Use organic pest control methods: Consider using insecticidal soap or neem oil to control pests.
* Choose disease-resistant varieties: This can help prevent disease problems.
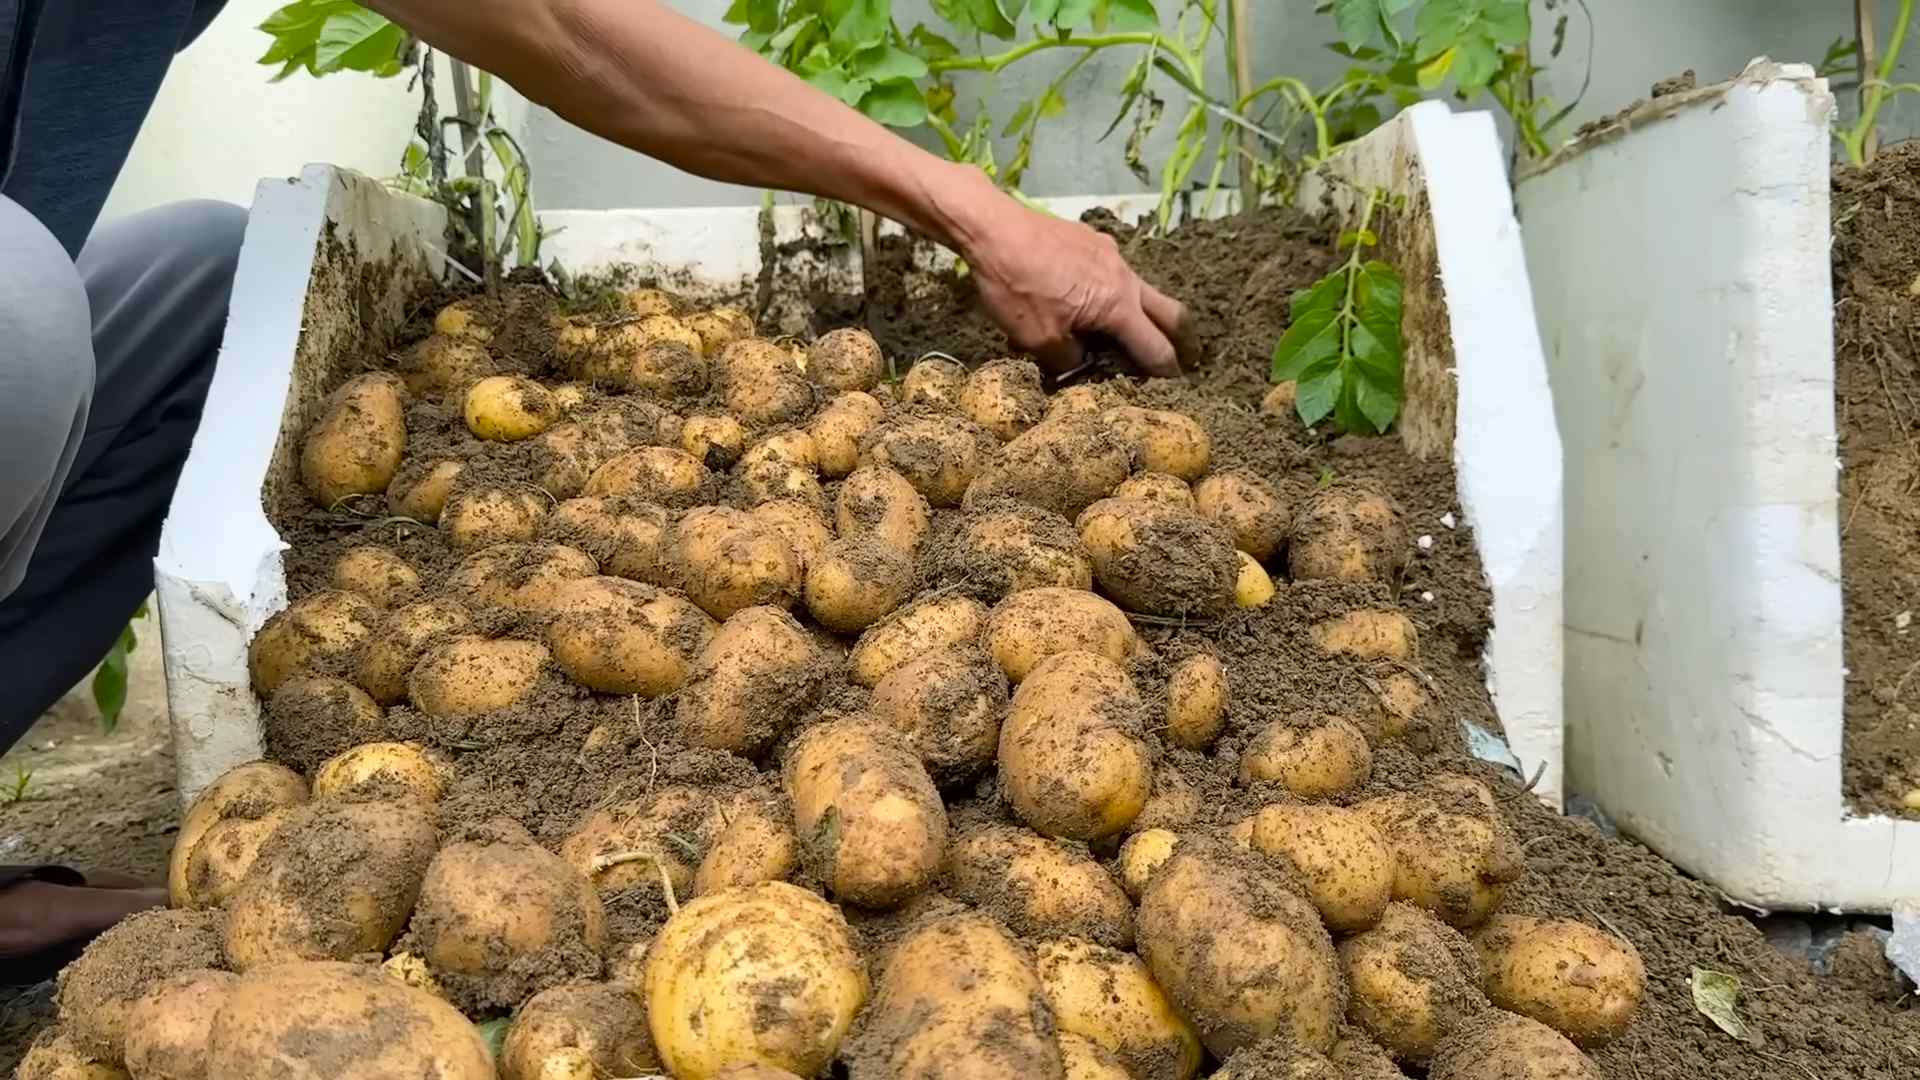
Harvesting Your Potatoes
The most exciting part! It’s time to reap the rewards of your hard work!
* When to Harvest: You can harvest “new potatoes” (small, tender potatoes) about 2-3 weeks after the plants flower. For mature potatoes, wait until the foliage starts to die back.
* Dig Carefully: Use a garden fork to carefully dig around the potato plants, being careful not to damage the potatoes.
* Cure Your Potatoes: After harvesting, cure your potatoes by spreading them out in a cool, dark, and well-ventilated place for about a week. This will help them to develop a thicker skin and store longer.
Step-by-Step Harvesting Instructions:
1. Wait for the Right Time: Harvest new potatoes 2-3 weeks after flowering, or wait until the foliage dies back for mature potatoes.
2. Dig Carefully: Use a garden fork to carefully dig around the potato plants, being careful not to damage the potatoes.
3. Gently Lift the Potatoes: Gently lift the potatoes from the soil.
4. Cure the Potatoes: Spread the potatoes out in a cool, dark, and well-ventilated place for about a week to cure them.
Storing Your Potatoes
To enjoy your homegrown potatoes for months to come, proper storage is essential.
* Ideal Storage Conditions: Store your cured potatoes in a cool,
Conclusion
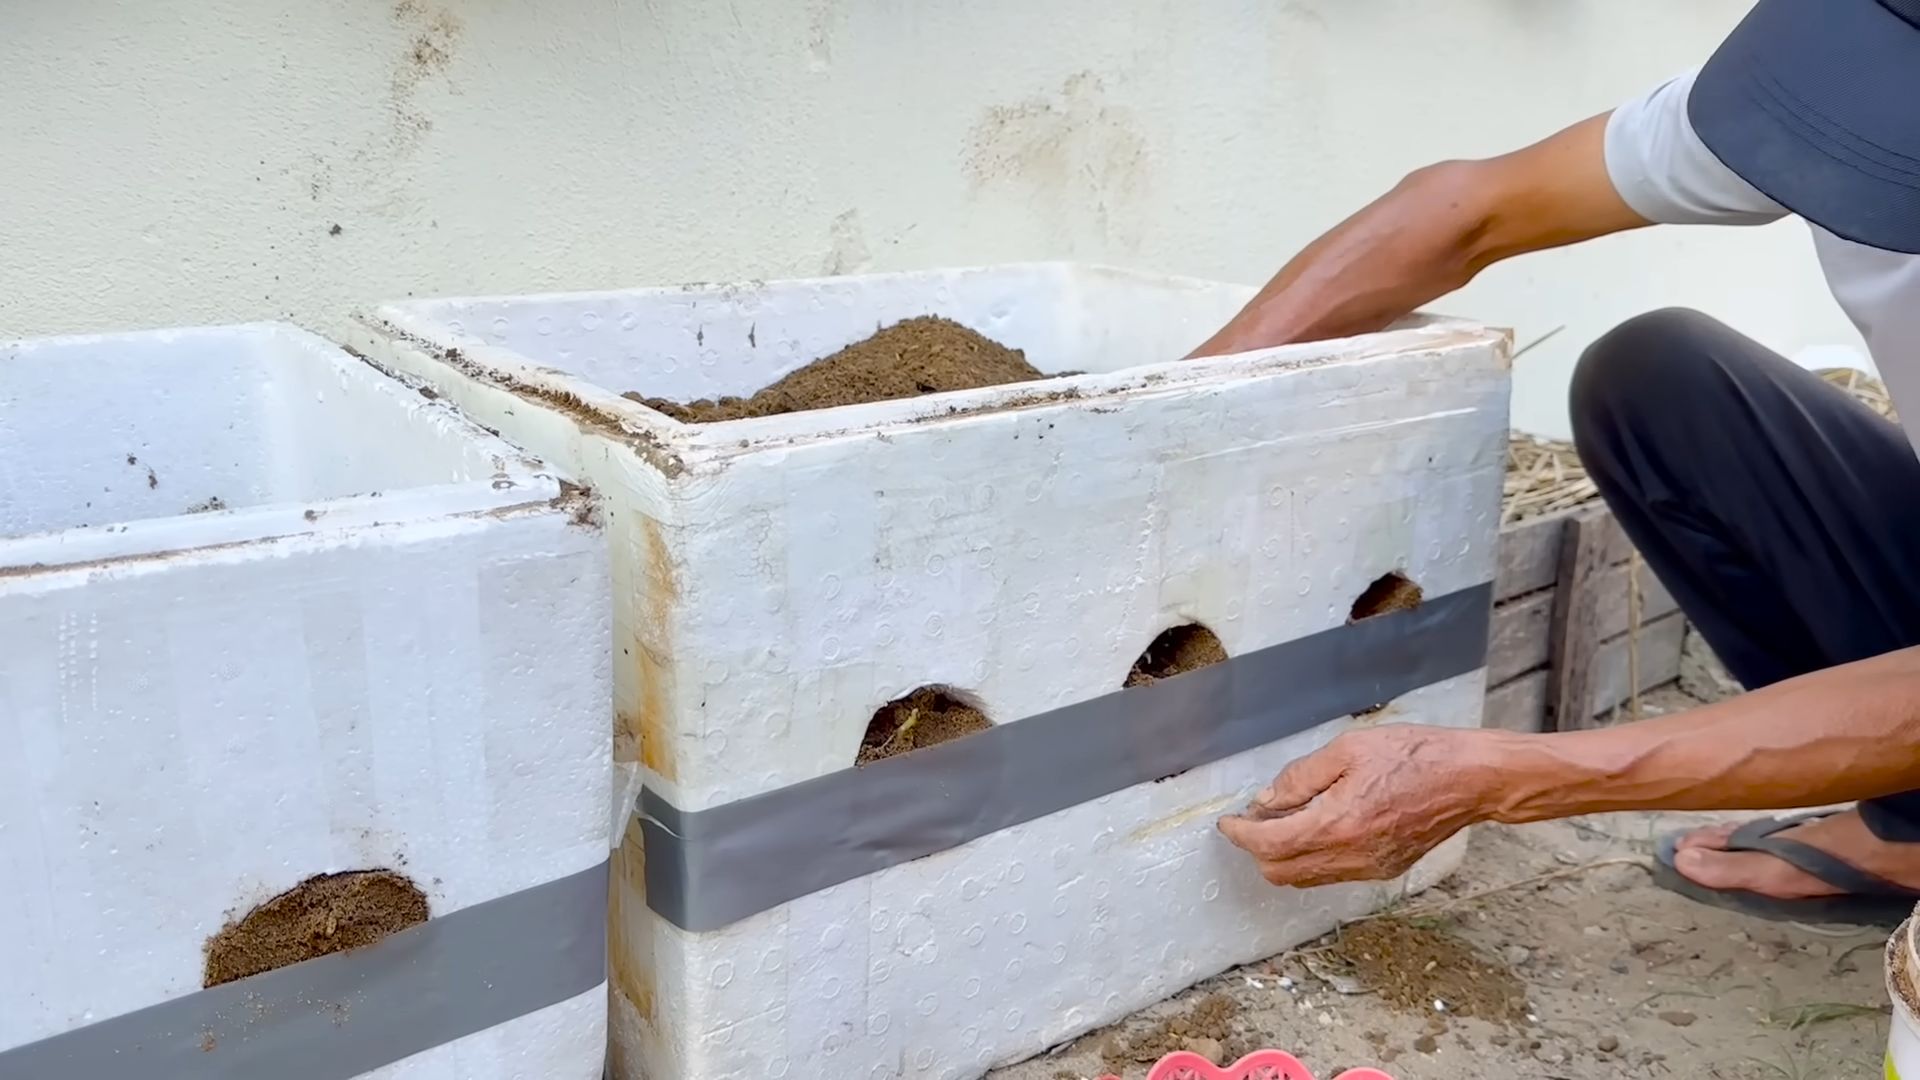
So, there you have it! Growing potatoes easily, right in your own backyard (or even on your balcony!), is not only achievable but incredibly rewarding. This DIY trick, using containers or grow bags, bypasses many of the common challenges associated with traditional potato farming, making it accessible to even the most novice gardener. Forget back-breaking digging and endless weeding; this method puts you in control, allowing you to nurture your potato plants in a contained, manageable environment.
Why is this a must-try? Because it’s efficient, space-saving, and yields delicious, homegrown potatoes that taste infinitely better than anything you can buy at the store. Imagine the satisfaction of harvesting your own crop, knowing exactly where it came from and what went into it. Plus, it’s a fantastic learning experience for kids and adults alike, connecting you to the natural world and the process of food production.
But the fun doesn’t stop there! Feel free to experiment with different potato varieties. Russets are great for baking and frying, Yukon Golds are perfect for creamy mashed potatoes, and red potatoes add a vibrant touch to salads. You can also try adding different types of compost or fertilizers to see how they affect the growth and flavor of your potatoes. Consider companion planting – marigolds can help deter pests, while basil can improve the overall health of your plants.
Don’t be afraid to get creative with your container choices, either. While grow bags are ideal for their breathability and drainage, you can also use large buckets, trash cans (with drainage holes, of course!), or even repurposed tires. The key is to ensure adequate drainage and enough space for the potatoes to develop.
We’re confident that once you try this DIY potato-growing method, you’ll be hooked. It’s a simple, effective, and incredibly satisfying way to enjoy fresh, homegrown potatoes. So, grab your containers, your seed potatoes, and get ready to embark on a rewarding gardening adventure!
We encourage you to try this method and share your experiences with us! Let us know what varieties you planted, what challenges you faced, and what successes you celebrated. Share your photos and tips in the comments below – we’d love to hear from you! Happy growing!
Frequently Asked Questions (FAQs)
What kind of potatoes should I use for growing in containers?
You’ll want to use seed potatoes, which are potatoes specifically grown for planting. These are different from the potatoes you buy at the grocery store, which may have been treated to prevent sprouting. You can find seed potatoes at most garden centers or online retailers. Choose varieties that are well-suited to your climate and your taste preferences. As mentioned earlier, Russets, Yukon Golds, and red potatoes are all excellent choices.
How much sunlight do potato plants need?
Potato plants need at least six to eight hours of direct sunlight per day to thrive. Choose a location for your containers that receives plenty of sunlight throughout the day. If you live in a particularly hot climate, you may want to provide some afternoon shade to prevent the plants from overheating.
What kind of soil should I use?
Potatoes prefer well-draining, slightly acidic soil. A good potting mix amended with compost is ideal. Avoid using heavy clay soil, as it can become waterlogged and prevent the potatoes from developing properly. You can also add perlite or vermiculite to improve drainage.
How often should I water my potato plants?
Water your potato plants regularly, especially during hot, dry weather. The soil should be consistently moist, but not waterlogged. Check the soil moisture by sticking your finger into the soil – if it feels dry an inch or two below the surface, it’s time to water. Avoid overwatering, as this can lead to root rot.
How do I “hill” the potatoes in a container?
“Hilling” is the process of adding more soil to the container as the potato plants grow. This encourages the plants to produce more potatoes along the buried stem. When the plants are about 6 inches tall, add a few inches of soil to the container, covering the lower part of the stems. Repeat this process every few weeks as the plants grow, until the container is nearly full.
When will my potatoes be ready to harvest?
The time it takes for potatoes to mature depends on the variety and the growing conditions. Generally, you can expect to harvest your potatoes about 70-100 days after planting. You’ll know they’re ready when the plants start to flower and the foliage begins to yellow and die back.
How do I harvest potatoes from a container?
Harvesting potatoes from a container is much easier than digging them up from the ground. Simply tip the container over and gently remove the soil, being careful not to damage the potatoes. You can also reach into the container and carefully pull out the potatoes by hand.
Can I grow potatoes in the same container year after year?
It’s generally not recommended to grow potatoes in the same container year after year, as this can deplete the soil of nutrients and increase the risk of disease. It’s best to use fresh potting mix each year or to rotate your crops.
What are some common pests and diseases that affect potato plants?
Some common pests that affect potato plants include aphids, potato beetles, and flea beetles. Common diseases include early blight, late blight, and potato scab. You can prevent these problems by using healthy seed potatoes, providing good air circulation, and avoiding overwatering. If you do encounter pests or diseases, you can treat them with organic pesticides or fungicides.
Can I grow potatoes indoors?
While it’s possible to grow potatoes indoors, it can be challenging to provide them with the amount of sunlight they need. If you do try growing potatoes indoors, be sure to place them in a sunny window or provide supplemental lighting. You may also need to pollinate the flowers by hand to ensure that the potatoes develop properly.
What if my potato plants don’t flower?
Not all potato varieties flower, and even those that do may not flower consistently. The absence of flowers doesn’t necessarily mean that your plants aren’t producing potatoes. Focus on providing the plants with adequate sunlight, water, and nutrients, and you should still be able to harvest a good crop.
How do I store my harvested potatoes?
Store your harvested potatoes in a cool, dark, and dry place. A root cellar is ideal, but a basement or garage will also work. Avoid storing potatoes in the refrigerator, as this can cause them to develop a sweet taste. Properly stored potatoes can last for several months.
Leave a Comment