

DIY Towel Mops: Tired of spending a fortune on disposable mop heads or wrestling with those flimsy, store-bought mops that fall apart after a few uses? I hear you! I’ve been there, scrubbing away with frustration, wishing there was a better, more sustainable, and frankly, cheaper way to keep my floors sparkling. Well, guess what? There is!
Before the age of mass-produced cleaning supplies, resourceful homemakers relied on ingenuity and readily available materials to keep their homes clean. Think about it – generations past used rags, repurposed fabrics, and clever contraptions to tackle household chores. This DIY spirit is something I truly admire, and it’s what inspired me to explore the world of homemade cleaning solutions.
That’s why I’m so excited to share this incredibly simple yet effective DIY towel mops trick with you. Not only will you save money by repurposing old towels, but you’ll also be reducing waste and creating a cleaning tool perfectly tailored to your needs. Plus, let’s be honest, there’s a certain satisfaction that comes from creating something useful with your own two hands. So, ditch the expensive disposable options and let’s get crafting! I’m going to show you how to make your own durable and eco-friendly mop using just a few simple supplies you probably already have at home. Get ready to say goodbye to flimsy mops and hello to sparkling clean floors, the sustainable way!

DIY Towel Mop: A Budget-Friendly Cleaning Solution
Hey there, fellow DIY enthusiasts! Are you tired of flimsy, expensive disposable mop pads? Or maybe you’re just looking for a more eco-friendly and budget-conscious way to keep your floors sparkling clean? Well, you’ve come to the right place! I’m going to show you how to create your very own reusable towel mop. It’s super easy, surprisingly effective, and a great way to repurpose those old towels you have lying around. Let’s get started!
What You’ll Need
Before we dive in, let’s gather our supplies. The beauty of this project is that you probably already have most of these items at home!
* **A Flat Mop Head:** This is the base of our operation. You can use an old mop head you already have, or purchase a new one. Look for one with a good clamping mechanism or Velcro strips to hold the towel in place. The size of the mop head will determine the size of the towels you need.
* **Old Towels:** This is where the magic happens! Old bath towels, hand towels, or even microfiber cloths work great. The thicker the towel, the more absorbent your mop will be. Just make sure they’re clean!
* **Scissors:** For cutting the towels to the right size.
* **Measuring Tape or Ruler:** To ensure accurate measurements.
* **Sewing Machine (Optional):** If you want to create more durable and fitted mop pads, a sewing machine is your best friend. But don’t worry, I’ll also show you a no-sew method!
* **Thread (Optional):** If you’re using a sewing machine, choose a thread color that matches your towels.
* **Pins (Optional):** For holding the fabric in place while sewing.
* **Elastic Band (Optional):** For creating a fitted mop pad that stays securely on the mop head.
* **Safety Pins (Optional):** For a quick and easy no-sew solution.
Section 1: Preparing Your Towels
The first step is to get your towels ready. This involves measuring, cutting, and potentially sewing, depending on the method you choose.
1. **Measure Your Mop Head:** Use your measuring tape or ruler to determine the length and width of your mop head. Add a few inches to each measurement to allow for overlap and secure attachment. For example, if your mop head is 12 inches wide and 5 inches long, you might want to cut your towel to be 16 inches wide and 9 inches long. This gives you a 2-inch overlap on each side.
2. **Cut Your Towels:** Using your scissors, carefully cut your towels according to the measurements you took. If you’re using multiple towels, you can cut them all at once to save time. Make sure your cuts are straight for a professional look.
3. **Decide on Your Attachment Method:** Now, you need to decide how you’re going to attach the towels to the mop head. You have a few options:
* **Simple Clamping:** If your mop head has a clamping mechanism, you can simply fold the towel over the mop head and clamp it in place. This is the easiest and fastest method.
* **Velcro Attachment:** If your mop head has Velcro strips, you can sew Velcro strips onto the back of your towels to create reusable mop pads.
* **Sewn Mop Pad:** This method involves sewing a fitted mop pad with elastic edges to keep it securely in place.
* **No-Sew Safety Pin Method:** This is a quick and easy alternative to sewing.
Section 2: Sewing Your Mop Pad (Optional)
If you’re feeling crafty and want a more durable and fitted mop pad, this section is for you!
1. **Fold and Pin:** Fold the edges of your cut towel inward by about 1/2 inch and pin them in place. This will create a clean, finished edge.
2. **Sew the Edges:** Using your sewing machine, sew along the folded edges to create a hem. This will prevent the fabric from fraying and give your mop pad a more professional look.
3. **Create Elastic Casing:** Fold the edges of your towel inward again, this time by about 1 inch, and pin them in place. This will create a casing for the elastic band.
4. **Sew the Casing:** Sew along the folded edges, leaving a small opening for inserting the elastic band.
5. **Insert Elastic Band:** Measure the perimeter of your mop head. Cut an elastic band that is slightly shorter than this measurement. Use a safety pin to attach one end of the elastic band to the opening in the casing. Thread the elastic band through the casing, gathering the fabric as you go.
6. **Secure the Elastic Band:** Once the elastic band is all the way through the casing, overlap the ends by about 1/2 inch and sew them together securely.
7. **Close the Opening:** Sew the opening in the casing closed.
8. **Test the Fit:** Place your new mop pad onto the mop head to ensure a snug and secure fit.
Section 3: No-Sew Safety Pin Method (Optional)
If you don’t have a sewing machine or simply don’t want to sew, this method is for you! It’s quick, easy, and requires only safety pins.
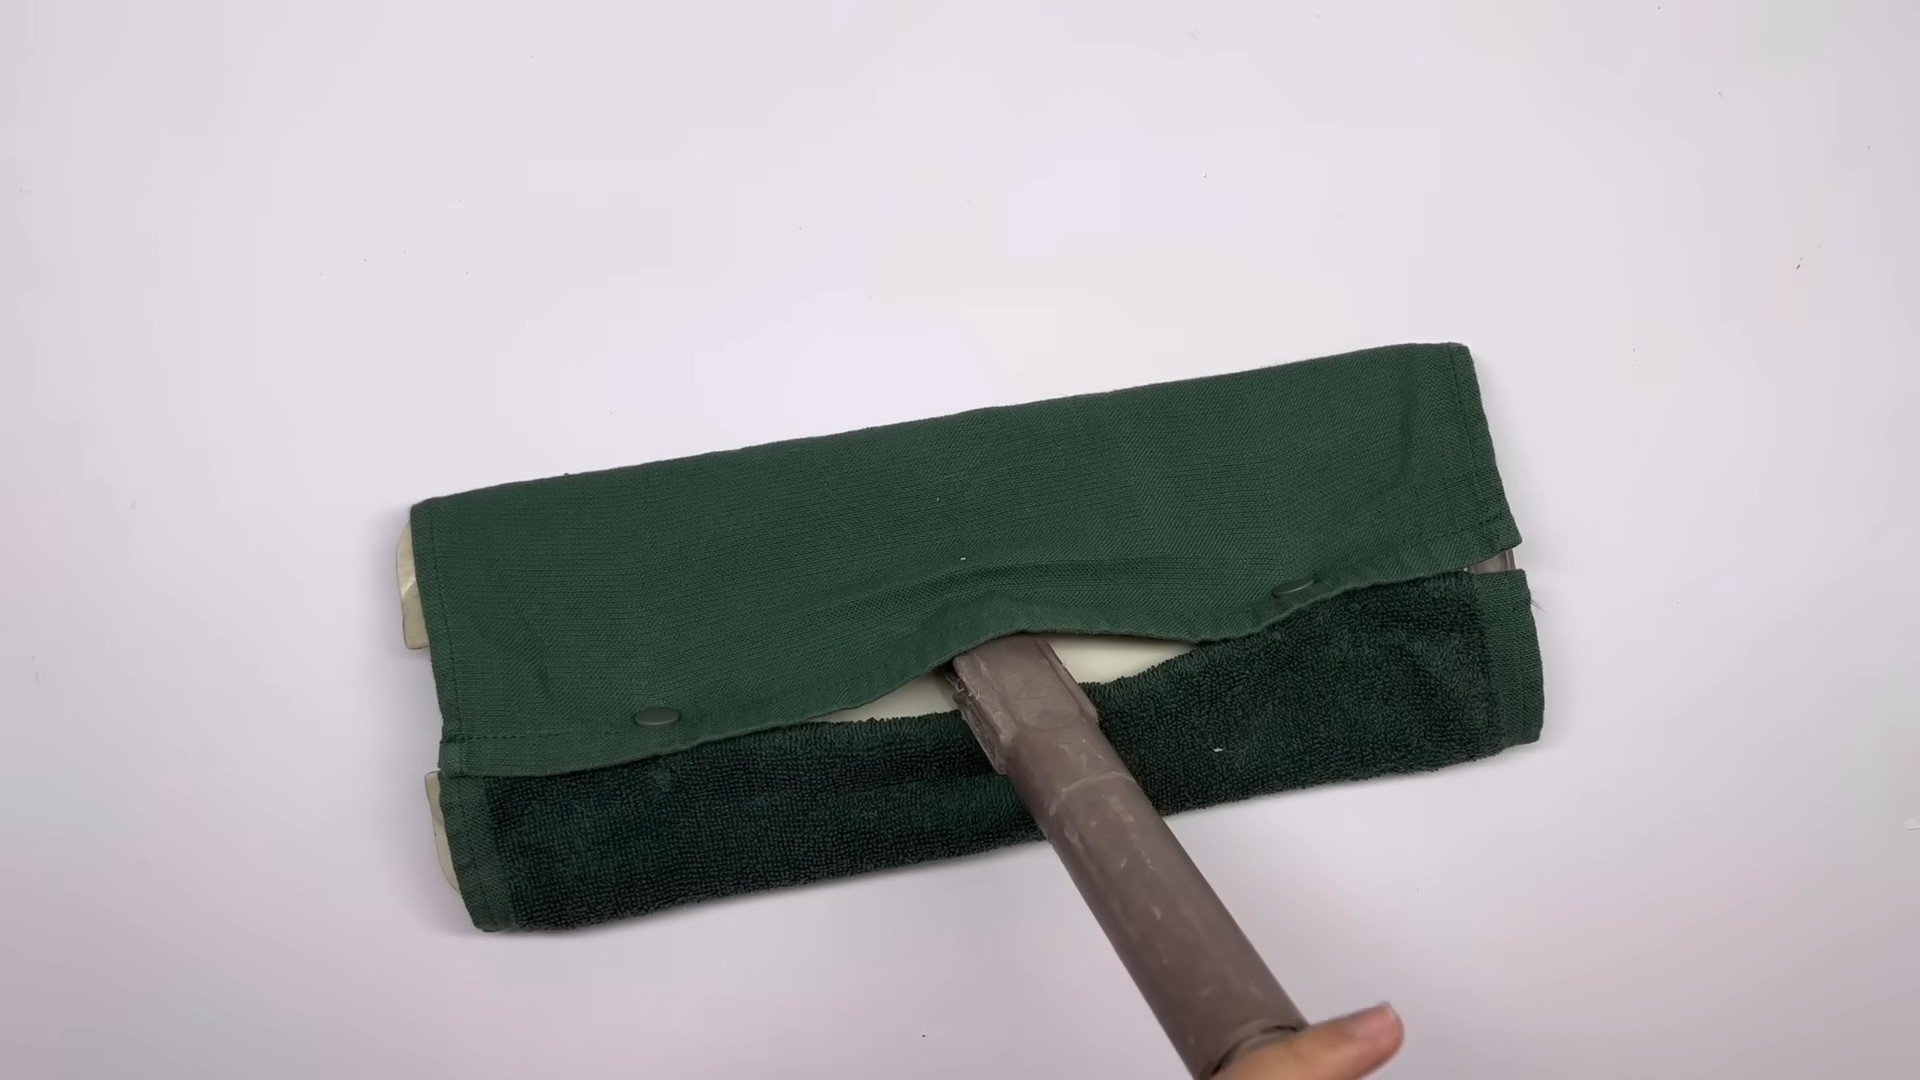
1. **Fold the Towel:** Fold the towel over the mop head, ensuring that it covers the entire surface.
2. **Secure with Safety Pins:** Use safety pins to secure the towel to itself underneath the mop head. Place the safety pins close together to ensure a secure hold. Pay special attention to the corners and edges.
3. **Check for Security:** Give the towel a gentle tug to make sure it’s securely attached. Add more safety pins if needed.
Section 4: Using Your DIY Towel Mop
Now that you’ve created your DIY towel mop, it’s time to put it to work!
1. **Attach the Towel:** Depending on the method you chose, attach the towel to your mop head. If you used the clamping method, simply clamp the towel in place. If you used the Velcro method, attach the Velcro strips. If you sewed a mop pad, slip it over the mop head. If you used the safety pin method, make sure all the safety pins are securely fastened.
2. **Prepare Your Cleaning Solution:** Fill a bucket with warm water and your favorite cleaning solution. You can use a commercial floor cleaner or a homemade solution of vinegar and water.
3. **Dip and Wring:** Dip the mop head into the cleaning solution and wring out the excess water. You want the mop to be damp, not soaking wet.
4. **Mop Your Floors:** Mop your floors in a back-and-forth motion, overlapping each stroke slightly.
5. **Rinse and Repeat:** As the mop becomes dirty, rinse it in the cleaning solution and wring it out again. Repeat this process until your floors are clean.
6. **Remove and Wash:** Once you’re finished mopping, remove the towel from the mop head and wash it in your washing machine. You can dry it in the dryer or hang it to dry.
Tips and Tricks for a Sparkling Clean
* Choose the Right Towel: Microfiber towels are excellent for trapping dirt and dust, while thicker bath towels are more absorbent for spills. Experiment to see what works best for your floors.
* Pre-Treat Stains: For stubborn stains, pre-treat them with a stain remover before mopping.
* Change Your Towel Frequently: For larger areas, you might need to change your towel more frequently to avoid spreading dirt around.
* Use the Right Cleaning Solution: Different types of flooring require different cleaning solutions. Be sure to use a cleaner that is safe for your floors.
* Don’t Over-Saturate: Avoid using too much water when mopping, as this can damage your floors.
* Regular Maintenance: Wash your towel mop pads regularly to keep them clean and effective.
* Experiment with Different Fabrics: Try using old t-shirts, flannel cloths, or even old socks for your mop pads. You might be surprised at what works best!
* Add Essential Oils: For a fresh and clean scent, add a few drops of your favorite essential oil to your cleaning solution. Lavender, lemon, and eucalyptus are all great options.
* Consider the Texture: For textured floors, a more abrasive towel might be necessary to get into the grooves.
* Safety First: Always wear gloves when mopping to protect your hands from harsh chemicals.
Benefits of Using a DIY Towel Mop
* Cost-Effective: You’re reusing old towels, saving you money on disposable mop pads.
* Eco-Friendly: You’re reducing waste by repurposing materials.
* Customizable: You can choose the type of towel and cleaning solution that works best for your floors.
* Durable:
Conclusion
So, there you have it! Transforming old towels into incredibly effective and eco-friendly DIY towel mops is not just a clever way to repurpose textiles; it’s a game-changer for your cleaning routine. Forget about expensive, disposable mop heads that contribute to landfill waste. This simple, cost-effective solution provides superior cleaning power, allowing you to tackle grime and dirt with ease while minimizing your environmental impact.
Why is this DIY trick a must-try? Because it’s practical, sustainable, and customizable. You’re not just cleaning your floors; you’re actively participating in a more eco-conscious lifestyle. The absorbency of towels, especially those made from cotton or microfiber, far surpasses many commercially available mop heads. This means fewer streaks, faster drying times, and a more thorough clean overall. Plus, you’re saving money by utilizing materials you already have on hand.
But the benefits don’t stop there. The beauty of these DIY towel mops lies in their versatility. Feel free to experiment with different types of towels to achieve your desired level of cleaning power. For heavily soiled areas, consider using thicker, more absorbent towels like bath towels or even old terry cloth robes. For lighter cleaning or delicate surfaces, opt for thinner microfiber towels or even old t-shirts.
Want to add a little extra oomph to your cleaning? Try infusing your cleaning solution with essential oils. A few drops of lavender, lemon, or eucalyptus oil can not only leave your floors smelling fresh and clean but also provide aromatherapy benefits. Just be sure to test the solution on an inconspicuous area first to ensure it doesn’t damage the surface.
Another variation to consider is the attachment method. While the instructions outlined a simple tying or elastic band system, you can get creative with other options. Consider sewing loops onto the towels to attach them more securely to the mop head, or even using Velcro strips for easy removal and washing. The possibilities are endless!
We wholeheartedly encourage you to give this DIY towel mop trick a try. It’s a simple, rewarding project that will transform the way you clean your floors. Not only will you be saving money and reducing waste, but you’ll also be enjoying a more effective and enjoyable cleaning experience.
Don’t just take our word for it! We’re eager to hear about your experiences with DIY towel mops. Share your tips, tricks, and variations in the comments below. Let us know what types of towels you used, what cleaning solutions you found most effective, and any other insights you’ve gained along the way. Together, we can create a community of eco-conscious cleaners who are passionate about making a difference, one clean floor at a time. So grab those old towels, get creative, and start mopping your way to a cleaner, greener home!
Frequently Asked Questions (FAQs)
What types of towels work best for DIY towel mops?
The best towels for DIY towel mops are those that are highly absorbent and durable. Cotton towels, especially those made from terry cloth, are a great option due to their excellent absorbency and ability to trap dirt and grime. Microfiber towels are another excellent choice, as they are known for their superior cleaning power and ability to lift dirt and dust from surfaces. Old bath towels, hand towels, and even washcloths can be repurposed for this project. Avoid using towels that are excessively worn or have holes, as they may not hold up well during mopping. Experiment with different types of towels to find what works best for your specific flooring and cleaning needs.
How do I clean the towel mop heads after use?
Cleaning your DIY towel mop heads is essential for maintaining their effectiveness and preventing the spread of bacteria. After each use, remove the towel from the mop head and rinse it thoroughly under running water to remove any loose dirt or debris. For a more thorough cleaning, machine wash the towel mop heads in hot water with a mild detergent. Avoid using fabric softeners, as they can reduce the absorbency of the towels. You can also add a cup of white vinegar to the wash to help disinfect and deodorize the towels. Tumble dry the towels on low heat or hang them to air dry. Ensure the towels are completely dry before storing them to prevent mildew growth.
Can I use any type of cleaning solution with my DIY towel mop?
Yes, you can use a variety of cleaning solutions with your DIY towel mop, depending on the type of flooring you have and the level of cleaning required. For general cleaning, a simple solution of warm water and a few drops of dish soap can be effective. For tougher stains or grime, you can use a commercial floor cleaner or a homemade solution of white vinegar and water. When using vinegar, be sure to dilute it properly to avoid damaging certain types of flooring, such as hardwood or marble. Always test the cleaning solution on an inconspicuous area of the floor first to ensure it doesn’t cause any discoloration or damage. You can also add a few drops of essential oils to your cleaning solution for a pleasant scent and added antibacterial properties.
How often should I replace my DIY towel mop heads?
The lifespan of your DIY towel mop heads will depend on how frequently you use them and how well you care for them. In general, it’s a good idea to replace your towel mop heads every few months, or sooner if they become excessively worn, stained, or damaged. If you notice that the towels are no longer absorbing water effectively or are leaving streaks on your floors, it’s time to replace them. You can also extend the lifespan of your towel mop heads by rotating them regularly and washing them properly after each use.
Is this DIY towel mop suitable for all types of flooring?
DIY towel mops are generally suitable for most types of flooring, including tile, laminate, vinyl, and sealed hardwood. However, it’s important to exercise caution when using them on delicate or unsealed surfaces, such as unsealed hardwood or natural stone. These types of flooring can be easily damaged by excessive moisture or harsh cleaning solutions. When cleaning these surfaces, use a minimal amount of water and a gentle cleaning solution. Always test the cleaning solution on an inconspicuous area first to ensure it doesn’t cause any damage. For unsealed hardwood, consider using a dry or slightly damp towel mop to avoid water damage.
How can I make my DIY towel mop more effective for scrubbing tough stains?
To make your DIY towel mop more effective for scrubbing tough stains, consider using a thicker, more textured towel, such as a terry cloth towel. You can also add a small amount of baking soda to your cleaning solution to help loosen stubborn stains. For particularly stubborn stains, pre-treat the area with a stain remover before mopping. When mopping, apply firm pressure and scrub the stained area in a circular motion. You can also use a scrub brush or sponge in conjunction with your towel mop to target specific stains.
Can I use this DIY towel mop on walls or other surfaces besides floors?
While primarily designed for floors, a DIY towel mop can also be used to clean walls and other surfaces, provided you use appropriate cleaning solutions and techniques. When cleaning walls, use a lightweight mop head and a gentle cleaning solution to avoid damaging the paint or wallpaper. Wring out the towel mop head thoroughly to prevent dripping and streaking. For higher surfaces, consider using a mop with an extendable handle. Always test the cleaning solution on an inconspicuous area first to ensure it doesn’t cause any damage.
What are some eco-friendly cleaning solution options for my DIY towel mop?
There are many eco-friendly cleaning solution options that you can use with your DIY towel mop. A simple solution of warm water and a few drops of dish soap is a great option for general cleaning. You can also use a homemade solution of white vinegar and water, which is effective for disinfecting and deodorizing floors. Baking soda is another versatile cleaning agent that can be used to scrub tough stains. For a pleasant scent and added antibacterial properties, add a few drops of essential oils to your cleaning solution. Avoid using harsh chemicals or bleach, as these can be harmful to the environment and your health.

Leave a Comment