

Mung Bean Sprouting at Home: It’s easier than you think! Forget those expensive, pre-packaged sprouts from the grocery store. I’m going to show you how to cultivate your own little sprout farm right on your kitchen counter. Imagine adding fresh, crunchy, and incredibly nutritious sprouts to your salads, sandwiches, and stir-fries, all grown by you!
Sprouting, in general, isn’t a new fad. In fact, it’s an ancient practice with roots in various cultures. For centuries, people have recognized the incredible nutritional benefits of sprouted seeds and legumes. Mung beans, in particular, hold a special place in Asian cuisine and traditional medicine, valued for their digestibility and concentrated nutrients.
But why should you bother with mung bean sprouting at home? Well, for starters, it’s incredibly cost-effective. A small bag of mung beans can yield a surprisingly large amount of sprouts. More importantly, you control the growing environment, ensuring your sprouts are free from harmful chemicals and contaminants. Plus, let’s be honest, there’s something incredibly satisfying about watching those tiny sprouts emerge and grow – it’s a little bit of nature magic right in your own home! This DIY trick will save you money, improve your diet, and connect you with the simple joys of growing your own food. So, let’s get sprouting!
Sprout Your Own Mung Beans: A Simple Guide
Hey there, fellow food enthusiasts! Ever thought about growing your own sprouts? It’s surprisingly easy, incredibly rewarding, and a fantastic way to add a boost of nutrients to your meals. Today, I’m going to walk you through the process of sprouting mung beans at home. Trust me, it’s simpler than you think, and the fresh, crunchy sprouts are absolutely delicious!
What You’ll Need
Before we dive in, let’s gather our supplies. You probably have most of these items already!
* **Mung Beans:** Obviously! Choose organic mung beans if possible, to avoid any unwanted pesticides. You can find these at most health food stores or online.
* **A Wide-Mouth Jar:** A quart-sized mason jar works perfectly. The wide mouth makes rinsing and draining much easier.
* **Sprouting Lid or Cheesecloth:** You’ll need something to cover the jar that allows for drainage and airflow. A sprouting lid is ideal, but cheesecloth secured with a rubber band works just as well.
* **Water:** Clean, filtered water is best.
* **A Bowl:** To soak the beans initially.
* **A Dark Place:** A cupboard or pantry works great. Sprouts need darkness to germinate properly.
* **A Well-Ventilated Area:** After the initial sprouting phase, they’ll need some indirect light and good airflow.
The Sprouting Process: Step-by-Step
Okay, let’s get sprouting! This process takes about 3-5 days, so be patient and follow these steps carefully.
Phase 1: Soaking the Beans
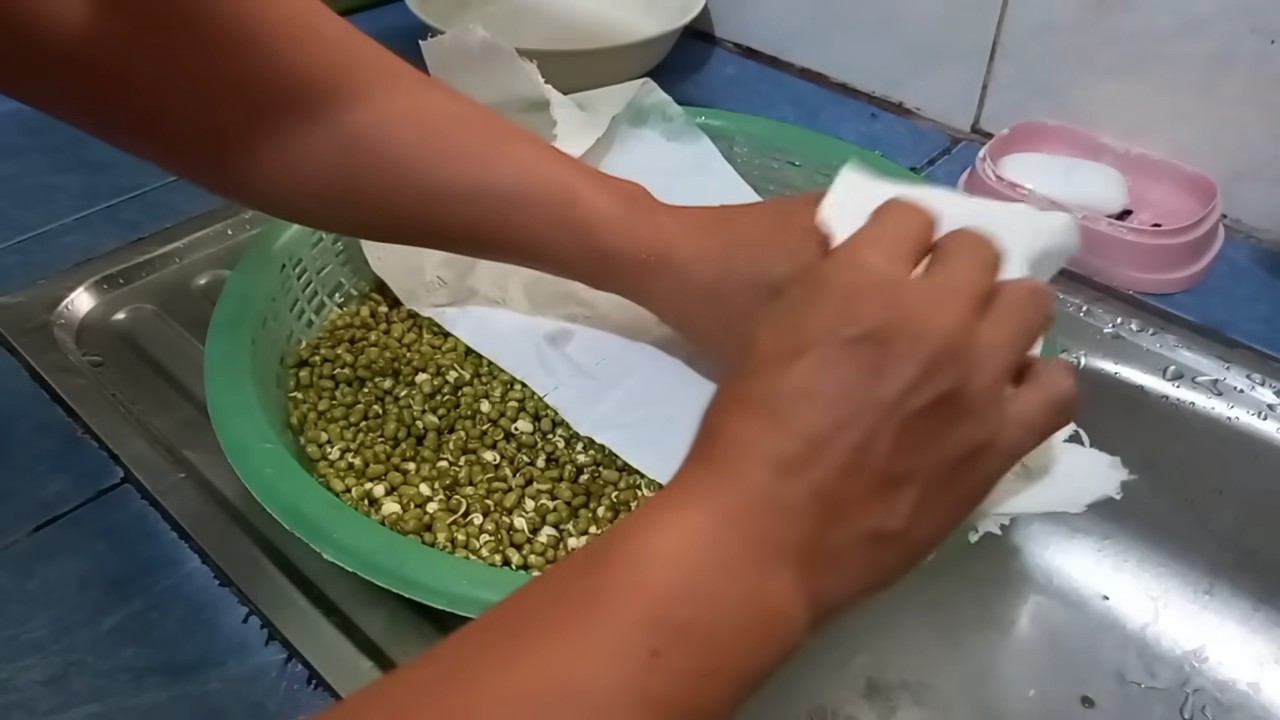
1. **Rinse the Beans:** Start by rinsing your mung beans thoroughly under cool water. This removes any dirt or debris. I usually give them a good swish in a bowl and then drain them.
2. **Soak the Beans:** Place the rinsed beans in your bowl and cover them with plenty of water. Mung beans will expand significantly as they soak, so make sure they have enough room. I usually use about 3 times the amount of water as beans.
3. **Soaking Time:** Let the beans soak for 8-12 hours, or even overnight. This is crucial for activating the germination process. I usually soak them before I go to bed and then start the sprouting process in the morning.
Phase 2: Sprouting the Beans
1. **Drain and Transfer:** After soaking, drain the beans completely and transfer them to your wide-mouth jar.
2. **Cover with Sprouting Lid or Cheesecloth:** Secure your sprouting lid or cheesecloth over the mouth of the jar. Make sure it’s tight enough to prevent any beans from escaping.
3. **Rinse and Drain (Again!):** Rinse the beans thoroughly through the sprouting lid or cheesecloth. This is important to keep them hydrated and prevent mold growth.
4. **Invert and Drain:** Invert the jar completely to drain all the excess water. You want the beans to be moist, not sitting in water. This is key to preventing rot.
5. **Dark Storage:** Place the jar in a dark, well-ventilated place, such as a cupboard or pantry. The darkness encourages the beans to sprout. I usually lean the jar at a 45-degree angle to allow for better drainage and airflow.
6. **Rinse and Drain (Repeat!):** This is the most important part! Rinse and drain the beans 2-3 times a day. This keeps them hydrated, prevents mold, and ensures even sprouting. I usually do this in the morning, afternoon, and before bed.
7. **Observe and Adjust:** Keep an eye on your sprouts. If they seem dry, rinse them more frequently. If they seem slimy or have a musty odor, they might be getting too much moisture. Make sure they are draining well.
Phase 3: Green Up (Optional)
1. **Indirect Light:** After 2-3 days of sprouting in the dark, you can expose the sprouts to indirect sunlight for a day or two. This will help them develop chlorophyll and turn a lovely shade of green. I usually place them near a window, but not in direct sunlight, which can overheat them.
2. **Continue Rinsing:** Continue rinsing and draining the sprouts 2-3 times a day during this greening phase.
Phase 4: Harvesting and Storing
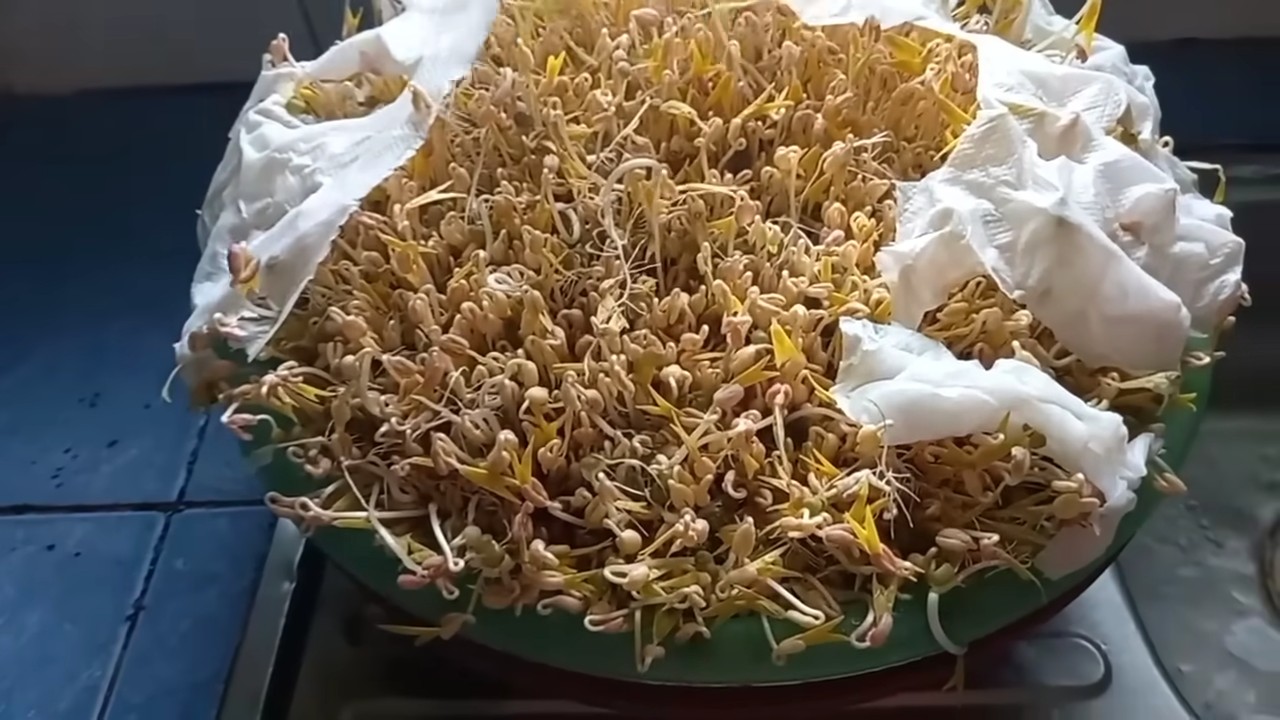
1. **Harvest Time:** Your mung bean sprouts are ready to harvest when they are about 1-2 inches long. They should be crisp and crunchy.
2. **Final Rinse:** Give the sprouts a final rinse to remove any remaining hulls or loose skins.
3. **Drain Thoroughly:** Drain the sprouts very well. Excess moisture will cause them to spoil quickly.
4. **Storage:** Store the sprouts in an airtight container in the refrigerator. They should last for about 5-7 days. I usually line the container with a paper towel to absorb any excess moisture.
Troubleshooting Tips
Sprouting is generally easy, but sometimes things can go wrong. Here are a few common issues and how to fix them:
* **Mold:** Mold is the biggest enemy of sprouts. It’s usually caused by insufficient rinsing or poor drainage. If you see mold, discard the entire batch and start over. Make sure you’re rinsing thoroughly and draining well. Using a clean jar and sprouting lid is also crucial.
* **Slimy Sprouts:** Slimy sprouts are another sign of overwatering or poor drainage. Rinse them more frequently and make sure they are draining completely.
* **Slow Sprouting:** If your sprouts are taking longer than expected to sprout, it could be due to the temperature. Mung beans sprout best at room temperature (around 70-75°F). If your house is too cold, try placing the jar in a slightly warmer location.
* **Uneven Sprouting:** Uneven sprouting can be caused by inconsistent rinsing or uneven distribution of moisture. Make sure you’re rinsing thoroughly and that the beans are evenly distributed in the jar.
* **Bitter Taste:** Sometimes, mung bean sprouts can have a slightly bitter taste. This is usually due to the presence of hulls or skins. Rinsing them thoroughly before storing can help reduce the bitterness.
Ways to Enjoy Your Homegrown Mung Bean Sprouts
Now for the best part – eating your sprouts! Mung bean sprouts are incredibly versatile and can be used in a variety of dishes. Here are some of my favorite ways to enjoy them:
* **Salads:** Add them to salads for a crunchy and nutritious boost.
* **Sandwiches and Wraps:** They add a great texture and flavor to sandwiches and wraps.
* **Stir-fries:** Toss them into stir-fries for a quick and healthy addition. Add them towards the end of cooking to maintain their crispness.
* **Soups:** Sprinkle them on top of soups for added crunch and nutrients.
* **Spring Rolls:** They’re a classic ingredient in fresh spring rolls.
* **On Their Own:** I sometimes just eat them raw as a snack!
Why Sprout? The Benefits of Mung Bean Sprouts
Sprouting mung beans isn’t just a fun DIY project; it’s also incredibly good for you! Here are some of the benefits:
* **Increased Nutrients:** Sprouting increases the bioavailability of nutrients in mung beans, making them easier for your body to absorb.
* **Improved Digestion:** Sprouting breaks down complex carbohydrates, making them easier to digest.
* **Rich in Enzymes:** Sprouts are packed with enzymes, which aid in digestion and overall health.
* **High in Protein:** Mung bean sprouts are a good source of plant-based protein.
* **Good Source of Fiber:** They’re also a good source of fiber, which is important for digestive health.
* **Affordable and Sustainable:** Sprouting your own mung beans is a cost-effective and sustainable way to add healthy food to your diet.
Final Thoughts
So there you have it! Sprouting mung beans at home is a simple, rewarding, and healthy activity. With a little patience and attention, you can enjoy fresh, crunchy sprouts in just a few days. Give it a try, and let me know how it goes! Happy sprouting!
Conclusion
So, there you have it! Mastering the art of mung bean sprouting at home is not just a fun kitchen experiment; it’s a gateway to fresher, healthier, and more affordable sprouts. Forget those limp, expensive sprouts from the grocery store. With minimal effort and readily available supplies, you can cultivate a vibrant batch of crunchy, nutritious mung bean sprouts right on your countertop.
Why is this DIY trick a must-try? Because it empowers you to take control of your food source. You know exactly what goes into your sprouts – no hidden preservatives, no questionable growing conditions. Plus, the taste difference is remarkable. Home-grown sprouts are noticeably fresher and more flavorful than their store-bought counterparts. Imagine adding a handful of these crisp sprouts to your salads, stir-fries, or sandwiches, knowing you nurtured them from tiny beans to culinary delights.
But the benefits extend beyond taste and freshness. Sprouting significantly increases the nutritional value of mung beans. The sprouting process unlocks enzymes and vitamins, making them more bioavailable and easier for your body to absorb. You’re essentially transforming a humble bean into a nutritional powerhouse.
Looking for variations? Experiment with different sprouting containers. While a mason jar with a sprouting lid is a classic choice, you can also use a colander lined with cheesecloth or even a specialized sprouting tray. The key is to ensure proper drainage and ventilation to prevent mold growth. You can also try sprouting other types of beans and seeds, such as lentils, alfalfa, or broccoli seeds, using the same basic principles. Each will offer a unique flavor and nutritional profile.
Consider adding a touch of natural light during the final stages of sprouting to encourage chlorophyll production, resulting in greener and even more nutritious sprouts. Just be careful to avoid direct sunlight, which can overheat and damage the sprouts.
Don’t be intimidated by the process. It’s surprisingly simple and rewarding. The satisfaction of watching those tiny beans transform into vibrant sprouts is truly unmatched. And the best part? You’re saving money and reducing your environmental impact by growing your own food.
We wholeheartedly encourage you to embark on this sprouting adventure. It’s a small change that can make a big difference in your health and well-being. Once you’ve experienced the joy of home-grown mung bean sprouts, you’ll never go back to store-bought again.
So, grab a bag of mung beans, gather your supplies, and get sprouting! We’re confident you’ll be amazed by the results. And most importantly, we want to hear about your experience. Share your photos, tips, and variations in the comments below. Let’s build a community of home sprouters and inspire others to discover the magic of mung bean sprouting at home. Happy sprouting!
Frequently Asked Questions (FAQ)
What are the benefits of sprouting mung beans at home compared to buying them from the store?
Sprouting mung beans at home offers several advantages. Firstly, you have complete control over the growing environment, ensuring the sprouts are free from harmful chemicals and pesticides. Secondly, home-grown sprouts are significantly fresher and more flavorful than store-bought ones, which often sit on shelves for extended periods. Thirdly, it’s a cost-effective way to enjoy a nutritious food source. Finally, sprouting increases the nutritional value of mung beans, making them more bioavailable and easier for your body to digest. You also reduce plastic waste from store packaging.
How long does it take to sprout mung beans?
Generally, mung beans take between 3 to 5 days to sprout at home. The exact time can vary depending on factors such as temperature, humidity, and the quality of the beans. Warmer temperatures tend to accelerate the sprouting process, while cooler temperatures may slow it down. It’s important to monitor the sprouts daily and rinse them regularly to prevent mold growth and ensure optimal sprouting conditions.
What kind of container is best for sprouting mung beans?
A mason jar with a sprouting lid is a popular and effective choice for sprouting mung beans. The lid allows for proper drainage and ventilation, which are crucial for preventing mold growth. Alternatively, you can use a colander lined with cheesecloth or a specialized sprouting tray. The key is to choose a container that allows for adequate drainage and airflow. Avoid using containers that are too deep or don’t provide sufficient ventilation, as this can lead to mold and spoilage.
How often should I rinse the mung beans during the sprouting process?
It’s essential to rinse the mung beans at least twice a day during the sprouting process. Rinsing helps to remove any accumulated bacteria or mold spores and keeps the sprouts hydrated. Use cool, clean water and ensure that all the water drains away completely after rinsing. This prevents the sprouts from becoming waterlogged and reduces the risk of spoilage. In warmer climates, you may need to rinse the sprouts more frequently to maintain optimal conditions.
How do I prevent mold from growing on my mung bean sprouts?
Preventing mold growth is crucial for successful mung bean sprouting. The most important factors are proper drainage and ventilation. Ensure that your sprouting container allows for adequate drainage and that the sprouts are not sitting in standing water. Rinse the sprouts thoroughly at least twice a day with cool, clean water. Avoid overcrowding the container, as this can restrict airflow and increase the risk of mold. If you notice any signs of mold, such as a fuzzy or slimy texture, discard the entire batch of sprouts immediately.
How do I know when the mung bean sprouts are ready to eat?
Mung bean sprouts are typically ready to eat when they have reached a length of about 1 to 2 inches. The sprouts should be crisp and firm, with a slightly sweet and nutty flavor. Avoid eating sprouts that are slimy, discolored, or have an unpleasant odor, as these may be spoiled. You can taste a small sprout to check for readiness.
How should I store mung bean sprouts after they have sprouted?
Once the mung bean sprouts have reached the desired length, rinse them thoroughly and drain them well. Store the sprouts in a clean, airtight container in the refrigerator. They will typically keep for up to a week. It’s important to keep the sprouts dry to prevent them from becoming slimy or spoiled. You can also wrap the sprouts in a paper towel to absorb any excess moisture.
Can I sprout other types of beans and seeds using the same method?
Yes, the same basic principles of mung bean sprouting can be applied to other types of beans and seeds, such as lentils, alfalfa, broccoli seeds, and radish seeds. However, the sprouting time and specific requirements may vary depending on the type of bean or seed. It’s always a good idea to research the specific sprouting instructions for each type of bean or seed before you begin.
Are there any potential health risks associated with eating raw sprouts?
While sprouts are generally considered a healthy food, there is a small risk of foodborne illness associated with eating raw sprouts. This is because sprouts are grown in warm, moist conditions, which can also promote the growth of bacteria such as Salmonella and E. coli. To minimize the risk, it’s important to purchase high-quality beans and seeds from a reputable source and to follow proper sprouting procedures. Thoroughly rinsing the sprouts and storing them properly can also help to reduce the risk of contamination. Individuals with weakened immune systems, pregnant women, and young children should exercise caution when consuming raw sprouts. Cooking the sprouts can eliminate the risk of bacterial contamination.
What can I do with my mung bean sprouts?
Mung bean sprouts are incredibly versatile and can be used in a wide variety of dishes. They are a popular addition to salads, stir-fries, sandwiches, and spring rolls. They can also be used as a topping for soups and noodles. Mung bean sprouts add a crisp, refreshing texture and a slightly sweet and nutty flavor to any dish. You can also juice them for a nutrient boost.

Leave a Comment