

Bottle Gardening Bell Peppers: Imagine harvesting vibrant, crisp bell peppers right from your own balcony or windowsill, even if you don’t have a sprawling garden! It sounds like a dream, right? Well, it’s a dream within reach thanks to the magic of bottle gardening! For centuries, resourceful gardeners have been finding innovative ways to cultivate food in limited spaces, from ancient rooftop gardens to modern-day vertical farms. This DIY project taps into that rich history of ingenuity, bringing the joy of fresh produce to everyone, regardless of their living situation.
Let’s face it, buying bell peppers from the store can be expensive, and sometimes the quality just isn’t there. Plus, there’s nothing quite like the satisfaction of nurturing a plant from seed to harvest. That’s where this simple yet effective bottle gardening trick comes in. I’m going to show you how to transform ordinary plastic bottles into mini-greenhouses, perfect for growing delicious bell peppers. Not only is it a budget-friendly way to enjoy fresh produce, but it’s also a fantastic way to recycle and reduce waste. So, grab your bottles, some soil, and let’s get started on your bottle gardening bell peppers adventure! You’ll be amazed at how easy and rewarding it is.
DIY Bottle Gardening: Grow Bell Peppers in Recycled Plastic Bottles!
Hey there, fellow gardening enthusiasts! Are you looking for a fun, eco-friendly, and space-saving way to grow your own bell peppers? Well, you’ve come to the right place! I’m going to walk you through how to create a thriving bell pepper garden using nothing but recycled plastic bottles. It’s a fantastic project for beginners and seasoned gardeners alike, and it’s a great way to reduce waste while enjoying fresh, homegrown produce. Let’s get started!
What You’ll Need
Before we dive into the step-by-step instructions, let’s gather all the necessary materials. This will make the process smoother and more enjoyable.
* Plastic Bottles: You’ll need several large plastic bottles (2-liter soda bottles or similar work great). The number depends on how many bell pepper plants you want to grow. Make sure they are clean and free of any residue.
* Bell Pepper Seeds or Seedlings: You can start from seeds or purchase seedlings from your local garden center. Seedlings will give you a head start.
* Potting Soil: Use a high-quality potting mix that is well-draining. This is crucial for healthy bell pepper growth.
* Scissors or Utility Knife: For cutting the plastic bottles. Be careful!
* Drill or Nail and Hammer: To create drainage holes in the bottles.
* Watering Can or Spray Bottle: For watering your plants.
* Optional:
* Gloves: To protect your hands.
* Measuring Tape or Ruler: For precise cutting (optional).
* Permanent Marker: For labeling (optional).
* Small Rocks or Gravel: For added drainage at the bottom of the bottles (optional).
* Plant Food/Fertilizer: To give your plants an extra boost (optional).
Preparing the Bottles
This is where we transform those ordinary plastic bottles into mini-gardens!
1. Clean the Bottles: Thoroughly wash the plastic bottles with soap and water to remove any dirt, grime, or sugary residue. Rinse them well and let them dry completely. This is important to prevent mold or bacteria growth.
2. Cut the Bottles: There are a couple of ways you can cut the bottles, depending on your preference and the space you have.
* Option 1: Vertical Cut (Hanging Planters): If you want to create hanging planters, cut the bottle lengthwise, leaving a small section intact at the top to act as a hinge. This will create two halves that you can fill with soil.
* Option 2: Horizontal Cut (Standard Planters): For standard planters, cut the bottle horizontally, about one-third of the way down from the top. You’ll be using the bottom portion as the planter. Discard or recycle the top portion.
* Option 3: Stacked Planters: Cut the bottle horizontally, about one-third of the way down from the top. Invert the top portion and place it inside the bottom portion. This creates a self-watering system. You’ll need to drill a small hole in the bottle cap to allow water to wick up.
3. Create Drainage Holes: This is absolutely essential! Bell peppers don’t like sitting in soggy soil. Use a drill or a nail and hammer to create several drainage holes in the bottom of each bottle. I usually make about 4-5 holes, spaced evenly apart.
4. Optional: Add Gravel: For extra drainage, you can add a layer of small rocks or gravel to the bottom of each bottle before adding the soil. This will help prevent the roots from sitting in water.
Planting Your Bell Peppers
Now for the fun part – planting your bell peppers!
1. Fill with Potting Soil: Fill each bottle with high-quality potting soil, leaving about an inch of space at the top. Gently pat the soil down to remove any air pockets.
2. Plant the Seeds or Seedlings:
* From Seeds: If you’re starting from seeds, sow them according to the instructions on the seed packet. Generally, you’ll want to plant them about ¼ inch deep. Water gently after planting.
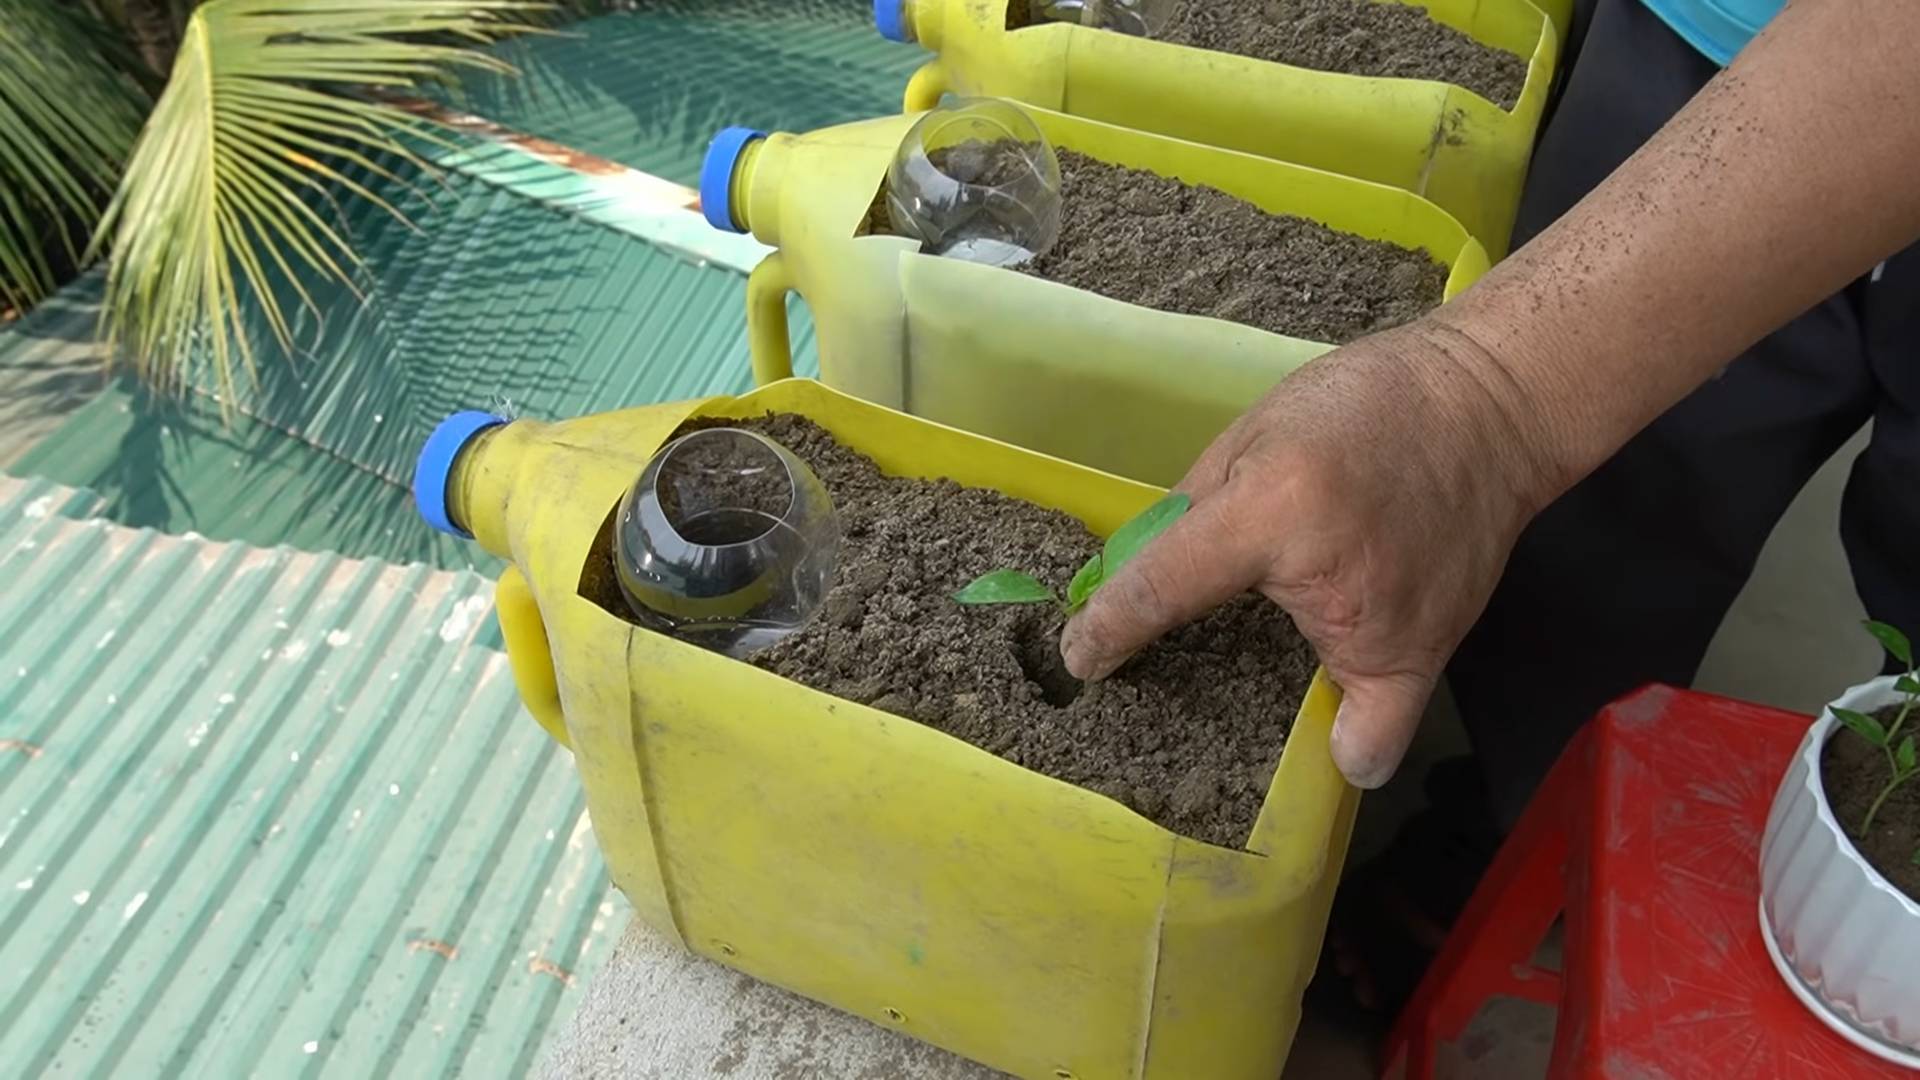
* From Seedlings: If you’re using seedlings, gently remove them from their containers. Loosen the roots slightly and place the seedling in the center of the bottle. Fill in around the seedling with potting soil, making sure the top of the root ball is level with the soil surface. Water thoroughly after planting.
3. Label (Optional): If you’re growing different varieties of bell peppers, use a permanent marker to label each bottle. This will help you keep track of which plant is which.
Caring for Your Bell Pepper Plants
Proper care is key to a bountiful harvest!
1. Watering: Water your bell pepper plants regularly, especially during hot weather. The soil should be consistently moist, but not soggy. Check the soil moisture by sticking your finger into the soil. If the top inch feels dry, it’s time to water. Avoid overwatering, as this can lead to root rot.
2. Sunlight: Bell peppers need at least 6-8 hours of sunlight per day. Place your bottle planters in a sunny location, such as a patio, balcony, or windowsill. If you don’t have enough natural sunlight, you can supplement with grow lights.
3. Fertilizing: Bell peppers are heavy feeders, so they benefit from regular fertilization. Use a balanced fertilizer or a fertilizer specifically formulated for vegetables. Follow the instructions on the fertilizer package. I like to use a liquid fertilizer diluted in water every couple of weeks.
4. Support: As your bell pepper plants grow, they may need support to prevent them from toppling over. You can use stakes, trellises, or even bamboo skewers to provide support.
5. Pruning: Pruning can help improve air circulation and encourage fruit production. Remove any suckers (small shoots that grow from the base of the plant) and any yellowing or dead leaves.
6. Pest Control: Keep an eye out for pests, such as aphids, whiteflies, and spider mites. If you notice any pests, you can try spraying them with insecticidal soap or neem oil.
Harvesting Your Bell Peppers
The moment you’ve been waiting for!
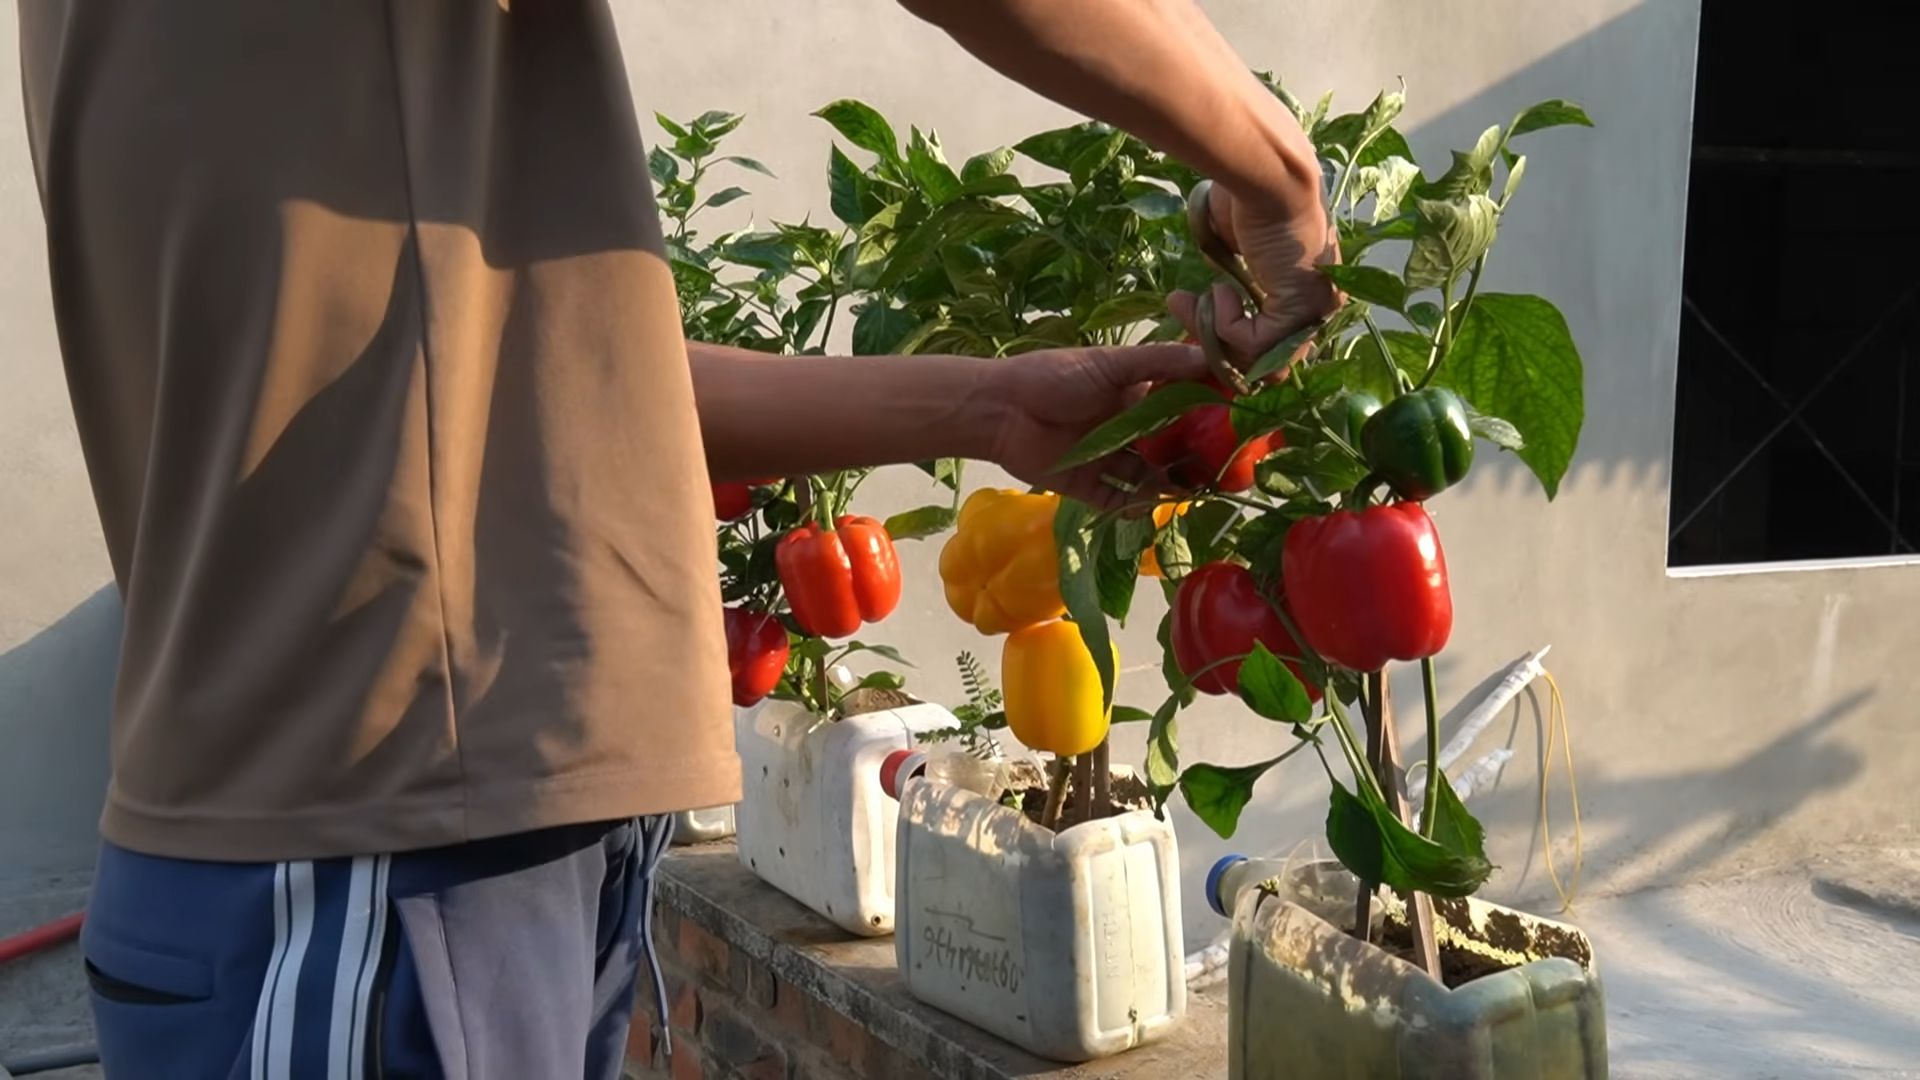
1. Harvest Time: Bell peppers are typically ready to harvest about 60-90 days after planting, depending on the variety. The peppers should be firm, glossy, and have reached their mature color (green, red, yellow, orange, etc.).
2. How to Harvest: Use a sharp knife or scissors to cut the pepper from the plant, leaving a small stem attached.
3. Enjoy Your Harvest: Use your homegrown bell peppers in your favorite recipes, such as salads, stir-fries, or stuffed peppers. You can also freeze or can them for later use.
Troubleshooting
Even with the best care, you might encounter some challenges. Here are a few common issues and how to address them:
* Yellowing Leaves: This could be a sign of overwatering, underwatering, nutrient deficiency, or pest infestation. Check the soil moisture, fertilize if necessary, and inspect for pests.
* Blossom End Rot: This is a common problem in bell peppers, characterized by a dark, sunken spot on the bottom of the fruit. It’s usually caused by calcium deficiency. You can prevent blossom end rot by adding calcium to the soil or using a calcium-rich fertilizer.
* Lack of Fruit: This could be due to insufficient sunlight, poor pollination, or extreme temperatures. Make sure your plants are getting enough sunlight, and consider hand-pollinating the flowers if necessary.
* Pest Infestation: As mentioned earlier, keep an eye out for pests and treat them promptly with insecticidal soap or neem oil.
Tips for Success
Here are a few extra tips to help you succeed with your bottle gardening project:
* Choose the Right Variety: Some bell pepper varieties are better suited for container gardening than others. Look for compact or dwarf varieties.
* Use High-Quality Potting Soil: Don’t skimp on the potting soil! Use a high-quality mix that is well-draining and contains plenty of nutrients.
* Don’t Overcrowd: Give your plants enough space to grow. Don’t try to cram too many plants into one bottle.
* Rotate Your Crops: If you’re growing bell peppers in the same bottles year after year, rotate your crops to prevent soilborne diseases.
* Have Fun! Gardening should be enjoyable. Don’t be afraid to experiment and try new things.
I hope this guide has inspired you to try bottle gardening with bell peppers. It’s a rewarding and sustainable way to grow your own food. Happy gardening!
Conclusion
So, there you have it! Bottle gardening bell peppers is not just a quirky gardening experiment; it’s a game-changer for urban gardeners, space-conscious enthusiasts, and anyone looking to add a touch of green to their lives without the hassle of traditional gardening. We’ve walked you through the process, highlighting the simplicity and sustainability of this method.
Why is this a must-try? Because it democratizes gardening. You don’t need acres of land or expensive equipment. All you need are recycled bottles, some soil, bell pepper seeds or seedlings, and a little bit of patience. Imagine the satisfaction of harvesting vibrant, juicy bell peppers grown right on your balcony, windowsill, or even your kitchen counter!
Beyond the sheer convenience, bottle gardening bell peppers offers a unique learning experience. You’ll gain a deeper understanding of plant life cycles, soil composition, and the delicate balance of nature. It’s an educational activity for kids and a rewarding hobby for adults.
But the benefits don’t stop there. This method is incredibly eco-friendly. By repurposing plastic bottles, you’re actively reducing waste and contributing to a more sustainable lifestyle. You’re also minimizing your carbon footprint by growing your own food locally.
Variations and Suggestions:
* Pepper Variety: While we’ve focused on bell peppers, feel free to experiment with other pepper varieties like chili peppers, jalapeños, or even sweet peppers. Just be mindful of their specific growing requirements.
* Bottle Size: The size of the bottle will influence the size of the plant. Larger bottles are better for larger pepper varieties.
* Nutrient Boost: Consider adding a diluted liquid fertilizer to your watering routine every few weeks to provide your plants with essential nutrients.
* Companion Planting: You can even try planting herbs like basil or oregano alongside your bell peppers in the same bottle. These herbs can help deter pests and enhance the flavor of your peppers.
* Vertical Gardening: Get creative with how you display your bottle gardens. Hang them from a wall, create a tiered system, or arrange them on a shelf for a visually stunning display.
* Watering System: For those who travel frequently, consider adding a self-watering system to your bottle garden. This can be as simple as a wick system that draws water from a reservoir.
We are confident that once you try bottle gardening bell peppers, you’ll be hooked. It’s a fun, rewarding, and sustainable way to grow your own food, regardless of your space constraints or gardening experience.
So, grab some bottles, gather your supplies, and get ready to embark on a green adventure. We encourage you to try this DIY trick and share your experiences with us! Post photos of your bottle gardens on social media using #BottlePepperGarden and let us know what you’ve learned. We can’t wait to see your creations! Happy gardening!
Frequently Asked Questions (FAQ)
What type of bottles are best for bottle gardening bell peppers?
The best bottles are sturdy, clear plastic bottles, such as those used for water, soda, or juice. Avoid using bottles that have contained harsh chemicals or cleaning products. Thoroughly wash and rinse the bottles before using them. The size of the bottle will depend on the variety of bell pepper you’re growing. Larger varieties will need larger bottles to accommodate their root systems. A good starting point is a 2-liter bottle.
What kind of soil should I use for bottle gardening bell peppers?
Use a well-draining potting mix specifically formulated for container gardening. Avoid using garden soil, as it can become compacted in a container and hinder drainage. You can also amend your potting mix with compost or other organic matter to improve its fertility and water retention. A mix of potting soil, perlite, and vermiculite is ideal for bottle gardening bell peppers.
How often should I water my bottle garden bell peppers?
Water your plants when the top inch of soil feels dry to the touch. Avoid overwatering, as this can lead to root rot. The frequency of watering will depend on the weather, the size of the bottle, and the type of soil you’re using. In hot, dry weather, you may need to water daily. In cooler weather, you may only need to water every few days. Ensure the bottle has drainage holes to prevent waterlogging.
How much sunlight do bottle garden bell peppers need?
Bell peppers need at least 6-8 hours of direct sunlight per day to thrive. Place your bottle gardens in a sunny location, such as a south-facing window or balcony. If you don’t have enough natural sunlight, you can supplement with grow lights. Rotate the bottles regularly to ensure that all sides of the plant receive adequate sunlight.
How do I fertilize my bottle garden bell peppers?
Bell peppers are heavy feeders and require regular fertilization. Use a balanced liquid fertilizer specifically formulated for vegetables. Dilute the fertilizer according to the package instructions and apply it every 2-3 weeks during the growing season. You can also add slow-release fertilizer granules to the potting mix at the time of planting.
How do I prevent pests and diseases in my bottle garden bell peppers?
Inspect your plants regularly for signs of pests or diseases. Common pests that affect bell peppers include aphids, spider mites, and whiteflies. You can control these pests with insecticidal soap or neem oil. To prevent diseases, ensure good air circulation around your plants and avoid overwatering. Remove any yellowing or diseased leaves promptly.
Can I grow bell peppers indoors in a bottle garden?
Yes, you can grow bell peppers indoors in a bottle garden, but you’ll need to provide them with adequate light. A sunny south-facing window is ideal, but you may also need to supplement with grow lights. Indoor plants may also require more frequent watering and fertilization than outdoor plants.
How long does it take to grow bell peppers in a bottle garden?
It typically takes 60-90 days from transplanting seedlings to harvesting mature bell peppers. The exact time will depend on the variety of bell pepper, the growing conditions, and the size of the plant. Be patient and provide your plants with the care they need, and you’ll be rewarded with a bountiful harvest.
What do I do if my bell pepper plant gets too big for the bottle?
If your bell pepper plant outgrows its bottle, you can transplant it into a larger container or even into the ground. Choose a container that is at least twice the size of the original bottle. Gently remove the plant from the bottle, being careful not to damage the roots. Plant it in the new container with fresh potting mix and water thoroughly.
Can I reuse the soil from my bottle garden?
It’s generally not recommended to reuse soil from a bottle garden, as it may be depleted of nutrients and harbor pests or diseases. However, if you choose to reuse the soil, you can amend it with compost or other organic matter to replenish its nutrients. Sterilize the soil by baking it in the oven at 200 degrees Fahrenheit for 30 minutes to kill any pests or diseases.
Leave a Comment