

Growing Cabbage From Seed might seem daunting, but trust me, it’s a rewarding journey that connects you to generations of gardeners! For centuries, cabbage has been a staple in diets worldwide, from the hearty stews of Eastern Europe to the vibrant slaws of Asia. Its cultivation dates back to ancient times, with evidence suggesting its presence in the gardens of ancient Greece and Rome.
But why bother starting from seed when you can just buy a seedling? Well, that’s where the magic of DIY comes in! Growing Cabbage From Seed allows you to choose from a wider variety of cultivars, often unavailable as transplants. Plus, there’s an undeniable satisfaction in nurturing a plant from its very beginning. Imagine the pride you’ll feel when you harvest your own homegrown cabbage, knowing you guided it every step of the way!
This DIY guide is your key to unlocking the secrets of successful cabbage cultivation. We’ll break down the process into easy-to-follow steps, ensuring even beginners can enjoy a bountiful harvest. Say goodbye to expensive store-bought cabbage and hello to fresh, flavorful, and organically grown goodness right from your own backyard. Let’s get started!
Growing Cabbage From Seed: A Complete DIY Guide
Okay, cabbage lovers! Let’s dive into the wonderful world of growing your own cabbage from seed. It’s easier than you think, and the taste of homegrown cabbage is simply unbeatable. I’m going to walk you through every step, from choosing the right seeds to transplanting your little seedlings. Get ready to enjoy fresh, crisp cabbage straight from your garden!
Choosing Your Cabbage Variety
First things first, let’s talk about cabbage varieties. There’s a whole world beyond the standard green cabbage! Consider these factors when making your choice:
* Growing Season: Cabbage varieties mature at different rates. Some are early-season (ready in about 60-70 days), while others are late-season (taking 80-100 days or more). Choose varieties that fit your local climate and growing season.
* Head Size: Do you want large heads for sauerkraut or smaller heads for individual meals? This will influence your variety selection.
* Color: Green is classic, but don’t forget about red and Savoy cabbages! They add visual interest to your garden and offer slightly different flavors.
* Disease Resistance: Look for varieties that are resistant to common cabbage diseases in your area, such as clubroot or black rot.
Some popular varieties to consider include:
* Early Jersey Wakefield: An early-season variety with small, pointed heads.
* Golden Acre: Another early variety, known for its round, compact heads.
* Red Acre: A beautiful red cabbage with a slightly peppery flavor.
* Savoy Ace: A crinkled-leaf cabbage with a mild, sweet taste.
* Brunswick: A late-season variety that produces large, dense heads, perfect for storage.
Once you’ve chosen your variety, it’s time to get your seeds! I always recommend buying from a reputable seed supplier to ensure good germination rates and healthy plants.
Starting Cabbage Seeds Indoors
Starting your cabbage seeds indoors gives them a head start, especially in areas with short growing seasons. Here’s how I do it:
1. Gather Your Supplies:
* Cabbage seeds
* Seed starting trays or pots (I prefer trays with individual cells)
* Seed starting mix (a light, well-draining mix is essential)
* Watering can or spray bottle
* Heat mat (optional, but helpful for germination)
* Grow lights (essential if you don’t have a very sunny window)
* Humidity dome (optional, but helps maintain moisture)
2. Prepare Your Seed Starting Trays:
* Moisten the seed starting mix thoroughly. It should be damp but not soggy.
* Fill each cell or pot with the moistened mix, leaving about ½ inch of space at the top.
* Gently press the mix down to remove any air pockets.
3. Sow the Seeds:
* Make a small indentation (about ¼ inch deep) in the center of each cell or pot.
* Place 2-3 cabbage seeds in each indentation. This increases the chances of at least one seed germinating.
* Cover the seeds with a thin layer of seed starting mix.
* Gently water the surface with a spray bottle to avoid disturbing the seeds.
4. Provide Warmth and Moisture:
* Place the seed starting trays on a heat mat (if using) and cover them with a humidity dome (if using).
* The ideal temperature for cabbage seed germination is between 65-75°F (18-24°C).
* Keep the seed starting mix consistently moist, but not waterlogged. Check daily and water as needed.
5. Provide Light:
* Once the seeds germinate (usually within 5-10 days), remove the humidity dome and place the trays under grow lights.
* Position the grow lights a few inches above the seedlings and keep them on for 14-16 hours per day.
* If you don’t have grow lights, place the trays in a very sunny window, rotating them regularly to prevent the seedlings from leaning towards the light.
6. Thin the Seedlings:
* Once the seedlings have developed their first true leaves (the second set of leaves after the initial seed leaves), thin them to one seedling per cell or pot.
* Choose the strongest, healthiest-looking seedling and gently snip off the others at the soil line with scissors. Don’t pull them out, as this can disturb the roots of the remaining seedling.
7. Fertilize the Seedlings:
* Once the seedlings have developed a few sets of true leaves, start fertilizing them with a diluted liquid fertilizer (follow the instructions on the fertilizer label).
* Fertilize every 1-2 weeks to provide the seedlings with the nutrients they need to grow strong and healthy.
Hardening Off Your Cabbage Seedlings
Before transplanting your cabbage seedlings outdoors, it’s crucial to “harden them off.” This process gradually acclimates them to the outdoor environment, reducing the risk of shock.
1. Start Gradually:
* About 1-2 weeks before your planned transplant date, begin taking the seedlings outdoors for a few hours each day.
* Start with a sheltered location, such as a porch or patio, and gradually increase the amount of time they spend outdoors each day.
2. Protect from Harsh Conditions:
* Protect the seedlings from direct sunlight, strong winds, and frost.
* If the weather is particularly harsh, bring the seedlings back indoors.
3. Monitor Moisture Levels:
* Check the soil moisture regularly and water as needed. Seedlings tend to dry out more quickly outdoors.
4. Increase Exposure:
* Over the course of the hardening-off period, gradually increase the amount of sunlight and wind the seedlings are exposed to.
* By the end of the week, they should be able to tolerate a full day outdoors.
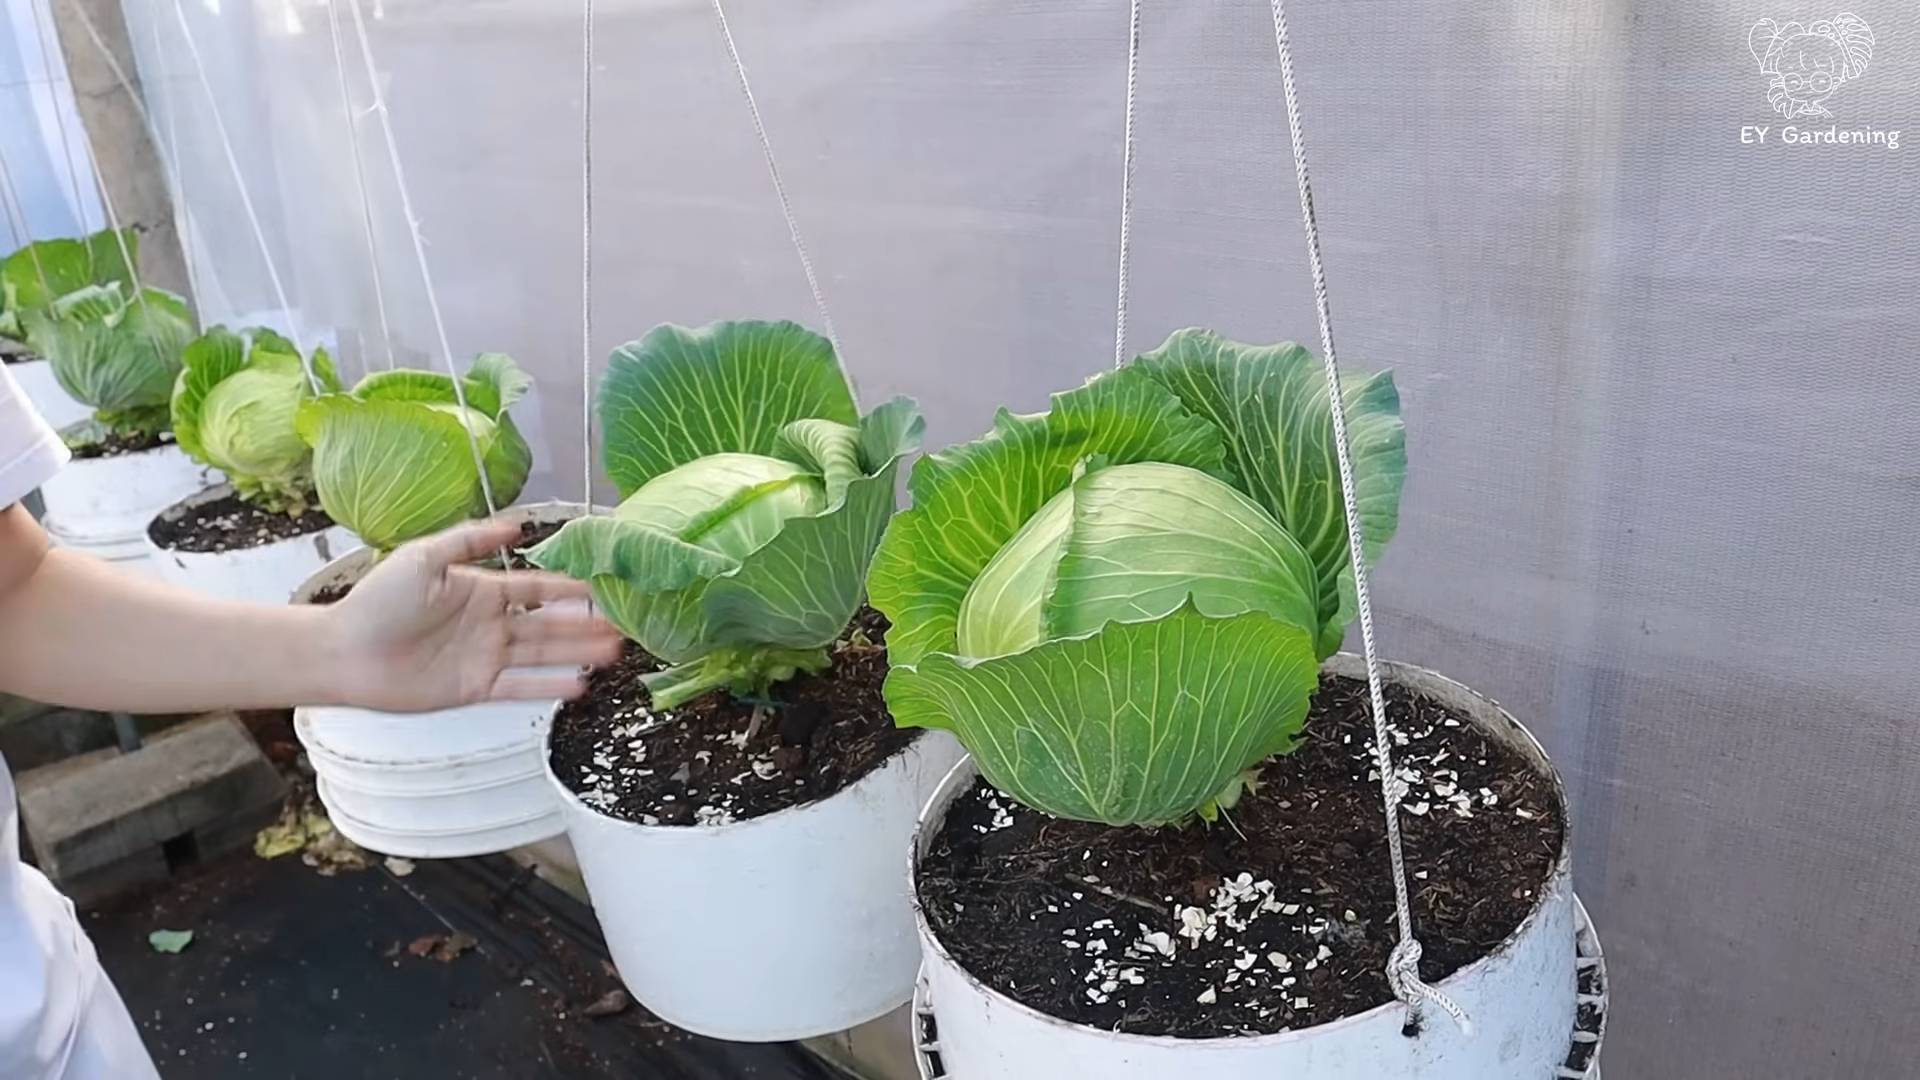
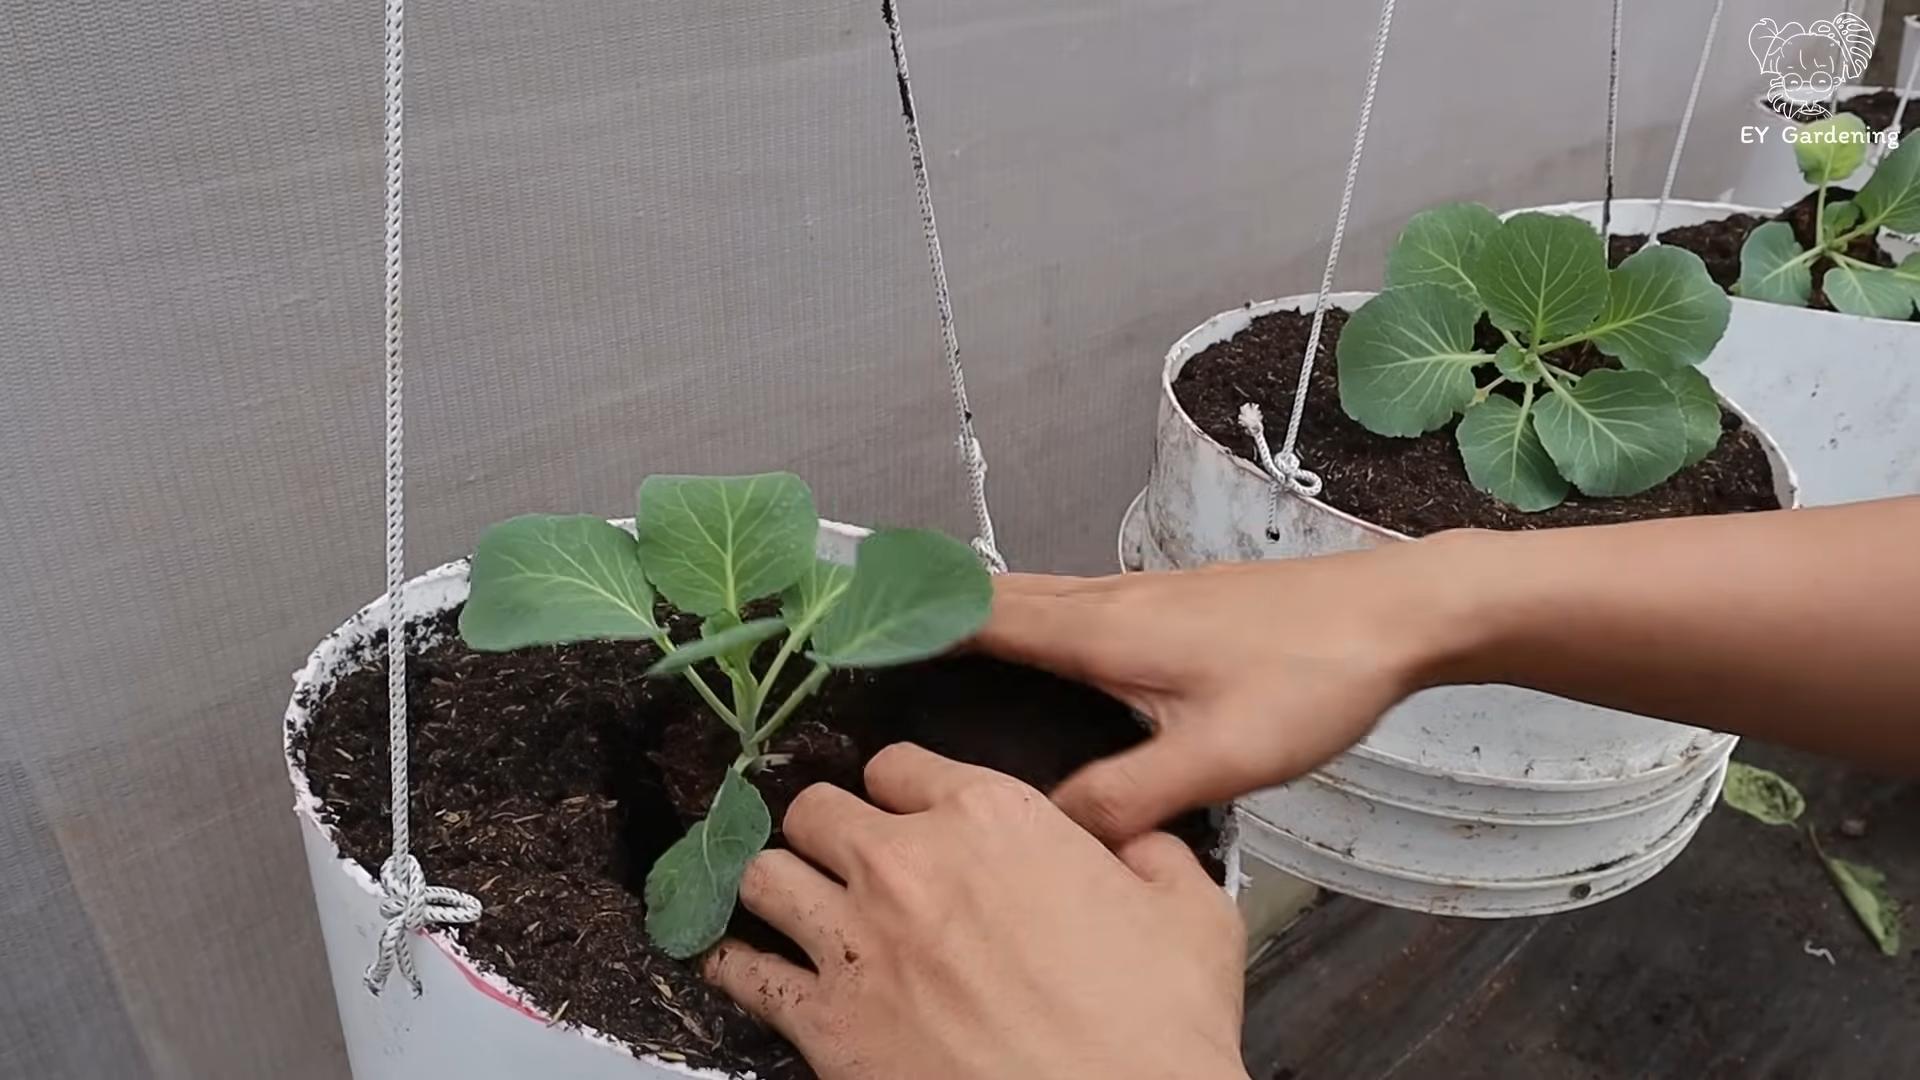
Transplanting Cabbage Seedlings Outdoors
Now for the exciting part – transplanting your cabbage seedlings into the garden!
1. Choose the Right Time:
* Transplant your cabbage seedlings outdoors after the last expected frost in your area.
* The ideal time to transplant is in the early morning or late afternoon, when the sun is less intense.
2. Prepare the Soil:
* Cabbage prefers well-drained, fertile soil with a pH of 6.0-7.5.
* Amend the soil with compost or other organic matter to improve drainage and fertility.
* Work the soil to a depth of at least 12 inches.
3. Space the Seedlings:
* Space the cabbage seedlings 12-24 inches apart, depending on the variety. Smaller varieties can be spaced closer together.
* Rows should be spaced 24-36 inches apart.
4. Dig the Holes:
* Dig holes that are slightly larger than the root balls of the seedlings.
5. Transplant Carefully:
* Gently remove the seedlings from their cells or pots.
* Loosen the roots slightly before planting.
* Place the seedlings in the holes, making sure the top of the root ball is level with the soil surface.
* Backfill the holes with soil and gently firm the soil around the seedlings.
6. Water Thoroughly:
* Water the newly transplanted seedlings thoroughly to help them settle in.
7. Mulch:
* Apply a layer of mulch around the cabbage plants to help retain moisture, suppress weeds, and regulate soil temperature. I like to use straw or shredded leaves.
Caring for Your Cabbage Plants
Once your cabbage plants are in the ground, it’s important to provide them with proper care to ensure a bountiful harvest.
1. Watering:
* Cabbage plants need consistent moisture, especially during head formation.
* Water deeply and regularly, especially during dry periods.
* Avoid overhead watering, as this can promote disease.
2. Fertilizing:
* Cabbage plants are heavy feeders and benefit from regular fertilization.
* Side-dress the plants with a balanced fertilizer every 4-6 weeks.
* You can also use compost tea or other organic fertilizers.
3. Weeding:
* Keep the area around the cabbage plants free of weeds.
* Weeds compete with the cabbage plants for nutrients and water.
* Hand-pull weeds or use a hoe to cultivate the soil.
4. Pest Control:
* Cabbage plants are susceptible to several pests, including cabbage worms, aphids, and flea
Conclusion
So, there you have it – a comprehensive guide to growing cabbage from seed! We’ve walked through each step, from selecting the right varieties and preparing your soil to nurturing those tiny seedlings and transplanting them into your garden. You might be thinking, “Is all this effort really worth it?” And the answer, unequivocally, is YES!
Growing your own cabbage from seed offers a multitude of benefits that far outweigh the initial investment of time and effort. First and foremost, you gain complete control over the process. You know exactly what goes into your cabbage – no harmful pesticides, no questionable fertilizers, just pure, wholesome goodness. This is especially important if you’re committed to organic gardening practices.
Beyond the health benefits, growing your own cabbage from seed allows you to explore a wider range of varieties than you’ll typically find at your local grocery store. Imagine the satisfaction of harvesting vibrant red cabbage, savoy cabbage with its beautifully crinkled leaves, or even a unique Asian variety like Napa cabbage. The possibilities are endless!
Furthermore, starting from seed is often more economical than purchasing transplants. While there’s an initial investment in seeds and seed-starting supplies, you’ll ultimately save money in the long run, especially if you plan on growing a significant amount of cabbage. Plus, you’ll have the satisfaction of knowing you nurtured your cabbage from the very beginning.
But the real magic lies in the taste. Homegrown cabbage, harvested at its peak ripeness, boasts a flavor that simply can’t be matched by store-bought varieties. It’s sweeter, more tender, and bursting with fresh, earthy notes. Whether you’re using it in coleslaw, stir-fries, soups, or sauerkraut, your homegrown cabbage will elevate your dishes to a whole new level.
Don’t be afraid to experiment with different techniques and variations. Try succession planting to ensure a continuous harvest throughout the growing season. Consider companion planting with herbs like dill or rosemary to deter pests and enhance flavor. And if you’re short on space, explore growing cabbage in containers.
Growing cabbage from seed is a rewarding experience that connects you to the natural world and provides you with delicious, healthy food. It’s a skill that you can pass down to future generations, fostering a love of gardening and sustainable living.
So, what are you waiting for? Grab a packet of seeds, prepare your soil, and embark on your cabbage-growing adventure today! We’re confident that you’ll be amazed by the results. And don’t forget to share your experiences with us! We’d love to hear about your successes, your challenges, and any tips or tricks you’ve learned along the way. Share your photos and stories in the comments below – let’s build a community of cabbage-growing enthusiasts! Let us know what kind of **cabbage** you grew and how it turned out!
Frequently Asked Questions (FAQ)
Q: How long does it take to grow cabbage from seed?
A: The time it takes to grow cabbage from seed to harvest can vary depending on the variety, climate, and growing conditions. Generally, it takes anywhere from 60 to 100 days from transplanting seedlings to harvesting mature heads. Early varieties tend to mature faster, while larger, later-maturing varieties will take longer. Starting seeds indoors 6-8 weeks before the last expected frost can give you a head start.
Q: What are the best cabbage varieties to grow from seed?
A: The best cabbage varieties to grow from seed depend on your climate, growing season, and personal preferences. Some popular and reliable varieties include:
* **Early Jersey Wakefield:** An early-maturing variety with small, pointed heads.
* **Golden Acre:** A classic early-maturing variety with round, compact heads.
* **Copenhagen Market:** A mid-season variety with medium-sized, round heads.
* **Red Acre:** A beautiful red cabbage variety with a slightly peppery flavor.
* **Savoy Ace:** A savoy cabbage variety with crinkled leaves and a mild flavor.
* **Napa Cabbage:** An Asian variety with elongated heads and a delicate flavor, perfect for stir-fries and salads.
Consider your local climate and growing season when selecting varieties. Check with your local garden center or extension office for recommendations specific to your area.
Q: What kind of soil is best for growing cabbage from seed?
A: Cabbage thrives in well-drained, fertile soil that is rich in organic matter. The ideal soil pH is between 6.0 and 7.0. Before planting, amend your soil with compost, aged manure, or other organic materials to improve drainage, fertility, and water retention. If your soil is heavy clay, consider adding sand or perlite to improve drainage. A soil test can help you determine the specific nutrient needs of your soil.
Q: How often should I water cabbage seedlings?
A: Cabbage seedlings need consistent moisture to thrive. Water them regularly, especially during dry periods. The soil should be kept consistently moist but not waterlogged. Check the soil moisture level by sticking your finger into the soil. If the top inch feels dry, it’s time to water. Avoid overhead watering, as this can promote fungal diseases. Water at the base of the plants to keep the foliage dry.
Q: What are some common pests and diseases that affect cabbage?
A: Cabbage is susceptible to several pests and diseases, including:
* **Cabbage worms:** These caterpillars can devour cabbage leaves. Handpick them off the plants or use Bacillus thuringiensis (Bt), a biological insecticide.
* **Cabbage loopers:** Similar to cabbage worms, these caterpillars can also damage cabbage leaves. Use Bt or insecticidal soap to control them.
* **Aphids:** These small, sap-sucking insects can weaken cabbage plants. Spray them with insecticidal soap or neem oil.
* **Flea beetles:** These tiny beetles can create small holes in cabbage leaves. Use row covers to protect seedlings or spray with pyrethrin.
* **Clubroot:** This fungal disease causes swollen roots and stunted growth. Prevent it by practicing crop rotation and maintaining a soil pH above 7.0.
* **Black rot:** This bacterial disease causes yellowing and blackening of cabbage leaves. Use disease-free seeds and practice crop rotation to prevent it.
Regularly inspect your cabbage plants for signs of pests or diseases. Take action promptly to prevent problems from spreading.
Q: Can I grow cabbage in containers?
A: Yes, you can grow cabbage in containers, especially if you have limited garden space. Choose a large container (at least 12 inches in diameter) with drainage holes. Use a high-quality potting mix that is well-draining and rich in organic matter. Water regularly and fertilize every few weeks with a balanced fertilizer. Select smaller cabbage varieties that are well-suited for container growing.
Q: How do I know when my cabbage is ready to harvest?
A: Cabbage is ready to harvest when the head is firm and solid to the touch. The size of the head will vary depending on the variety. Check the seed packet or plant tag for specific information on the expected size and maturity time. To harvest, use a sharp knife to cut the head from the stem, leaving a few outer leaves intact.
Q: Can I save seeds from my cabbage plants?
A: Saving seeds from cabbage plants can be challenging, as cabbage is a biennial plant, meaning it takes two years to produce seeds. In the first year, the plant produces the head. In the second year, it flowers and produces seeds. To save seeds, you’ll need to overwinter the cabbage plant and allow it to flower in the spring. However, cabbage is also cross-pollinated, so if you’re growing multiple varieties, the seeds may not be true to type. For best results, purchase seeds from a reputable source each year.

Leave a Comment