

Grow Microgreens at Home – sounds intimidating, right? But trust me, it’s easier than you think, and way more rewarding than buying them at the store! Imagine having a constant supply of fresh, nutrient-packed greens right on your windowsill, ready to add a burst of flavor and color to your salads, sandwiches, and smoothies.
For centuries, cultures around the world have recognized the power of sprouts and young greens. From ancient Chinese medicine to modern-day health food trends, the value of these tiny powerhouses has been consistently celebrated. But why buy them when you can easily cultivate your own little indoor garden?
Let’s face it, we’re all looking for ways to eat healthier and save a little money. Growing microgreens at home ticks both boxes! Plus, in a world where we’re increasingly disconnected from our food sources, this is a fantastic way to reconnect with nature and experience the joy of nurturing something from seed to plate. This DIY guide will give you all the simple tricks and hacks you need to start growing your own microgreens at home, even if you have limited space or zero gardening experience. Get ready to unleash your inner urban farmer!
Grow Your Own Microgreens: A Beginner’s Guide
Hey there, fellow plant enthusiasts! Ever wanted to add a burst of fresh flavor and nutrients to your meals without even leaving your kitchen? Well, you’re in the right place! I’m going to walk you through the super easy and rewarding process of growing your own microgreens at home. Trust me, it’s simpler than you think, and the results are absolutely delicious.
What are Microgreens Anyway?
Before we dive in, let’s quickly cover what microgreens actually are. They’re basically baby versions of vegetables and herbs, harvested just a week or two after germination. Think of them as the “teenagers” of the plant world – they’ve got more flavor and nutrients packed into a tiny package compared to sprouts, but they’re not quite as mature as full-grown vegetables.
They’re incredibly versatile. You can sprinkle them on salads, sandwiches, soups, tacos – pretty much anything you want to give a little extra zing and a nutritional boost. Plus, they look gorgeous!
Why Grow Your Own Microgreens?
Okay, so why bother growing them yourself when you can buy them at the store? Here’s the deal:
* Freshness: Nothing beats the taste of freshly harvested microgreens. Store-bought ones can sometimes be a little wilted or past their prime.
* Cost-Effective: Once you have the initial supplies, growing your own microgreens is way cheaper than buying them regularly.
* Control: You know exactly what’s going into your microgreens – no pesticides or weird chemicals.
* Convenience: Having a constant supply of fresh greens right in your kitchen is incredibly convenient.
* It’s Fun! Seriously, watching those tiny plants sprout and grow is surprisingly satisfying.
Getting Started: What You’ll Need
Alright, let’s gather our supplies. Don’t worry, you probably already have some of these things lying around.
* Seeds: This is the most important part! Choose seeds specifically meant for microgreens. Some popular options include:
* Radish
* Broccoli
* Sunflower
* Pea shoots
* Mustard
* Arugula
* Kale
* Cress
Important Note: Make sure you’re using seeds that haven’t been treated with fungicides or other chemicals. Look for seeds labeled for sprouting or microgreens.
* Growing Trays: You’ll need two trays: one with drainage holes and one without. The one without holes will act as a reservoir for water. You can find these at most garden centers or online. I like using shallow trays, about 1-2 inches deep.
* Growing Medium: You have a few options here:
* Seed Starting Mix: This is a good all-around choice. It’s lightweight and provides good drainage.
* Coconut Coir: This is a sustainable option made from coconut husks. It holds moisture well.
* Hemp Mat: These are pre-cut mats made from hemp fibers. They’re easy to use and biodegradable.
* Spray Bottle: For misting your microgreens.
* Water: Filtered water is best.
* Weight (Optional): A small weight, like a book or a brick wrapped in plastic, to help the seeds germinate evenly.
* Light Source: A sunny windowsill or a grow light. Microgreens need light to thrive.
Step-by-Step Guide to Growing Microgreens
Okay, let’s get our hands dirty! Here’s the step-by-step process I use to grow my microgreens:
1. Prepare Your Trays
1. Soak the Growing Medium: If you’re using seed starting mix or coconut coir, moisten it thoroughly. You want it to be damp but not soggy. I usually put the growing medium in a bucket and add water until it’s evenly moist.
2. Fill the Tray with Drainage Holes: Fill the tray with drainage holes with your moistened growing medium. Spread it evenly and gently press it down. You want the surface to be relatively flat. Leave about half an inch of space at the top of the tray.
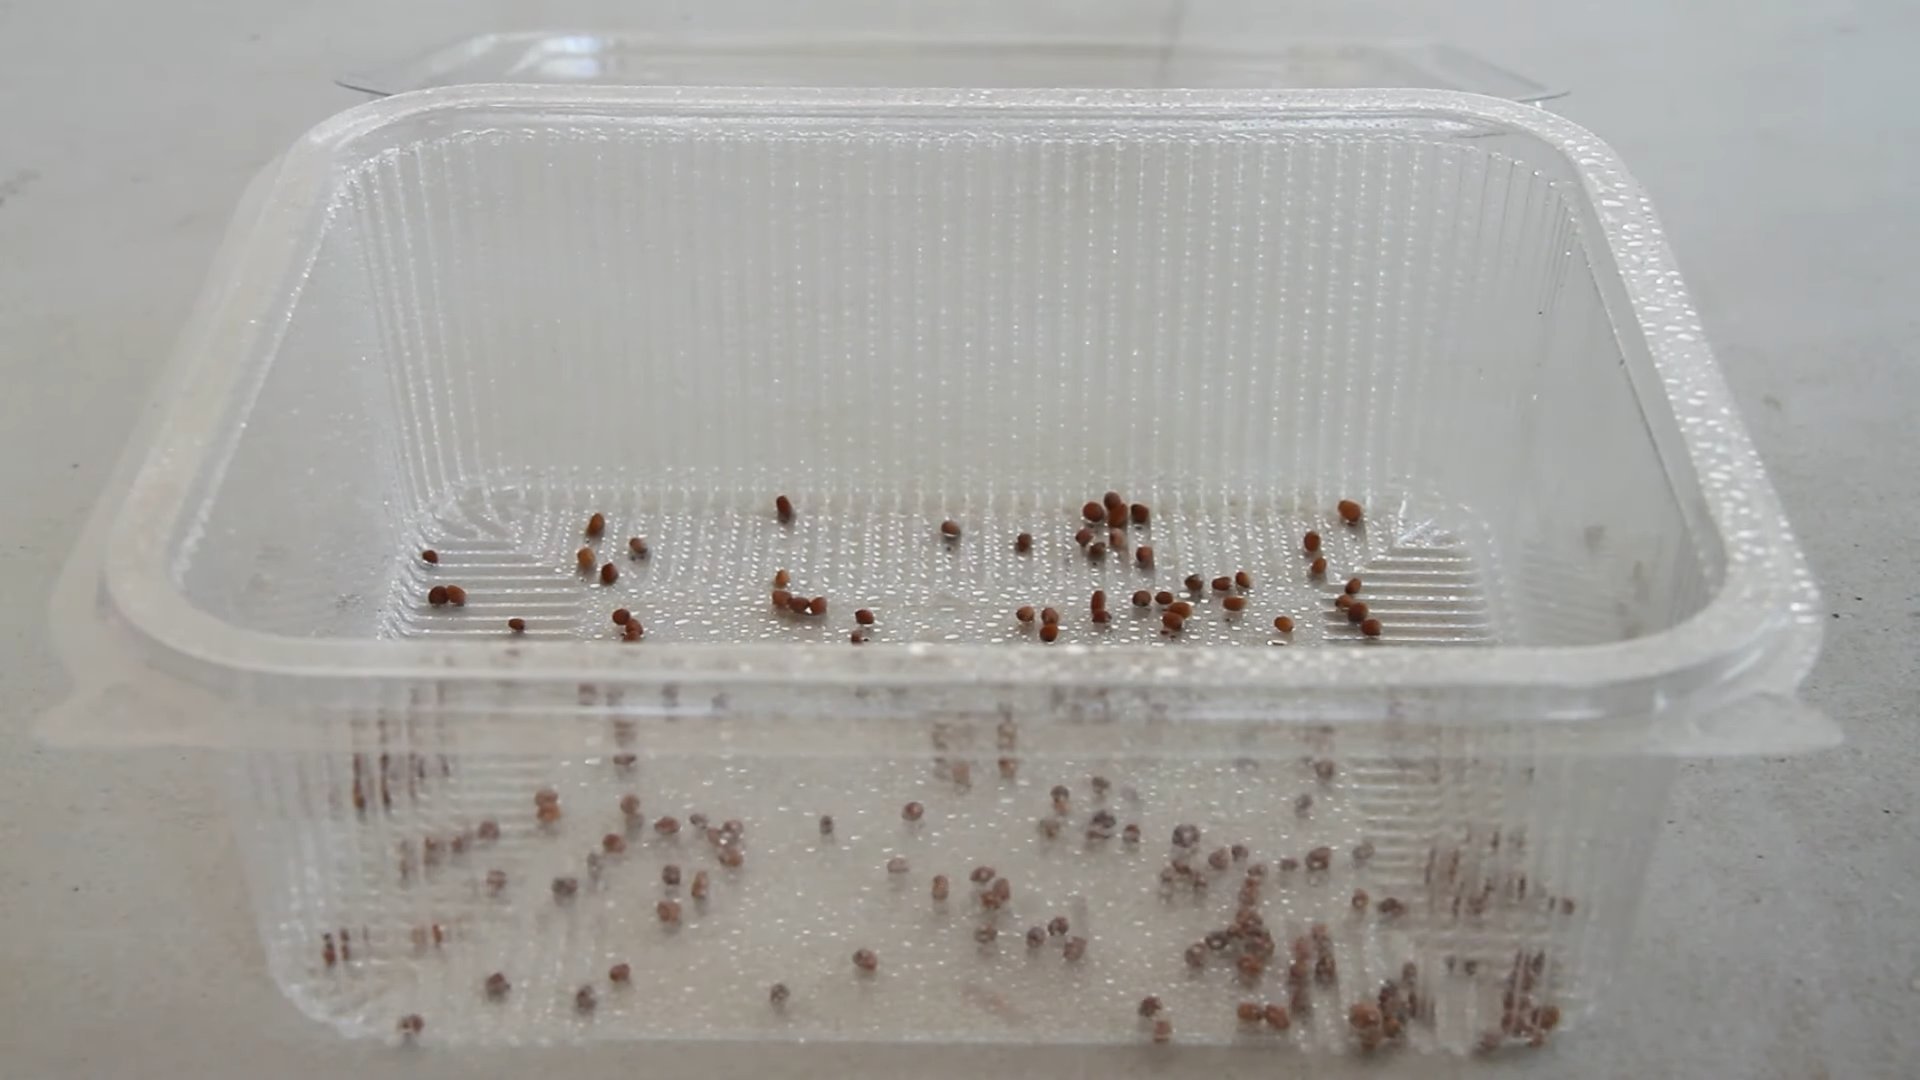
2. Sow the Seeds
1. Scatter the Seeds: Sprinkle the seeds evenly over the surface of the growing medium. Don’t overcrowd them! You want them to be close enough together to form a dense mat, but not so close that they’re competing for space and nutrients. A good rule of thumb is to aim for about 10-15 seeds per square inch.
2. Gently Press the Seeds: Gently press the seeds into the growing medium. You don’t need to bury them completely, just make sure they’re making good contact with the soil.
3. Mist with Water: Use your spray bottle to mist the seeds with water. You want to moisten them without dislodging them.
3. Germination Phase (The Dark Period)
1. Cover the Seeds: Cover the tray with the second tray (the one without drainage holes). This will create a dark, humid environment that’s ideal for germination.
2. Add Weight (Optional): Place a small weight on top of the covered tray. This will help the seeds germinate evenly and prevent them from drying out.
3. Keep it Dark: Place the tray in a dark, cool place. A closet or a cupboard works well.
4. Mist Daily: Check the seeds daily and mist them with water if the growing medium feels dry. You want to keep it consistently moist.
5. Wait for Germination: The germination time will vary depending on the type of seed you’re using. Radish and broccoli seeds usually germinate in 2-3 days, while sunflower and pea shoots may take 3-5 days.
4. The Light Phase
1. Remove the Cover and Weight: Once the seeds have germinated and you see tiny sprouts emerging, remove the cover and the weight.
2. Introduce Light: Place the tray in a sunny windowsill or under a grow light. If you’re using a windowsill, rotate the tray regularly to ensure that the microgreens get even light exposure. If you’re using a grow light, position it about 6-12 inches above the tray.
3. Water Regularly: Continue to water the microgreens regularly, but be careful not to overwater them. The growing medium should be moist but not soggy. I usually water them from the bottom by pouring water into the tray without drainage holes and letting the growing medium absorb it.
4. Monitor Growth: Watch your microgreens grow! They should start to green up and develop their first true leaves.
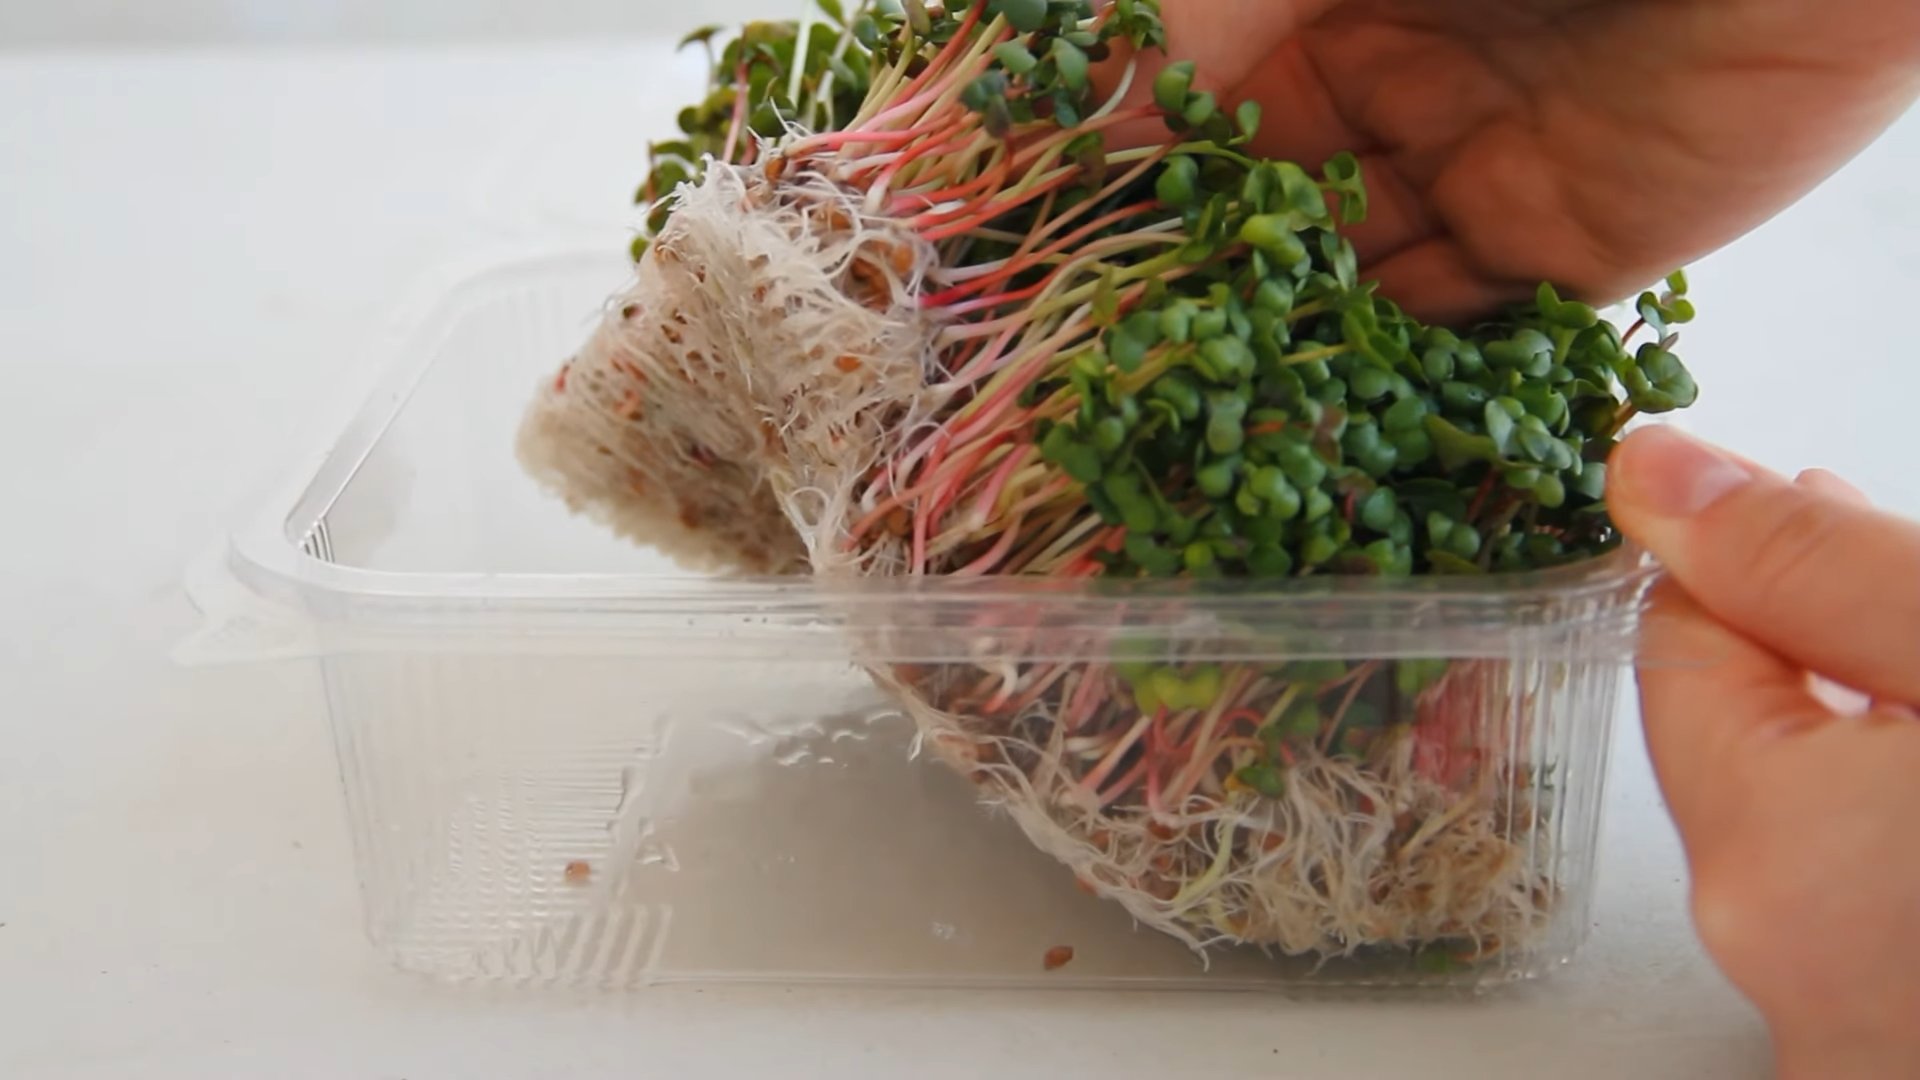
5. Harvesting Your Microgreens
1. Harvest Time: Your microgreens are ready to harvest when they have developed their first true leaves (the second set of leaves after the initial seed leaves). This usually takes about 7-14 days, depending on the type of seed.
2. Harvesting: Use a pair of scissors or a sharp knife to cut the microgreens just above the growing medium.
3. Rinse and Enjoy: Rinse the harvested microgreens with water and enjoy them immediately! You can also store them in the refrigerator for a few days. I usually wrap them in a paper towel and place them in a plastic bag.
Troubleshooting Tips
* Mold: If you see mold growing on your microgreens, it’s usually a sign of overwatering or poor air circulation. Try reducing the amount of water you’re using and make sure the tray is well-ventilated. You can also try spraying the affected area with a diluted solution of hydrogen peroxide.
* Leggy Microgreens: If your microgreens are tall and spindly, it means they’re not getting enough light. Move them to a sunnier location or use a grow light.
* Uneven Germination: Uneven germination can be caused by uneven watering or uneven seed distribution. Make sure you’re watering the seeds evenly and that you’re spreading them out evenly on the growing medium.
* Damping Off: Damping off is a fungal disease that can kill young seedlings. It’s usually caused by overwatering and poor air circulation. To prevent damping off, make sure you’re not overwatering your microgreens and that the tray is well-ventilated.
Choosing the Right Seeds
Not all seeds are created equal when it comes to growing microgreens. Here’s a breakdown of some popular choices and their unique characteristics:
* Radish: These are super fast-growing and have a spicy, peppery flavor. They’re a great choice for beginners.
* Broccoli: Broccoli microgreens have a mild, slightly sweet flavor and are packed with nutrients.
* Sunflower: Sunflower microgreens have a nutty flavor and a crunchy texture. They’re a bit more challenging to grow than radish
Conclusion
So, there you have it! Growing microgreens at home is not only incredibly easy and cost-effective, but it also provides you with a constant supply of fresh, nutrient-packed greens right at your fingertips. Forget those wilted, overpriced containers from the grocery store. With just a few simple supplies and a little bit of patience, you can cultivate a vibrant garden of flavor and health in your own kitchen.
This DIY trick is a must-try for anyone looking to boost their diet, add a touch of freshness to their meals, or simply connect with the natural world. The vibrant colors and intense flavors of homegrown microgreens will transform your salads, sandwiches, smoothies, and countless other dishes. Imagine sprinkling peppery radish microgreens on your avocado toast, adding a burst of sweetness with sunflower shoots to your stir-fry, or blending nutrient-rich broccoli microgreens into your morning smoothie. The possibilities are truly endless!
But the benefits extend beyond just taste and nutrition. Growing your own microgreens is also a sustainable and eco-friendly choice. You’ll be reducing your reliance on commercially grown produce, minimizing your carbon footprint, and avoiding the use of harmful pesticides and herbicides. Plus, it’s a wonderfully therapeutic and rewarding activity that can bring a sense of calm and accomplishment to your day.
Ready to take your microgreen game to the next level? Consider experimenting with different seed varieties to discover your favorite flavors and textures. Try mixing and matching different types of microgreens in your growing trays to create unique and flavorful blends. You can also explore different growing mediums, such as coconut coir or hemp mats, to see which works best for you.
And don’t be afraid to get creative with your presentation! Use your homegrown microgreens to garnish your dishes, add a pop of color to your table settings, or even give them as thoughtful and healthy gifts to friends and family.
We are confident that once you experience the joy and satisfaction of growing your own microgreens at home, you’ll be hooked. So, gather your supplies, plant your seeds, and get ready to enjoy a bountiful harvest of fresh, delicious, and nutritious microgreens.
We encourage you to try this DIY trick and share your experience with us! Let us know what varieties you’ve grown, what challenges you’ve faced, and what delicious creations you’ve made with your homegrown microgreens. Share your photos and stories on social media using [Your Hashtag Here] – we can’t wait to see what you create! Happy growing!
Frequently Asked Questions (FAQs)
What exactly are microgreens?
Microgreens are young vegetable greens that are typically harvested 7-14 days after germination, when the first true leaves have emerged. They are larger than sprouts but smaller than baby greens, and they are packed with flavor and nutrients. They are essentially baby versions of mature vegetables and herbs.
What are the benefits of growing microgreens at home?
There are numerous benefits to growing microgreens at home, including:
* **Freshness:** You can harvest them right before you need them, ensuring maximum freshness and flavor.
* **Nutritional Value:** Microgreens are often more nutrient-dense than their mature counterparts.
* **Cost-Effectiveness:** Growing your own microgreens is significantly cheaper than buying them from the store.
* **Convenience:** You’ll always have a supply of fresh greens on hand.
* **Sustainability:** You’ll be reducing your reliance on commercially grown produce and minimizing your environmental impact.
* **Therapeutic:** Gardening can be a relaxing and rewarding activity.
What kind of seeds can I use to grow microgreens?
Many different types of seeds can be used to grow microgreens, including:
* **Vegetables:** Broccoli, radish, kale, arugula, peas, spinach, beets, carrots
* **Herbs:** Basil, cilantro, dill, parsley
* **Grains:** Wheatgrass, barley
* **Other:** Sunflower, buckwheat
It’s important to use seeds that are specifically intended for sprouting or microgreen production, as these are typically untreated and free from harmful chemicals. Avoid using seeds that have been treated with fungicides or other chemicals.
What kind of growing medium should I use?
Several different growing mediums can be used for microgreens, including:
* **Potting soil:** A good quality potting soil is a popular and readily available option.
* **Coconut coir:** Coconut coir is a sustainable and eco-friendly alternative to peat moss.
* **Hemp mats:** Hemp mats are a natural and biodegradable option that provides excellent drainage.
* **Paper towels:** Paper towels can be used for growing microgreens, but they may not provide as much support as other mediums.
How much light do microgreens need?
Microgreens need plenty of light to grow properly. Ideally, they should receive at least 6-8 hours of direct sunlight per day. If you don’t have enough natural light, you can use grow lights to supplement. Position the grow lights a few inches above the microgreens and keep them on for 12-16 hours per day.
How often should I water my microgreens?
Microgreens need to be kept consistently moist, but not soggy. Water them gently once or twice a day, or as needed, using a spray bottle or watering can with a fine rose. Avoid overwatering, as this can lead to mold and fungal growth.
How long does it take for microgreens to grow?
The time it takes for microgreens to grow varies depending on the variety, but most microgreens are ready to harvest in 7-14 days.
How do I harvest microgreens?
To harvest microgreens, simply snip them off at the base of the stem using scissors or a sharp knife. Harvest them when they are about 1-3 inches tall and have developed their first true leaves.
How do I store microgreens?
Microgreens are best consumed fresh, but they can be stored in the refrigerator for up to a week. To store them, gently rinse them with water and pat them dry with a paper towel. Place them in a sealed container or plastic bag and store them in the crisper drawer of your refrigerator.
What are some common problems when growing microgreens and how can I fix them?
Some common problems when growing microgreens include:
* **Mold:** Mold can be caused by overwatering or poor ventilation. To prevent mold, avoid overwatering, ensure good air circulation, and use a clean growing medium.
* **Damping off:** Damping off is a fungal disease that can kill seedlings. To prevent damping off, use a sterile growing medium, avoid overwatering, and ensure good air circulation.
* **Leggy growth:** Leggy growth is caused by insufficient light. To prevent leggy growth, provide your microgreens with plenty of light.
* **Slow growth:** Slow growth can be caused by a variety of factors, including insufficient light, poor soil quality, or lack of nutrients. To promote faster growth, provide your microgreens with plenty of light, use a good quality growing medium, and consider adding a diluted fertilizer solution.
Can I reuse the growing medium?
It’s generally not recommended to reuse the growing medium for microgreens, as it can harbor bacteria and fungi that can harm your plants. It’s best to start with fresh growing medium each time.
Is growing microgreens at home organic?
Yes, growing microgreens at home can be organic if you use organic seeds and growing mediums, and avoid using any synthetic fertilizers or pesticides. This allows you to have complete control over what goes into your food.

Leave a Comment