

Grow Basil Indoors? Absolutely! Imagine having fresh, fragrant basil right at your fingertips, no matter the season. Forget those sad, wilted bunches from the grocery store. I’m going to show you how to cultivate your own thriving basil plants right inside your home.
Basil, with its vibrant green leaves and intoxicating aroma, has been cherished for centuries. Originating in Southeast Asia, it holds a special place in many cultures, symbolizing love, good luck, and even protection. From ancient medicinal practices to culinary masterpieces, basil has consistently proven its worth. But let’s be honest, sometimes getting your basil to thrive can feel like a battle against the elements, especially if you don’t have a sprawling garden.
That’s where these DIY tricks come in! I’ve compiled a collection of simple, effective methods to help you grow basil indoors successfully. Whether you’re a seasoned gardener or a complete beginner, these tips will empower you to enjoy a constant supply of fresh basil for your pesto, pizzas, and everything in between. Say goodbye to expensive store-bought herbs and hello to the satisfaction of nurturing your own little indoor basil garden. Let’s get started!
Growing Basil Indoors: A DIY Guide to Fresh Herbs Year-Round
Hey there, fellow herb enthusiasts! Ever dreamt of having fresh, fragrant basil readily available, even when the snow is piling up outside? Well, dream no more! Growing basil indoors is totally achievable, and I’m here to walk you through every step of the process. Get ready to enjoy pesto, Caprese salads, and all sorts of delicious dishes with your very own homegrown basil.
What You’ll Need: The Basil Starter Kit
Before we dive in, let’s gather our supplies. Having everything on hand will make the whole process smoother and more enjoyable.
* **Basil Seeds:** Opt for a variety you love! Genovese is a classic for pesto, but lemon basil, Thai basil, or purple basil can add exciting flavors to your cooking.
* **Seed Starting Tray or Small Pots:** These will be your basil’s first home. Make sure they have drainage holes!
* **Seed Starting Mix:** This is a light, airy soil specifically designed for seedlings. Regular potting soil can be too heavy.
* **Potting Soil:** Once your seedlings are ready to move to bigger pots, you’ll need a good quality potting soil.
* **Grow Lights (Optional, but Recommended):** Especially during the winter months, grow lights will provide the necessary light for healthy growth.
* **Plant Pots (4-6 inches in diameter):** These will be the final home for your basil plants.
* **Watering Can or Spray Bottle:** For gentle watering.
* **Small Shovel or Spoon:** For transplanting.
* **Scissors or Pruning Shears:** For harvesting and pruning.
* **A Warm, Sunny Spot (or a place for your grow lights):** Basil loves warmth and light!
Phase 1: Starting Your Basil Seeds
This is where the magic begins! We’re going to coax those tiny seeds into becoming vibrant basil plants.
1. **Prepare Your Seed Starting Tray or Pots:** Fill your seed starting tray or small pots with seed starting mix. Gently pat it down, but don’t compact it too much. You want the roots to be able to easily grow.
2. **Sow the Seeds:** Sprinkle a few basil seeds on top of the soil in each cell or pot. Basil seeds are tiny, so don’t overdo it. A few seeds per cell is plenty.
3. **Cover the Seeds Lightly:** Sprinkle a very thin layer of seed starting mix over the seeds. They need a little bit of darkness to germinate, but not too much.
4. **Water Gently:** Use a spray bottle or watering can with a gentle nozzle to moisten the soil. You want the soil to be damp, but not soaking wet.
5. **Provide Warmth and Light:** Place your seed starting tray or pots in a warm location. A heat mat can be helpful, but a sunny windowsill will also work. If you’re using grow lights, position them a few inches above the soil surface.
6. **Keep the Soil Moist:** Check the soil daily and water as needed to keep it consistently moist. Don’t let it dry out!
7. **Wait for Germination:** Basil seeds typically germinate in 5-10 days. Be patient! Once you see those little green sprouts, you’ll know your efforts are paying off.
Phase 2: Nurturing Your Seedlings
Now that your basil seeds have sprouted, it’s time to give them the care they need to grow into strong, healthy plants.
1. **Provide Adequate Light:** Once the seedlings emerge, they need plenty of light. If you’re using a windowsill, rotate the tray or pots regularly to ensure even growth. Grow lights are ideal for consistent light exposure.
2. **Thin the Seedlings (If Necessary):** If multiple seedlings have sprouted in the same cell or pot, you’ll need to thin them out. Choose the strongest seedling and gently snip off the others at the soil line. This will give the remaining seedling room to grow.
3. **Water Regularly:** Continue to water the seedlings regularly, keeping the soil moist but not waterlogged.
4. **Fertilize Lightly:** Once the seedlings have developed their first set of true leaves (the leaves that look like basil leaves, not the initial seed leaves), you can start fertilizing them with a diluted liquid fertilizer. Follow the instructions on the fertilizer package. I usually use a half-strength solution.
5. **Harden Off the Seedlings (If Moving Outdoors):** If you plan to move your basil plants outdoors eventually, you’ll need to harden them off. This means gradually exposing them to outdoor conditions over a period of a week or two. Start by placing them outside for an hour or two each day, gradually increasing the amount of time they spend outdoors. This will help them acclimate to the sun, wind, and temperature changes.
Phase 3: Transplanting and Growing to Maturity
It’s time to give your basil plants their permanent home!
1. **Choose the Right Pot:** Select a pot that is at least 4-6 inches in diameter. Make sure it has drainage holes to prevent waterlogging.
2. **Fill the Pot with Potting Soil:** Fill the pot with a good quality potting soil. Leave about an inch of space at the top of the pot.
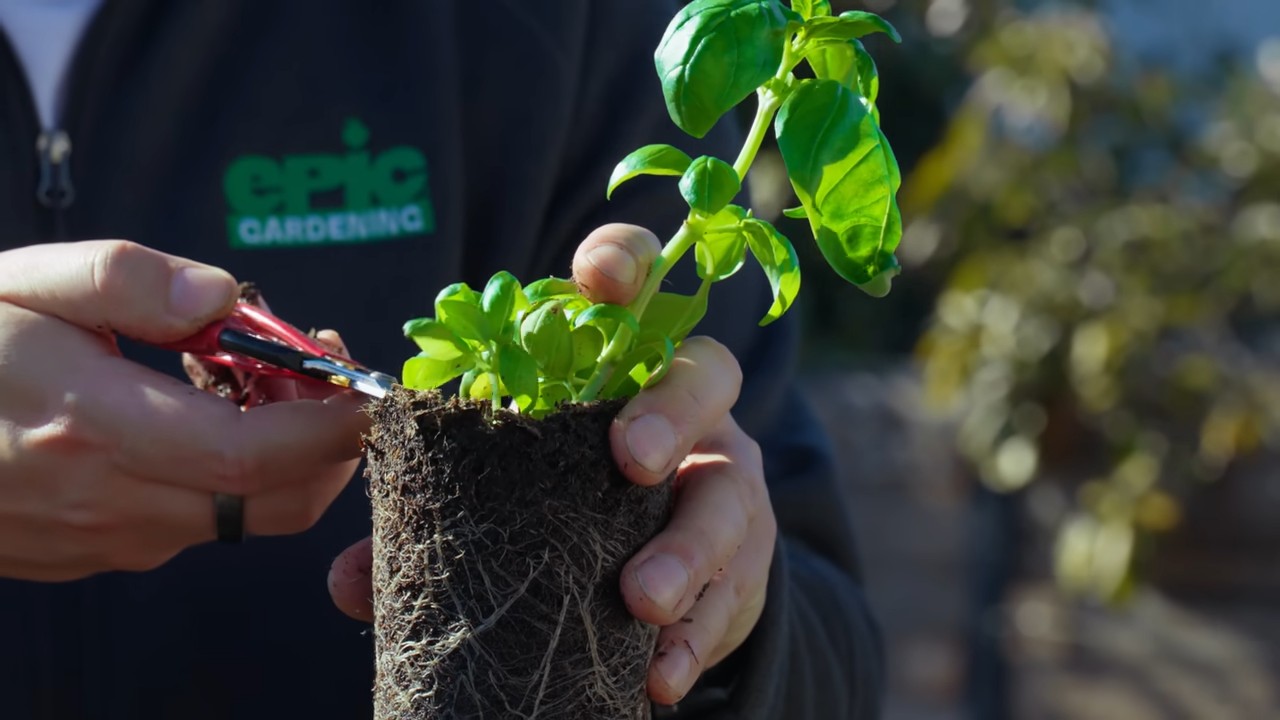
3. **Gently Remove the Seedling:** Carefully remove the seedling from its seed starting tray or pot. Be gentle to avoid damaging the roots. If the seedling is root-bound (the roots are tightly circling the bottom of the pot), gently loosen them before planting.
4. **Plant the Seedling:** Dig a small hole in the potting soil and place the seedling in the hole. Make sure the top of the root ball is level with the soil surface.
5. **Fill in with Soil:** Fill in the hole with potting soil and gently pat it down.
6. **Water Thoroughly:** Water the newly transplanted basil plant thoroughly.
7. **Provide Warmth and Light:** Place the pot in a warm, sunny location or under grow lights.
8. **Water Regularly:** Water the basil plant regularly, keeping the soil moist but not waterlogged.
9. **Fertilize Regularly:** Fertilize the basil plant every two weeks with a diluted liquid fertilizer.
10. **Pinch Off Flower Buds:** Basil plants will eventually produce flower buds. Pinching off these buds will encourage the plant to produce more leaves and keep it from going to seed.
Phase 4: Harvesting and Enjoying Your Basil
The best part! Time to reap the rewards of your hard work.
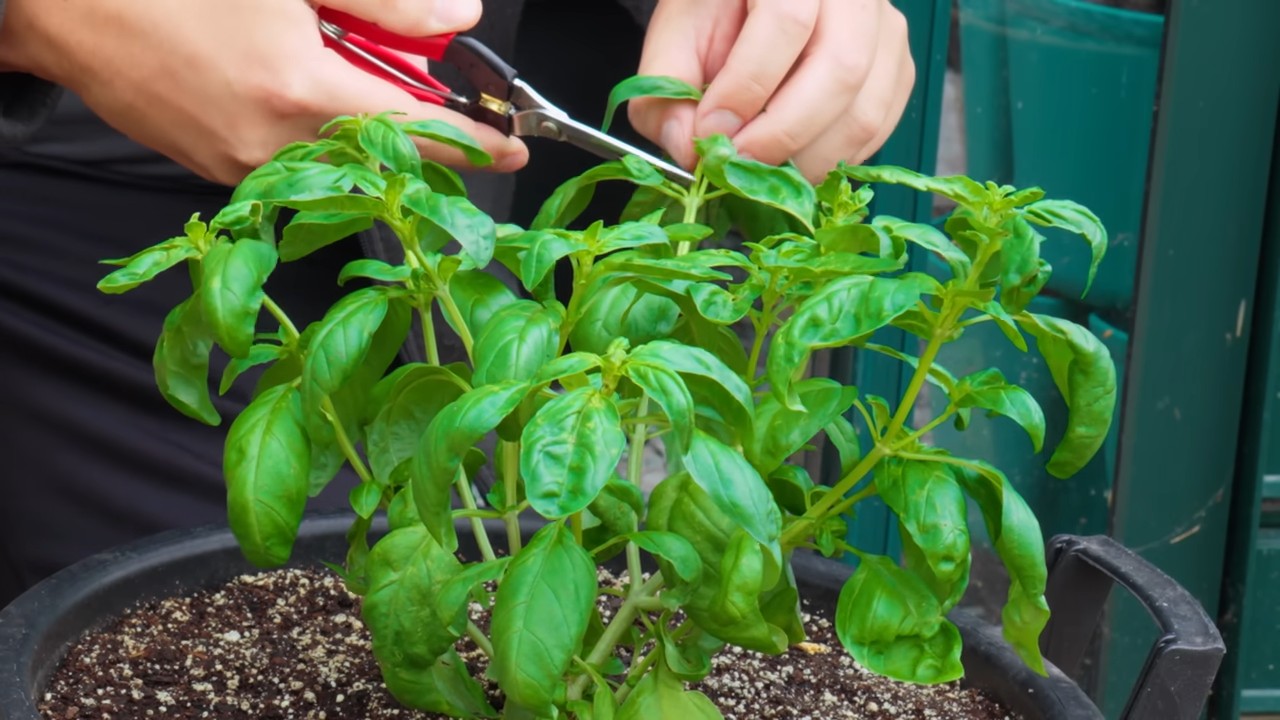
1. **Harvest Regularly:** Start harvesting your basil leaves when the plant is about 6-8 inches tall.
2. **Pinch or Cut the Leaves:** Pinch or cut the leaves off the plant just above a leaf node (the point where leaves grow out of the stem). This will encourage the plant to branch out and produce more leaves.
3. **Harvest from the Top Down:** Harvest the leaves from the top of the plant down. This will help to keep the plant compact and bushy.
4. **Use Fresh or Preserve:** Use your fresh basil leaves in your favorite recipes. You can also preserve them by drying, freezing, or making pesto.
Troubleshooting: Common Basil Problems and Solutions
Even with the best care, you might encounter a few challenges along the way. Here are some common basil problems and how to fix them:
* **Yellowing Leaves:** This can be caused by overwatering, underwatering, or nutrient deficiencies. Check the soil moisture and adjust your watering accordingly. Fertilize regularly with a balanced fertilizer.
* **Leggy Growth:** This is usually caused by insufficient light. Provide more light, either by moving the plant to a sunnier location or using grow lights.
* **Pests:** Aphids, spider mites, and whiteflies can sometimes infest basil plants. Inspect your plants regularly and treat any infestations promptly with insecticidal soap or neem oil.
* **Fungal Diseases:** Basil is susceptible to fungal diseases like powdery mildew and downy mildew. Provide good air circulation and avoid overwatering. Treat any infections with a fungicide.
Tips for Success: Extra Basil Growing Wisdom
Here are a few extra tips to help you grow the best basil possible:
* **Choose the Right Variety:** Different basil varieties have different flavors and growth habits. Choose a variety that you enjoy and that is well-suited to indoor growing.
* **Use a Well-Draining Potting Mix:** Basil plants need well-draining soil to prevent root rot.
* **Provide Adequate Light:** Basil plants need at least 6 hours of sunlight per day. If you don’t have a sunny window, use grow lights.
* **Water Regularly:** Basil plants need to be watered regularly, but don’t overwater them. Allow the soil to dry out slightly between waterings.
* **Fertilize Regularly:** Basil plants need to be fertilized regularly to provide them with the nutrients they need to grow.
* **Pinch Off Flower Buds:** Pinching off flower buds will encourage the plant to produce more leaves.
* **Harvest Regularly:** Harvesting regularly will encourage the plant to branch out and produce more leaves.
*
Conclusion
So, there you have it! Mastering the art of growing basil indoors is not only achievable but also incredibly rewarding. Forget those sad, wilted bunches from the grocery store. Imagine stepping into your kitchen and snipping fresh, fragrant basil leaves whenever you need them. The vibrant aroma alone is enough to elevate any culinary creation.
This DIY trick isn’t just about convenience; it’s about quality. Homegrown basil bursts with flavor that store-bought basil simply can’t match. You control the growing environment, ensuring your plants receive the perfect amount of light, water, and nutrients. Plus, you avoid the pesticides and herbicides often used in commercial farming.
But the benefits extend beyond the kitchen. Nurturing a basil plant is a therapeutic experience. The simple act of tending to a living thing can be incredibly calming and grounding. Watching your basil thrive, knowing you played a part in its growth, is deeply satisfying.
Ready to take your indoor basil game to the next level? Consider experimenting with different varieties. Genovese basil is a classic choice for pesto, but lemon basil adds a bright, citrusy note to salads and teas. Thai basil, with its anise-like flavor, is perfect for Asian-inspired dishes. Purple basil not only tastes delicious but also adds a pop of color to your indoor garden.
Another variation to explore is hydroponics. While soil-based growing is perfectly effective, hydroponic systems can offer even faster growth and higher yields. These systems use nutrient-rich water solutions instead of soil, providing the roots with direct access to everything they need.
Don’t be afraid to get creative with your setup. Repurpose old jars or containers into charming planters. Add decorative stones or pebbles to the soil surface for a touch of elegance. Hang your basil plants in macrame hangers to create a vertical garden. The possibilities are endless!
The key to success is consistency. Check your plants regularly, water them when the soil feels dry to the touch, and provide them with plenty of light. Don’t be discouraged if you encounter a few challenges along the way. Gardening is a learning process, and every mistake is an opportunity to improve.
We are confident that with a little patience and care, you’ll be enjoying fresh, homegrown basil in no time. This DIY trick is a game-changer for any home cook or gardening enthusiast.
So, what are you waiting for? Grab a pot, some soil, and a basil seedling, and get started today! We can’t wait to hear about your experiences. Share your photos and tips in the comments below. Let’s create a community of indoor basil growers and inspire each other to cultivate our own little green havens. Happy growing!
Frequently Asked Questions (FAQ)
What kind of soil is best for growing basil indoors?
A well-draining potting mix is ideal for growing basil indoors. Avoid using garden soil, as it can be too heavy and compact, leading to root rot. Look for a potting mix that contains ingredients like peat moss, perlite, and vermiculite. These materials help to improve drainage and aeration, creating a healthy environment for your basil plant’s roots. You can also amend your potting mix with compost for added nutrients.
How much sunlight does indoor basil need?
Basil thrives in bright, direct sunlight. Aim for at least 6-8 hours of sunlight per day. If you don’t have a sunny windowsill, you can supplement with a grow light. Place the grow light about 6-12 inches above the plant and keep it on for 12-14 hours per day. Rotate your basil plant regularly to ensure that all sides receive adequate light. This will prevent the plant from becoming leggy and leaning towards the light source.
How often should I water my indoor basil plant?
Water your basil plant when the top inch of soil feels dry to the touch. Avoid overwatering, as this can lead to root rot. When you water, water thoroughly until water drains out of the bottom of the pot. Be sure to empty the saucer underneath the pot to prevent the plant from sitting in water. During the warmer months, you may need to water more frequently. In the winter, when the plant is not actively growing, you can reduce watering.
How do I harvest basil leaves without harming the plant?
The best way to harvest basil leaves is to pinch them off just above a leaf node (the point where leaves grow from the stem). This will encourage the plant to branch out and produce more leaves. Avoid removing more than one-third of the plant’s leaves at a time, as this can stress the plant. You can also prune the plant to maintain its shape and prevent it from flowering. Flowering will cause the leaves to become bitter.
Why are my basil leaves turning yellow?
Yellowing basil leaves can be caused by several factors, including overwatering, underwatering, nutrient deficiencies, and pests. Check the soil moisture to ensure that you are not overwatering or underwatering. If the soil is consistently wet, allow it to dry out completely before watering again. If the soil is dry, water thoroughly. You can also fertilize your basil plant with a balanced liquid fertilizer to address any nutrient deficiencies. Inspect the plant for pests, such as aphids or spider mites, and treat accordingly.
Can I grow basil from seed indoors?
Yes, you can easily grow basil from seed indoors. Start by sowing the seeds in a seed-starting tray or small pots filled with seed-starting mix. Keep the soil moist and warm (around 70-75°F). The seeds should germinate within 5-10 days. Once the seedlings have developed a few sets of true leaves, you can transplant them into larger pots.
What are some common pests that affect indoor basil plants?
Common pests that can affect indoor basil plants include aphids, spider mites, and whiteflies. These pests can suck the sap from the leaves, causing them to become yellow, spotted, or distorted. Inspect your plants regularly for signs of pests. If you find any, you can treat them with insecticidal soap or neem oil. You can also try washing the pests off with a strong stream of water.
How do I prevent my basil plant from flowering?
Flowering will cause basil leaves to become bitter. To prevent your basil plant from flowering, pinch off any flower buds as soon as you see them. You can also prune the plant regularly to encourage vegetative growth. Providing your basil plant with plenty of light and nutrients will also help to prevent flowering.
Can I propagate basil from cuttings?
Yes, basil is very easy to propagate from cuttings. Simply take a 4-6 inch cutting from a healthy basil plant, remove the lower leaves, and place the cutting in a glass of water. Change the water every few days. Within a week or two, the cutting should develop roots. Once the roots are about an inch long, you can transplant the cutting into a pot filled with potting mix.
Is growing basil indoors year-round possible?
Absolutely! With the right conditions – sufficient light (natural or artificial), proper watering, and occasional fertilization – you can enjoy fresh basil year-round. Indoor growing allows you to bypass seasonal limitations and have a constant supply of this flavorful herb at your fingertips. Just remember to monitor your plant’s health and adjust your care routine as needed to ensure its continued growth and productivity.

Leave a Comment