

Celery gardening small spaces can feel like a pipe dream, right? I get it! You’re picturing lush, vibrant celery stalks, but your reality is a cozy balcony or a petite patio. But don’t let limited square footage squash your gardening ambitions! This article is your ultimate guide to unlocking the secrets of growing crisp, delicious celery, even if you’re short on space.
Celery, with its refreshing crunch and subtle flavor, has been enjoyed for centuries. Originating in the Mediterranean, it was initially valued for its medicinal properties before becoming a culinary staple. Now, imagine harvesting your own celery, bursting with freshness, right outside your door!
In today’s world, where access to fresh, healthy produce can be a challenge, and where we are all looking for ways to save money, mastering celery gardening small spaces is more relevant than ever. Plus, there’s something incredibly satisfying about nurturing a plant from seed to table. This DIY guide will provide you with simple, effective tricks and hacks to maximize your yield, choose the right varieties, and troubleshoot common problems. Get ready to transform your small space into a thriving celery haven!
Growing Celery in Small Spaces: A DIY Guide
Hey there, fellow gardening enthusiasts! Dreaming of fresh, crunchy celery but short on space? Don’t worry, I’ve got you covered! Growing celery in small spaces is totally achievable with a little know-how and some clever techniques. I’m going to walk you through everything you need to know, from choosing the right container to harvesting your own homegrown celery. Let’s get started!
Choosing the Right Container and Soil
First things first, let’s talk about where your celery will call home.
* Container Size: Celery needs room to spread its roots, so opt for a container that’s at least 12 inches deep and 12 inches wide. A larger container is always better, as it will hold more moisture and nutrients. I’ve had success with large pots, raised beds, and even repurposed storage bins.
* Drainage: Excellent drainage is crucial! Celery loves moisture, but soggy roots are a no-no. Make sure your container has plenty of drainage holes. If not, you can easily drill some.
* Soil: Celery is a heavy feeder, meaning it needs nutrient-rich soil. I recommend using a high-quality potting mix amended with compost. Compost provides essential nutrients and improves drainage. You can also add some slow-release fertilizer to give your celery an extra boost.
Starting Celery from Seed (or a Store-Bought Stalk!)
You have two main options for starting your celery: from seed or from a store-bought stalk. Starting from seed takes longer, but it gives you more control over the variety. Growing from a stalk is quicker and easier, but you’re limited to whatever variety you can find at the grocery store.
Starting from Seed:
* Timing: Celery seeds need a long growing season, so start them indoors 10-12 weeks before the last expected frost.
* Sowing: Celery seeds are tiny and need light to germinate. Sprinkle them on the surface of a seed-starting mix and gently press them down. Don’t cover them with soil.
* Moisture: Keep the soil consistently moist by misting it regularly. You can also cover the seed tray with a plastic dome or plastic wrap to create a humid environment.
* Light: Place the seed tray under grow lights or in a sunny window. Celery seeds need at least 12 hours of light per day to germinate.
* Germination: Germination can take 2-3 weeks, so be patient!
* Transplanting: Once the seedlings have a few sets of true leaves, you can transplant them into individual pots. Harden them off gradually by exposing them to outdoor conditions for a few hours each day before transplanting them into their final container.
Regrowing from a Store-Bought Stalk:
This is my favorite method because it’s so easy and satisfying!
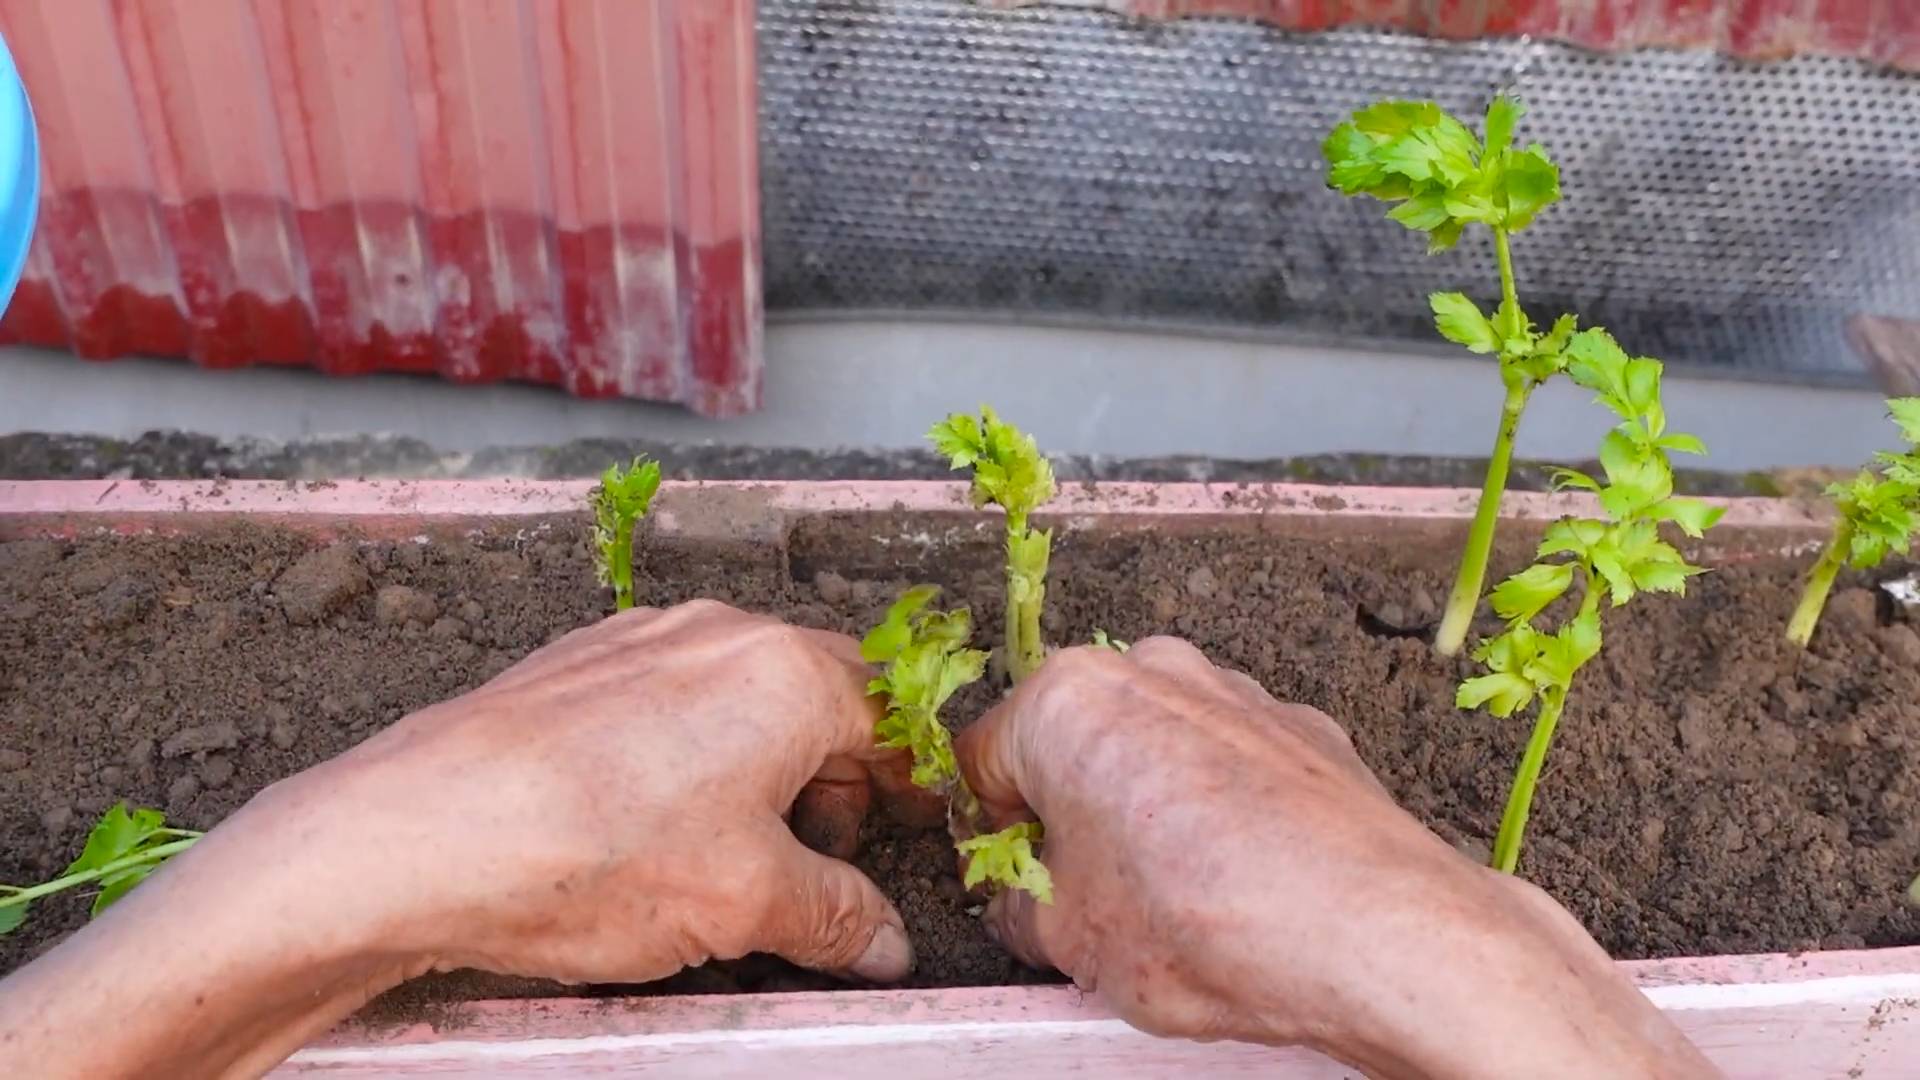
1. Cut the Base: After using the celery stalks, cut off the base of the celery stalk (about 2 inches from the bottom).
2. Place in Water: Place the base in a shallow dish of water, with the cut side facing up.
3. Sunlight: Put the dish in a sunny windowsill.
4. Change Water: Change the water every day or two to prevent mold growth.
5. Roots and Leaves: After a few days, you should start to see roots growing from the bottom and new leaves sprouting from the top.
6. Transplant: Once the roots are a few inches long, you can transplant the celery base into your prepared container.
Planting Your Celery
Now that you have your celery seedlings or regrown stalk, it’s time to plant them in their final container.
1. Prepare the Container: Fill your container with the prepared potting mix, leaving a few inches of space at the top.
2. Dig a Hole: Dig a hole in the soil that’s large enough to accommodate the root ball of your celery seedling or the base of your regrown stalk.
3. Plant the Celery: Gently remove the celery seedling from its pot or carefully place the regrown stalk into the hole. Make sure the top of the root ball is level with the soil surface.
4. Backfill: Fill in the hole with soil and gently firm it around the base of the plant.
5. Water Thoroughly: Water the celery thoroughly after planting.
Caring for Your Celery
Celery needs consistent care to thrive. Here’s what you need to do:
* Watering: Celery needs consistently moist soil. Water deeply whenever the top inch of soil feels dry to the touch. Avoid letting the soil dry out completely, as this can cause the stalks to become bitter.
* Fertilizing: Celery is a heavy feeder, so fertilize it regularly with a balanced liquid fertilizer. I like to fertilize every two weeks during the growing season.
* Sunlight: Celery needs at least 6 hours of sunlight per day. If you’re growing it indoors, make sure it’s in a sunny window or under grow lights.
* Blanching (Optional): Blanching celery stalks makes them more tender and less bitter. About two weeks before harvest, you can blanch the stalks by wrapping them with newspaper or cardboard. Leave the tops of the leaves exposed to sunlight.
* Pest Control: Celery can be susceptible to pests like aphids and celery leaf miners. Inspect your plants regularly and take action if you see any signs of infestation. You can use insecticidal soap or neem oil to control pests.
* Weed Control: Keep the area around your celery plants free of weeds. Weeds compete with celery for water and nutrients.
Harvesting Your Celery
You can start harvesting celery stalks when they are about 6-8 inches tall.
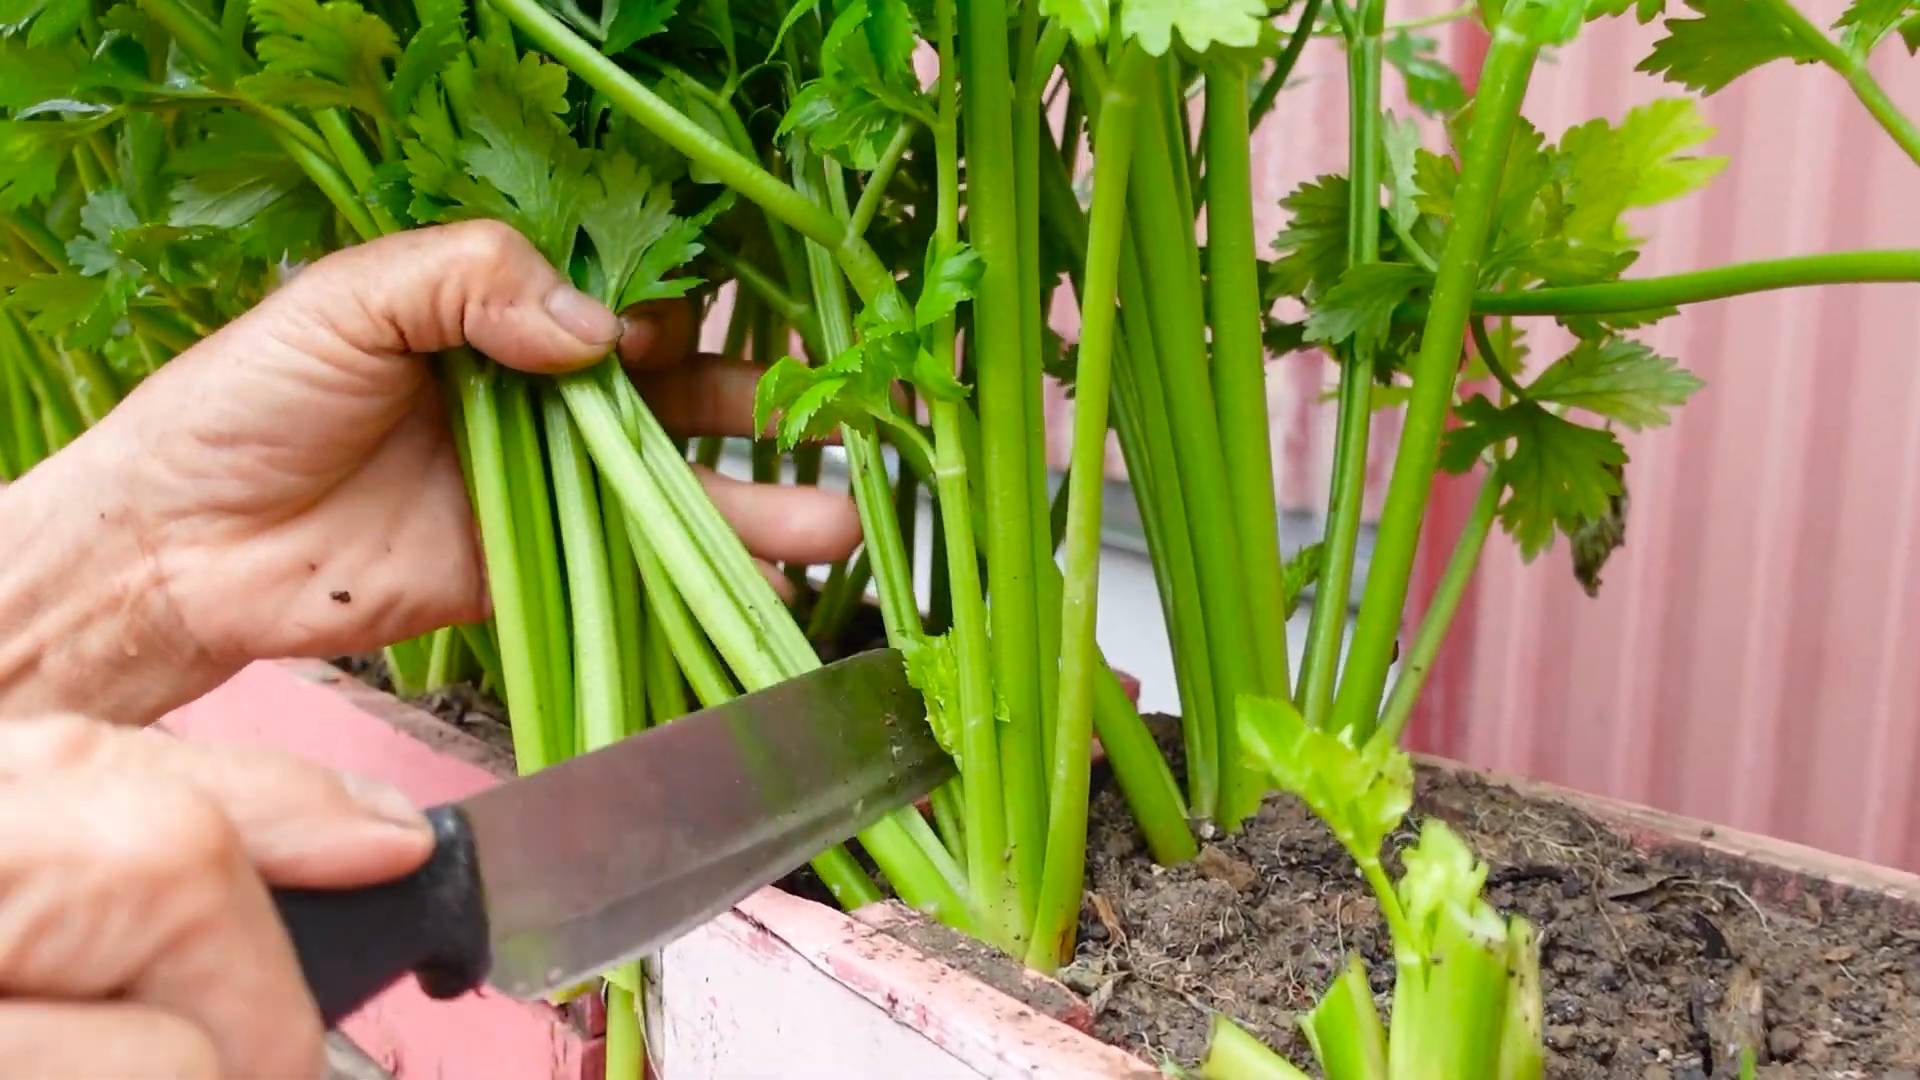
1. Harvesting Individual Stalks: To harvest individual stalks, simply cut them off at the base of the plant with a sharp knife.
2. Harvesting the Whole Plant: To harvest the entire plant, cut it off at the base.
3. Storage: Store harvested celery in the refrigerator. It will last for several weeks if stored properly.
Troubleshooting
Even with the best care, you might encounter some problems while growing celery. Here are some common issues and how to fix them:
* Bitter Stalks: Bitter stalks can be caused by inconsistent watering, lack of nutrients, or hot weather. Make sure you’re watering your celery regularly and fertilizing it properly. You can also try blanching the stalks to reduce bitterness.
* Yellowing Leaves: Yellowing leaves can be a sign of nutrient deficiency or overwatering. Check the soil moisture and adjust your watering accordingly. You can also fertilize your celery with a balanced fertilizer.
* Pest Infestation: Inspect your plants regularly for pests and take action if you see any signs of infestation. Insecticidal soap and neem oil are effective treatments for many common celery pests.
* Bolting: Bolting is when a plant prematurely flowers and goes to seed. This can be caused by hot weather or stress. To prevent bolting, make sure you’re providing your celery with consistent care and protecting it from extreme temperatures.
Tips for Growing Celery in Small Spaces
Here are some additional tips to help you succeed in growing celery in small spaces:
* Choose the Right Variety: Some celery varieties are more compact than others. Look for varieties that are specifically bred for small spaces or container gardening.
* Vertical Gardening: Consider using vertical gardening techniques to maximize your space. You can grow celery in hanging baskets or on a trellis.
* Succession Planting: Plant celery seeds or stalks every few weeks to ensure a continuous harvest.
* Companion Planting: Plant celery with companion plants like onions, garlic, and tomatoes. These plants can help to deter pests and improve the flavor of your celery.
Celery Varieties for Small Spaces
While most celery can be grown in containers, some varieties are better suited for smaller spaces than others. Here are a few I recommend:
* ‘Golden Self-Blanching’: This heirloom variety is known for its tender, mild-flavored stalks that naturally blanch themselves. It’s relatively compact and does well in containers.
* ‘Utah Tall Green’: A classic celery variety with crisp, flavorful stalks. While it can get fairly tall, it’s still manageable in a large container.
* ‘Ventura’: This variety is known for its disease resistance and tolerance to heat. It’s a good choice for warmer climates.
* ‘Chinese Celery’ (also known as ‘Leaf Celery’): This type is grown for its flavorful leaves rather than its stalks. It’s more compact than traditional celery and can be harvested continuously.
Enjoying Your Homegrown Celery
Now that you’ve successfully grown your own celery, it’s time to enjoy the fruits (or rather, stalks!) of your labor.
Conclusion
So, there you have it! Growing your own celery, even in the most compact of spaces, is not only achievable but incredibly rewarding. This DIY celery gardening trick transforms kitchen scraps into fresh, crisp stalks ready to elevate your salads, soups, and snacks. Forget those wilted, overpriced bunches at the grocery store – imagine the satisfaction of harvesting your own, knowing exactly where it came from and how it was grown.
This isn’t just about saving money; it’s about connecting with your food, reducing waste, and adding a touch of green to your living space. The process is surprisingly simple, making it a perfect project for beginner gardeners, families with children, or anyone looking for a low-maintenance, high-impact gardening experience.
Why is this DIY celery gardening trick a must-try? Because it’s sustainable, space-saving, cost-effective, and undeniably fun! It’s a fantastic way to repurpose something you’d normally throw away, turning kitchen waste into a delicious and nutritious resource. Plus, the vibrant green of the celery leaves adds a touch of freshness to any windowsill or balcony.
Ready to take your celery growing to the next level? Consider these variations:
* Experiment with different celery varieties: While standard celery is a great starting point, explore other types like Pascal celery or even celeriac for a unique flavor profile.
* Companion planting: Celery thrives alongside certain herbs and vegetables. Try planting it near tomatoes, onions, or marigolds to deter pests and improve growth.
* Hydroponic celery: For an even more space-saving approach, explore hydroponic celery growing. This method uses water and nutrients instead of soil, making it ideal for indoor environments.
* Vertical gardening: If you’re truly limited on horizontal space, consider a vertical gardening system. Celery can be grown in hanging baskets or stacked planters to maximize your yield.
Don’t be afraid to experiment and adapt this DIY celery gardening trick to suit your specific needs and preferences. The beauty of gardening is that there’s always something new to learn and discover.
We wholeheartedly encourage you to give this DIY celery gardening trick a try. It’s a simple, satisfying, and sustainable way to enjoy fresh celery, no matter how small your space may be. Once you’ve harvested your first stalks, we’d love to hear about your experience! Share your photos, tips, and tricks in the comments below. Let’s build a community of celery-growing enthusiasts and inspire others to embrace the joys of homegrown produce. Happy gardening!
Frequently Asked Questions (FAQ)
Q: How long does it take to grow celery from a base?
A: Generally, it takes about 2-3 weeks to see significant regrowth from a celery base. You’ll notice new leaves sprouting from the center. After about 80-100 days, you can harvest mature stalks. However, the initial regrowth is primarily for establishing roots and foliage. The stalks will take longer to fully develop.
Q: What kind of soil is best for growing celery in small spaces?
A: Celery thrives in rich, well-draining soil. A good potting mix amended with compost or aged manure is ideal. Ensure the soil is slightly acidic to neutral (pH 6.0-7.0). You can also add perlite or vermiculite to improve drainage and aeration, especially if you’re using containers.
Q: How much sunlight does celery need when grown indoors?
A: Celery needs at least 6 hours of direct sunlight per day. If you’re growing it indoors, place it near a sunny window, preferably a south-facing one. If you don’t have enough natural light, consider using a grow light to supplement.
Q: How often should I water my celery plants?
A: Celery needs consistent moisture to thrive. Water deeply whenever the top inch of soil feels dry to the touch. Avoid overwatering, as this can lead to root rot. Ensure your container has drainage holes to prevent waterlogging. During hot weather, you may need to water more frequently.
Q: Can I grow celery in just water?
A: Yes, you can initially regrow celery in just water. This is how you start the process of rooting the base. However, for long-term growth and to produce substantial stalks, you’ll need to transplant it into soil. Water provides the initial hydration, but soil provides the necessary nutrients for healthy development.
Q: What are some common pests and diseases that affect celery?
A: Common pests include aphids, celery leaf tiers, and spider mites. Diseases include celery blight and pink rot. Regularly inspect your plants for signs of infestation or disease. Use organic pest control methods like insecticidal soap or neem oil to manage pests. Ensure good air circulation to prevent fungal diseases.
Q: How do I harvest celery from my small space garden?
A: You can harvest individual stalks as needed, starting with the outer stalks. Simply cut them off at the base with a sharp knife. Alternatively, you can harvest the entire plant by cutting it off at the soil level.
Q: Can I use the celery leaves?
A: Absolutely! Celery leaves are packed with flavor and nutrients. Use them in salads, soups, stews, or as a garnish. They can also be dried and used as a seasoning. Don’t let them go to waste!
Q: My celery stalks are thin and stringy. What am I doing wrong?
A: Thin and stringy stalks can be caused by several factors, including insufficient sunlight, lack of water, or nutrient deficiencies. Ensure your plants are getting enough sunlight and water, and fertilize them regularly with a balanced fertilizer.
Q: Is it better to start celery from seed or from a base?
A: Starting from a base is much easier and faster, especially for small-space gardening. Starting from seed requires more time and effort, as celery seeds are slow to germinate and the seedlings are delicate. Regrowing from a base is a great way to recycle kitchen scraps and get a head start on your celery harvest.
Q: How can I prevent my celery from bolting (going to seed)?
A: Bolting is often triggered by stress, such as extreme temperatures or inconsistent watering. Ensure your plants are getting consistent moisture and protection from extreme heat or cold. Choose bolt-resistant varieties if you live in an area with unpredictable weather.
Q: What kind of fertilizer should I use for celery?
A: A balanced fertilizer with equal parts nitrogen, phosphorus, and potassium (e.g., 10-10-10) is a good choice for celery. You can also use a fertilizer specifically formulated for vegetables. Apply the fertilizer according to the package instructions.
Q: Can I grow celery indoors year-round?
A: Yes, you can grow celery indoors year-round, provided you provide adequate light, water, and nutrients. Use grow lights if necessary to supplement natural light during the winter months.
Q: How do I store harvested celery?
A: To store harvested celery, wrap it tightly in a damp paper towel and place it in a plastic bag in the refrigerator. This will help keep it crisp and fresh for up to two weeks. You can also store celery stalks in a container of water in the refrigerator.


Leave a Comment