

Growing Water Spinach at Home can seem daunting, but trust me, it’s easier than you think! Have you ever dreamt of snipping fresh, vibrant greens right from your backyard to add to your stir-fries? Imagine the satisfaction of knowing exactly where your food comes from and that it’s free from harmful pesticides. Well, that dream can become a reality with a little know-how.
Water spinach, also known as Ong Choy or Kang Kong, has a rich history, deeply rooted in Asian cuisine. For centuries, it’s been a staple in dishes across Southeast Asia and China, prized for its delicious flavor and nutritional benefits. It’s a fast-growing, leafy green that thrives in warm, moist conditions, making it a perfect candidate for home gardeners like you and me.
But why should you bother growing water spinach at home? In today’s world, where food security and healthy eating are paramount, having the ability to cultivate your own produce is incredibly empowering. Plus, store-bought water spinach can sometimes be hard to find or not as fresh as you’d like. This DIY guide will provide you with simple, effective tricks and hacks to successfully grow this amazing vegetable, even if you have limited space or gardening experience. I’m here to guide you through every step, ensuring you enjoy a bountiful harvest of fresh, delicious water spinach right from your own home!

Growing Water Spinach (Kangkong) at Home: A Beginner’s Guide
Hey there, fellow gardening enthusiasts! Ever wanted to grow your own fresh, leafy greens right in your backyard (or even on your balcony)? Well, today I’m going to walk you through the surprisingly easy process of growing water spinach, also known as kangkong or ong choy. This delicious and nutritious vegetable is a staple in many Asian cuisines, and trust me, nothing beats the taste of homegrown kangkong!
What You’ll Need
Before we dive in, let’s gather our supplies. Here’s a list of everything you’ll need to get started:
* Water Spinach Seeds or Cuttings: You can find these at most Asian grocery stores or online. Seeds are generally easier for beginners, but cuttings can give you a head start.
* A Container or Garden Bed: Kangkong thrives in water, so choose a container that can hold water or a garden bed with good water retention. A large pot, a plastic tub, or even a repurposed kiddie pool will work!
* Potting Mix or Soil: Use a rich, well-draining potting mix if you’re growing in a container. If you’re planting in a garden bed, amend the soil with compost or other organic matter.
* Water: Lots and lots of water! Kangkong loves to be moist.
* Fertilizer (Optional): A balanced liquid fertilizer can help boost growth, but it’s not essential.
* Sunlight: Kangkong needs at least 6 hours of sunlight per day.
* Gardening Gloves (Optional): To keep your hands clean.
Starting from Seeds: A Step-by-Step Guide
Okay, let’s get our hands dirty! Here’s how to grow water spinach from seeds:
1. Soaking the Seeds: This is a crucial step to improve germination rates. Place the water spinach seeds in a bowl of warm water and let them soak for 12-24 hours. This softens the seed coat and helps them sprout faster. I usually soak mine overnight.
2. Preparing the Container or Garden Bed: Fill your chosen container with potting mix, leaving about an inch of space at the top. If you’re using a garden bed, make sure the soil is loose and well-drained. You can incorporate compost or other organic matter to improve its fertility.
3. Sowing the Seeds: Sow the seeds about 1/2 inch deep and 1-2 inches apart. You can either sprinkle them evenly over the surface and then cover them with a thin layer of soil, or create small furrows and plant the seeds in rows. I prefer the row method because it makes it easier to thin the seedlings later.
4. Watering Thoroughly: After sowing the seeds, water the soil gently but thoroughly. You want the soil to be moist but not waterlogged. A gentle shower from a watering can is ideal.
5. Maintaining Moisture: Keep the soil consistently moist. Water spinach loves water, so don’t let the soil dry out. You might need to water daily, especially in hot weather. I usually check the soil moisture level every morning and water accordingly.
6. Germination: Be patient! Water spinach seeds usually germinate within 5-10 days. Once the seedlings emerge, make sure they get plenty of sunlight.
7. Thinning the Seedlings (Optional): If your seedlings are too crowded, thin them out to about 4-6 inches apart. This will give them enough space to grow and prevent them from competing for resources. I usually do this when the seedlings are about 2-3 inches tall.
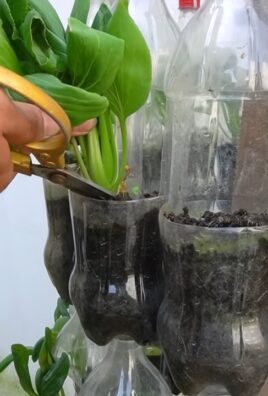
Starting from Cuttings: A Faster Route
If you’re impatient like me, you can also grow water spinach from cuttings. This method is faster and easier than starting from seeds.
1. Obtaining Cuttings: You can get cuttings from a friend who grows water spinach, or you can buy them from some Asian markets. Choose healthy-looking stems that are about 6-8 inches long.
2. Preparing the Cuttings: Remove the leaves from the bottom 2-3 inches of the stem. This will encourage root growth.
3. Rooting the Cuttings: There are two ways to root water spinach cuttings:
* Water Method: Place the cuttings in a glass or jar of water, making sure the bottom 2-3 inches of the stem are submerged. Change the water every 1-2 days. Roots should start to appear within a week or two.
* Soil Method: Plant the cuttings directly into moist potting mix. Keep the soil consistently moist. Roots should develop within a few weeks.
I personally prefer the water method because you can see the roots growing!
4. Planting the Rooted Cuttings: Once the cuttings have developed a good root system (at least an inch or two long), you can plant them in your container or garden bed. Space them about 4-6 inches apart.
5. Watering Thoroughly: After planting, water the cuttings thoroughly.
6. Maintaining Moisture: Just like with seeds, keep the soil consistently moist.
Caring for Your Water Spinach
Now that your water spinach is growing, here’s how to keep it happy and healthy:
1. Sunlight: Water spinach needs at least 6 hours of sunlight per day. If you’re growing it indoors, place it near a sunny window or use a grow light.
2. Watering: Water spinach loves water! Keep the soil consistently moist. You can even grow it in a container with standing water, as long as the water is changed regularly. I often flood my container every few days and then let the excess water drain out.
3. Fertilizing (Optional): If you want to boost growth, you can fertilize your water spinach every 2-3 weeks with a balanced liquid fertilizer. Follow the instructions on the fertilizer label. I usually use a diluted fish emulsion fertilizer.
4. Pest Control: Water spinach is generally pest-resistant, but it can sometimes be affected by aphids or spider mites. If you notice any pests, you can spray them with insecticidal soap or neem oil. I prefer to use organic pest control methods whenever possible.
Harvesting Your Water Spinach
The best part! You can start harvesting your water spinach about 4-6 weeks after planting.
1. Harvesting Method: Use scissors or a sharp knife to cut the stems about 6-8 inches from the top. This will encourage the plant to produce new shoots.
2. Continuous Harvesting: You can harvest water spinach continuously throughout the growing season. Just keep cutting the stems back, and the plant will keep producing new growth.
3. Enjoying Your Harvest: Water spinach is delicious in stir-fries, soups, and salads. It has a mild, slightly sweet flavor and a crisp texture. I love to stir-fry it with garlic and oyster sauce.
Troubleshooting
Even with the best care, you might encounter some problems. Here are a few common issues and how to fix them:
* Yellowing Leaves: This could be a sign of nutrient deficiency. Try fertilizing your water spinach with a balanced liquid fertilizer. It could also be a sign of overwatering, so make sure the soil is well-draining.
* Slow Growth: This could be due to lack of sunlight or water. Make sure your water spinach is getting at least 6 hours of sunlight per day and that the soil is consistently moist.
* Pests: As mentioned earlier, aphids and spider mites can sometimes be a problem. Spray them with insecticidal soap or neem oil.
Tips for Success
Here are a few extra tips to help you grow the best water spinach possible:
* Choose the Right Variety: There are different varieties of water spinach, some of which are better suited for certain climates. Do some research to find a variety that grows well in your area.
* Start with Good Quality Seeds or Cuttings: This will increase your chances of success.
* Don’t Overwater: While water spinach loves water, it’s important to make sure the soil is well-draining to prevent root rot.
* Harvest Regularly: This will encourage the plant to produce new growth and keep it healthy.
* Have Fun! Gardening should be enjoyable. Don’t be afraid to experiment and learn from your mistakes.
Growing water spinach at home is a rewarding experience. Not only will you have fresh, delicious greens at your fingertips, but you’ll also gain a sense of accomplishment from growing your own food. So, what are you waiting for? Get out there and start planting! Happy gardening!

Conclusion
So, there you have it! Cultivating your own water spinach at home is not only surprisingly simple, but also incredibly rewarding. Forget those wilted, overpriced bunches at the grocery store. With a little effort and this easy DIY trick, you can have a constant supply of fresh, crisp, and delicious water spinach right at your fingertips.
Why is this a must-try? Because it empowers you to control the quality and freshness of your produce. You know exactly what goes into growing your water spinach 鈥?no pesticides, no questionable fertilizers, just pure, homegrown goodness. Plus, it’s a fantastic way to reduce your carbon footprint by minimizing transportation and packaging waste. And let’s be honest, there’s something deeply satisfying about harvesting your own food.
But the benefits don’t stop there. Growing water spinach at home is also incredibly versatile. You can experiment with different growing mediums, from simple containers filled with soil to hydroponic systems for a more advanced approach. Consider adding a slow-release fertilizer to your water for even more robust growth. You can also adjust the amount of sunlight your plants receive to influence their flavor and texture. More sunlight generally leads to thicker stems and a slightly more intense flavor.
For those who enjoy a bit of spice, try adding a few chili peppers to your growing container. The subtle heat will infuse into the water spinach, adding a delightful kick to your stir-fries and soups. Alternatively, if you prefer a milder flavor, consider growing your water spinach in a shadier location.
Don’t be afraid to experiment with different varieties of water spinach as well. Some varieties are known for their thicker stems, while others are prized for their tender leaves. Exploring these variations will allow you to find the perfect water spinach to suit your culinary preferences.
We’ve shown you how easy it is to achieve success with this DIY trick for growing water spinach at home. Now it’s your turn to give it a try! We are confident that you’ll be amazed by the results. Imagine the satisfaction of serving a delicious meal featuring water spinach that you grew yourself.
We encourage you to embark on this exciting gardening adventure. Share your experiences with us! Post photos of your thriving water spinach plants on social media using #HomegrownWaterSpinach and tag us. We’d love to see your progress and learn from your unique approaches. Let’s create a community of home gardeners who are passionate about fresh, sustainable food.
So, grab your seeds, prepare your containers, and get ready to enjoy the delicious rewards of growing your own water spinach. Happy gardening!
Frequently Asked Questions (FAQ)
What are the ideal growing conditions for water spinach?
Water spinach thrives in warm, humid environments with plenty of sunlight. Aim for at least six hours of direct sunlight per day. The ideal temperature range is between 75掳F and 90掳F (24掳C and 32掳C). Water spinach also requires consistently moist soil or water. It’s an aquatic plant, so don’t be afraid to keep the soil saturated. If you’re growing it in a container, ensure there are drainage holes to prevent waterlogging, but also consider placing the container in a tray of water to maintain consistent moisture.
How often should I water my water spinach?
Water spinach needs consistent moisture. If you’re growing it in soil, water it daily, especially during hot weather. The soil should always feel damp to the touch. If you’re growing it hydroponically or in a container submerged in water, ensure the water level is consistently maintained. Check the water level daily and replenish as needed.
What kind of fertilizer should I use for water spinach?
Water spinach is a heavy feeder, meaning it requires a good amount of nutrients to thrive. A balanced fertilizer with an NPK ratio (Nitrogen, Phosphorus, Potassium) of 10-10-10 or 20-20-20 is a good starting point. You can use a liquid fertilizer diluted according to the package instructions and apply it every two weeks. Alternatively, you can use a slow-release granular fertilizer mixed into the soil at planting time. Organic options like compost tea or fish emulsion are also excellent choices. Avoid over-fertilizing, as this can lead to excessive foliage growth at the expense of flavor.
How long does it take for water spinach to grow?
Water spinach is a fast-growing plant. You can typically start harvesting leaves within 4-6 weeks of planting. The exact time will depend on the growing conditions, such as temperature, sunlight, and nutrient availability. Regular harvesting encourages further growth, so don’t be afraid to start picking leaves once they reach a reasonable size.
How do I harvest water spinach?
Harvesting water spinach is simple. You can either cut the entire plant a few inches above the soil level, allowing it to regrow, or you can selectively harvest individual leaves and stems as needed. When harvesting, use sharp scissors or a knife to make clean cuts. Avoid tearing the stems, as this can damage the plant. Harvest in the morning for the best flavor and texture.
What are some common pests and diseases that affect water spinach?
Water spinach is generally resistant to pests and diseases, but it can occasionally be affected by aphids, spider mites, or fungal diseases. Aphids and spider mites can be controlled with insecticidal soap or neem oil. Fungal diseases can be prevented by ensuring good air circulation and avoiding overwatering. If you notice any signs of infestation or disease, address them promptly to prevent them from spreading.
Can I grow water spinach indoors?
Yes, you can grow water spinach indoors, but you’ll need to provide adequate light. A sunny windowsill that receives at least six hours of direct sunlight is ideal. If you don’t have enough natural light, you can supplement with grow lights. Use full-spectrum LED grow lights and position them a few inches above the plants. Ensure the plants have good air circulation to prevent fungal diseases.
Is water spinach safe to eat?
Yes, water spinach is generally safe to eat when grown properly. However, it’s important to source your seeds from a reputable supplier to ensure they are free from contaminants. Thoroughly wash the leaves before eating to remove any dirt or debris. Avoid growing water spinach in areas with contaminated water or soil.
Can I grow water spinach from cuttings?
Yes, water spinach can be easily propagated from cuttings. Simply take a cutting that is about 6-8 inches long and remove the lower leaves. Place the cutting in a glass of water, ensuring that the nodes (where the leaves were removed) are submerged. Roots will typically develop within a week or two. Once the roots are a few inches long, you can transplant the cutting into soil or a hydroponic system.
What are some ways to cook with water spinach?
Water spinach is a versatile vegetable that can be used in a variety of dishes. It’s commonly used in stir-fries, soups, salads, and curries. It has a mild, slightly sweet flavor that pairs well with garlic, ginger, chili peppers, and soy sauce. You can also blanch or steam water spinach and serve it as a side dish. Avoid overcooking it, as it can become slimy.
Leave a Comment