

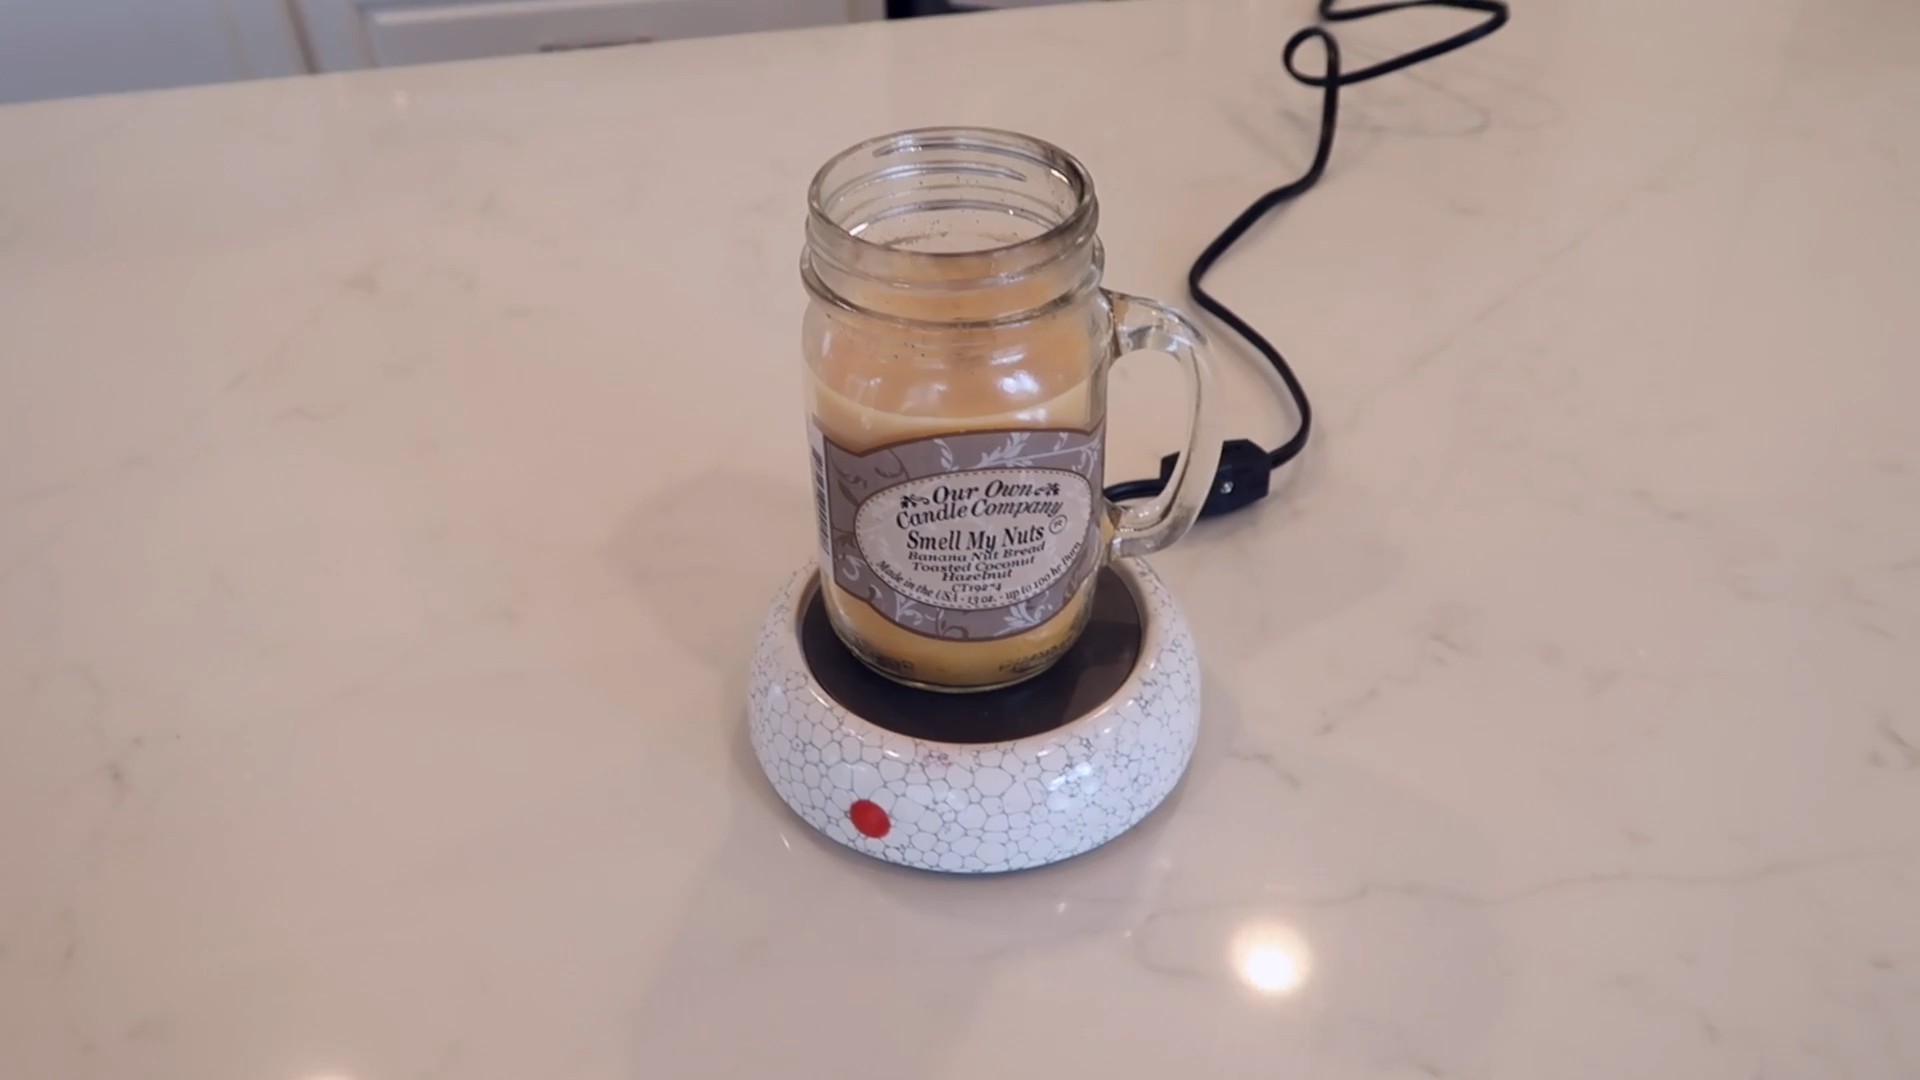
Candle Hacks for Home: Ever wished you could stretch the life of your favorite scented candle, or maybe transform a plain, unscented one into something truly special? I know I have! There’s something so comforting about the warm glow and inviting fragrance of candles, but let’s face it, they can burn down quickly and sometimes leave a mess.
For centuries, candles have been more than just a source of light. From ancient civilizations using them in religious ceremonies to Victorian-era homes relying on them for illumination, candles have played a significant role in human history and culture. Today, they’re more about ambiance and aromatherapy, but the desire to get the most out of them remains the same.
That’s where these amazing candle hacks for home come in! I’m going to share some simple, yet effective DIY tricks that will not only help you save money but also allow you to personalize your candle experience. Whether you’re looking to prevent tunneling, revive a faded scent, or even create your own unique candle blends, these tips are designed to make your home feel cozier and more inviting. So, grab your favorite candles, and let’s get started on these fun and practical DIY projects!
DIY Yardlong Bean Trellis: From Seed to Spectacular Harvest
Okay, let’s get down to business! I’m going to walk you through building a sturdy and beautiful trellis for your yardlong beans. Trust me, these beans are vigorous growers, and they *need* a good support system to thrive. Without a trellis, they’ll sprawl all over the ground, making harvesting a nightmare and increasing the risk of disease. This guide will cover everything from choosing the right materials to planting your seeds and training your vines. Get ready for a bountiful harvest!
Materials You’ll Need
Before we start building, let’s gather our supplies. This is what I used, but feel free to adapt it based on what you have available and the size of trellis you want to build.
* Wooden Posts: I recommend using treated 4×4 lumber for the main support posts. The length will depend on how tall you want your trellis, but I suggest at least 8 feet, with 2 feet buried in the ground. So, you’ll have a 6-foot-tall trellis. You’ll need at least two posts, but for a longer row of beans, add more posts every 6-8 feet.
* Horizontal Supports: Use 2×4 lumber for the horizontal supports that connect the posts. These will add stability and provide more points for the beans to climb.
* Trellis Netting or Wire: This is what the beans will actually climb on. You can use plastic trellis netting (easy to find at garden centers), sturdy wire mesh, or even strong twine. I personally prefer wire mesh because it’s more durable and lasts longer.
* Fasteners: You’ll need screws or nails to attach the horizontal supports to the posts. I prefer screws because they provide a stronger hold. Use exterior-grade screws to withstand the weather.
* Concrete Mix (Optional): If you want extra stability, you can set the posts in concrete. This is especially helpful in windy areas.
* Tools:
* Measuring tape
* Saw (for cutting lumber)
* Drill (with drill bits for pilot holes and driving screws)
* Level
* Shovel or post hole digger
* Staple gun (if using trellis netting)
* Wire cutters (if using wire mesh)
* Gloves (to protect your hands)
* Safety glasses (always a good idea when working with tools)
Building the Trellis Frame
This is where we start putting everything together. Take your time and make sure everything is level and secure.
1. Prepare the Posts: If you’re using concrete, now’s the time to prepare the holes. Dig holes at least 2 feet deep where you want to place your posts. The distance between the posts will depend on the length of your horizontal supports. I usually space mine about 6-8 feet apart.
2. Set the Posts (Optional): If you’re using concrete, place the posts in the holes and brace them so they stand upright. Mix the concrete according to the package directions and pour it into the holes around the posts. Use a level to ensure the posts are plumb (perfectly vertical) while the concrete sets. Let the concrete cure for at least 24 hours before proceeding. If you’re not using concrete, simply tamp the soil firmly around the posts to secure them.
3. Attach the Horizontal Supports: Measure and cut the 2×4 lumber to the desired length for your horizontal supports. I usually place one support near the top of the posts and another about halfway down. Use a level to ensure the supports are horizontal before attaching them to the posts with screws. Drill pilot holes first to prevent the wood from splitting.
4. Reinforce the Structure: For added stability, consider adding diagonal braces between the posts and the horizontal supports. This will help prevent the trellis from swaying in the wind.
Adding the Trellis Netting or Wire
Now for the climbing surface! This is what your yardlong beans will use to reach for the sky.
1. Attach Trellis Netting: If you’re using trellis netting, simply unroll it and attach it to the frame using a staple gun. Start at the top and work your way down, stretching the netting taut as you go. Make sure the staples are securely fastened to the wood. Overlap the netting slightly at the seams to prevent gaps.
2. Attach Wire Mesh: If you’re using wire mesh, use wire cutters to cut it to the desired size. Wear gloves to protect your hands from the sharp edges. Attach the wire mesh to the frame using U-nails or heavy-duty staples. Again, start at the top and work your way down, stretching the mesh taut as you go.
3. Secure the Bottom: Make sure the bottom of the netting or wire mesh is securely attached to the ground or to the bottom horizontal support. This will prevent the beans from pulling it loose as they grow.
Planting Your Yardlong Beans
Alright, the trellis is built! Now it’s time to get those beans in the ground.
1. Choose the Right Location: Yardlong beans need plenty of sunshine, so choose a location that gets at least 6-8 hours of direct sunlight per day. Also, make sure the soil is well-drained and fertile.
2. Prepare the Soil: Before planting, amend the soil with compost or other organic matter to improve its fertility and drainage. Loosen the soil to a depth of at least 6 inches.
3. Sow the Seeds: Plant the seeds directly in the ground about 1 inch deep and 2-3 inches apart. Water thoroughly after planting.
4. Thin the Seedlings: Once the seedlings emerge, thin them to about 6-8 inches apart. This will give them enough room to grow and prevent overcrowding.
5. Water Regularly: Yardlong beans need consistent moisture, especially during hot weather. Water deeply whenever the soil feels dry to the touch.
6. Fertilize: Fertilize the beans every few weeks with a balanced fertilizer. Follow the package directions for application rates.
Training the Vines
As your yardlong beans grow, you’ll need to train them to climb the trellis. This is a simple process, but it’s important to do it regularly to ensure the vines stay on track.
1. Guide the Vines: As the vines start to grow, gently guide them towards the trellis. You can use plant ties or twine to attach them to the netting or wire.
2. Encourage Upward Growth: Encourage the vines to grow upwards by pinching off any side shoots that are growing horizontally. This will help them focus their energy on climbing.
3. Check Regularly: Check the vines regularly and adjust them as needed. Make sure they’re not getting tangled or growing in the wrong direction.
Harvesting Your Yardlong Beans
The moment you’ve been waiting for! Harvesting your delicious yardlong beans.
1. Harvest Time: Yardlong beans are typically ready to harvest about 60-70 days after planting. The pods should be long and slender, but still tender.
2. Harvesting Technique: Use scissors or pruning shears to cut the beans from the vine. Be careful not to damage the plant.
3. Regular Harvesting: Harvest the beans regularly to encourage continued production. The more you harvest, the more beans the plant will produce.
4. Enjoy Your Harvest: Yardlong beans can be eaten fresh, stir-fried, or added to soups and stews. They’re a delicious and nutritious addition to any meal.
Troubleshooting
Even with the best planning, you might encounter a few challenges along the way. Here are some common problems and how to deal with them:
* Pests: Aphids, bean beetles, and other pests can attack yardlong beans. Inspect your plants regularly and treat any infestations promptly with insecticidal soap or other organic pest control methods.
* Diseases: Fungal diseases like powdery mildew can also affect yardlong beans. Ensure good air circulation around the plants and avoid overhead watering. If you see signs of disease, treat with a fungicide.
* Poor Growth: If your beans aren’t growing well, it could be due to poor soil, lack of sunlight, or insufficient watering. Amend the soil, ensure the plants are getting enough sunlight, and water regularly.
* Trellis Instability: If your trellis starts to wobble or lean, reinforce it with additional supports or concrete.
Tips for Success
Here are a few extra tips to help you grow the best yardlong beans possible:
* Choose the Right Variety: There are many different varieties of yardlong beans available, so choose one that is well-suited to your climate and growing conditions.
* Start Seeds Indoors: If you live in a cold climate, you can start the seeds indoors a few weeks before the last frost. This will give them a head start on the growing season.
* Provide Support Early:

Conclusion
So, there you have it! This simple yet transformative candle hack is more than just a clever trick; it’s a gateway to a more personalized and enjoyable home fragrance experience. We’ve shown you how to breathe new life into those half-burned candles, prevent tunneling, and even create entirely new scent combinations. Why spend a fortune on expensive, mass-produced candles when you can craft unique, long-lasting aromas tailored perfectly to your preferences?
This DIY approach isn’t just about saving money; it’s about taking control of your environment and creating a space that truly reflects your personality. Imagine the satisfaction of knowing that the comforting scent filling your living room is a blend you created yourself, a testament to your creativity and resourcefulness.
Beyond the basic techniques we’ve covered, the possibilities are truly endless. Experiment with different essential oils to create custom aromatherapy blends. Add dried flowers or herbs to your melted wax for a visually stunning and fragrant candle. Consider using different types of wax, such as soy wax or beeswax, for a more natural and eco-friendly option. You could even try embedding small crystals or charms into your candles for an extra touch of magic.
For a festive twist, try adding cinnamon sticks, cloves, and orange peels for a warm and inviting holiday scent. Or, for a refreshing summer aroma, blend lemon, grapefruit, and mint essential oils. The only limit is your imagination!
But the real beauty of this candle hack lies in its simplicity and accessibility. You don’t need any special equipment or prior experience to get started. All you need are a few basic supplies, a little bit of creativity, and a willingness to experiment.
We wholeheartedly encourage you to give this DIY trick a try. Gather your old candles, select your favorite scents, and embark on a journey of olfactory exploration. We’re confident that you’ll be amazed at the results.
And most importantly, we want to hear about your experiences! Share your creations, your scent combinations, and your tips and tricks in the comments below. Let’s build a community of candle enthusiasts who are passionate about creating beautiful, fragrant homes. Your insights could inspire others to discover the joy of DIY candle making and unlock their own creative potential. So, go ahead, light up your life with this amazing candle hack, and let us know what you think! We can’t wait to see what you create.
Frequently Asked Questions (FAQs)
What kind of candles work best for this hack?
This candle hack is incredibly versatile and works well with most types of candles, including paraffin wax, soy wax, and beeswax candles. However, the type of wax will influence the burn time and scent throw. Soy wax, for example, tends to burn cleaner and longer than paraffin wax. The most important thing is to ensure that the candle is made of wax that can be safely melted and re-poured. Avoid candles with embedded plastic or other non-wax materials that could be hazardous when heated. Jar candles, pillar candles (once melted down), and even tea lights can be repurposed using this method.
Is it safe to melt candles at home?
Yes, melting candles at home can be safe if you follow proper precautions. Always melt wax in a well-ventilated area and never leave it unattended. Use a double boiler or a heat-safe bowl placed over a pot of simmering water to melt the wax gently and evenly. Avoid direct heat, as this can cause the wax to overheat and potentially catch fire. Use a thermometer to monitor the wax temperature and ensure it doesn’t exceed the manufacturer’s recommended melting point. Wear heat-resistant gloves to protect your hands from burns. Keep a fire extinguisher nearby as a safety precaution. If you are using a microwave, do so in short intervals and monitor closely.
What essential oils are safe to use in candles?
Most essential oils are safe to use in candles, but it’s essential to use them in the correct proportions and to be aware of any potential sensitivities or allergies. Start with a low concentration of essential oils (around 6-10% of the total wax volume) and adjust to your preference. Some popular and generally safe essential oils for candles include lavender, lemon, peppermint, eucalyptus, and tea tree. Avoid using essential oils that are known to be flammable or that have a low flash point. Always research the specific essential oil you plan to use and consult with a qualified aromatherapist if you have any concerns.
How do I prevent tunneling in my candles?
Tunneling, where a candle burns down the center leaving a ring of unmelted wax around the edges, is a common problem. This candle hack can help prevent tunneling by ensuring that the entire surface of the candle melts evenly. When you first light a new candle, allow it to burn long enough for the entire top layer of wax to melt completely to the edges of the container. This creates a “memory ring” that will help the candle burn evenly in subsequent uses. If tunneling does occur, you can use a heat gun or hair dryer to gently melt the wax around the edges and even out the surface. Alternatively, you can wrap the candle in aluminum foil, leaving a small opening at the top, to trap heat and encourage the wax to melt evenly.
Can I add dried flowers or herbs to my candles?
Yes, adding dried flowers or herbs to your candles can create a beautiful and fragrant visual effect. However, it’s important to use dried materials that are completely dry to prevent them from catching fire. Embed the dried flowers or herbs into the melted wax after it has cooled slightly but is still pliable. Avoid placing them too close to the wick, as this could increase the risk of fire. Consider using flowers and herbs that complement the scent of your essential oils. For example, lavender flowers pair well with lavender essential oil, and rose petals complement rose essential oil.
How long will my DIY candles last?
The lifespan of your DIY candles will depend on several factors, including the type of wax used, the size of the candle, and the frequency of use. Soy wax candles typically burn longer than paraffin wax candles. To maximize the lifespan of your candles, trim the wick to ¼ inch before each use. This will prevent smoking and ensure a clean, even burn. Avoid burning candles for more than 4 hours at a time, as this can cause the wax to overheat and shorten the lifespan of the candle. Store your candles in a cool, dry place away from direct sunlight to prevent the wax from melting or discoloring.
What if my candle wick is too short?
A wick that is too short can cause the candle to tunnel or extinguish prematurely. If you find that your candle wick is too short, you can try using a wick extender. A wick extender is a small metal clip that attaches to the wick and raises it above the wax surface. Alternatively, you can carefully melt the wax around the wick and remove some of the excess wax to expose more of the wick. Be careful not to damage the wick in the process. In some cases, it may be necessary to replace the wick entirely. You can purchase replacement wicks at most craft stores.
How do I clean up spilled candle wax?
Spilled candle wax can be a nuisance, but it’s relatively easy to clean up if you act quickly. Allow the wax to cool and harden completely. Once the wax is solid, you can gently scrape it off the surface using a plastic scraper or a dull knife. For delicate surfaces, such as fabric or upholstery, place a piece of paper towel or brown paper bag over the wax and iron it on low heat. The heat will melt the wax, which will then be absorbed by the paper. Repeat this process until all of the wax is removed. For stubborn wax stains, you can try using a solvent-based cleaner, but be sure to test it in an inconspicuous area first to ensure it doesn’t damage the surface.


Leave a Comment