

Vinegar fruit wash DIY: Are you tired of biting into a seemingly perfect apple, only to be met with a waxy residue and the lingering thought of pesticides? I know I am! For generations, our grandparents relied on simple, natural methods to keep their produce clean, a practice rooted in resourcefulness and a deep connection to the land. Now, more than ever, we’re realizing the importance of knowing exactly what we’re putting into our bodies.
That’s why I’m so excited to share this incredibly easy and effective vinegar fruit wash DIY recipe with you. It’s a game-changer for anyone looking to remove dirt, grime, and those pesky chemicals from their fruits and vegetables without resorting to harsh commercial cleaners. Think of it as a spa day for your produce, leaving them sparkling clean and ready to nourish you and your family.
In this article, I’ll walk you through a simple, step-by-step guide to creating your own vinegar fruit wash. It’s cost-effective, eco-friendly, and takes just minutes to prepare. Say goodbye to questionable residues and hello to fresh, clean, and delicious fruits and veggies! Let’s get started!
DIY Fruit and Veggie Wash: Keep Your Produce Sparkling Clean!
Hey everyone! I’m always looking for ways to make my home a little greener and my food a little safer. That’s why I started making my own fruit and veggie wash. It’s super easy, incredibly effective, and saves you money compared to buying those pre-made washes at the store. Plus, you know exactly what’s going on your food! This recipe uses simple ingredients you probably already have in your pantry. Let’s get started!
Why Make Your Own Fruit and Veggie Wash?
Before we dive into the how-to, let’s talk about why this is such a great idea. Store-bought produce can be covered in all sorts of things – dirt, pesticides, waxes, and even bacteria. While rinsing with plain water helps, it doesn’t always get everything off. A good fruit and veggie wash helps to loosen and remove these unwanted substances, leaving you with cleaner, safer, and tastier produce.
Ingredients You’ll Need
* 1 cup of white vinegar (the star of the show!)
* 4 cups of water (filtered is best, but tap water works too)
* 1 tablespoon of baking soda (optional, but adds extra cleaning power)
* 10-15 drops of lemon essential oil (optional, for a fresh scent and added antibacterial properties)
* A clean spray bottle or large bowl
Equipment You’ll Need
* Measuring cups and spoons
* A mixing bowl (if you’re not using a spray bottle)
* A clean spray bottle (if you prefer a spray)
* A vegetable brush (optional, for scrubbing tougher produce)
Making the Fruit and Veggie Wash: Two Methods
I’m going to give you two ways to make this wash: a spray version and a soak version. Both are effective, so choose the one that best suits your needs and preferences.
Method 1: The Spray Bottle Method
This is my go-to method because it’s quick and easy for washing smaller amounts of produce.
1. Combine the Ingredients: In a mixing bowl, combine 1 cup of white vinegar, 4 cups of water, and 1 tablespoon of baking soda (if using). The baking soda will fizz a bit when it hits the vinegar, so don’t be alarmed! Stir gently until the baking soda is dissolved.
2. Add Essential Oil (Optional): If you’re using lemon essential oil, add 10-15 drops to the mixture. Stir well to combine. The essential oil not only adds a pleasant scent but also has antibacterial properties.
3. Transfer to Spray Bottle: Carefully pour the mixture into a clean spray bottle. A funnel can be helpful to avoid spills.
4. Label the Bottle: Don’t forget to label your spray bottle clearly as “Fruit and Veggie Wash” to avoid any confusion.
Method 2: The Soak Method
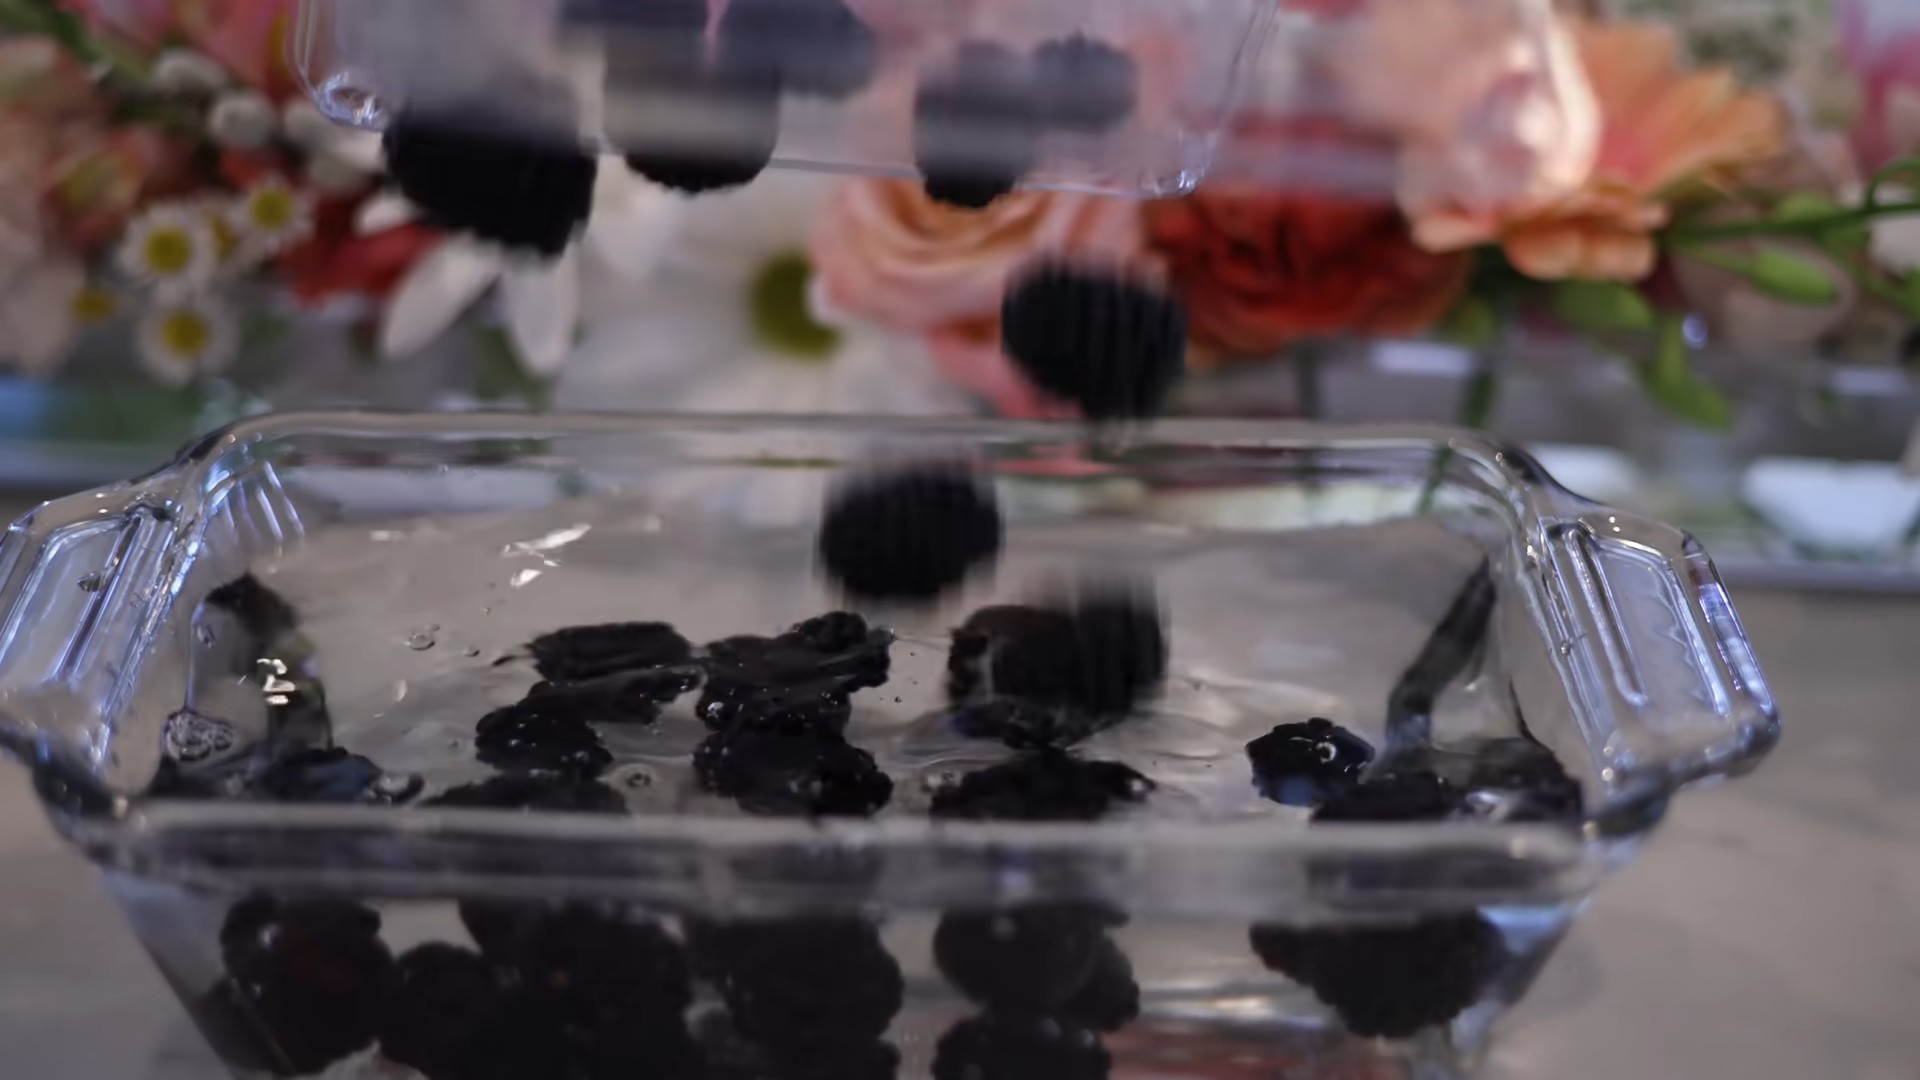
This method is great for washing larger quantities of produce or for produce with lots of nooks and crannies, like broccoli or grapes.
1. Combine the Ingredients: In a large bowl, combine 1 cup of white vinegar, 4 cups of water, and 1 tablespoon of baking soda (if using). Stir gently until the baking soda is dissolved.
2. Add Essential Oil (Optional): If you’re using lemon essential oil, add 10-15 drops to the mixture. Stir well to combine.
3. Prepare Your Produce: Fill another bowl or your sink with cool, clean water. You’ll use this for rinsing.
Using Your Homemade Fruit and Veggie Wash
Now that you’ve made your wash, let’s put it to work!
Using the Spray Bottle Method:
1. Spray the Produce: Generously spray your fruits and vegetables with the wash, making sure to coat all surfaces.
2. Let it Sit: Allow the wash to sit on the produce for about 30 seconds to 1 minute. This gives the vinegar time to work its magic.
3. Scrub (Optional): For produce with thick skins or lots of dirt, use a vegetable brush to gently scrub the surface.
4. Rinse Thoroughly: Rinse the produce thoroughly under cool, running water to remove the wash and any loosened dirt or debris.
5. Dry: Pat the produce dry with a clean towel or let it air dry.
Using the Soak Method:
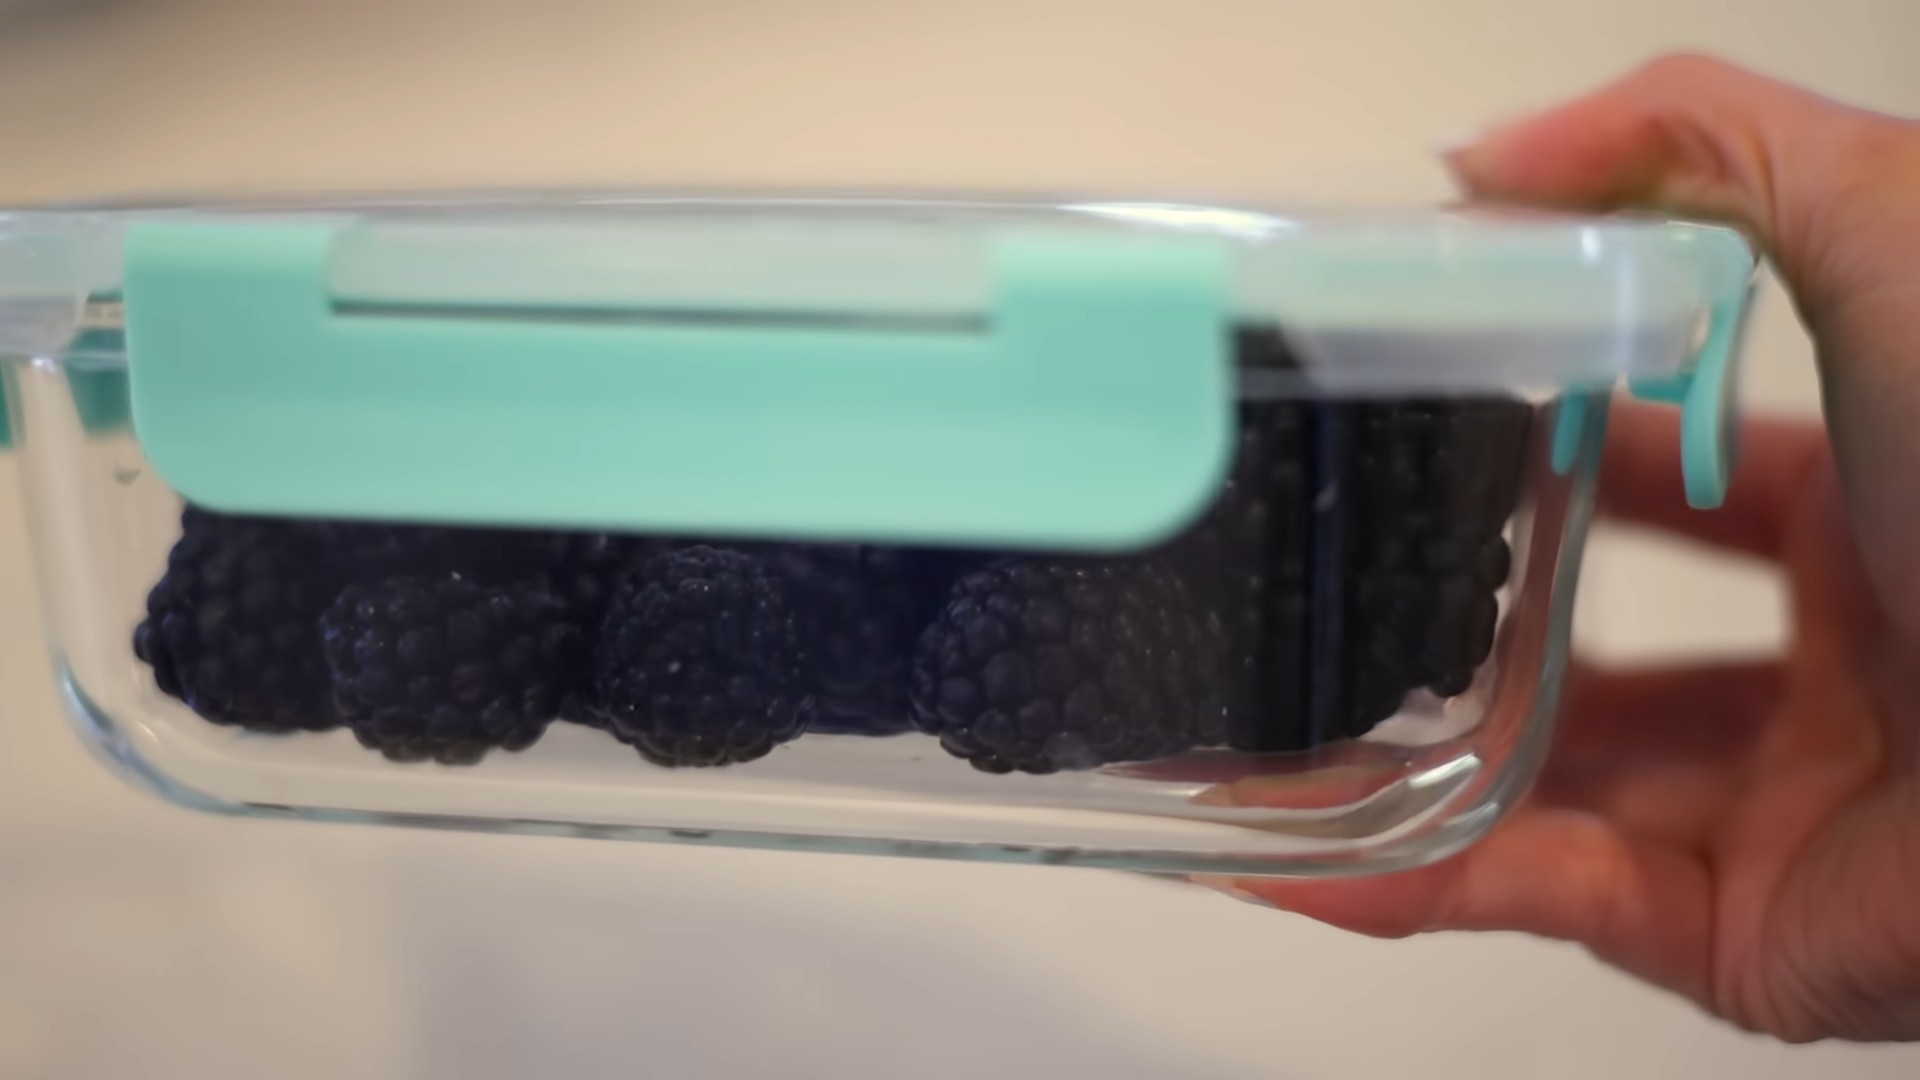
1. Soak the Produce: Place your fruits and vegetables in the bowl of wash, making sure they are fully submerged.
2. Let it Soak: Allow the produce to soak for about 5-10 minutes. This gives the wash time to loosen dirt and grime.
3. Scrub (Optional): For produce with thick skins or lots of dirt, gently scrub the surface while it’s submerged in the wash.
4. Rinse Thoroughly: Remove the produce from the wash and rinse it thoroughly under cool, running water.
5. Dry: Pat the produce dry with a clean towel or let it air dry.
Tips and Tricks for the Best Results
* Adjust the Vinegar Ratio: If you find the vinegar smell too strong, you can reduce the amount of vinegar slightly. However, keep in mind that the vinegar is the main cleaning agent, so reducing it too much may affect the effectiveness of the wash.
* Don’t Soak Delicate Produce Too Long: Soaking delicate fruits and vegetables like berries for too long can make them mushy. Reduce the soaking time to just a few minutes for these items.
* Use a Vegetable Brush: A vegetable brush is a great tool for scrubbing produce with thick skins, like potatoes, carrots, and apples.
* Store Properly: Store your homemade fruit and veggie wash in a cool, dark place. It should last for several weeks.
* Wash Before Storing: I prefer to wash my produce right before I eat it. Washing it and then storing it can sometimes lead to faster spoilage. However, if you prefer to wash it all at once, make sure the produce is completely dry before storing it in the refrigerator.
* Consider the Produce Type: Some produce, like mushrooms, are very porous and can absorb liquids easily. For mushrooms, I recommend a quick rinse under running water instead of soaking.
* Vinegar Alternatives: While white vinegar is my preferred choice, you can also use apple cider vinegar. It has a milder scent and also has antibacterial properties.
* Baking Soda Benefits: The baking soda helps to neutralize acids and can also help to remove pesticides. It’s a great addition to the wash, but it’s not essential.
* Essential Oil Safety: When using essential oils, make sure they are food-grade and safe for consumption. Lemon essential oil is a popular choice because of its fresh scent and antibacterial properties. However, you can also use other citrus oils like grapefruit or orange.
* Test on a Small Area: If you’re concerned about the wash affecting the color or texture of your produce, test it on a small area first.
* Don’t Use Soap: Avoid using dish soap or other household cleaners to wash your produce. These products are not meant for consumption and can leave harmful residues.
* Rinse Thoroughly: I can’t stress this enough – rinse your produce thoroughly after washing it! This is essential to remove any remaining wash and dirt.
* Observe the Water: When you’re rinsing your produce, pay attention to the water. You’ll likely see dirt, debris, and even a waxy film being washed away. This is a good indication that the wash is working!
Troubleshooting
* Vinegar Smell Too Strong: Reduce the amount of vinegar slightly or add more essential oil to mask the scent.
* Produce Feels Slimy: This could be due to a buildup of bacteria. Make sure you’re rinsing the produce thoroughly and using fresh ingredients for your wash.
* Wash Doesn’t Seem Effective: Make sure you’re using enough vinegar and allowing the wash to sit on the produce for long enough. You may also need to scrub the produce more vigorously.
Benefits of Using This DIY Wash
* Cost-Effective: Making your own fruit and veggie wash is much cheaper than buying pre-made washes.
* Natural and Safe: You know exactly what’s going on your food, avoiding harsh chemicals and artificial ingredients.
* Effective Cleaning: This wash effectively removes dirt, pesticides, waxes, and bacteria from your produce.
* Environmentally Friendly: You’re reducing your reliance on plastic bottles and contributing to a more sustainable lifestyle.
* Customizable: You can adjust the ingredients to suit your preferences and needs.
Final Thoughts
I hope you found this DIY fruit and veggie wash tutorial helpful! It’s a simple and effective way to keep your produce clean and safe, and it’s something I do regularly in my own kitchen. Give it
Conclusion
So, there you have it! This simple, cost-effective, and incredibly efficient vinegar fruit wash DIY method is a game-changer for anyone concerned about the cleanliness and safety of their produce. We’ve walked you through the process, highlighting its benefits and addressing common concerns. But why is this DIY trick a must-try?
Firstly, it’s about peace of mind. Knowing you’re removing potentially harmful pesticides, waxes, and bacteria from the fruits and vegetables you and your family consume is invaluable. Store-bought fruit washes can be expensive and often contain ingredients you might not be comfortable with. This DIY solution puts you in control, allowing you to use simple, natural ingredients you likely already have in your pantry.
Secondly, it’s about extending the shelf life of your produce. By removing surface contaminants, you’re slowing down the spoilage process, meaning less food waste and more savings in the long run. Imagine enjoying your berries for days longer, or your leafy greens staying crisp and fresh for an extended period.
But the beauty of this vinegar fruit wash DIY lies in its adaptability. Feel free to experiment with variations to suit your preferences and needs. For a more fragrant wash, add a few drops of your favorite essential oil, such as lemon or grapefruit (ensure they are food-grade). If you’re dealing with particularly dirty produce, consider adding a tablespoon of baking soda to the wash for extra cleaning power. For delicate fruits like berries, shorten the soaking time to prevent them from becoming too soft. You can also adjust the vinegar-to-water ratio slightly, depending on the type of produce you’re washing and your sensitivity to the vinegar smell. Some people prefer a slightly weaker solution for leafy greens, while others opt for a stronger concentration for thicker-skinned fruits like apples.
Don’t be afraid to get creative and find what works best for you. The key is to ensure you’re thoroughly rinsing the produce after the wash to remove any residual vinegar taste.
We are confident that once you try this vinegar fruit wash DIY, you’ll wonder how you ever lived without it. It’s a simple, effective, and sustainable way to ensure your produce is clean, safe, and delicious.
Now, we want to hear from you! Give this DIY trick a try and share your experience in the comments below. Did you notice a difference in the cleanliness or shelf life of your produce? Did you experiment with any variations? What tips and tricks did you discover along the way? Your feedback is invaluable and helps us all learn and improve together. Let’s create a community of healthy eaters who are empowered to take control of their food safety! We are excited to hear your thoughts and experiences. Happy washing!
Frequently Asked Questions (FAQ)
What type of vinegar should I use for my fruit wash?
White distilled vinegar is generally recommended for a vinegar fruit wash DIY. It’s inexpensive, readily available, and has a neutral odor that dissipates quickly after rinsing. Apple cider vinegar can also be used, but it has a stronger flavor that might linger slightly, especially on porous fruits and vegetables. Avoid using flavored vinegars or cleaning vinegars, as these may contain additives that are not safe for consumption. The key is to use a vinegar that is specifically labeled as food-grade and safe for use in cooking.
How long should I soak my fruits and vegetables in the vinegar wash?
The ideal soaking time depends on the type of produce. For most fruits and vegetables, a 15-20 minute soak is sufficient. However, for delicate items like berries or leafy greens, a shorter soak of 5-10 minutes is recommended to prevent them from becoming too soft or wilted. For thicker-skinned fruits and vegetables like apples or potatoes, you can soak them for up to 30 minutes. Always observe the produce during the soaking process and adjust the time accordingly. If you notice any signs of softening or discoloration, remove them from the wash immediately.
Will the vinegar wash leave a taste on my fruits and vegetables?
If you rinse your produce thoroughly after the vinegar wash, there should be no lingering vinegar taste. It’s crucial to rinse the fruits and vegetables under running water for at least 30 seconds to ensure all traces of vinegar are removed. If you’re particularly sensitive to the taste of vinegar, you can add a final rinse with plain water. Some people also find that adding a squeeze of lemon juice to the final rinse helps to neutralize any remaining vinegar odor.
Can I reuse the vinegar wash solution?
It’s not recommended to reuse the vinegar wash solution. After each use, the solution will contain contaminants and debris from the produce, which could re-contaminate subsequent batches. For optimal cleanliness, it’s best to prepare a fresh batch of vinegar wash for each use. This ensures that you’re effectively removing dirt, pesticides, and bacteria from your fruits and vegetables.
Is this vinegar fruit wash DIY safe for all types of produce?
Yes, this vinegar fruit wash DIY is generally safe for all types of produce. However, it’s important to adjust the soaking time and vinegar-to-water ratio based on the specific type of fruit or vegetable. As mentioned earlier, delicate items like berries and leafy greens require a shorter soaking time and a weaker vinegar solution. For produce with a waxy coating, such as apples or cucumbers, you may need to scrub them gently with a soft brush during the wash to remove the wax effectively.
Can I use this wash on organic produce?
Even organic produce can benefit from a vinegar wash. While organic farming practices minimize the use of synthetic pesticides, organic produce can still be exposed to dirt, bacteria, and natural pesticides. A vinegar wash will help to remove these contaminants, ensuring that your organic fruits and vegetables are as clean and safe as possible.
How often should I wash my fruits and vegetables with this method?
It’s best to wash your fruits and vegetables with this method immediately before you plan to eat or use them. This will ensure that they are as fresh and clean as possible. Washing produce too far in advance can actually shorten its shelf life, as the moisture from the wash can create a breeding ground for bacteria. If you’re not planning to use the produce right away, store it unwashed in the refrigerator and wash it just before consumption.
Can I add anything else to the vinegar wash for extra cleaning power?
Yes, you can add a tablespoon of baking soda to the vinegar wash for extra cleaning power. Baking soda is a natural abrasive that can help to remove dirt and grime from the surface of fruits and vegetables. However, be aware that adding baking soda to vinegar will create a fizzing reaction, so make sure to use a large enough container to prevent overflow. You can also add a few drops of food-grade essential oils, such as lemon or grapefruit, for a more fragrant wash.
How should I store my fruits and vegetables after washing them?
After washing your fruits and vegetables, it’s important to dry them thoroughly before storing them. Excess moisture can promote the growth of bacteria and mold, which can shorten their shelf life. You can use a clean kitchen towel or a salad spinner to remove excess water. Store the washed and dried produce in the refrigerator in airtight containers or produce bags. This will help to keep them fresh and crisp for longer.
What if I don’t have vinegar? Can I use something else?
While vinegar is the most commonly recommended ingredient for a DIY fruit wash, you can use lemon juice as an alternative. Lemon juice has similar antibacterial and antifungal properties to vinegar, making it an effective cleaning agent. Use the same ratio of lemon juice to water as you would for vinegar (1 part lemon juice to 3 parts water). You can also use a commercial fruit and vegetable wash, but be sure to read the label carefully and choose a product that is made with natural ingredients.

Leave a Comment