

Cleaning routine transformation tricks – sounds like magic, right? Well, maybe not magic, but definitely a game-changer for anyone who dreads spending their weekends scrubbing and dusting! I know I used to. For centuries, cultures around the world have developed unique cleaning methods, from ancient Egyptians using natron (a naturally occurring salt) to the elaborate cleaning rituals in Japanese homes. But let’s be honest, who has time for all that these days?
That’s where these DIY cleaning hacks come in. We all want a sparkling clean home, but the thought of spending hours achieving it? No thanks! These aren’t just your average tips; they’re clever, time-saving, and often use ingredients you already have in your pantry. Think vinegar, baking soda, and lemon power! I’m going to share some of my favorite cleaning routine transformation tricks that have completely revolutionized how I approach housework. They’ll save you time, money, and maybe even your sanity. Get ready to say goodbye to endless scrubbing and hello to a cleaner, happier home!

Transform Your Cleaning Routine: Genius DIY Hacks for a Sparkling Home!
Okay, let’s face it, cleaning isn’t exactly anyone’s favorite pastime. But what if I told you there are some super simple, budget-friendly DIY hacks that can make your cleaning routine faster, easier, and even a little bit… dare I say… fun? I’ve compiled some of my absolute favorite cleaning tricks that have completely transformed how I tackle household chores. Get ready to ditch the drudgery and embrace a sparkling clean home with these game-changing ideas!
Hack 1: The Magic Microwave Cleaner
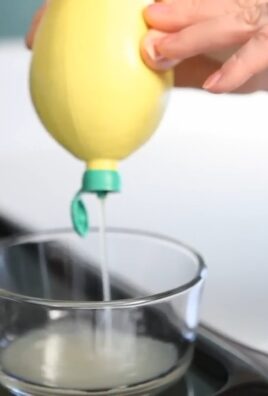
Is your microwave looking like a Jackson Pollock painting gone wrong? Don’t worry, I’ve got you covered. This hack uses the power of steam and lemon (or vinegar) to loosen up all that stuck-on food.
What You’ll Need:
* 1 cup water
* 1 tablespoon white vinegar *or* the juice of half a lemon
* Microwave-safe bowl
* Clean sponge or cloth
Step-by-Step Instructions:
1. Mix the Solution: In your microwave-safe bowl, combine the water and either the vinegar or lemon juice. I personally love the fresh scent of lemon, but vinegar works just as well for cutting through grease.
2. Microwave it Up: Place the bowl in the microwave and heat on high for 5-7 minutes. You want the solution to boil and create a lot of steam.
3. Let it Steam: Once the timer goes off, *don’t* open the microwave door immediately. Let it sit for another 3-5 minutes. This allows the steam to really loosen up all the grime.
4. Wipe it Clean: Carefully remove the bowl (it will be hot!). Then, using your sponge or cloth, wipe down the inside of the microwave. You’ll be amazed at how easily the food particles come off! For stubborn spots, you might need a little extra elbow grease, but most of the work is already done.
5. Final Touches: Wipe down the turntable and the inside of the door. Now your microwave should be sparkling clean and smelling fresh!
Hack 2: DIY All-Purpose Cleaner (Goodbye, Harsh Chemicals!)
I’m a big fan of reducing the number of harsh chemicals in my home. This DIY all-purpose cleaner is not only effective but also uses ingredients you probably already have in your pantry.
What You’ll Need:
* Spray bottle
* 1/4 cup white vinegar
* 1 tablespoon baking soda
* 2 cups hot water
* 10-15 drops essential oil (optional, but I love lemon, lavender, or tea tree)
Step-by-Step Instructions:
1. Prepare the Bottle: Make sure your spray bottle is clean and empty.
2. Add Baking Soda: Carefully pour the baking soda into the spray bottle.
3. Slowly Add Vinegar: Slowly pour the vinegar into the bottle. Be prepared for it to fizz! This is normal.
4. Add Hot Water: Gradually add the hot water to the bottle, leaving some space at the top.
5. Add Essential Oils (Optional): If you’re using essential oils, add them now.
6. Shake Well: Secure the spray nozzle and shake the bottle well to combine all the ingredients.
7. Cleaning Time! Now you’re ready to clean! This all-purpose cleaner is great for countertops, sinks, appliances, and even floors (test in an inconspicuous area first).
Important Note: Do not use this cleaner on marble or granite surfaces, as the vinegar can damage them.
Hack 3: Sparkling Shower Head in Minutes
Hard water got your shower head looking crusty? This simple hack will dissolve all that mineral buildup and restore your shower head to its former glory.
What You’ll Need:
* Plastic bag (sandwich bag or larger, depending on the size of your shower head)
* White vinegar
* Rubber band or twist tie
Step-by-Step Instructions:
1. Fill the Bag: Pour enough white vinegar into the plastic bag to completely submerge the shower head.
2. Secure the Bag: Carefully attach the bag to the shower head, making sure the shower head is fully immersed in the vinegar. Use a rubber band or twist tie to secure the bag tightly.
3. Let it Soak: Let the shower head soak in the vinegar for at least 30 minutes, or even overnight for really stubborn buildup.
4. Remove and Rinse: Remove the bag and discard the vinegar. Rinse the shower head thoroughly with water.
5. Wipe Clean: Use a clean cloth to wipe away any remaining residue.
6. Enjoy Your Sparkling Shower: Turn on the shower and enjoy the improved water pressure and sparkling clean shower head!
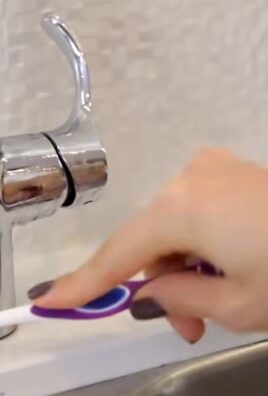
Hack 4: Revive Your Grout with Baking Soda Paste
Grungy grout can make even the cleanest bathroom look dirty. This baking soda paste is a natural and effective way to brighten your grout lines.
What You’ll Need:
* Baking soda
* Water
* Old toothbrush or grout brush
* Spray bottle (optional)
Step-by-Step Instructions:
1. Make the Paste: In a small bowl, mix baking soda with enough water to form a thick paste.
2. Apply the Paste: Apply the paste to the grout lines, using your fingers or a small spoon.
3. Scrub, Scrub, Scrub: Use an old toothbrush or grout brush to scrub the grout lines. Apply some pressure and work in small sections.
4. Let it Sit: Let the paste sit on the grout for 5-10 minutes.
5. Rinse and Wipe: Rinse the grout lines thoroughly with water. You can use a spray bottle to make rinsing easier. Wipe away any remaining residue with a clean cloth.
6. Admire Your Work: Stand back and admire your bright, clean grout!
Optional Boost: For extra cleaning power, you can add a few drops of hydrogen peroxide to the baking soda paste.
Hack 5: Dust-Busting Pillowcases
This is one of my favorite lazy-person cleaning hacks! Instead of buying expensive dusting cloths, I use old pillowcases.
What You’ll Need:
* Old pillowcases
Step-by-Step Instructions:
1. Grab a Pillowcase: Find an old pillowcase that you don’t mind getting dusty.
2. Dust Away: Simply slip the pillowcase over your hand and use it to dust furniture, shelves, blinds, and anything else that needs a good dusting. The soft fabric is gentle on surfaces and effectively picks up dust.
3. Wash and Reuse: When the pillowcase gets too dusty, simply toss it in the washing machine and reuse it again and again!
Bonus Tip: For hard-to-reach areas, like ceiling fans, slip the pillowcase over the fan blade and gently wipe. This will trap the dust inside the pillowcase, preventing it from falling all over you.
Hack 6: Unclog Drains with Baking Soda and Vinegar (The Natural Way!)
Forget harsh chemical drain cleaners! This baking soda and vinegar method is a natural and effective way to unclog drains.
What You’ll Need:
* 1 cup baking soda
* 2 cups white vinegar
* Hot water
Step-by-Step Instructions:
1. Pour in Baking Soda: Pour the baking soda down the clogged drain.
2. Follow with Vinegar: Immediately pour the vinegar down the drain after the baking soda.
3. Let it Fizz: Let the mixture fizz and bubble for 30 minutes. This chemical reaction helps to break down the clog.
4. Flush with Hot Water: After 30 minutes, flush the drain with a pot of boiling water.
5. Repeat if Necessary: If the drain is still clogged, repeat the process.
Pro Tip: For really stubborn clogs, you can use a plunger after flushing with hot water.
Hack 7: Streak-Free Windows with Newspaper
Ditch the paper towels and expensive window cleaners! This old-fashioned trick uses newspaper to achieve streak-free windows.
What You’ll Need:
* Spray bottle filled with equal parts water and white vinegar
* Newspaper (crumpled)
Step-by-Step Instructions:
1. Spray the Windows: Lightly spray the windows with the water and vinegar solution.
2. Wipe with Newspaper: Crumple up a sheet of newspaper and use it to wipe the windows. The newspaper will absorb the moisture and leave a streak-free shine.
3. Repeat if Necessary: If the windows are particularly dirty, you may need to repeat the process.
Why Newspaper Works: The ink

Conclusion
So, there you have it! This simple yet incredibly effective DIY cleaning routine transformation trick is more than just a shortcut; it’s a game-changer for anyone looking to reclaim their time and sanity. We’ve shown you how to take everyday cleaning tasks and elevate them to a level of efficiency you probably didn’t think was possible. Forget spending hours scrubbing and stressing – this method is about working smarter, not harder.
Why is this a must-try? Because it addresses the core issues that make cleaning a chore: the time commitment, the perceived difficulty, and the lack of lasting results. By implementing this technique, you’re not just cleaning; you’re creating a system that keeps your home cleaner for longer, reducing the frequency and intensity of future cleaning sessions. Think of it as an investment in your own well-being. A clean home contributes to a clearer mind and a more relaxed atmosphere.
But don’t just take our word for it. The beauty of this DIY cleaning routine transformation trick lies in its adaptability. Feel free to experiment with different cleaning solutions to find what works best for your surfaces and preferences. For instance, if you’re dealing with stubborn bathroom grime, try adding a bit of baking soda to your cleaning paste for extra scrubbing power. Or, if you prefer a more natural approach, vinegar and essential oils can be excellent alternatives. Consider using lemon essential oil for its degreasing properties and uplifting scent, or tea tree oil for its antibacterial benefits.
Variations to Consider:
* Scent Customization: Infuse your cleaning solutions with your favorite essential oils. Lavender for relaxation, citrus for energy, or eucalyptus for a refreshing clean.
* Surface-Specific Solutions: Tailor your cleaning paste to different surfaces. A gentler formula for delicate surfaces like wood, and a more abrasive one for tough stains on tile.
* Time-Saving Tools: Invest in a good quality microfiber cloth and a spray bottle. These tools will make the cleaning process even more efficient.
* Deep Cleaning Schedule: Incorporate this trick into a larger deep cleaning schedule. Focus on one area of your home each week to prevent overwhelming yourself.
We encourage you to give this DIY cleaning routine transformation trick a try. Start small, perhaps with just one room or one specific cleaning task. Once you experience the difference, you’ll be hooked! The key is to be consistent and to adapt the method to your own needs and preferences.
We’re confident that you’ll find this trick to be a valuable addition to your cleaning arsenal. But more importantly, we want to hear about your experience! Share your tips, variations, and success stories in the comments below. Let’s create a community of clean-home enthusiasts who are all about making life easier and more enjoyable. Your insights could help others discover the joy of a sparkling clean home without the stress and hassle. So, go ahead, transform your cleaning routine and share your journey with us!
Frequently Asked Questions (FAQ)
What exactly is the core principle behind this DIY cleaning routine transformation trick?
The core principle is to proactively address cleaning tasks by creating a system that minimizes future effort. Instead of waiting for dirt and grime to accumulate, this trick focuses on regular, quick maintenance to prevent build-up. This involves using readily available ingredients and simple techniques to keep surfaces clean and prevent the need for intensive scrubbing later on. It’s about consistency and prevention rather than reactive deep cleaning.
How often should I implement this cleaning routine transformation trick for optimal results?
The frequency depends on your lifestyle and the specific area you’re cleaning. For high-traffic areas like kitchens and bathrooms, a quick wipe-down every few days can make a significant difference. For less frequently used areas, a weekly or bi-weekly cleaning might suffice. The key is to observe how quickly dirt accumulates and adjust your cleaning schedule accordingly. The goal is to prevent grime from setting in, making future cleaning easier.
What are some common mistakes people make when trying this DIY cleaning routine transformation trick, and how can I avoid them?
One common mistake is using the wrong cleaning solution for a particular surface. Always test your cleaning solution in an inconspicuous area first to ensure it doesn’t damage the material. Another mistake is using too much cleaning solution, which can leave behind a residue. Use a minimal amount and wipe thoroughly. Finally, neglecting to rinse surfaces after cleaning can also lead to residue build-up. Always rinse with clean water and dry with a microfiber cloth.
Can this DIY cleaning routine transformation trick be used on all types of surfaces?
While this trick is versatile, it’s not suitable for all surfaces. Avoid using abrasive cleaners on delicate surfaces like wood or painted walls. Always check the manufacturer’s instructions for specific cleaning recommendations. For sensitive surfaces, opt for gentler cleaning solutions like diluted vinegar or mild soap and water. When in doubt, test the solution in an inconspicuous area first.
What are some eco-friendly alternatives to the cleaning solutions mentioned in this DIY cleaning routine transformation trick?
There are many eco-friendly alternatives you can use. Vinegar is a great all-purpose cleaner and disinfectant. Baking soda is a natural abrasive that can be used to scrub away grime. Lemon juice is a natural degreaser and deodorizer. Essential oils can be added for fragrance and antibacterial properties. You can also find commercially available eco-friendly cleaning products that are made with plant-based ingredients.
How can I involve my family in this DIY cleaning routine transformation trick to make it a shared responsibility?
Make cleaning a family affair by assigning age-appropriate tasks to each member. Young children can help with simple tasks like wiping down surfaces or putting away toys. Older children can take on more challenging tasks like cleaning bathrooms or vacuuming. Create a cleaning schedule and rotate tasks to keep things fair. Make it fun by playing music or turning it into a game. The key is to make cleaning a shared responsibility rather than a chore that falls solely on one person.
What if I don’t see immediate results after trying this DIY cleaning routine transformation trick?
Don’t get discouraged if you don’t see immediate results. Sometimes it takes a few tries to find the right cleaning solution and technique for your specific surfaces. Be patient and persistent. If you’re dealing with stubborn stains or grime, you may need to repeat the cleaning process or use a stronger cleaning solution. Remember, consistency is key. The more often you clea
So, there you have it! This simple yet incredibly effective DIY cleaning routine transformation trick is more than just a shortcut; it’s a game-changer for anyone looking to reclaim their time and sanity. We’ve shown you how to take everyday cleaning tasks and elevate them to a level of efficiency you probably didn’t think was possible. Forget spending hours scrubbing and stressing – this method is about working smarter, not harder.
Why is this a must-try? Because it addresses the core issues that make cleaning a chore: the time commitment, the perceived difficulty, and the lack of lasting results. By implementing this technique, you’re not just cleaning; you’re creating a system that keeps your home cleaner for longer, reducing the frequency and intensity of future cleaning sessions. Think of it as an investment in your own well-being. A clean home contributes to a clearer mind and a more relaxed atmosphere.
But don’t just take our word for it. The beauty of this DIY cleaning routine transformation trick lies in its adaptability. Feel free to experiment with different cleaning solutions to find what works best for your surfaces and preferences. For instance, if you’re dealing with stubborn bathroom grime, try adding a bit of baking soda to your cleaning paste for extra scrubbing power. Or, if you prefer a more natural approach, vinegar and essential oils can be excellent alternatives. Consider using lemon essential oil for its degreasing properties and uplifting scent, or tea tree oil for its antibacterial benefits.
Variations to Consider:
* Scent Customization: Infuse your cleaning solutions with your favorite essential oils. Lavender for relaxation, citrus for energy, or eucalyptus for a refreshing clean.
* Surface-Specific Solutions: Tailor your cleaning paste to different surfaces. A gentler formula for delicate surfaces like wood, and a more abrasive one for tough stains on tile.
* Time-Saving Tools: Invest in a good quality microfiber cloth and a spray bottle. These tools will make the cleaning process even more efficient.
* Deep Cleaning Schedule: Incorporate this trick into a larger deep cleaning schedule. Focus on one area of your home each week to prevent overwhelming yourself.
We encourage you to give this DIY cleaning routine transformation trick a try. Start small, perhaps with just one room or one specific cleaning task. Once you experience the difference, you’ll be hooked! The key is to be consistent and to adapt the method to your own needs and preferences.
We’re confident that you’ll find this trick to be a valuable addition to your cleaning arsenal. But more importantly, we want to hear about your experience! Share your tips, variations, and success stories in the comments below. Let’s create a community of clean-home enthusiasts who are all about making life easier and more enjoyable. Your insights could help others discover the joy of a sparkling clean home without the stress and hassle. So, go ahead, transform your cleaning routine and share your journey with us!
Frequently Asked Questions (FAQ)
What exactly is the core principle behind this DIY cleaning routine transformation trick?
The core principle is to proactively address cleaning tasks by creating a system that minimizes future effort. Instead of waiting for dirt and grime to accumulate, this trick focuses on regular, quick maintenance to prevent build-up. This involves using readily available ingredients and simple techniques to keep surfaces clean and prevent the need for intensive scrubbing later on. It’s about consistency and prevention rather than reactive deep cleaning.
How often should I implement this cleaning routine transformation trick for optimal results?
The frequency depends on your lifestyle and the specific area you’re cleaning. For high-traffic areas like kitchens and bathrooms, a quick wipe-down every few days can make a significant difference. For less frequently used areas, a weekly or bi-weekly cleaning might suffice. The key is to observe how quickly dirt accumulates and adjust your cleaning schedule accordingly. The goal is to prevent grime from setting in, making future cleaning easier.
What are some common mistakes people make when trying this DIY cleaning routine transformation trick, and how can I avoid them?
One common mistake is using the wrong cleaning solution for a particular surface. Always test your cleaning solution in an inconspicuous area first to ensure it doesn’t damage the material. Another mistake is using too much cleaning solution, which can leave behind a residue. Use a minimal amount and wipe thoroughly. Finally, neglecting to rinse surfaces after cleaning can also lead to residue build-up. Always rinse with clean water and dry with a microfiber cloth.
Can this DIY cleaning routine transformation trick be used on all types of surfaces?
While this trick is versatile, it’s not suitable for all surfaces. Avoid using abrasive cleaners on delicate surfaces like wood or painted walls. Always check the manufacturer’s instructions for specific cleaning recommendations. For sensitive surfaces, opt for gentler cleaning solutions like diluted vinegar or mild soap and water. When in doubt, test the solution in an inconspicuous area first.
What are some eco-friendly alternatives to the cleaning solutions mentioned in this DIY cleaning routine transformation trick?
There are many eco-friendly alternatives you can use. Vinegar is a great all-purpose cleaner and disinfectant. Baking soda is a natural abrasive that can be used to scrub away grime. Lemon juice is a natural degreaser and deodorizer. Essential oils can be added for fragrance and antibacterial properties. You can also find commercially available eco-friendly cleaning products that are made with plant-based ingredients.
How can I involve my family in this DIY cleaning routine transformation trick to make it a shared responsibility?
Make cleaning a family affair by assigning age-appropriate tasks to each member. Young children can help with simple tasks like wiping down surfaces or putting away toys. Older children can take on more challenging tasks like cleaning bathrooms or vacuuming. Create a cleaning schedule and rotate tasks to keep things fair. Make it fun by playing music or turning it into a game. The key is to make cleaning a shared responsibility rather than a chore that falls solely on one person.
What if I don’t see immediate results after trying this DIY cleaning routine transformation trick?
Don’t get discouraged if you don’t see immediate results. Sometimes it takes a few tries to find the right cleaning solution and technique for your specific surfaces. Be patient and persistent. If you’re dealing with stubborn stains or grime, you may need to repeat the cleaning process or use a stronger cleaning solution. Remember, consistency is key. The more often you clean, the easier it will become to maintain a clean home.
How does this DIY cleaning routine transformation trick save time in the long run?
This trick saves time by preventing dirt and grime from building up in the first place. By regularly cleaning surfaces, you’re preventing the need for intensive scrubbing later on. This means you’ll spend less time cleaning overall. Additionally, this trick helps you develop a cleaning routine, which makes it easier to stay organized and on top of things. A well-organized cleaning routine can save you time and stress in the long run.
What are some additional tools or gadgets that can enhance the effectiveness of this DIY cleaning routine transformation trick?
Investing in a few key tools can make this trick even more effective. A good quality microfiber cloth is essential for wiping down surfaces without leaving streaks. A spray bottle is useful for applying cleaning solutions evenly. A scrub brush can help you tackle stubborn stains. A vacuum cleaner with attachments can help you clean hard-to-reach areas. And a steam cleaner can be used to sanitize surfaces without the need for harsh chemicals.
How can I adapt this DIY cleaning routine transformation trick to fit my specific needs and preferences?
The beauty of this trick is its adaptability. Feel free to experiment with different cleaning solutions, tools, and techniques to find what works best for you. If you prefer natural cleaning solutions, use vinegar, baking soda, and lemon juice. If you prefer scented cleaning solutions, add essential oils. If you have sensitive skin, wear gloves. The key is to customize the trick to fit your specific needs and preferences. Don’t be afraid to experiment and find what works best for you.
Leave a Comment