

Bitter Gourd Urban Gardening Hacks: Ever dreamt of harvesting your own vibrant, knobbly bitter gourds right in the heart of the city? I know I have! It might seem like a challenge, especially if you’re short on space, but trust me, with a few clever tricks, you can absolutely cultivate this nutritional powerhouse, even on a small balcony or patio.
Bitter gourd, also known as karela, isn’t just a vegetable; it’s a culinary staple with a rich history, particularly in Asian cultures. For centuries, it’s been celebrated not only for its unique, albeit acquired, taste but also for its impressive health benefits. From traditional medicine to modern cuisine, bitter gourd holds a special place.
But why bother growing your own? Well, store-bought bitter gourds can sometimes lack freshness and flavor. Plus, knowing exactly where your food comes from and how it’s grown is incredibly rewarding. That’s where these bitter gourd urban gardening hacks come in! I’m going to share some simple, effective DIY techniques that will help you overcome common urban gardening obstacles, like limited space, poor soil, and pest control. Get ready to transform your small space into a thriving bitter gourd haven and enjoy the satisfaction of harvesting your own delicious, healthy produce!
Growing Bitter Gourd Like a Pro: My Urban Gardening Hacks
Okay, let’s dive into the world of bitter gourd! I know, I know, it’s not everyone’s favorite flavor, but trust me, growing your own is incredibly rewarding. Plus, fresh, homegrown bitter gourd is way less bitter than the ones you find at the store. I’m going to share all my secrets for successfully growing this vine in an urban setting, even if you only have a small balcony or patio.
Choosing the Right Variety and Starting Seeds
First things first, let’s talk about varieties. There are tons of different types of bitter gourd, varying in size, shape, and bitterness. For urban gardening, I recommend sticking with smaller varieties that don’t require as much space. Some good options include:
- Arka Harit: A high-yielding variety with medium-sized, dark green fruits.
- Pusa Do Mausami: An early-maturing variety, perfect if you want a quick harvest.
- Green Long: As the name suggests, this variety produces long, slender, green fruits.
Once you’ve chosen your variety, it’s time to start the seeds. You can directly sow them in the ground, but I prefer starting them indoors for a head start, especially if you live in a cooler climate.
Here’s how I do it:
1. Scarify the Seeds: Bitter gourd seeds have a tough outer shell, which can make germination difficult. To help them sprout, I gently scarify them by rubbing them with sandpaper or nicking them with a knife. Be careful not to damage the inner seed!
2. Soak the Seeds: After scarifying, I soak the seeds in warm water for 24 hours. This helps to soften the seed coat and further promote germination.
3. Prepare Seedling Trays: I use seedling trays filled with a well-draining potting mix. You can also use small pots.
4. Sow the Seeds: Plant the seeds about half an inch deep in the potting mix.
5. Water Gently: Water the trays gently to moisten the soil. Avoid overwatering, which can lead to rot.
6. Provide Warmth: Bitter gourd seeds need warmth to germinate. I place my seedling trays in a warm spot, like near a sunny window or on a heat mat.
7. Wait Patiently: Germination usually takes about 7-14 days. Keep the soil moist but not soggy during this time.
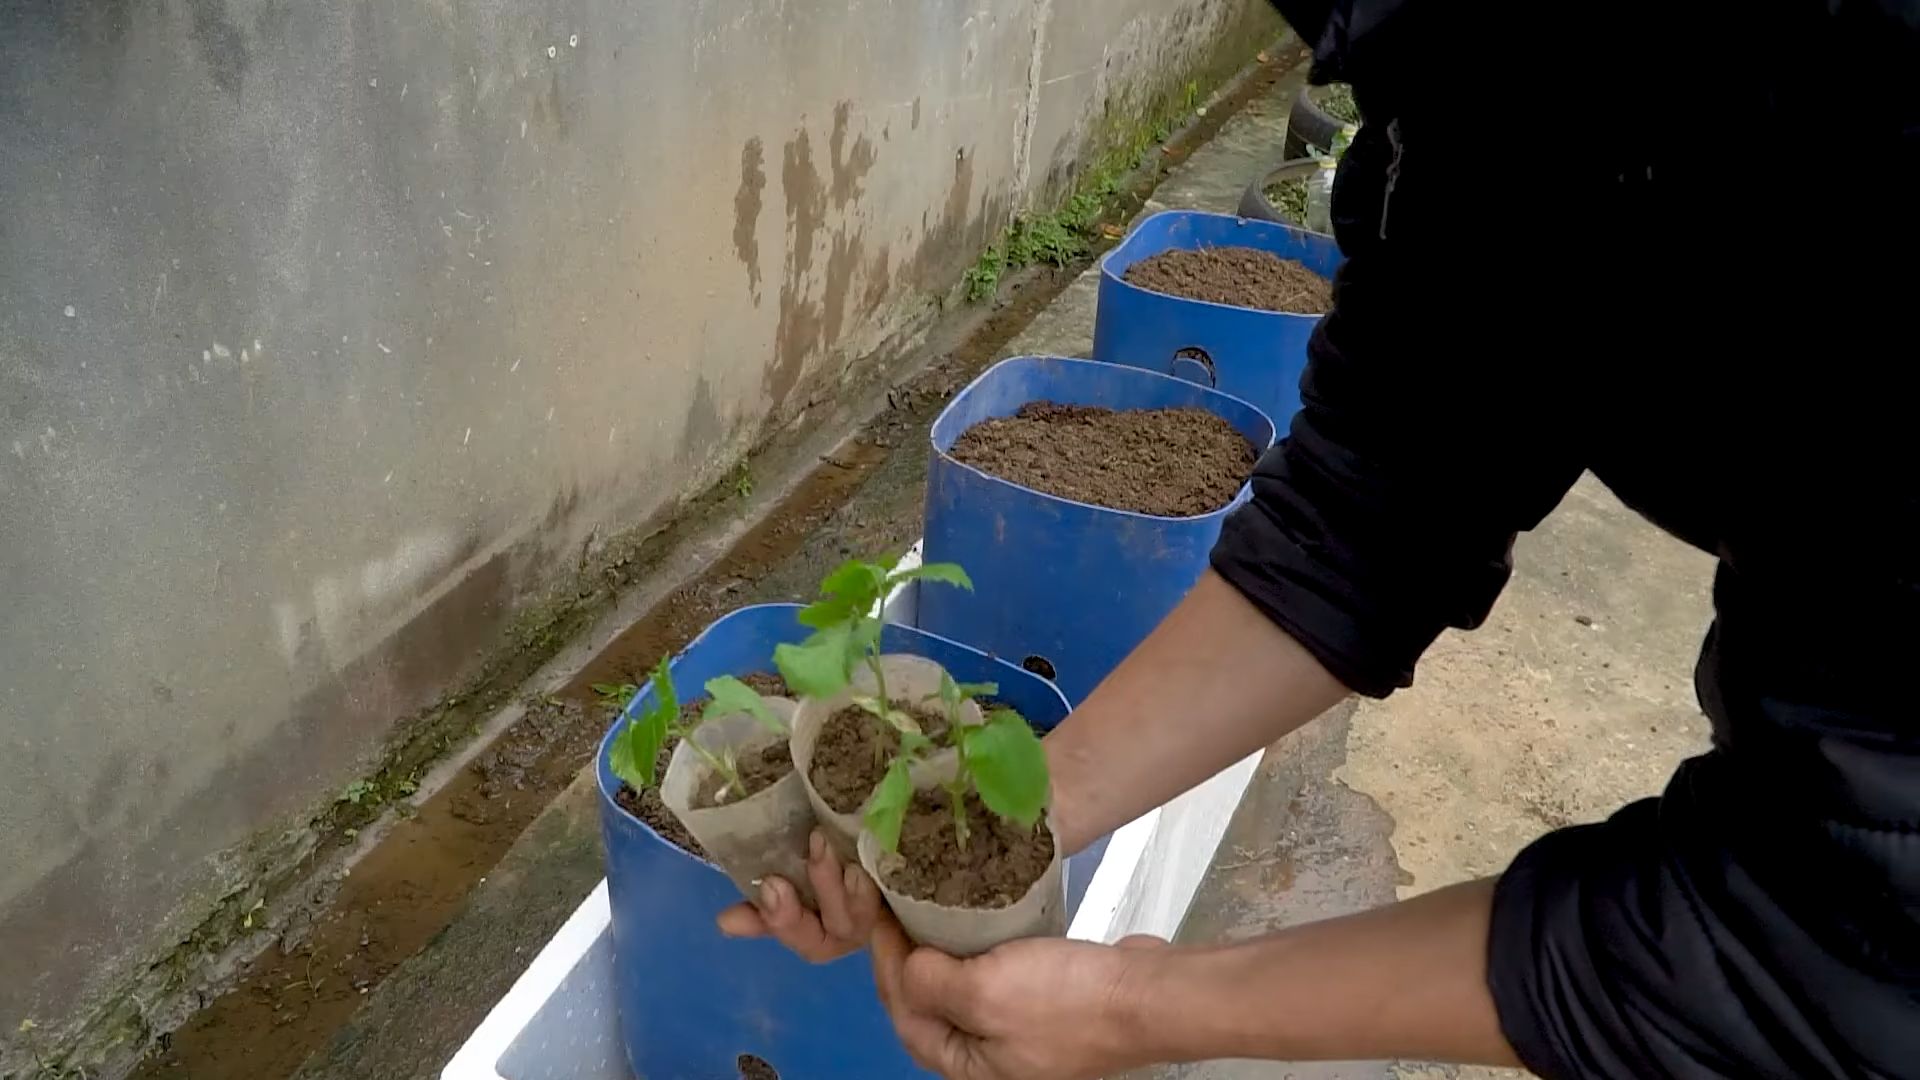
Preparing the Soil and Planting Seedlings
While your seedlings are growing, it’s time to prepare the soil. Bitter gourd needs well-draining soil that is rich in organic matter.
Here’s my soil preparation routine:
1. Choose a Sunny Location: Bitter gourd needs at least 6-8 hours of sunlight per day. Choose a spot in your garden or balcony that gets plenty of sun.
2. Prepare the Soil: If you’re planting in the ground, dig a hole that is about twice the size of the seedling’s root ball. If you’re planting in a container, choose a large pot (at least 12 inches in diameter) with drainage holes.
3. Amend the Soil: Mix the soil with plenty of compost or well-rotted manure. This will provide the plants with the nutrients they need to grow. I also like to add a handful of bone meal to the soil, which helps promote strong root growth.
4. Plant the Seedlings: Once the seedlings have developed a few true leaves, they’re ready to be transplanted. Gently remove the seedlings from the trays and plant them in the prepared soil.
5. Water Thoroughly: Water the seedlings thoroughly after planting.
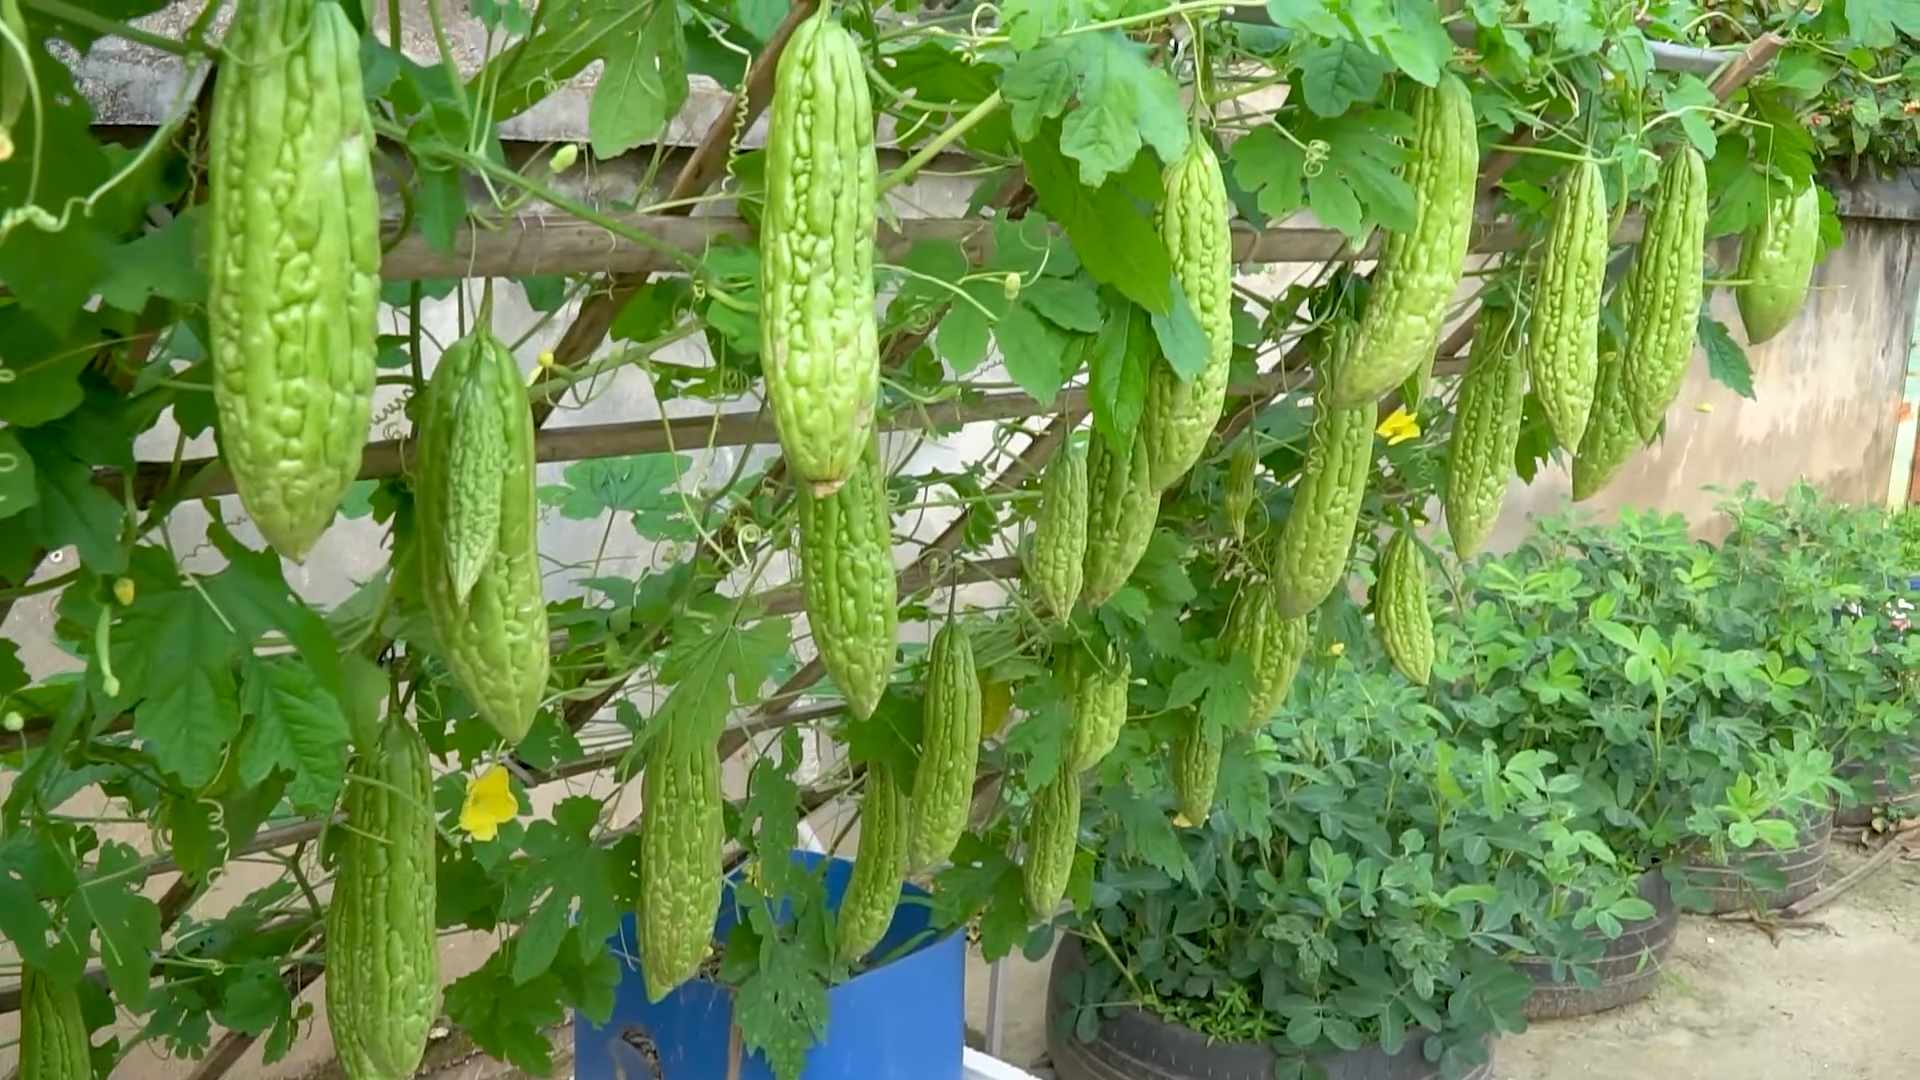
Creating a Strong Trellis System
Bitter gourd is a vine, so it needs a trellis to climb on. A strong and well-designed trellis is crucial for supporting the weight of the growing vines and fruits.
Here are some trellis options I’ve used:
- Bamboo Trellis: This is a simple and inexpensive option. You can create a bamboo trellis by tying bamboo poles together with twine.
- Netting: You can use netting to create a trellis by attaching it to a frame or wall.
- Metal Trellis: Metal trellises are more durable and can support heavier vines.
- DIY Trellis: Get creative and build your own trellis using materials like wood, PVC pipes, or even old ladders.
Here’s how I set up my trellis:
1. Choose a Trellis Type: Select the trellis type that best suits your space and budget.
2. Install the Trellis: Install the trellis near the seedlings, making sure it’s sturdy and well-supported.
3. Guide the Vines: As the vines grow, gently guide them onto the trellis and tie them loosely with twine or plant clips.
Watering, Fertilizing, and Pruning
Proper watering, fertilizing, and pruning are essential for healthy growth and abundant fruit production.
Watering:
1. Water Regularly: Bitter gourd needs consistent moisture, especially during hot weather. Water deeply whenever the top inch of soil feels dry.
2. Avoid Overwatering: Overwatering can lead to root rot. Make sure the soil is well-draining and avoid letting the plants sit in standing water.
3. Water in the Morning: Water in the morning to allow the foliage to dry before nightfall, which can help prevent fungal diseases.
Fertilizing:
1. Use a Balanced Fertilizer: Fertilize the plants every 2-3 weeks with a balanced fertilizer (e.g., 10-10-10).
2. Apply Organic Fertilizers: You can also use organic fertilizers like compost tea or fish emulsion.
3. Side-Dress with Compost: Side-dress the plants with compost every month to provide them with a slow-release source of nutrients.
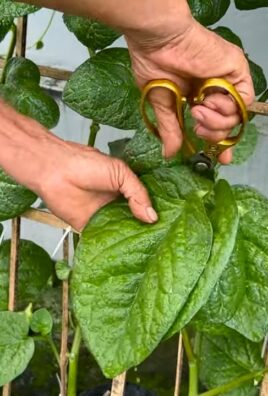
Pruning:
1. Pinch Off Side Shoots: Pinch off the side shoots (the small branches that grow from the main stem) to encourage the plant to focus its energy on fruit production.
2. Remove Yellowing Leaves: Remove any yellowing or diseased leaves to prevent the spread of disease.
3. Prune Overcrowded Vines: If the vines become too crowded, prune them to improve air circulation and sunlight penetration.
Dealing with Pests and Diseases
Bitter gourd can be susceptible to pests and diseases, but with proper care, you can minimize these problems.
Common Pests:
- Aphids: These small, sap-sucking insects can weaken the plants. Control them with insecticidal soap or neem oil.
- Spider Mites: These tiny mites can cause yellowing and stippling of the leaves. Control them with insecticidal soap or miticides.
- Fruit Flies: Fruit flies can lay their eggs in the fruits, causing them to rot. Use fruit fly traps or cover the fruits with netting.
Common Diseases:
- Powdery Mildew: This fungal disease causes a white, powdery coating on the leaves. Control it with fungicides or by improving air circulation.
- Downy Mildew: This fungal disease causes yellow spots on the upper surface of the leaves and a grayish-purple mold on the underside. Control it with fungicides or by improving air circulation.
- Anthracnose: This fungal disease causes dark, sunken spots on the leaves and fruits. Control it with fungicides or by removing infected plant parts.
My Pest and Disease Control Strategies:
1. Regular Inspection: I regularly inspect my plants for signs of pests and diseases.
2. Handpicking: I handpick any pests that I find on the plants.
3. Insecticidal Soap: I use insecticidal soap to control aphids, spider mites, and other soft-bodied insects.
4. Neem Oil: I use neem oil to control a variety of pests and diseases.
5. Fungicides: I use fungicides to control fungal diseases like powdery mildew and downy mildew.
6. Good Air Circulation: I make sure the plants have good air circulation to prevent fungal diseases.
Harvesting and Enjoying Your Bitter Gourd
Harvesting is the most rewarding part of growing bitter gourd! You can usually start harvesting about 2-3 months after planting.
Here’s how I harvest my bitter gourd:
1. Harvest When Young: Harvest the fruits when they are young and tender, before they turn yellow or orange.
2. Use a Sharp Knife: Use a sharp knife or pruning shears to cut the fruits from the vine.
3. Handle with Care: Handle the fruits with care to avoid bruising them.
Enjoying
Conclusion
So, there you have it! Transforming your urban space into a thriving bitter gourd haven is not only achievable but also incredibly rewarding. We’ve explored simple yet effective DIY tricks that can significantly boost your yield and overall gardening experience. From optimizing soil composition with readily available kitchen scraps to crafting ingenious support systems from recycled materials, these methods are designed to be accessible, affordable, and environmentally conscious.
Why is this a must-try? Because growing your own bitter gourd offers a multitude of benefits. You gain access to fresh, pesticide-free produce, contributing to a healthier lifestyle. You reduce your carbon footprint by minimizing reliance on commercially grown and transported vegetables. And perhaps most importantly, you connect with nature in a tangible way, fostering a sense of accomplishment and well-being.
But the beauty of urban gardening lies in its adaptability. Feel free to experiment with these techniques and tailor them to your specific environment and resources. For instance, if you live in a particularly sunny area, consider using shade cloth during the hottest part of the day to prevent leaf scorch. If space is truly limited, explore vertical gardening options like hanging baskets or repurposed pallet planters. You can even try different varieties of bitter gourd, each with its unique flavor profile and growth habit. Consider adding companion plants like beans or marigolds to deter pests naturally.
Don’t be afraid to get creative with your DIY solutions. Instead of traditional trellises, you could repurpose old ladders or even construct a simple frame using bamboo poles. The key is to provide ample support for the vigorous vines of the bitter gourd. Remember to consistently monitor your plants for signs of pests or diseases, and address any issues promptly. Regular watering and fertilization are also crucial for optimal growth and fruit production.
Ultimately, successful bitter gourd cultivation hinges on observation, patience, and a willingness to learn. Embrace the challenges, celebrate the small victories, and enjoy the process of nurturing your own food. We are confident that these DIY tricks will empower you to cultivate a bountiful harvest of bitter gourd, right in the heart of your urban oasis.
We strongly encourage you to try these DIY bitter gourd urban gardening hacks. We are eager to hear about your experiences! Share your successes, your challenges, and any innovative modifications you’ve made along the way. Let’s build a community of urban gardeners, sharing knowledge and inspiring each other to grow our own food, one bitter gourd at a time. Post your photos and stories on social media using #BitterGourdDIY and #UrbanGardeningHacks. Let’s show the world that anyone can grow their own food, no matter where they live! Your insights could be invaluable to other aspiring gardeners. So, get your hands dirty, embrace the challenge, and reap the rewards of homegrown bitter gourd!
Frequently Asked Questions (FAQ)
What is the best time of year to plant bitter gourd?
The ideal time to plant bitter gourd is during the late spring or early summer, after the last frost has passed. Bitter gourd thrives in warm weather and requires a long growing season of at least 90-120 days. Soil temperature should be consistently above 65°F (18°C) for optimal germination and growth. If you live in a region with a shorter growing season, you can start seeds indoors 4-6 weeks before the last expected frost and transplant them outdoors once the weather warms up.
What kind of soil is best for growing bitter gourd?
Bitter gourd prefers well-drained, fertile soil that is rich in organic matter. A slightly acidic to neutral pH of 6.0 to 6.8 is ideal. Before planting, amend your soil with compost, aged manure, or other organic materials to improve drainage, fertility, and water retention. Avoid heavy clay soils, as they can become waterlogged and hinder root development. If you have clay soil, consider growing bitter gourd in raised beds or containers with a well-draining potting mix.
How much sunlight does bitter gourd need?
Bitter gourd requires at least 6-8 hours of direct sunlight per day to thrive. Choose a planting location that receives ample sunlight throughout the day. If you live in a particularly hot climate, providing some afternoon shade can help prevent leaf scorch. Insufficient sunlight can lead to stunted growth, reduced fruit production, and increased susceptibility to pests and diseases.
How often should I water bitter gourd?
Water bitter gourd regularly, especially during hot and dry weather. Aim to keep the soil consistently moist but not waterlogged. Water deeply and less frequently, rather than shallowly and more often, to encourage deep root growth. Check the soil moisture level regularly by inserting your finger into the soil. If the top inch feels dry, it’s time to water. Avoid overhead watering, as it can promote fungal diseases. Drip irrigation or soaker hoses are excellent options for delivering water directly to the roots.
What are some common pests and diseases that affect bitter gourd?
Bitter gourd can be susceptible to various pests and diseases, including aphids, spider mites, squash bugs, powdery mildew, and downy mildew. Regularly inspect your plants for signs of infestation or disease. Use organic pest control methods, such as insecticidal soap, neem oil, or diatomaceous earth, to control pests. Ensure good air circulation around your plants to prevent fungal diseases. Remove any infected leaves or fruits promptly to prevent the spread of disease.
How do I harvest bitter gourd?
Harvest bitter gourd when the fruits are still young and tender, typically about 6-8 inches long. The skin should be smooth and firm, and the color should be a vibrant green. Use a sharp knife or pruning shears to cut the fruit from the vine, leaving a short stem attached. Overripe bitter gourd will turn yellow or orange and become more bitter in taste. Harvest regularly to encourage continued fruit production.
How can I reduce the bitterness of bitter gourd?
Bitter gourd is known for its distinct bitter taste, but there are several ways to reduce its bitterness. Soaking the sliced bitter gourd in salted water for at least 30 minutes can help draw out some of the bitterness. You can also blanch the sliced bitter gourd in boiling water for a few minutes before cooking. Another technique is to remove the seeds and pith, as they contain a high concentration of bitter compounds. Cooking bitter gourd with acidic ingredients, such as vinegar or lemon juice, can also help balance the bitterness.
Can I grow bitter gourd in containers?
Yes, bitter gourd can be successfully grown in containers, provided you choose a large enough container and provide adequate support for the vines. Select a container that is at least 12-18 inches in diameter and depth. Use a well-draining potting mix and ensure that the container has drainage holes. Provide a trellis or other support structure for the vines to climb. Water and fertilize regularly, as container-grown plants tend to dry out and deplete nutrients more quickly than those grown in the ground.
What are some good companion plants for bitter gourd?
Companion planting can help improve the growth and health of bitter gourd by attracting beneficial insects, repelling pests, and improving soil fertility. Some good companion plants for bitter gourd include beans, peas, marigolds, nasturtiums, and basil. Beans and peas can fix nitrogen in the soil, benefiting the bitter gourd. Marigolds and nasturtiums can repel pests, such as aphids and nematodes. Basil can attract beneficial insects, such as pollinators and predatory wasps.
How do I save seeds from bitter gourd?
To save seeds from bitter gourd, allow a few fruits to fully ripen on the vine. The fruits will turn yellow or orange and become soft. Remove the seeds from the ripe fruits and wash them thoroughly to remove any pulp. Spread the seeds out on a paper towel to dry completely. Once the seeds are dry, store them in an airtight container in a cool, dark, and dry place. Properly stored bitter gourd seeds can remain viable for several years.

Leave a Comment