

Terrace Asparagus Growing Tips: Dreaming of fresh, homegrown asparagus gracing your dinner plate? I know I am! But maybe you’re thinking, “Asparagus? On my terrace? Impossible!” Well, I’m here to tell you it’s absolutely possible, and I’m going to share some simple DIY tricks to make it happen.
Asparagus has a rich history, enjoyed since Roman times for its delicate flavor and purported medicinal benefits. Imagine, cultivating a plant with such a legacy right outside your door! For centuries, it was a delicacy reserved for the wealthy, but now, thanks to modern gardening techniques, we can all enjoy this springtime treat.
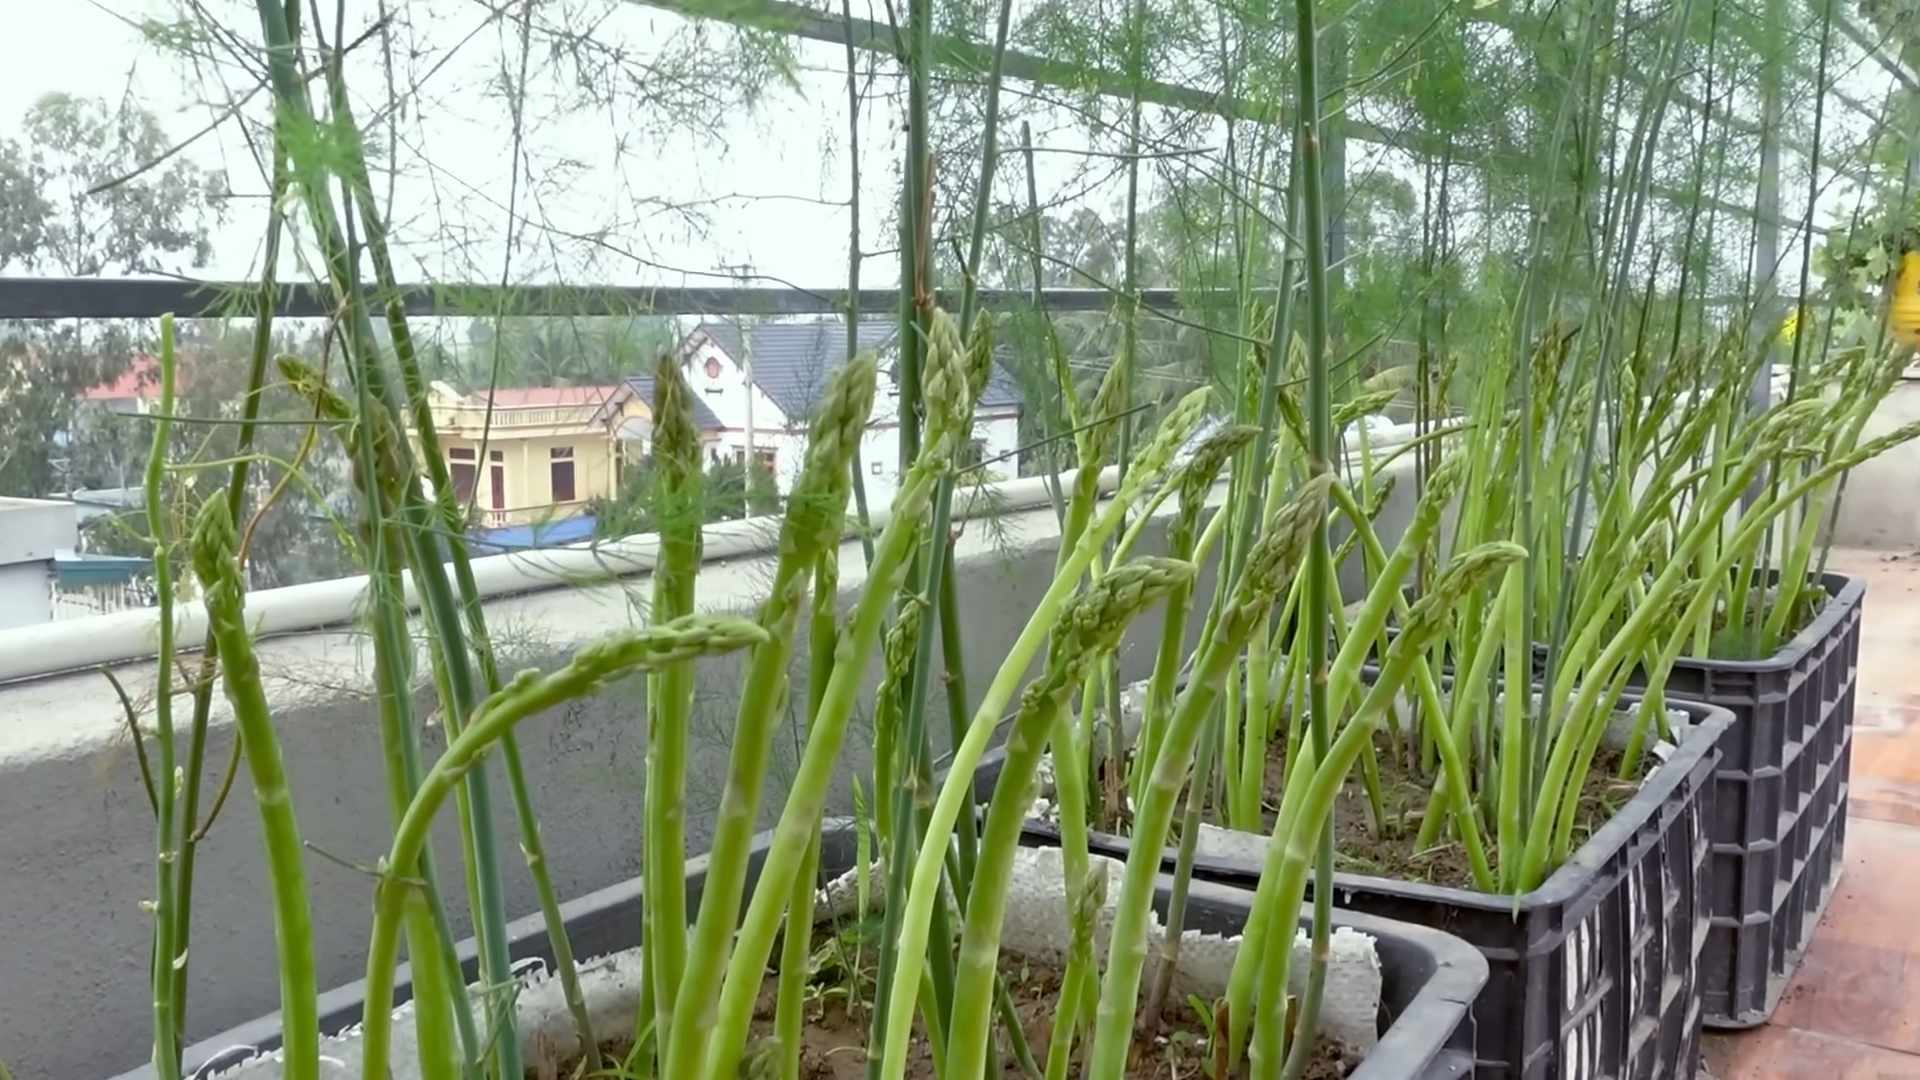
Why bother with these terrace asparagus growing tips? Because store-bought asparagus simply can’t compare to the flavor of freshly harvested spears. Plus, growing your own is incredibly rewarding! It’s a sustainable way to enjoy delicious produce, and it’s a fantastic way to connect with nature, even in a limited space. Many people are intimidated by growing asparagus, thinking it requires vast fields. But with a few clever DIY hacks, you can successfully cultivate this perennial vegetable in containers on your terrace, balcony, or patio. I’m excited to guide you through the process, making it easy and fun to enjoy your own homegrown asparagus for years to come!
Growing Asparagus on Your Terrace: A DIY Guide
Hey there, fellow gardening enthusiasts! Ever dreamed of snipping fresh asparagus spears right from your own terrace? Well, dream no more! Growing asparagus in containers is totally doable, and I’m here to walk you through every step. It might seem intimidating, but trust me, with a little patience and the right know-how, you’ll be enjoying homegrown asparagus in no time.
What You’ll Need
Before we dive in, let’s gather our supplies. Having everything ready will make the process smooth and enjoyable.
* Asparagus Crowns: These are the one-year-old roots of the asparagus plant. Choose a variety that’s well-suited to your climate. ‘Jersey Knight’ and ‘Purple Passion’ are popular choices. I personally love ‘Jersey Knight’ for its high yield.
* Large Containers: Asparagus needs room to spread its roots. I recommend containers that are at least 18 inches deep and 18 inches wide. The bigger, the better!
* Well-Draining Potting Mix: Asparagus hates soggy roots. A mix of compost, peat moss, and perlite or vermiculite works wonders. You can also buy a pre-made potting mix specifically designed for vegetables.
* Compost or Aged Manure: This will provide essential nutrients for your asparagus plants.
* Fertilizer: A balanced, slow-release fertilizer is ideal. Look for one with an NPK ratio of around 10-10-10.
* Trowel or Shovel: For digging and planting.
* Watering Can or Hose: For keeping your asparagus plants hydrated.
* Mulch: Straw, wood chips, or shredded leaves will help retain moisture and suppress weeds.
* Gardening Gloves: To protect your hands.
* Optional: A trellis or stakes for support, especially if you choose a taller variety.
Choosing the Right Asparagus Variety
This is crucial! Not all asparagus varieties are created equal. Consider your climate and the amount of sunlight your terrace receives.
* ‘Jersey Knight’: A popular and reliable choice, known for its high yield and disease resistance. It’s a male variety, which means it doesn’t produce seeds, so all its energy goes into spear production.
* ‘Purple Passion’: A beautiful variety with purple spears that turn green when cooked. It’s sweeter and more tender than green varieties.
* ‘Mary Washington’: An older variety that’s still widely grown. It’s known for its good flavor and adaptability.
* ‘UC 157’: A high-yielding variety that’s resistant to rust.
Do some research and choose a variety that’s well-suited to your specific needs and growing conditions. Your local nursery can offer valuable advice.
Step-by-Step Planting Guide
Okay, let’s get our hands dirty! Here’s how to plant your asparagus crowns in containers:
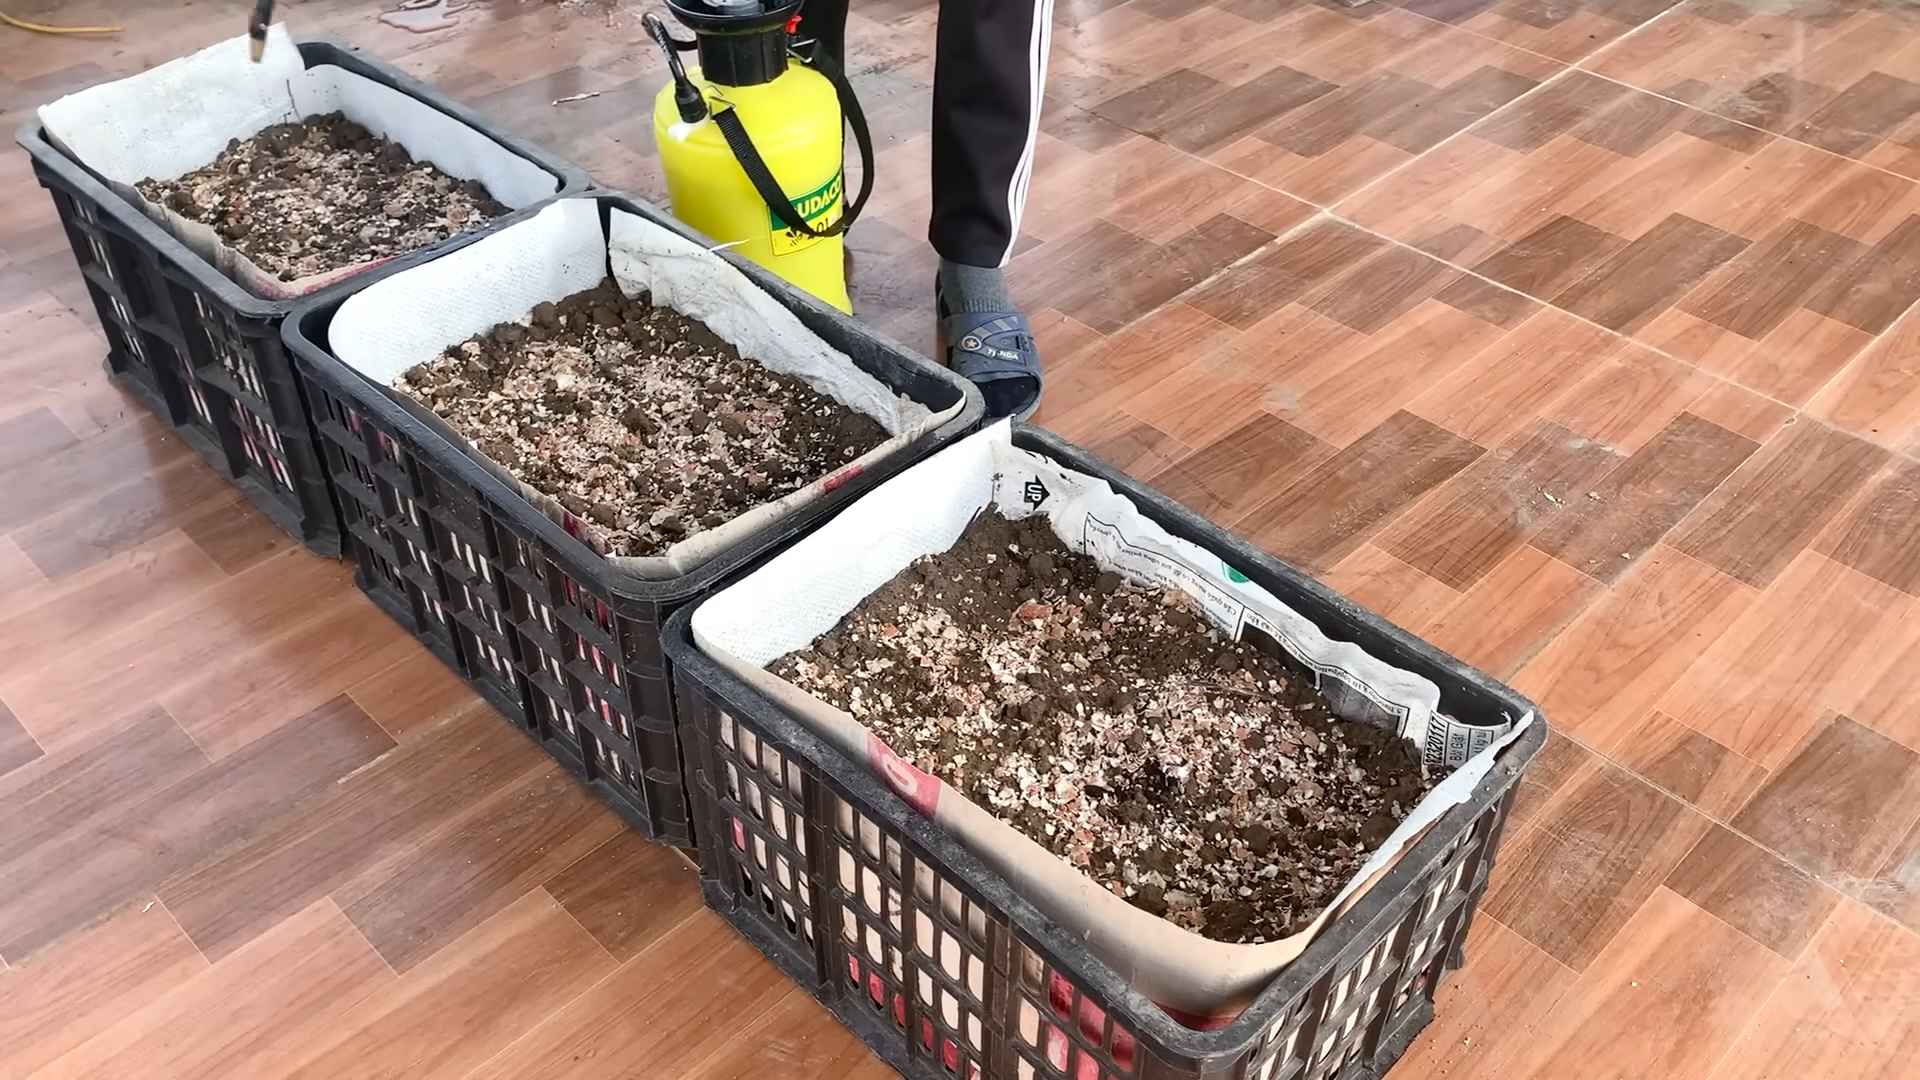
1. Prepare the Containers: Make sure your containers have drainage holes. If not, drill some. Add a layer of gravel or broken pottery to the bottom of the container to improve drainage.
2. Add Potting Mix: Fill the container about one-third full with your well-draining potting mix.
3. Create a Mound: Form a small mound of potting mix in the center of the container. This is where you’ll place the asparagus crown.
4. Position the Crown: Gently place the asparagus crown on top of the mound, spreading the roots out around it like a spider.
5. Cover the Crown: Carefully cover the crown with about 2-3 inches of potting mix.
6. Water Thoroughly: Water the container well until water drains out of the bottom. This will help settle the soil and encourage root growth.
7. Add More Potting Mix: As the asparagus grows, gradually add more potting mix to the container until it’s almost full. This will encourage the development of more spears.
8. Mulch: Apply a layer of mulch around the base of the plant to help retain moisture and suppress weeds.
9. Fertilize: Apply a slow-release fertilizer according to the package directions.
Caring for Your Asparagus Plants
Now that your asparagus is planted, it’s time to provide the care it needs to thrive.
* Watering: Asparagus needs consistent moisture, especially during the growing season. Water deeply whenever the top inch of soil feels dry to the touch. Avoid overwatering, as this can lead to root rot.
* Fertilizing: Asparagus is a heavy feeder. Fertilize every 4-6 weeks with a balanced fertilizer. You can also side-dress with compost or aged manure.
* Sunlight: Asparagus needs at least 6-8 hours of sunlight per day. Choose a sunny spot on your terrace for your containers.
* Weeding: Keep the containers free of weeds. Weeds compete with asparagus for nutrients and water.
* Pest and Disease Control: Asparagus is relatively pest-resistant, but keep an eye out for asparagus beetles and aphids. Treat infestations with insecticidal soap or neem oil. Good air circulation can help prevent fungal diseases.
* Winter Care: In colder climates, asparagus plants will go dormant in the winter. Cut back the foliage to the ground after it turns brown. You can leave the containers outdoors, but protect them from extreme cold by wrapping them in burlap or moving them to a sheltered location.
The Waiting Game: Patience is Key
This is the hardest part! You need to resist the urge to harvest asparagus spears in the first year or two. This allows the plants to establish a strong root system, which is essential for long-term productivity.
* First Year: Don’t harvest any spears. Let the plants grow and develop their foliage.
* Second Year: You can harvest a few spears, but only for a short period (2-3 weeks).
* Third Year and Beyond: You can harvest spears for a longer period (6-8 weeks).
Harvesting Your Asparagus
Finally, the moment you’ve been waiting for! Here’s how to harvest your asparagus spears:
1. Timing: Harvest spears when they are about 6-8 inches tall and the tips are still tightly closed.
2. Cutting: Use a sharp knife to cut the spears at or slightly below the soil surface.
3. Frequency: Harvest spears every day or two during the peak harvesting season.
4. Stop Harvesting: Stop harvesting when the spears become thin and spindly. This indicates that the plants are starting to run out of energy.
Troubleshooting Common Problems
Even with the best care, you might encounter some problems along the way. Here are a few common issues and how to address them:
* Yellowing Foliage: This could be a sign of overwatering, underwatering, nutrient deficiency, or disease. Check the soil moisture, fertilize, and inspect the plants for pests or diseases.
* Thin Spears: This could be a sign of overharvesting, nutrient deficiency, or lack of sunlight. Stop harvesting, fertilize, and make sure the plants are getting enough sunlight.
* Asparagus Beetles: These pests can damage the foliage and spears. Handpick them off the plants or treat with insecticidal soap or neem oil.
* Root Rot: This is caused by overwatering. Make sure your containers have good drainage and avoid overwatering.
Extending the Harvest
Want to enjoy asparagus for even longer? Here are a few tips:
* Succession Planting: Plant different varieties of asparagus that mature at different times.
* Cold Frames: Use cold frames to protect your asparagus plants from frost and extend the growing season.
* Proper Storage: Store harvested asparagus spears in the refrigerator, wrapped in a damp paper towel.
Enjoying Your Homegrown Asparagus
Now for the best part – eating your homegrown asparagus! There are so many delicious ways to prepare it. You can steam it, roast it, grill it, or sauté it. It’s also great in salads, soups, and omelets.
My personal favorite is roasting it with a little olive oil, salt, and pepper. It’s simple, but it really brings out the natural flavor of the asparagus.
Why Grow Asparagus on Your Terrace?
Besides the obvious benefit of having fresh, delicious asparagus at your fingertips, there are several other reasons to grow asparagus on your terrace:
* It’s a Sustainable Choice: Growing your own food reduces your carbon footprint and supports local food systems.
* It’s a Healthy Choice: Homegrown asparagus is packed with vitamins and minerals.
* It’s a Rewarding Experience: There’s nothing quite like the satisfaction of harvesting your own food.
* It
Conclusion
So, there you have it! Growing asparagus on your terrace might seem like a daunting task at first, but with these simple tips and a little patience, you can enjoy fresh, homegrown asparagus right outside your door. This DIY project is a must-try for several reasons. First, the taste of freshly harvested asparagus is simply unparalleled. Store-bought asparagus, even the freshest varieties, can’t compare to the vibrant flavor and crisp texture of asparagus you’ve nurtured yourself. Second, growing your own asparagus is incredibly rewarding. Watching those spears emerge from the soil, knowing you’ve played a part in their growth, is a deeply satisfying experience. Third, it’s a sustainable and eco-friendly way to enjoy this delicious vegetable. You’ll reduce your carbon footprint by eliminating the need for transportation and packaging.
But perhaps the most compelling reason to try this DIY trick is the sheer convenience. Imagine stepping onto your terrace and harvesting a handful of asparagus spears to add to your omelet, pasta dish, or grilled vegetables. No more trips to the grocery store, no more wondering about the freshness of the produce – just pure, unadulterated asparagus goodness at your fingertips.
Don’t be afraid to experiment with different varieties of asparagus to find your favorite. ‘Jersey Knight’ is a popular choice for its high yield and disease resistance, while ‘Purple Passion’ offers a unique color and slightly sweeter flavor. You can also try companion planting with herbs like parsley, basil, and thyme, which can help deter pests and attract beneficial insects. Consider adding marigolds around the perimeter of your container to further protect your asparagus from unwanted visitors.
Ready to embark on your terrace asparagus adventure? We encourage you to give these tips a try and experience the joy of growing your own food. Remember to start with a large container, well-draining soil, and plenty of sunlight. Be patient, as asparagus takes a few years to mature, but the wait is well worth it.
And most importantly, don’t forget to share your experience with us! We’d love to hear about your successes, challenges, and any variations you’ve tried. Post photos of your thriving asparagus plants on social media using #TerraceAsparagus or leave a comment below. Let’s create a community of terrace asparagus growers and inspire others to embrace the joys of urban gardening. Growing your own asparagus is not just a hobby; it’s a lifestyle. It’s about connecting with nature, enjoying fresh, healthy food, and creating a beautiful and productive space right outside your door. So, grab your gardening gloves, gather your supplies, and get ready to experience the magic of terrace asparagus growing!
Frequently Asked Questions (FAQ)
How long does it take for asparagus to grow from seed or crowns?
Asparagus grown from seed can take up to three years to produce a substantial harvest. While it’s a more economical option, it requires more patience. Asparagus crowns, which are one-year-old plants, will typically yield a small harvest in the second year after planting and a full harvest in the third year. Crowns are the preferred method for most gardeners as they offer a quicker return on investment. Remember, patience is key when growing asparagus!
What is the best type of container for growing asparagus on a terrace?
The ideal container for terrace asparagus should be large and deep. A container that is at least 24 inches in diameter and 24 inches deep is recommended to accommodate the extensive root system of the asparagus plant. Choose a container made from durable material such as plastic, wood, or terracotta. Ensure the container has adequate drainage holes to prevent waterlogging, which can lead to root rot.
What type of soil is best for growing asparagus in containers?
Asparagus thrives in well-draining, fertile soil. A mix of equal parts garden soil, compost, and sand or perlite is ideal. This combination provides the necessary nutrients, drainage, and aeration for healthy root growth. Avoid using heavy clay soil, as it can retain too much moisture and suffocate the roots. You can also purchase a pre-made potting mix specifically formulated for vegetables.
How often should I water my terrace asparagus?
Water asparagus regularly, especially during dry periods. Aim to keep the soil consistently moist but not waterlogged. Water deeply, allowing the water to penetrate the entire root zone. Check the soil moisture by inserting your finger a few inches into the soil. If the soil feels dry, it’s time to water. Reduce watering during the dormant season (fall and winter).
How much sunlight does asparagus need?
Asparagus requires at least six to eight hours of direct sunlight per day to thrive. Choose a sunny spot on your terrace where your asparagus plants will receive ample sunlight. If your terrace is partially shaded, consider using grow lights to supplement the natural sunlight.
How do I fertilize my terrace asparagus?
Fertilize asparagus plants in early spring and again in mid-summer with a balanced fertilizer, such as a 10-10-10 or 14-14-14 formula. Follow the instructions on the fertilizer package for application rates. You can also amend the soil with compost or aged manure to provide a slow-release source of nutrients. Avoid over-fertilizing, as this can lead to excessive foliage growth at the expense of spear production.
How do I harvest asparagus spears?
Harvest asparagus spears when they are about 6-8 inches tall and about as thick as your finger. Use a sharp knife to cut the spears at or slightly below the soil surface. Avoid damaging the crown of the plant. Harvest spears regularly during the harvest season, which typically lasts for 6-8 weeks in the spring. Stop harvesting when the spears become thin and spindly, as this indicates that the plant needs to replenish its energy reserves.
What are some common pests and diseases that affect asparagus?
Common pests that can affect asparagus include asparagus beetles, aphids, and spider mites. Diseases include asparagus rust and fusarium crown and root rot. Inspect your plants regularly for signs of pests or diseases. Treat infestations with insecticidal soap or neem oil. Prevent diseases by ensuring good air circulation and avoiding overwatering.
How do I overwinter my terrace asparagus?
In colder climates, asparagus plants will go dormant in the fall. Cut back the foliage to the ground after it turns brown and yellow. Apply a layer of mulch, such as straw or leaves, to protect the crown of the plant from freezing temperatures. In milder climates, you may not need to mulch. In the spring, remove the mulch and fertilize the plants to encourage new growth.
Can I grow asparagus in a raised bed on my terrace?
Yes, growing asparagus in a raised bed on your terrace is an excellent option. Raised beds provide better drainage and allow you to control the soil composition. Ensure the raised bed is at least 24 inches deep and wide enough to accommodate multiple asparagus plants. Follow the same planting and care instructions as for container-grown asparagus.
What are some companion plants for asparagus?
Companion plants for asparagus include tomatoes, basil, parsley, marigolds, and nasturtiums. These plants can help deter pests, attract beneficial insects, and improve the overall health of your asparagus plants. Avoid planting asparagus near onions, garlic, or potatoes, as these plants can inhibit asparagus growth.
Is it safe to eat asparagus that has gone to seed?
While the spears are the primary edible part of the asparagus plant, the seeds themselves are not typically consumed. If your asparagus plant has gone to seed, it’s best to focus on harvesting the spears during the next growing season. The seeds are primarily used for propagation purposes.
How can I tell if my asparagus plant is male or female?
Male asparagus plants are generally more productive than female plants because they don’t expend energy producing seeds. However, it can be difficult to distinguish between male and female plants until they are mature. Female plants will produce small red berries in the fall, while male plants will not. Some newer asparagus varieties are all-male hybrids, which are known for their high yields.
What if my asparagus spears are thin and spindly?
Thin and spindly asparagus spears can indicate that the plant is stressed or lacking nutrients. Ensure your plants are receiving adequate sunlight, water, and fertilizer. Avoid over-harvesting, as this can weaken the plant. Allow the plants to rest and replenish their energy reserves. You may also need to amend the soil with compost or aged manure to improve its fertility.
Leave a Comment