

Tomato growing routine can seem daunting, especially if you’re new to home gardening. But fear not, fellow plant enthusiasts! I’m here to share some simple yet effective DIY tricks and hacks that will transform your tomato-growing experience from frustrating to fruitful. Imagine biting into a juicy, sun-ripened tomato that you nurtured from a tiny seed – that’s the magic we’re aiming for!
Tomatoes have a rich history, originating in South America and gradually making their way into cuisines worldwide. They weren’t always beloved, though! In some cultures, they were initially considered ornamental due to their relation to poisonous nightshade. Thankfully, we now know better and celebrate the tomato’s delicious versatility.
Why do you need these DIY tricks? Well, let’s face it, store-bought tomatoes often lack the vibrant flavor and freshness of homegrown ones. Plus, gardening is incredibly therapeutic! But more importantly, a solid tomato growing routine ensures you’re providing your plants with the optimal conditions for growth, protecting them from pests and diseases, and maximizing your yield. I’ll guide you through easy-to-implement strategies that will save you time, money, and a whole lot of gardening headaches. Let’s get our hands dirty and grow some amazing tomatoes together!
DIY Tomato Growing Routine: From Seed to Sauce!
Hey there, fellow gardening enthusiasts! I’m so excited to share my tried-and-true tomato growing routine with you. I’ve spent years tweaking and perfecting this process, and I’m confident that it will help you yield a bumper crop of juicy, delicious tomatoes, no matter your experience level. Get ready to roll up your sleeves and get your hands dirty!
Choosing Your Tomato Varieties
Before we even think about planting, let’s talk about tomato varieties. This is a crucial step because different tomatoes thrive in different climates and have different uses.
* Determinate vs. Indeterminate: This is the first big decision. Determinate tomatoes grow to a certain size and then produce all their fruit at once, making them ideal for canning. Indeterminate tomatoes, on the other hand, keep growing and producing fruit throughout the season. I personally prefer indeterminate varieties because I love having a continuous supply of fresh tomatoes.
* Heirloom vs. Hybrid: Heirloom tomatoes are open-pollinated varieties that have been passed down through generations. They often have unique flavors and colors, but they can be more susceptible to diseases. Hybrid tomatoes are bred for specific traits, such as disease resistance and high yields. I usually grow a mix of both to get the best of both worlds.
* Consider Your Climate: Some tomato varieties are better suited to hot climates, while others prefer cooler temperatures. Do some research to find varieties that will thrive in your area. Your local nursery is a great resource for this!
* Think About Your Needs: Are you planning to make sauce? Grow some Roma or San Marzano tomatoes. Want slicing tomatoes for sandwiches? Beefsteak or Brandywine are excellent choices. Cherry tomatoes are perfect for snacking and salads.
Starting Your Seeds Indoors (Optional, but Recommended)
Starting your seeds indoors gives you a head start on the growing season, especially if you live in a cooler climate. I highly recommend this method!
1. Gather Your Supplies: You’ll need seed starting trays or small pots, seed starting mix (not regular potting soil!), tomato seeds, a spray bottle, and a grow light (optional, but highly beneficial).
2. Sow the Seeds: Fill your trays or pots with seed starting mix. Moisten the mix with the spray bottle – you want it damp, not soggy. Plant 2-3 seeds per cell or pot, about ¼ inch deep.
3. Provide Warmth and Light: Tomato seeds need warmth to germinate. I use a heat mat under my seed trays to keep the soil temperature around 75-80°F (24-27°C). Once the seeds germinate, they need plenty of light. A grow light is ideal, but you can also use a sunny windowsill. Just make sure the seedlings get at least 6 hours of direct sunlight per day.
4. Water Carefully: Keep the seed starting mix consistently moist, but not waterlogged. Use the spray bottle to gently water the seedlings. Avoid overwatering, which can lead to damping off, a fungal disease that can kill young seedlings.
5. Thin the Seedlings: Once the seedlings have their first true leaves (the second set of leaves that appear after the initial seed leaves), thin them to one seedling per cell or pot. Choose the strongest, healthiest-looking seedling and snip off the others at the soil line with scissors.
6. Harden Off the Seedlings: Before transplanting your seedlings outdoors, you need to harden them off. This means gradually exposing them to outdoor conditions over a period of 7-10 days. Start by placing them in a sheltered spot outdoors for an hour or two each day, gradually increasing the amount of time they spend outside. This will help them acclimate to the sun, wind, and temperature changes.
Preparing Your Garden Bed
Tomatoes need a sunny spot with well-drained soil. I aim for at least 6-8 hours of direct sunlight per day.
1. Choose a Sunny Location: As I mentioned, sunlight is key! Pick a spot in your garden that gets plenty of sunshine throughout the day.
2. Amend the Soil: Tomatoes are heavy feeders, so they need rich, fertile soil. Amend your soil with plenty of compost or well-rotted manure. This will improve drainage, add nutrients, and help retain moisture. I also like to add a handful of bone meal to each planting hole to provide phosphorus, which promotes strong root growth.
3. Test Your Soil pH: Tomatoes prefer a slightly acidic soil pH of around 6.0-6.8. You can test your soil pH with a soil testing kit, which you can find at most garden centers. If your soil is too alkaline, you can amend it with sulfur. If it’s too acidic, you can add lime.
4. Consider Raised Beds: If you have poor soil or drainage problems, consider growing your tomatoes in raised beds. Raised beds provide excellent drainage and allow you to control the soil quality.
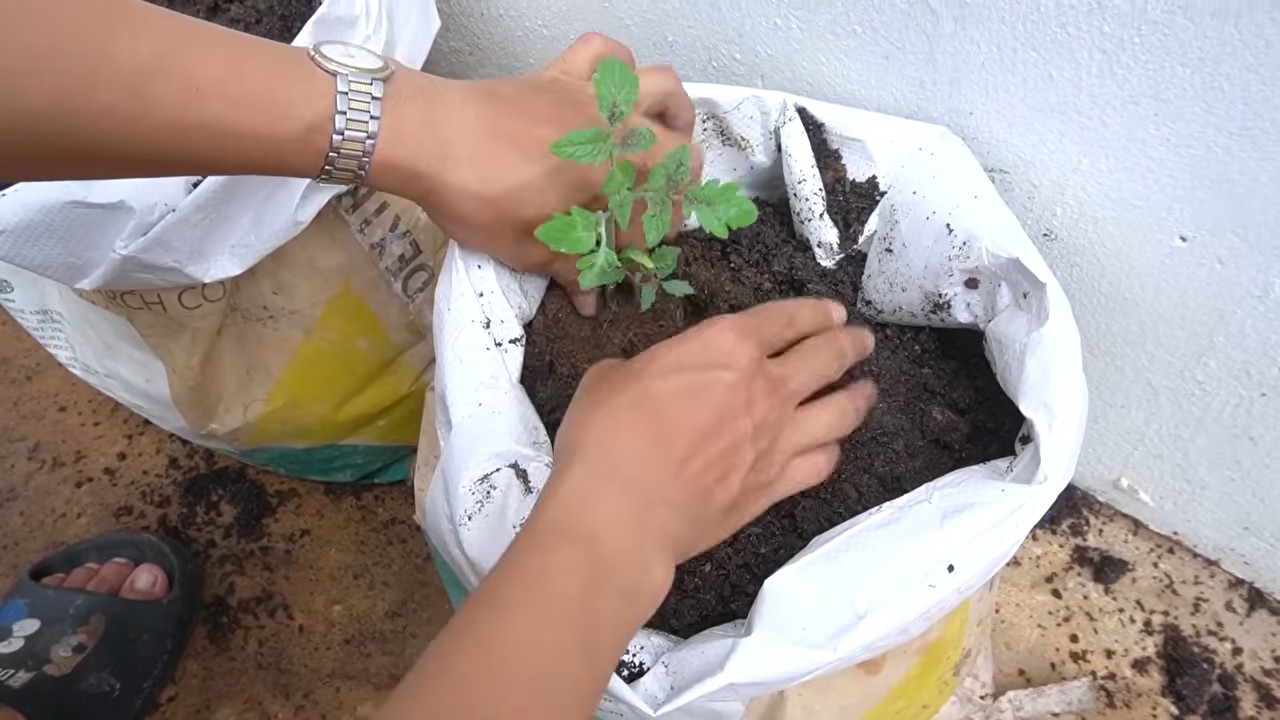
Transplanting Your Tomato Seedlings
Now for the exciting part – getting those little plants into the ground!
1. Wait for Warm Weather: Don’t transplant your tomato seedlings outdoors until the danger of frost has passed. Tomatoes are very sensitive to frost, and even a light frost can kill them. I usually wait until the soil temperature is at least 60°F (16°C).
2. Dig the Planting Holes: Dig holes that are slightly larger than the root balls of your seedlings. Space the holes about 2-3 feet apart, depending on the variety. Indeterminate tomatoes need more space than determinate tomatoes.
3. Plant Deeply: This is a trick I learned years ago, and it makes a huge difference! Plant your tomato seedlings deeply, burying the stem up to the first set of leaves. Tomatoes can grow roots along their stems, so planting deeply will encourage a stronger root system.
4. Add Support: Tomatoes need support to keep them from sprawling on the ground. You can use stakes, cages, or trellises. I prefer using tomato cages because they provide good support and allow the plants to grow naturally. Place the support in the ground at the time of planting to avoid damaging the roots later.
5. Water Thoroughly: After planting, water your tomato seedlings thoroughly. This will help settle the soil around the roots and get them off to a good start.
Caring for Your Tomato Plants
Once your tomato plants are in the ground, it’s important to provide them with the care they need to thrive.
1. Water Regularly: Tomatoes need consistent moisture, especially during hot weather. Water deeply and regularly, aiming for about 1-2 inches of water per week. Avoid overhead watering, which can promote fungal diseases. I prefer using a soaker hose or drip irrigation to water my tomatoes at the base of the plants.
2. Fertilize Regularly: As I mentioned, tomatoes are heavy feeders, so they need regular fertilization. Use a balanced fertilizer that is specifically formulated for tomatoes. I like to fertilize my tomatoes every 2-3 weeks.
3. Prune Your Tomato Plants: Pruning can help improve air circulation, reduce disease, and encourage fruit production. Remove suckers (the small shoots that grow between the main stem and the branches) to encourage the plant to focus its energy on producing fruit.
4. Mulch Around Your Plants: Mulching helps retain moisture, suppress weeds, and regulate soil temperature. I like to use straw or shredded leaves as mulch.
5. Watch Out for Pests and Diseases: Tomatoes are susceptible to a variety of pests and diseases, such as aphids, whiteflies, tomato hornworms, and blight. Inspect your plants regularly for signs of pests or diseases. If you find any problems, take action immediately. There are many organic and non-organic options for pest and disease control.
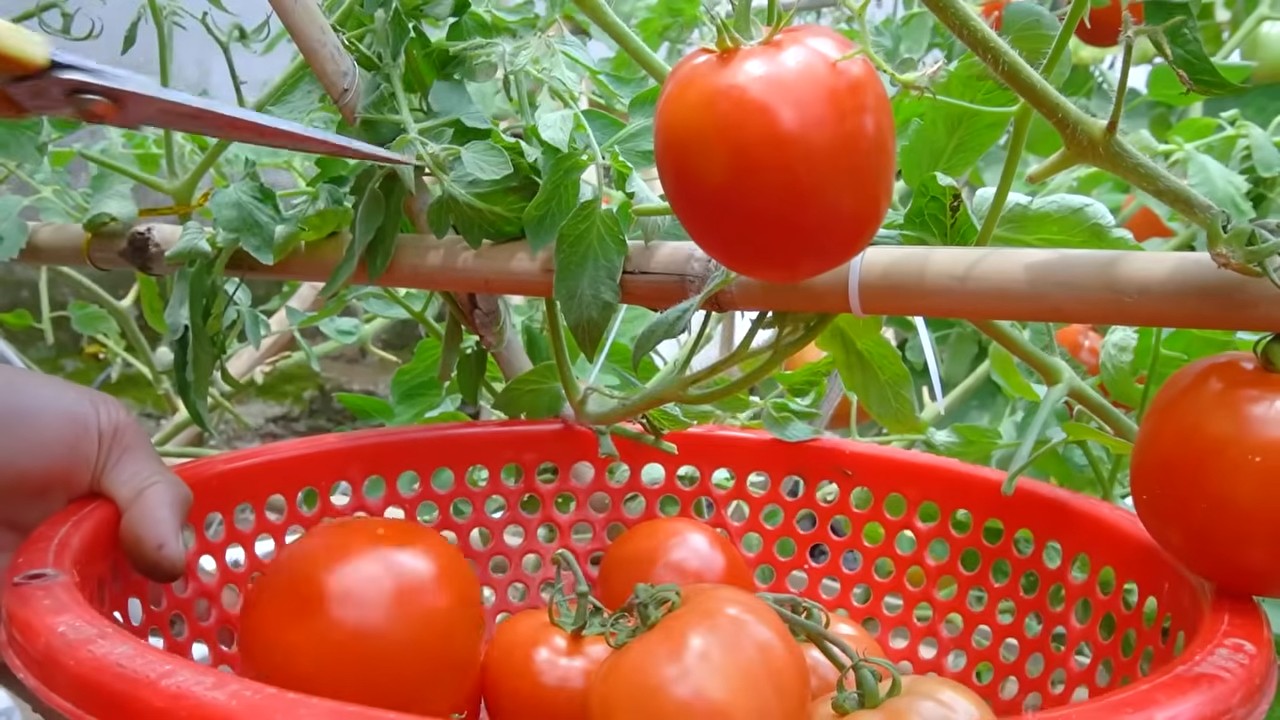
Harvesting Your Tomatoes
The moment we’ve all been waiting for!
1. Harvest When Ripe: Tomatoes are ripe when they are fully colored and slightly soft to the touch. Gently twist the tomato off the vine.
2. Store Properly: Store ripe tomatoes at room temperature. Refrigerating them can affect their flavor and texture.
3. Enjoy Your Harvest! Use your tomatoes in salads, sandwiches, sauces, or just eat them straight off the vine. There’s nothing quite like the taste of a homegrown tomato!
Troubleshooting Common Tomato Problems
Even with the best care, you might encounter some problems along the way. Here are a few common issues and how to address them:
* Blossom End Rot: This is caused by a calcium deficiency. Make sure your soil has enough calcium and water your plants consistently.
* Tomato Hornworms: These large green caterpillars can quickly defoliate your tomato plants. Handpick them off the plants or use a biological insecticide like Bacillus thuringiensis (Bt).
* Early Blight: This fungal disease causes dark spots on the leaves. Remove infected leaves and apply a fungicide.
* Aphids: These small insects can suck the sap from your tomato plants. Spray them with a strong stream of water or use insecticidal
Conclusion
So, there you have it! Transforming your tomato growing routine with this simple yet incredibly effective DIY trick is more than just a gardening hack; it’s an investment in a bountiful harvest and healthier, happier tomato plants. We’ve walked you through the process, highlighting the benefits of improved aeration, enhanced nutrient uptake, and reduced risk of soilborne diseases – all contributing to juicier, more flavorful tomatoes.
Why is this a must-try? Because it addresses some of the most common challenges faced by tomato growers, regardless of their experience level. Whether you’re a seasoned gardener or just starting out, this DIY approach offers a tangible way to boost your tomato yield without breaking the bank or resorting to harsh chemicals. It’s about working *with* nature, not against it, to create an optimal environment for your plants to thrive.
But the beauty of this DIY trick lies in its adaptability. Feel free to experiment with variations to suit your specific needs and preferences. For instance, if you’re growing tomatoes in containers, consider adding a layer of gravel at the bottom for even better drainage. Or, if you’re dealing with particularly heavy clay soil, incorporate some compost or peat moss to improve its texture and drainage capabilities. You could also try different types of organic matter, such as shredded leaves or aged manure, to enrich the soil and provide your tomato plants with a slow-release source of nutrients.
Don’t be afraid to get creative and tailor this DIY trick to your unique gardening situation. The key is to understand the underlying principles – improved drainage, enhanced aeration, and nutrient availability – and then adapt the technique to achieve those goals in your own garden.
We are confident that incorporating this DIY trick into your tomato growing routine will make a significant difference in the health and productivity of your plants. Imagine biting into a sun-ripened tomato, bursting with flavor, knowing that you played a direct role in its creation. That’s the satisfaction that comes from successful gardening, and this DIY trick can help you achieve it.
Now, it’s your turn! We wholeheartedly encourage you to try this DIY trick and witness the positive impact it has on your tomato plants. Document your journey, take photos, and share your experiences with us and the wider gardening community. We’re eager to hear about your successes, your challenges, and any variations you discover along the way. Let’s learn from each other and collectively improve our tomato growing skills.
Remember, gardening is a journey of continuous learning and experimentation. Embrace the process, be patient, and don’t be afraid to make mistakes. With a little effort and the right techniques, you can transform your garden into a tomato-lover’s paradise. So, get out there, get your hands dirty, and start growing the best tomatoes you’ve ever tasted! We are sure that this DIY trick will improve your tomato growing routine.
Frequently Asked Questions (FAQ)
Q: What type of organic matter is best to use for this DIY trick?
A: The best type of organic matter depends on your soil type and what you have readily available. Compost is generally an excellent choice as it provides a balanced mix of nutrients and improves soil structure. Well-rotted manure is another great option, but be sure it’s fully composted to avoid burning your plants. Shredded leaves, grass clippings (untreated with herbicides), and even coffee grounds can also be used, but they may need to be supplemented with other nutrients. The key is to use organic matter that is well-decomposed and free of harmful pathogens or chemicals. Consider testing your soil to determine its specific nutrient deficiencies and choose organic matter that can help address those needs.
Q: How often should I apply this DIY trick to my tomato plants?
A: This DIY trick is typically a one-time application at the time of planting. However, you can refresh the organic matter around your plants every few weeks by adding a layer of compost or mulch. This will help maintain soil moisture, suppress weeds, and provide a slow-release source of nutrients. Avoid disturbing the roots of your tomato plants when adding new organic matter. Monitor your plants for signs of nutrient deficiencies, such as yellowing leaves, and adjust your feeding schedule accordingly.
Q: Can I use this DIY trick for other plants besides tomatoes?
A: Yes, this DIY trick can be beneficial for other plants that prefer well-drained soil and benefit from increased aeration. Vegetables like peppers, eggplants, and cucumbers can also benefit from this technique. However, be sure to research the specific needs of each plant before applying this trick. Some plants may prefer slightly different soil conditions or nutrient levels. Adjust the type and amount of organic matter used based on the specific requirements of the plants you are growing.
Q: What if I don’t have access to organic matter? Are there any alternatives?
A: While organic matter is ideal, there are alternatives you can use if it’s not readily available. Perlite and vermiculite are inorganic materials that can improve soil drainage and aeration. You can mix these into your soil at the time of planting. However, keep in mind that these materials don’t provide any nutrients, so you’ll need to supplement with fertilizer. Another option is to use a commercial potting mix specifically designed for vegetables. These mixes typically contain a blend of peat moss, perlite, and vermiculite, along with added nutrients.
Q: My tomato plants are already planted. Can I still use this DIY trick?
A: While it’s best to incorporate this DIY trick at the time of planting, you can still benefit from it even if your tomato plants are already in the ground. Gently loosen the soil around the base of your plants, being careful not to damage the roots. Then, add a layer of compost or other organic matter around the plants, working it lightly into the soil. Water thoroughly after applying the organic matter. This will help improve soil drainage and aeration, and provide your plants with a boost of nutrients.
Q: How do I know if this DIY trick is working?
A: You’ll typically see positive results within a few weeks of applying this DIY trick. Look for signs of improved plant health, such as increased growth, darker green leaves, and more abundant flowering. You may also notice that your plants are less susceptible to diseases and pests. Ultimately, the most obvious sign that this trick is working is a larger and more flavorful tomato harvest. Keep a close eye on your plants and compare their performance to previous years or to plants that haven’t received this treatment.
Q: Is this DIY trick suitable for all types of tomato plants?
A: Yes, this DIY trick is generally suitable for all types of tomato plants, including determinate, indeterminate, and dwarf varieties. However, the specific needs of each variety may vary slightly. For example, indeterminate varieties, which grow tall and require staking, may benefit from a larger amount of organic matter to support their vigorous growth. Dwarf varieties, which are smaller and more compact, may require less organic matter. Adjust the amount of organic matter used based on the specific needs of your tomato plants.
Leave a Comment