

Grow Collard Greens Easily, even if you think you don’t have a green thumb! Have you ever dreamed of stepping into your backyard and harvesting fresh, vibrant greens for a delicious and healthy meal? It’s more attainable than you think! For generations, collard greens have been a staple in Southern cuisine, symbolizing prosperity and good health, especially around New Year’s. Their rich history is intertwined with resilience and resourcefulness, as they were often a readily available and nutritious food source.
But let’s be honest, sometimes gardening can feel intimidating. That’s where these DIY tricks and hacks come in! I’m here to show you that you can grow collard greens easily, regardless of your experience level or garden size. We’ll explore simple, effective methods to ensure a bountiful harvest. Imagine the satisfaction of serving up homegrown collard greens, knowing you nurtured them from seed to table. This article will provide you with the knowledge and confidence to cultivate your own thriving collard green patch, saving you money at the grocery store and providing you with fresh, organic produce. Let’s get started!
Grow Your Own Delicious Collard Greens: A Beginner’s Guide
Hey there, fellow gardening enthusiasts! I’m so excited to share my tried-and-true method for growing collard greens. These leafy greens are packed with nutrients, incredibly versatile in the kitchen, and surprisingly easy to cultivate, even if you’re a complete newbie. I’ve had great success with this method, and I’m confident you will too!
Choosing Your Collard Green Variety
Before we dive into the nitty-gritty, let’s talk about choosing the right collard green variety for your garden. There are tons of options out there, each with its own unique flavor and characteristics. Here are a few of my favorites:
* Georgia Southern: This is a classic variety known for its large, smooth leaves and mild flavor. It’s a reliable choice and widely available.
* Vates: A compact variety that’s perfect for smaller gardens. It’s also cold-hardy, making it a great option for cooler climates.
* Champion: This variety is known for its disease resistance and high yields. It’s a great choice if you’ve had trouble with pests or diseases in the past.
* Top Bunch: A relatively new variety that boasts excellent flavor and texture. It’s also slow to bolt, meaning it won’t go to seed as quickly in warm weather.
Consider your climate, garden size, and personal preferences when making your selection. You can find seeds or starter plants at most garden centers or online retailers.
Getting Started: Planting Your Collard Greens
Now for the fun part: planting! You can start collard greens from seeds or transplants. I personally prefer starting from seeds because it’s more economical and allows me to choose from a wider variety of options.
Here’s what you’ll need:
* Collard green seeds or transplants
* Seed starting trays or small pots (if starting from seed)
* Seed starting mix or potting soil
* Garden soil
* Compost or other organic matter
* Watering can or hose
* Gardening gloves (optional, but recommended)
* Row covers (optional, for pest protection)
Starting from Seeds (Indoor Method)
This method is great if you want to get a head start on the growing season or if you live in an area with a short growing season.
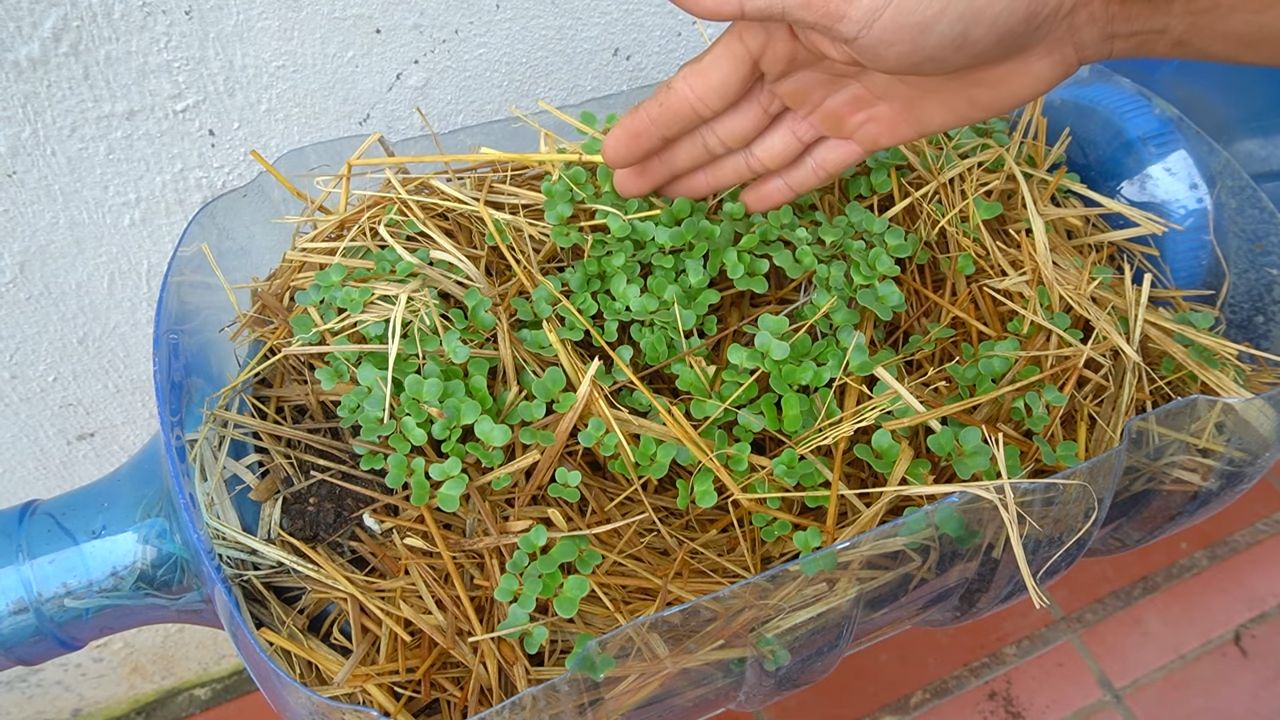
1. Sow the seeds: Fill your seed starting trays or pots with seed starting mix. Moisten the soil gently. Sow the collard green seeds about ¼ inch deep, placing 2-3 seeds per cell or pot.
2. Provide warmth and light: Cover the trays or pots with a clear plastic lid or plastic wrap to create a humid environment. Place them in a warm location (around 70-75°F) or use a heat mat. Once the seeds germinate (usually within 5-10 days), remove the cover and provide plenty of light. A sunny windowsill or grow light works well.
3. Thin the seedlings: Once the seedlings have developed their first true leaves (the second set of leaves), thin them to one plant per cell or pot. Snip off the weaker seedlings at the soil line.
4. Harden off the seedlings: Before transplanting the seedlings outdoors, you’ll need to harden them off. This process gradually acclimates them to outdoor conditions. Start by placing the seedlings outdoors in a sheltered location for a few hours each day, gradually increasing the amount of time they spend outside over the course of a week.
Direct Sowing (Outdoor Method)
This method is simpler and works well if you have a longer growing season.
1. Prepare the soil: Choose a sunny location in your garden with well-drained soil. Amend the soil with compost or other organic matter to improve its fertility and drainage.
2. Sow the seeds: Sow the collard green seeds about ½ inch deep, spacing them about 1-2 inches apart in rows.
3. Water gently: Water the soil gently to keep it moist.
4. Thin the seedlings: Once the seedlings have developed their first true leaves, thin them to about 12-18 inches apart.
Transplanting Seedlings
Whether you started your collard greens indoors or purchased transplants from a garden center, here’s how to transplant them into your garden:
1. Prepare the planting site: Choose a sunny location with well-drained soil. Amend the soil with compost or other organic matter.
2. Dig holes: Dig holes that are slightly larger than the root balls of the seedlings, spacing them about 12-18 inches apart.
3. Remove the seedlings from their containers: Gently remove the seedlings from their containers, being careful not to damage the roots.
4. Place the seedlings in the holes: Place the seedlings in the holes, making sure the top of the root ball is level with the surrounding soil.
5. Fill in the holes: Fill in the holes with soil and gently firm the soil around the base of the plants.
6. Water thoroughly: Water the plants thoroughly after transplanting.
Caring for Your Collard Greens
Once your collard greens are planted, it’s important to provide them with the care they need to thrive.
* Watering: Collard greens need consistent moisture, especially during hot, dry weather. Water them deeply whenever the top inch of soil feels dry.
* Fertilizing: Collard greens are heavy feeders, so they benefit from regular fertilization. You can use a balanced fertilizer or side-dress them with compost or other organic matter.
* Weeding: Keep the area around your collard greens free of weeds, which can compete for nutrients and water.
* Pest control: Collard greens can be susceptible to pests such as cabbage worms, aphids, and flea beetles. You can use row covers to protect your plants from pests, or you can use organic pest control methods such as insecticidal soap or neem oil.
* Mulching: Mulching around your collard greens can help to retain moisture, suppress weeds, and regulate soil temperature.
Harvesting Your Collard Greens
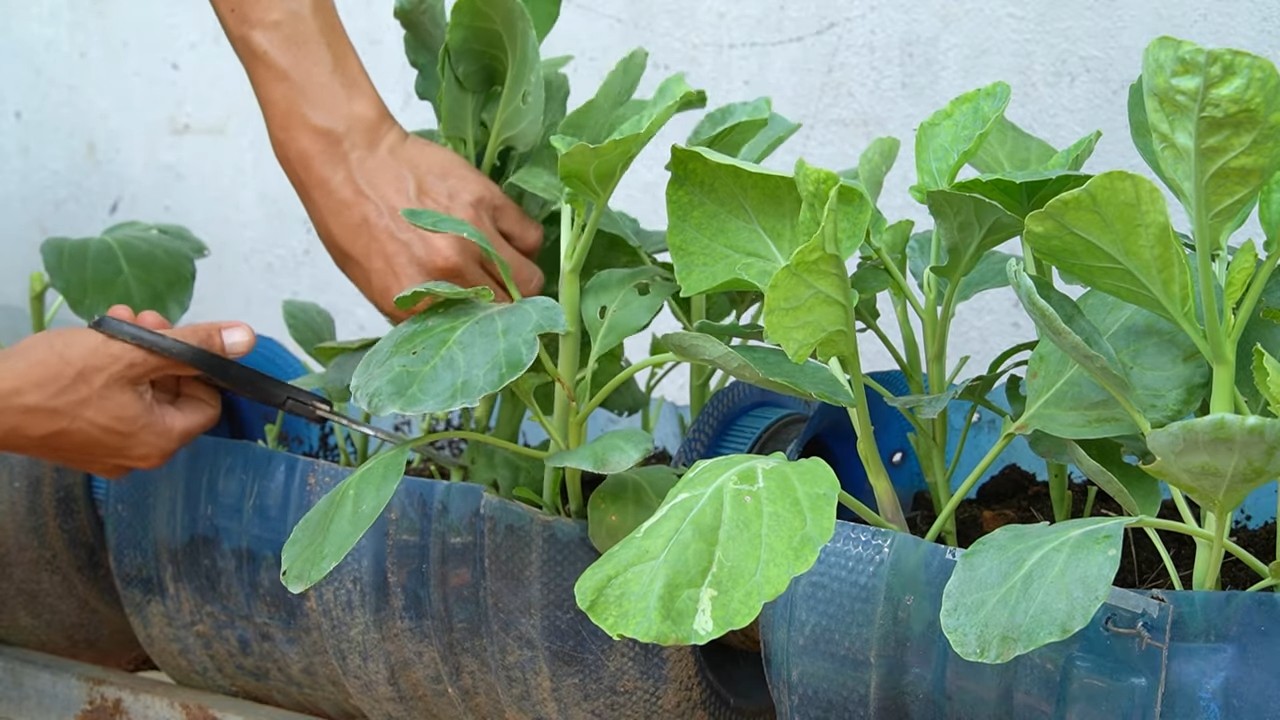
The best part of growing collard greens is, of course, harvesting them! You can start harvesting collard greens when the leaves are about 8-10 inches long.
1. Harvest outer leaves: Harvest the outer leaves first, leaving the inner leaves to continue growing.
2. Cut or snap off leaves: You can cut or snap off the leaves at the base of the plant.
3. Harvest regularly: Harvest regularly to encourage continued growth.
Collard greens are best eaten fresh, but they can also be stored in the refrigerator for up to a week.
Troubleshooting Common Problems
Even with the best care, you might encounter some problems while growing collard greens. Here are a few common issues and how to address them:
* Yellowing leaves: This can be caused by nutrient deficiencies, overwatering, or underwatering. Make sure your plants are getting enough nutrients and that the soil is well-drained.
* Holes in leaves: This is usually caused by pests such as cabbage worms or flea beetles. Use row covers or organic pest control methods to protect your plants.
* Bolting: This occurs when the plants go to seed prematurely, usually due to hot weather. Choose bolt-resistant varieties and provide shade during the hottest part of the day.
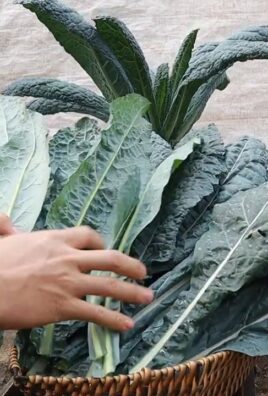
Enjoying Your Homegrown Collard Greens
Now that you’ve harvested your delicious collard greens, it’s time to enjoy them! There are countless ways to prepare collard greens, from simple steamed greens to hearty stews and soups. Here are a few of my favorite recipes:
* Southern-style collard greens: This classic recipe involves simmering collard greens with smoked ham hocks or bacon for a rich, savory flavor.
* Sautéed collard greens with garlic and olive oil: A simple and healthy way to enjoy collard greens.
* Collard green wraps: Use large collard green leaves as a healthy and flavorful alternative to tortillas.
Remember, growing your own collard greens is a rewarding experience that allows you to enjoy fresh, healthy produce right from your backyard. With a little bit of effort and these tips, you’ll be harvesting delicious collard greens in no time! Happy gardening!
Conclusion
So, there you have it! Growing collard greens doesn’t have to be a daunting task reserved for seasoned gardeners. With this simple DIY trick, even beginners can enjoy a bountiful harvest of these nutritious and delicious leafy greens. We’ve shown you how to bypass some of the common challenges, like poor germination rates and pest infestations, by starting your collard greens indoors and providing them with the optimal conditions they need to thrive.
This method is a must-try because it offers a significant head start, allowing you to enjoy fresh collard greens weeks earlier than if you direct-sowed them in the garden. Plus, by nurturing your seedlings indoors, you’re giving them a fighting chance against common garden pests like flea beetles and cabbage worms, which can decimate young plants. The controlled environment also allows for better moisture management and temperature regulation, leading to stronger, healthier seedlings that are better equipped to handle the transition to the outdoors.
But don’t stop there! Feel free to experiment with different varieties of collard greens. Try growing ‘Georgia Southern’ for its classic flavor, ‘Champion’ for its cold hardiness, or ‘Top Bunch’ for its high yields. You can also adjust the size of your starter containers depending on your available space and the number of plants you want to grow. Consider using biodegradable pots to minimize root disturbance when transplanting.
Another variation to consider is companion planting. Collard greens thrive alongside certain herbs and vegetables that can help deter pests and improve soil health. Try planting them near rosemary, thyme, or dill to repel cabbage moths, or interplant them with onions or garlic to ward off aphids. Marigolds are also a great companion plant, as they attract beneficial insects that prey on common garden pests.
Ultimately, the best way to discover what works best for you is to get your hands dirty and give it a try. We are confident that this DIY trick will revolutionize your approach to growing collard greens. It’s a game-changer for anyone looking to enjoy fresh, homegrown produce without the hassle.
We encourage you to embrace this simple yet effective method and experience the satisfaction of harvesting your own delicious collard greens. Don’t be afraid to adapt the technique to suit your specific needs and growing conditions. And most importantly, share your experiences with us! We’d love to hear about your successes, challenges, and any variations you’ve tried. Let’s build a community of collard green enthusiasts and learn from each other’s experiences. Share your photos and stories on social media using [Your Hashtag Here] and let us know how this DIY trick helped you **grow collard greens easily**. Happy gardening!
Frequently Asked Questions (FAQ)
1. What are the benefits of starting collard greens indoors?
Starting collard greens indoors offers several key advantages over direct sowing. Firstly, it provides a head start to the growing season, allowing you to harvest your greens weeks earlier. Secondly, it protects young seedlings from harsh weather conditions and common garden pests like flea beetles, slugs, and cabbage worms, which can easily decimate vulnerable plants. Thirdly, indoor starting allows for better control over environmental factors such as temperature, moisture, and light, leading to stronger, healthier seedlings that are better equipped to thrive when transplanted outdoors. Finally, it improves germination rates, as you can provide the optimal conditions for seeds to sprout successfully.
2. What type of soil should I use for starting collard greens indoors?
A high-quality seed-starting mix is ideal for starting collard greens indoors. These mixes are typically lightweight, well-draining, and sterile, which helps prevent fungal diseases that can affect young seedlings. Avoid using garden soil, as it can be too heavy and may contain pests or diseases. You can also create your own seed-starting mix by combining equal parts peat moss, perlite, and vermiculite. Ensure the mix is thoroughly moistened before sowing your seeds.
3. How often should I water my collard green seedlings?
Water your collard green seedlings regularly to keep the soil consistently moist but not waterlogged. Check the soil moisture daily by sticking your finger about an inch into the soil. If it feels dry, it’s time to water. Water gently from the bottom to avoid damping off, a fungal disease that can kill young seedlings. You can do this by placing the seedling tray in a shallow dish of water and allowing the soil to absorb the moisture from the bottom. Remove the tray from the water once the surface of the soil is moist.
4. How much light do collard green seedlings need?
Collard green seedlings need plenty of light to grow strong and healthy. Ideally, they should receive at least 6-8 hours of direct sunlight per day. If you don’t have a sunny windowsill, you can use grow lights to supplement the natural light. Position the grow lights a few inches above the seedlings and adjust the height as they grow. Rotate the seedlings regularly to ensure they receive even light exposure on all sides.
5. When should I transplant my collard green seedlings outdoors?
Transplant your collard green seedlings outdoors when they have developed several sets of true leaves and the weather has warmed up. This is typically about 4-6 weeks after sowing the seeds indoors. Before transplanting, harden off the seedlings by gradually exposing them to outdoor conditions for a week or two. Start by placing them in a sheltered location for a few hours each day, gradually increasing the amount of time they spend outdoors. This will help them acclimate to the sun, wind, and temperature changes.
6. What are some common pests and diseases that affect collard greens?
Collard greens are susceptible to several common pests and diseases, including flea beetles, cabbage worms, aphids, and downy mildew. To prevent pest infestations, consider using row covers to protect your plants. You can also handpick pests off the plants or use insecticidal soap or neem oil. To prevent diseases, ensure good air circulation around your plants and avoid overwatering. If you notice signs of disease, remove the affected leaves immediately and treat the plants with a fungicide if necessary.
7. How do I harvest collard greens?
You can begin harvesting collard greens when the leaves are large enough to eat, typically about 6-8 inches long. Harvest the outer leaves first, leaving the inner leaves to continue growing. This will allow you to enjoy a continuous harvest throughout the growing season. To harvest, simply cut the leaves off at the base of the plant with a sharp knife or scissors.
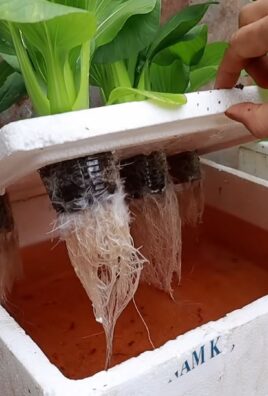
8. Can I grow collard greens in containers?
Yes, collard greens can be successfully grown in containers. Choose a large container that is at least 12 inches deep and wide to provide enough room for the roots to grow. Use a well-draining potting mix and water regularly. Container-grown collard greens may need to be fertilized more frequently than those grown in the ground.
9. What are some good companion plants for collard greens?
Good companion plants for collard greens include rosemary, thyme, dill, onions, garlic, and marigolds. These plants can help deter pests and improve soil health. Avoid planting collard greens near other members of the brassica family, such as broccoli, cabbage, and kale, as they can attract the same pests and diseases.
10. How can I store collard greens after harvesting?
After harvesting, wash the collard greens thoroughly and pat them dry. Store them in a plastic bag in the refrigerator for up to a week. For longer storage, you can blanch and freeze the collard greens. To blanch, submerge the leaves in boiling water for 2-3 minutes, then transfer them to an ice bath to stop the cooking process. Drain the leaves and pack them into freezer bags or containers. Frozen collard greens can be stored for up to a year.
Leave a Comment