

Kailan Nonstop Harvest: Imagine stepping into your backyard and plucking fresh, vibrant kailan leaves whenever you need them. No more last-minute grocery store runs or wilted greens! This isn’t just a dream; it’s an achievable reality with the right techniques. For centuries, cultivating kailan has been a staple in Asian cuisine, prized for its nutritional value and delicious flavor. From stir-fries to soups, this leafy green adds a healthy and flavorful punch to any dish.
But what if I told you that you could enjoy a continuous supply of kailan, right from your own garden? Many gardeners struggle with the “boom and bust” cycle of harvesting, where they get a large yield all at once, followed by a period of waiting. This DIY guide is designed to break that cycle and empower you to achieve a kailan nonstop harvest. We’ll delve into simple yet effective tricks and hacks that will keep your kailan plants producing consistently, ensuring a steady stream of fresh greens for your table.
Whether you’re a seasoned gardener or just starting out, these tips are easy to implement and will transform your kailan growing experience. Say goodbye to gardening frustrations and hello to a bountiful, continuous harvest of this amazing vegetable! Let’s get started and unlock the secrets to a never-ending supply of fresh, homegrown kailan.
DIY Kailan Nonstop Harvest: A Gardener’s Guide to Perpetual Greens
Hey fellow gardeners! Are you tired of planting kailan (Chinese broccoli) only to harvest it once and then have to start all over again? I was too! That’s why I’m so excited to share my method for achieving a nonstop kailan harvest. This isn’t just about getting more kailan; it’s about maximizing your garden space and enjoying fresh, homegrown greens for months on end. This method focuses on strategic cutting and encouraging side shoots, giving you a continuous supply of delicious kailan. Let’s get started!
Understanding Kailan’s Growth Habit
Before we dive into the how-to, it’s important to understand how kailan grows. Unlike some vegetables that produce a single fruit or head, kailan is a leafy green that readily produces side shoots when the main stem is cut. These side shoots will then grow and produce their own smaller heads, giving you multiple harvests from a single plant. This is the key to our nonstop harvest strategy!
Choosing the Right Kailan Variety
While most kailan varieties will work with this method, some are better suited than others. Look for varieties that are known for their vigorous growth and ability to produce numerous side shoots. Here are a few of my favorites:
* Green Lance: This variety is known for its tender stems and abundant side shoots.
* Chinese Kale: A classic choice, this variety is reliable and produces good-sized heads.
* Kailan Hybrid: Many hybrid varieties are bred for increased yield and disease resistance, making them excellent choices for continuous harvesting.
Preparing Your Kailan Plants
Whether you’re starting from seeds or seedlings, proper preparation is crucial for a successful nonstop harvest.
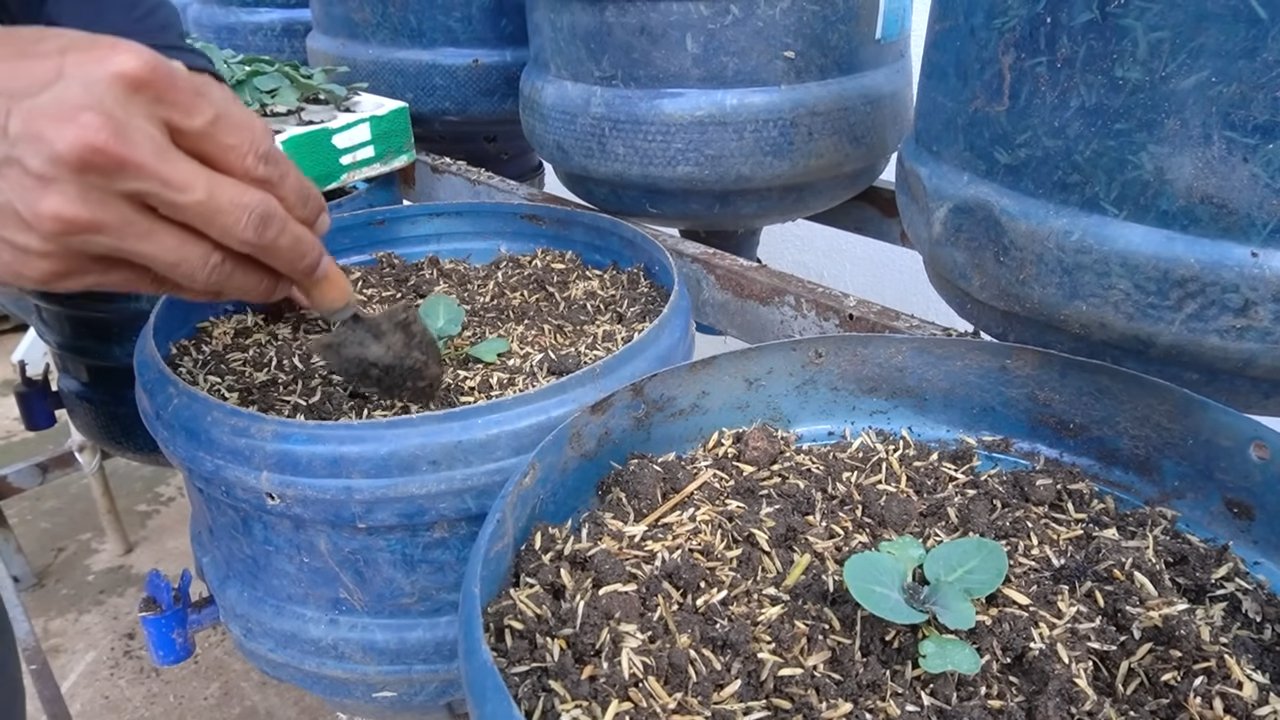
* Starting from Seeds:
* Sow seeds indoors 4-6 weeks before the last expected frost.
* Use a seed-starting mix and keep the soil consistently moist.
* Once the seedlings have a few true leaves, transplant them into individual pots.
* Harden off the seedlings by gradually exposing them to outdoor conditions before transplanting them into the garden.
* Starting from Seedlings:
* Choose healthy seedlings with vibrant green leaves and strong stems.
* Avoid seedlings that are root-bound or show signs of disease.
Planting Your Kailan
Now it’s time to get your kailan plants into the ground!
* Choosing the Right Location:
* Kailan thrives in full sun (at least 6 hours of direct sunlight per day).
* Choose a location with well-drained soil.
* Amend the soil with compost or other organic matter to improve fertility and drainage.
* Planting Instructions:
* Space kailan plants 12-18 inches apart.
* Dig a hole that is slightly larger than the root ball of the seedling.
* Gently remove the seedling from its pot and loosen the roots.
* Place the seedling in the hole and backfill with soil.
* Water thoroughly after planting.
The Nonstop Harvest Technique: Step-by-Step
This is where the magic happens! Follow these steps to ensure a continuous supply of kailan.
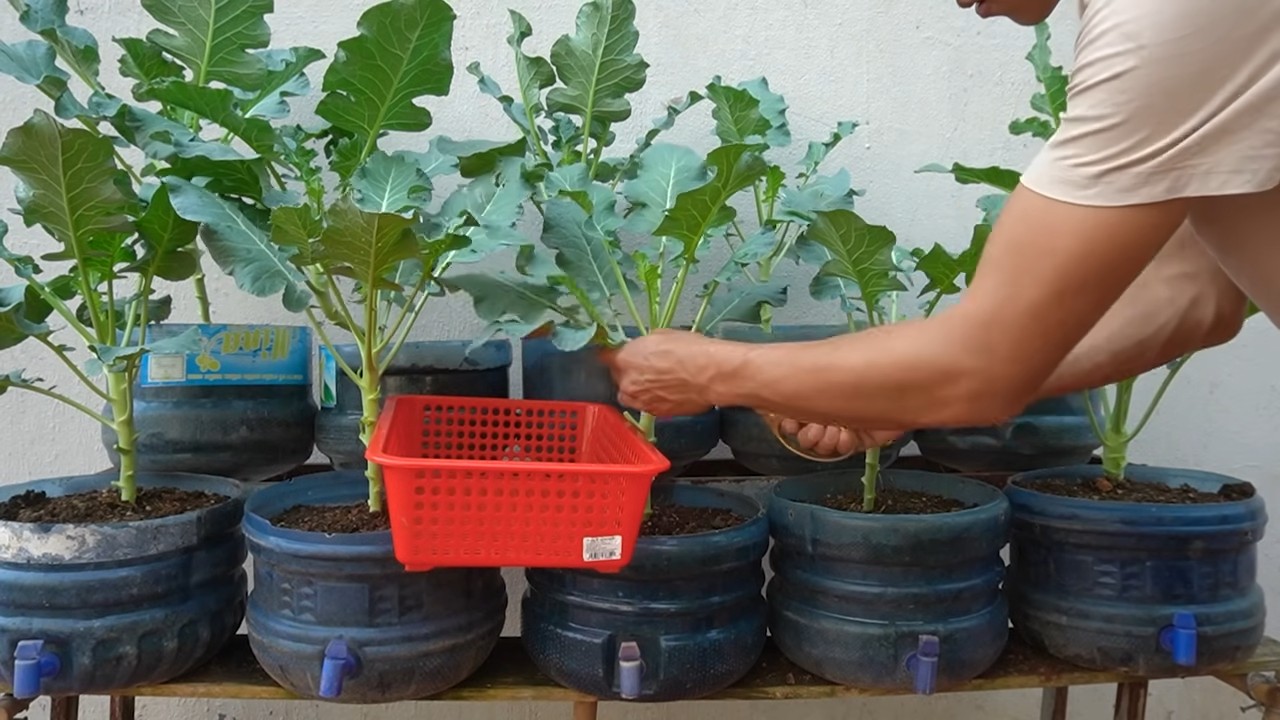
1. First Harvest: The Initial Cut
* Wait until the main stem of the kailan plant reaches a height of 8-12 inches. This usually takes about 6-8 weeks after planting.
* Using a sharp, clean knife or pruning shears, cut the main stem at a 45-degree angle, leaving about 4-6 inches of the stem above the ground. This is crucial for encouraging side shoot growth.
* Make sure your cut is clean to prevent disease.
2. Encouraging Side Shoot Growth:
* After the initial cut, the kailan plant will start to produce side shoots from the leaf axils (the point where the leaves meet the stem).
* To encourage vigorous side shoot growth, fertilize the plant with a balanced fertilizer or compost tea.
* Water regularly, especially during dry periods.
* Remove any yellowing or damaged leaves to prevent disease and pests.
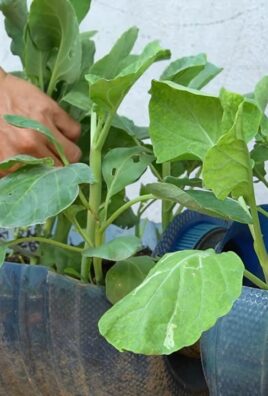
3. Subsequent Harvests: Harvesting the Side Shoots
* Once the side shoots reach a size that you’re happy with (usually 4-6 inches long), harvest them in the same way you harvested the main stem: by cutting them at a 45-degree angle.
* Leave a small portion of the side shoot stem on the plant to encourage further branching.
* Continue to harvest the side shoots as they mature, and the plant will continue to produce new ones.
4. Maintaining Plant Health:
* Regularly inspect your kailan plants for pests and diseases.
* Common kailan pests include aphids, cabbage worms, and flea beetles.
* Control pests with organic methods such as insecticidal soap, neem oil, or hand-picking.
* Prevent diseases by ensuring good air circulation and avoiding overwatering.
* Mulch around the plants to help retain moisture and suppress weeds.
5. Extending the Harvest:
* To extend the harvest season, you can succession plant kailan every few weeks. This means planting a new batch of kailan seedlings every 2-3 weeks to ensure a continuous supply of plants.
* In colder climates, you can protect kailan plants from frost by covering them with row covers or bringing them indoors.
Troubleshooting Common Issues
Even with the best care, you might encounter some challenges. Here are a few common issues and how to address them:
* Yellowing Leaves: This can be caused by overwatering, underwatering, nutrient deficiencies, or disease. Check the soil moisture and adjust your watering accordingly. Fertilize with a balanced fertilizer to address nutrient deficiencies.
* Pest Infestations: Regularly inspect your plants for pests and take action promptly. Insecticidal soap, neem oil, and hand-picking are effective organic methods for controlling pests.
* Slow Growth: This can be caused by insufficient sunlight, poor soil, or lack of nutrients. Ensure that your kailan plants are getting at least 6 hours of direct sunlight per day. Amend the soil with compost or other organic matter to improve fertility. Fertilize with a balanced fertilizer.
* Bolting (Premature Flowering): Kailan can bolt in hot weather. To prevent bolting, provide shade during the hottest part of the day and water regularly. Choose bolt-resistant varieties.
Tips for Maximizing Your Harvest
Here are a few extra tips to help you get the most out of your kailan plants:
* Fertilize Regularly: Kailan is a heavy feeder, so it needs regular fertilization to produce abundant side shoots. Use a balanced fertilizer or compost tea every 2-3 weeks.
* Water Consistently: Kailan needs consistent moisture to thrive. Water deeply whenever the soil feels dry to the touch.
* Pinch Off Flowers: If you see any flowers developing, pinch them off immediately. Flowering will signal the plant to stop producing leaves and focus on seed production.
* Rotate Crops: To prevent soilborne diseases, rotate your kailan plants to a different location in the garden each year.
* Companion Planting: Plant kailan with companion plants such as marigolds, nasturtiums, and dill to deter pests.
Enjoying Your Harvest
Now for the best part: enjoying your f
Hey fellow gardeners! Are you tired of planting kailan (Chinese broccoli) only to harvest it once and then have to start all over again? I was too! That’s why I’m so excited to share my method for achieving a nonstop kailan harvest. This isn’t just about getting more kailan; it’s about maximizing your garden space and enjoying fresh, homegrown greens for months on end. This method focuses on strategic cutting and encouraging side shoots, giving you a continuous supply of delicious kailan. Let’s get started!
Understanding Kailan’s Growth Habit
Before we dive into the how-to, it’s important to understand how kailan grows. Unlike some vegetables that produce a single fruit or head, kailan is a leafy green that readily produces side shoots when the main stem is cut. These side shoots will then grow and produce their own smaller heads, giving you multiple harvests from a single plant. This is the key to our nonstop harvest strategy!
Choosing the Right Kailan Variety
While most kailan varieties will work with this method, some are better suited than others. Look for varieties that are known for their vigorous growth and ability to produce numerous side shoots. Here are a few of my favorites:
* Green Lance: This variety is known for its tender stems and abundant side shoots.
* Chinese Kale: A classic choice, this variety is reliable and produces good-sized heads.
* Kailan Hybrid: Many hybrid varieties are bred for increased yield and disease resistance, making them excellent choices for continuous harvesting.
Preparing Your Kailan Plants
Whether you’re starting from seeds or seedlings, proper preparation is crucial for a successful nonstop harvest.
* Starting from Seeds:
* Sow seeds indoors 4-6 weeks before the last expected frost.
* Use a seed-starting mix and keep the soil consistently moist.
* Once the seedlings have a few true leaves, transplant them into individual pots.
* Harden off the seedlings by gradually exposing them to outdoor conditions before transplanting them into the garden.
* Starting from Seedlings:
* Choose healthy seedlings with vibrant green leaves and strong stems.
* Avoid seedlings that are root-bound or show signs of disease.
Planting Your Kailan
Now it’s time to get your kailan plants into the ground!
* Choosing the Right Location:
* Kailan thrives in full sun (at least 6 hours of direct sunlight per day).
* Choose a location with well-drained soil.
* Amend the soil with compost or other organic matter to improve fertility and drainage.
* Planting Instructions:
* Space kailan plants 12-18 inches apart.
* Dig a hole that is slightly larger than the root ball of the seedling.
* Gently remove the seedling from its pot and loosen the roots.
* Place the seedling in the hole and backfill with soil.
* Water thoroughly after planting.
The Nonstop Harvest Technique: Step-by-Step
This is where the magic happens! Follow these steps to ensure a continuous supply of kailan.
1. First Harvest: The Initial Cut
* Wait until the main stem of the kailan plant reaches a height of 8-12 inches. This usually takes about 6-8 weeks after planting.
* Using a sharp, clean knife or pruning shears, cut the main stem at a 45-degree angle, leaving about 4-6 inches of the stem above the ground. This is crucial for encouraging side shoot growth.
* Make sure your cut is clean to prevent disease.
2. Encouraging Side Shoot Growth:
* After the initial cut, the kailan plant will start to produce side shoots from the leaf axils (the point where the leaves meet the stem).
* To encourage vigorous side shoot growth, fertilize the plant with a balanced fertilizer or compost tea.
* Water regularly, especially during dry periods.
* Remove any yellowing or damaged leaves to prevent disease and pests.
3. Subsequent Harvests: Harvesting the Side Shoots
* Once the side shoots reach a size that you’re happy with (usually 4-6 inches long), harvest them in the same way you harvested the main stem: by cutting them at a 45-degree angle.
* Leave a small portion of the side shoot stem on the plant to encourage further branching.
* Continue to harvest the side shoots as they mature, and the plant will continue to produce new ones.
4. Maintaining Plant Health:
* Regularly inspect your kailan plants for pests and diseases.
* Common kailan pests include aphids, cabbage worms, and flea beetles.
* Control pests with organic methods such as insecticidal soap, neem oil, or hand-picking.
* Prevent diseases by ensuring good air circulation and avoiding overwatering.
* Mulch around the plants to help retain moisture and suppress weeds.
5. Extending the Harvest:
* To extend the harvest season, you can succession plant kailan every few weeks. This means planting a new batch of kailan seedlings every 2-3 weeks to ensure a continuous supply of plants.
* In colder climates, you can protect kailan plants from frost by covering them with row covers or bringing them indoors.
Troubleshooting Common Issues
Even with the best care, you might encounter some challenges. Here are a few common issues and how to address them:
* Yellowing Leaves: This can be caused by overwatering, underwatering, nutrient deficiencies, or disease. Check the soil moisture and adjust your watering accordingly. Fertilize with a balanced fertilizer to address nutrient deficiencies.
* Pest Infestations: Regularly inspect your plants for pests and take action promptly. Insecticidal soap, neem oil, and hand-picking are effective organic methods for controlling pests.
* Slow Growth: This can be caused by insufficient sunlight, poor soil, or lack of nutrients. Ensure that your kailan plants are getting at least 6 hours of direct sunlight per day. Amend the soil with compost or other organic matter to improve fertility. Fertilize with a balanced fertilizer.
* Bolting (Premature Flowering): Kailan can bolt in hot weather. To prevent bolting, provide shade during the hottest part of the day and water regularly. Choose bolt-resistant varieties.
Tips for Maximizing Your Harvest
Here are a few extra tips to help you get the most out of your kailan plants:
* Fertilize Regularly: Kailan is a heavy feeder, so it needs regular fertilization to produce abundant side shoots. Use a balanced fertilizer or compost tea every 2-3 weeks.
* Water Consistently: Kailan needs consistent moisture to thrive. Water deeply whenever the soil feels dry to the touch.
* Pinch Off Flowers: If you see any flowers developing, pinch them off immediately. Flowering will signal the plant to stop producing leaves and focus on seed production.
* Rotate Crops: To prevent soilborne diseases, rotate your kailan plants to a different location in the garden each year.
* Companion Planting: Plant kailan with companion plants such as marigolds, nasturtiums, and dill to deter pests.
Enjoying Your Harvest
Now for the best part: enjoying your fresh, homegrown kailan! Kailan is a versatile vegetable that can be used in a variety of dishes. Here are a few ideas:
* Stir-fries: Kailan is a classic ingredient in stir-fries. Simply chop it up and add it to your favorite stir-fry recipe.
* Steamed: Steaming kailan is a quick and easy way to prepare it. Serve it with a drizzle of soy sauce or sesame oil.
* Soups: Add chopped kailan to soups for a nutritious and flavorful boost.
* Salads: Use young, tender kailan leaves in salads.
* Juices and Smoothies: Add kailan to your favorite green juices and smoothies for a healthy dose of vitamins and minerals.
Conclusion
With a little bit of care and attention, you can enjoy a nonstop harvest of kailan from your garden. This method is not only productive but also rewarding, as you’ll be able to enjoy fresh, homegrown greens for months on end. So, get out there and start planting! Happy gardening!
Conclusion
So, there you have it! Unlocking the secret to a Kailan Nonstop Harvest is not just a gardening dream; it’s an achievable reality with this simple yet effective DIY trick. We’ve walked you through the process, highlighting how strategic cutting and consistent care can transform your single Kailan plant into a perpetual source of fresh, delicious greens.
Why is this a must-try? Because it’s economical, sustainable, and incredibly rewarding. Imagine stepping into your garden and knowing you have a reliable supply of Kailan whenever you need it. No more last-minute trips to the grocery store or settling for wilted, overpriced vegetables. This method empowers you to control the quality and freshness of your produce, ensuring you’re always serving the best to your family.
Beyond the practical benefits, this DIY trick fosters a deeper connection with your garden. You’ll learn to observe your plant’s growth patterns, understand its needs, and appreciate the miracle of nature unfolding before your eyes. It’s a therapeutic and educational experience that can bring joy and satisfaction to gardeners of all levels.
Looking for variations? Absolutely! While we’ve focused on the core technique, feel free to experiment with different fertilizers to see what works best for your soil and climate. Some gardeners swear by compost tea, while others prefer organic liquid feeds. You can also adjust the cutting height based on your plant’s vigor and the desired size of the new shoots. Consider companion planting with herbs like basil or rosemary to deter pests and enhance the flavor of your Kailan. Another variation is to try this method with other leafy greens that have similar growth habits, such as choy sum or bok choy. While the results may vary slightly, the principles of strategic harvesting and encouraging regrowth remain the same.
Don’t be afraid to get creative and adapt the technique to suit your specific needs and preferences. The beauty of gardening lies in its flexibility and the opportunity to learn through experimentation.
We wholeheartedly encourage you to give this Kailan Nonstop Harvest method a try. It’s a game-changer for any gardener who wants to maximize their yield and enjoy a continuous supply of fresh, homegrown greens. Once you’ve experienced the satisfaction of harvesting your own Kailan time and time again, you’ll wonder why you didn’t try it sooner.
But the journey doesn’t end here! We want to hear about your experiences. Did this DIY trick work for you? What challenges did you encounter, and how did you overcome them? What variations did you try, and what were the results? Share your stories, tips, and photos in the comments below. Let’s create a community of Kailan enthusiasts who are passionate about sustainable gardening and sharing their knowledge with others. Your insights could inspire and help fellow gardeners achieve their own Kailan Nonstop Harvest success. So, get out there, get your hands dirty, and let’s grow together!
Frequently Asked Questions (FAQ)
1. What exactly is Kailan, and why should I grow it?
Kailan, also known as Chinese kale or Chinese broccoli, is a leafy green vegetable popular in Asian cuisine. It’s known for its thick, slightly bitter leaves and thick stems, which are all edible. Growing your own Kailan offers several advantages: it’s fresher and more nutritious than store-bought options, it’s more economical in the long run, and you have complete control over the growing conditions, ensuring it’s free from harmful pesticides and chemicals. Plus, the taste of freshly harvested Kailan is simply unbeatable!
2. How long does it take for Kailan to grow from seed to harvest?
Generally, Kailan takes about 50-60 days to mature from seed to the first harvest. However, with the Kailan Nonstop Harvest method, you can extend the harvest period significantly, potentially enjoying fresh greens for several months from a single plant. The key is to harvest strategically, allowing the plant to regenerate and produce new shoots.
3. What are the ideal growing conditions for Kailan?
Kailan thrives in well-drained soil that is rich in organic matter. It prefers full sun (at least 6 hours of direct sunlight per day) but can tolerate partial shade, especially in hotter climates. The ideal temperature range for Kailan is between 15°C and 25°C (59°F and 77°F). Regular watering is essential, especially during dry periods, to keep the soil consistently moist but not waterlogged.
4. What kind of fertilizer should I use for Kailan?
Kailan is a heavy feeder, meaning it requires a good supply of nutrients to grow well. A balanced fertilizer with a ratio of 10-10-10 (nitrogen, phosphorus, potassium) is a good starting point. You can also use organic fertilizers such as compost tea, fish emulsion, or well-rotted manure. Apply fertilizer every 2-3 weeks, following the instructions on the product label. Remember to water thoroughly after fertilizing to prevent fertilizer burn.
5. How do I know when to harvest my Kailan?
The best time to harvest Kailan is when the leaves are young and tender, typically when they reach about 6-8 inches in length. Avoid harvesting leaves that are too old or tough, as they may be bitter. With the Kailan Nonstop Harvest method, you’ll be harvesting the main stem and encouraging side shoots to grow. Harvest the main stem when it reaches a desirable size, leaving a few leaves at the base of the plant to promote regrowth.
6. What are some common pests and diseases that affect Kailan, and how can I prevent them?
Common pests that affect Kailan include aphids, cabbage worms, and flea beetles. To prevent pest infestations, consider using row covers to protect your plants, handpicking pests as you see them, or using organic insecticides such as neem oil or insecticidal soap. Diseases that can affect Kailan include clubroot and downy mildew. To prevent these diseases, ensure good soil drainage, avoid overcrowding your plants, and practice crop rotation.
7. Can I grow Kailan in containers?
Yes, Kailan can be successfully grown in containers, making it a great option for gardeners with limited space. Choose a container that is at least 12 inches deep and wide to provide enough room for the roots to grow. Use a well-draining potting mix and ensure the container has drainage holes. Water regularly and fertilize as needed.
8. How do I store harvested Kailan?
To store harvested Kailan, wash the leaves thoroughly and pat them dry. Wrap them in a damp paper towel and store them in a plastic bag in the refrigerator. Kailan can typically be stored for up to a week using this method.
9. Can I freeze Kailan?
Yes, you can freeze Kailan for longer storage. Blanch the leaves in boiling water for 2-3 minutes, then immediately transfer them to an ice bath to stop the cooking process. Drain the leaves thoroughly and pack them into freezer bags or containers. Frozen Kailan can be stored for up to 6 months.
10. What are some delicious ways to cook with Kailan?
Kailan is a versatile vegetable that can be used in a variety of dishes. It can be stir-fried, steamed, boiled, or added to soups and stews. Some popular Kailan recipes include stir-fried Kailan with garlic, Kailan with oyster sauce, and Kailan soup. The slightly bitter flavor of Kailan pairs well with savory and umami-rich ingredients.
11. What if my Kailan plant doesn’t regrow after harvesting the main stem?
Several factors can contribute to a lack of regrowth. Ensure you’ve left enough leaves at the base of the plant to support new growth. Check that the plant is receiving adequate sunlight, water, and nutrients. If the soil is compacted, gently loosen it around the base of the plant. In some cases, the plant may simply be exhausted and need a break. Consider planting a new Kailan plant to ensure a continuous supply of greens.
12. Is the Kailan Nonstop Harvest method suitable for all climates?
While the Kailan Nonstop Harvest method can be adapted to various climates, it’s most effective in regions with mild to warm temperatures. In colder climates, you may need to provide additional protection to your Kailan plants, such as growing them in a greenhouse or using row covers. In extremely hot climates, provide shade during the hottest part of the day to prevent the plants from bolting (going to seed prematurely).
Leave a Comment